BRAKE PADS AUDI A4 B8 8K2,B8 SEDAN
To identify the vehicle and reliably select brake pads for Audi A4 B8 8K2,B8 Sedan , you should carefully select the vehicle modification.
To do this, use clarifying information with data containing: power, measured in horsepower (example 103 hp), engine size (example 1.6 liters), type (example gasoline) and model + engine code, as a rule, this parameter rarely used, but you can only find it in the vehicle title, you can also pay attention to the drive axle (there are rear, front or all-wheel drive), and a mandatory parameter is the release date, which divides the vehicle model into restyling, pre-restyling, first and last year production. This data serves to uniquely install spare parts during a certain production period, as manufacturers are constantly upgrading cars off the assembly line.
Information about the repair of Volkswagen AG cars with photos.
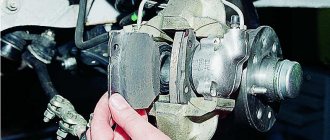
We remove the wheel (I will write out this procedure in a separate report another time) and see the caliper. We unscrew the upper locking bolt at 13, holding the finger from turning it with a key at 15 (hello from the burghers). In the photo I called it a locknut, although in fact it is a hexagon on the body of the finger. However, that's not the point.
There is a similar pin with a locking bolt at the bottom.
To be honest, it is not necessary to unscrew it, you can unfasten the bracket and change the pads, but putting the piston back into the caliper will be inconvenient (the handbrake cable will be spring-loaded), and you won’t be able to check the condition of the lower pin. In short, I usually unscrew it. After that, placing the assembly in the hole of the bracket and using it as a lever, unfasten the caliper.
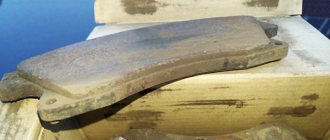
We see that as the pads wear out, the piston comes far out of the cylinder. For that. To return it to its original position you will need a device. In my case, I purchased this one.
And on the device itself there are pins for these grooves.
Since this device is nothing more than cheap Chinese bullshit, I was not very surprised when it turned out that the diameter of the pins and their center-to-center distance did not correspond to the required ones and this device did not fit on the piston. I was not upset and made some modifications to the design using a grinder.
Well, now everything fits wonderfully onto the piston.
READ How to remove the battery from a car
And fix it with a locking bar.
Next, we rotate the rod and drive the piston into place.
When installing new pads, do not forget to remove the stickers from them, as required by the instructions. By the way, the kit also includes new locking bolts for the bracket. In principle, if you did not lick the edges on the old ones, then their only difference from the new ones is the absence of a thread lock. In short, it's still better to replace it.
We remove the stickers, install new pads in place and fasten the bracket.
Then, pressing the bracket and overcoming the force of the shoe springs, insert the upper bolt and tighten it too.
That's the whole operation. When the bracket is removed, do not forget to check the condition of the pins and guide bushings. To do this, remove the fingers from the caliper and add grease to the boot if it is not there.
I had lubricant in sufficient quantity, in my opinion.
The cookie could probably last until spring, but given the lack of sensors on the rear pads and my love for sound sleep, I decided to replace them in the fall. It's still warm.
When performing the entire described procedure, you must carefully inspect all anthers for integrity. When using such a device, you must ensure that the boot does not bite between it and the piston, otherwise you will tear the boot. In general, be careful and take your time.
Select vehicle modification to search for brake pads
Engine: volume – 1.8 l., power – 170 hp, type – petrol. Drive: front. Year of manufacture: 2010-2012
Engine: volume – 1.8 l., power – 120 hp, type – petrol, model – CDHA. Drive: front. Year of manufacture: 2008-2012
Engine: volume – 1.8 l., power – 160 hp, type – petrol, model – CDHB. Drive: front. Year of manufacture: 2007-2012
Engine: volume – 1.8 l., power – 160 hp, type – petrol, model – CDHB. Drive: full. Year of manufacture: 2008-2012
Engine: volume – 1.8 l., power – 170 hp, type – petrol, model – CJEB. Drive: front. Year of manufacture: 2011-2012
Engine: volume – 1.8 l., power – 170 hp, type – petrol, model – CJEB. Drive: full. Year of manufacture: 2011-2012
Engine: volume – 2 liters, power – 180 hp, type – petrol, model – CFKA. Drive: front. Year of manufacture: 2008-2012
Engine: volume – 2 liters, power – 180 hp, type – petrol, model – CFKA. Drive: full. Year of manufacture: 2009-2012
Engine: volume – 2 liters, power – 180 hp, type – petrol, model – CFKA. Drive: front. Year of manufacture: 2009-2012
Engine: volume – 2 liters, power – 180 hp, type – petrol, model – CFKA. Drive: full. Year of manufacture: 2009-2012
Engine: volume – 2 liters, power – 211 hp, type – petrol, model – CAEB. Drive: front. Year of manufacture: 2008-2012
Engine: volume – 2 liters, power – 211 hp, type – petrol, model – CPMA. Drive: full. Year of manufacture: 2008-2012
Engine: volume – 2 liters, power – 220 hp, type – petrol, model – CAED. Drive: front. Year of manufacture: 2013-2012
Engine: volume – 2 liters, power – 220 hp, type – petrol, model – CPMB. Drive: full. Year of manufacture: 2013-2012
Engine: volume – 2 liters, power – 224 hp, type – petrol, model – CNCD. Drive: front. Year of manufacture: 2013-2012
Engine: volume – 2 liters, power – 224 hp, type – petrol, model – CNCD. Drive: full. Year of manufacture: 2013-2012
Engine: volume – 3 liters, power – 272 hp, type – petrol, model – CRED. Drive: full. Year of manufacture: 2012
Engine: volume – 3.2 liters, power – 258 hp, type – petrol, model – CALA. Drive: full. Year of manufacture: 2009-2012
Engine: volume – 3.2 liters, power – 265 hp, type – petrol, model – CALA. Drive: front. Year of manufacture: 2008-2012
Engine: volume – 3.2 liters, power – 265 hp, type – petrol, model – CALA. Drive: full. Year of manufacture: 2007-2012
Engine: volume – 3 liters, power – 333 hp, type – petrol, model – CREC. Drive: full. Year of manufacture: 2008-2012
Engine: volume – 2 liters, power – 120 hp, type – diesel, model – CJCC. Drive: front. Year of manufacture: 2008-2012
Engine: volume – 2 liters, power – 136 hp, type – diesel, model – CSUB. Drive: front. Year of manufacture: 2007-2012
Engine: volume – 2 liters, power – 143 hp, type – diesel, model – CMFA. Drive: front. Year of manufacture: 2007-2012
Replacement of rear brake pads of Audi 80 B3
Greetings, dear friends! In my series of articles, I continue to tell you about repairing Audi cars , and in today’s post I would like to share with you my experience of replacing the front and rear brake pads of an Audi 80 B3 .
But before moving on to the step-by-step instructions, I suggest you familiarize yourself with the manufacturers and prices of brake pads for the Audi A 80 in Russia.
The frequency of replacing brake pads on an Audi 80 car is set by the manufacturer: front every 15 - 20 thousand km, rear every 70 - 80 thousand
What factors negatively affect brake pad performance?
Failure of the brake system is fraught with danger. This negatively affects the vehicle's handling and can lead to an accident. If you hear a knocking sound in your car when driving on an uneven road or a slight creaking sound, then you need to urgently inspect your car. Here are some phenomena that can cause brake pad failure:
- bursting linings and, as a result, wheel jamming at the most inopportune moment;
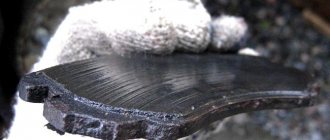
- the material from which the friction lining is made begins to crumble or has worn off beyond the maximum permissible value. For safety reasons, it is not permissible to use pads with a friction coating thickness below 2 mm in cars. Many drivers can determine the condition of the product by the type of sound it makes;
- defective material that was installed on a batch of pads at the factory;
- malfunction of wheel brake discs;
- engine oil getting on the surface of the lining.
If we talk about the number of kilometers that the original products can withstand, then we can say with confidence that the pads can withstand 30 thousand mileage. It all depends on the driver himself and the way he drives the vehicle: some do not know how to drive calmly, while others move around the city every day with a busy schedule.
Replacing brake pads with new ones yourself is not a big hassle for an experienced driver; everything can be done without outside help. The main thing is to do it on time, before it’s too late.
Replacing front pads on Audi A 4
If there is a need to replace the pads, you first need to choose the appropriate option. To correctly determine the linings, you should take into account the modification of the car, power, type and size of the engine, as well as its year of production. Since the car manufacturer is constantly upgrading its car, these parameters are especially important when choosing a product.
When the part has been selected, you can begin to replace it.
- First of all, and this is mandatory, remove the cap of the brake fluid reservoir in order to prevent the occurrence of increased pressure when the cylinder is compressed.
- The replacement procedure can be performed on a lift or using a jack, placing a wheel under the car body.
- The front brakes are equipped with calipers that can be easily removed with pliers.
- Now you need to disconnect the friction material wear sensor. We take out the plastic plugs for the caliper mounting bolts (there are two of them).
- Using a hex wrench, unscrew both bolts.
- Remove the caliper, after which you can pull out the worn linings. Press down the brake cylinder using a special device.
- The next step is installing new pads. After this, the entire assembly is performed in reverse order.
Replacing car rear pads
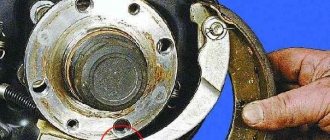
- To remove the pads, you need to remove the wheels.
- Unscrew the bolts that secure the caliper. It is better to use two keys of different sizes (13th and 15th).
- The old pads are dismantled, and the caliper is hung by a spring so as not to interfere. Use the 17 head to disconnect the bracket.
- Remove the bracket and clean it of dirt and other accumulations. The brake disc is inspected and, if necessary, replaced with a new one.
- After installing the new disk, compress it slightly by tightening one bolt. Then the caliper bracket is attached. Next, the brake cylinder is pressed with a clamp.
- The piston is installed by screwing it in clockwise. At the same time, carefully monitor the boot so that it does not become deformed.
- When fixing the caliper, you need to add lubricant to it in order to prevent jamming during further work. Now you can install new brake pads.
- And the last thing - you need to check the results of the work; you need to bleed the brake pedal so that the caliper compresses into working condition (until counteraction appears).
Source: zapchasti.expert
Selection of front and rear brake pads for Audi 80 B3
The average price for rear and front brake pads for Audi 80 cars: 1000 – 1200 rubles, in my article I would like to highlight several analogues that are worth paying attention to.
- Delphi (price 1400 rubles)
- Bosch (price 700 rubles)
- LPR (price just over 700 rubles)
In general, the choice does not end there - and you yourself can choose both European and Chinese analogues of brake pads, which are presented in auto parts stores in your city
Step-by-step instructions for replacing the front and rear brake pads of an Audi 80
Of course, to get to the brake caliper and pads, you first need to remove the wheel. After removal, you can turn the steering wheel to make it easier to work with the caliper. If you don't have a tool at hand to press the piston, then you can slide a flat lever between the brake disc and pad and press the piston. Only first, by pressing the piston in one way or another, it is better to unscrew the cap of the brake fluid reservoir.
- And so let's get started, first remove the wheel and see this picture:
- We unscrew the guide pins (internal hexagon) to remove the brake caliper.
- I tied the brake caliper to the spring with wire, be careful not to break the brake hose.
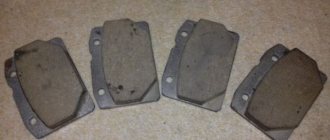
- We take out the old pads and throw them away. One block fell apart in half right in my hands.
- Next, unscrew the 2 17mm bolts that hold the bracket.
- Be patient, the bolts are stuck and it will be difficult to unscrew them, but as they say, invention is tricky. I came up with this scheme for unscrewing the bolts (unscrew the bolts using a jack):
- We remove the bracket itself
- We see the hub. We carefully clean everything in the new connection between the hub and the brake disc.
- We put on a new brake disc.
- We fasten the bracket and insert new brake pads.
replacing pads and discs
replacing pads and discs
Post by victorr1 » Fri Dec 05, 2008 10:59 am
I finally bought VAGRUS, cheers comrades, thanks for the tip.
Questions about brakes 1. Can I change (separate) my pads using VAGA? 2. What is the standard for disk wear? I have ok wear. 2mm, do they need to be changed?
Actually, on discs and pads, I have already thrown dealers through the existential. I also want to organize a replacement myself.
Post by Akin » Fri Dec 05, 2008 11:15 am
Replacing rear pads on A8 D3.
We go to 53 – Parkbremse (handbrake control unit).
1.) 04 – Grundeinstellung (basic adjustments): – channel 05 – move the rear pads apart – channel 06 – bring the rear pads together 2.) 10 – Anpassung (adaptation): – channel 06 – enter the thickness of the new pads (13) 3.) 04 – Grundeinstellung (basic adjustments): – channel 10 – pad adaptation (you must turn off the ignition, remove the key from the lock and wait until the adaptation process is completed) 4.) 02 – interrogate the fault memory and erase errors
Post by Akin » Fri Dec 05, 2008 11:19 am
Post by dasus » Fri Dec 05, 2008 11:21 am
In principle, according to Elsa, 2 mm is critical wear and needs to be changed, but in a crisis, you can sharpen the disc to remove the edges and drive on them with another set of pads.
I drove and with wear of 4 mm nothing, but I drove and drive moderately.
If you have money, change it, if you don’t want to spend money, you can continue driving, but then sharpen the edges so they don’t creak.
Post by victorr1 » Fri Dec 05, 2008 11:34 am
thanks to all. I bought the wheels and they are easy to change. Yes, and I’m a “racer”.
By the way, the “block” sign has been on for 2 weeks, but no squeaking or wheezing has been heard. Of course, I'll change it over the weekend, but still, what kind of reserve do they leave?
everything together with all the pads and discs came out to 19 thousand rubles. ATE original. in Warsaw, only the front pads cost more than 20,000 rubles from the budget.
The handbrake still works. pah-pah.
Uv. AKIN, should I also change the front pads?
Post by Akin » Fri Dec 05, 2008 11:38 am
Post by victorr1 » Fri Dec 05, 2008 11:39 am
Post by dasus » Fri Dec 05, 2008 8:47 pm
about 19 thousand rubles in more detail if possible plz, are these front and rear pads and discs or is it just the rear?
Don’t forget to lubricate the caliper guides at the back and check the anthers for holes.
Post by victorr1 » Mon Dec 08, 2008 1:26 pm
discs front-rear + pads front-rear = approx. I don’t have an outfit with me for 19,000 rubles, but I’ll scan it and post it one of these days.
Replacing Front Brake Pads Audi A4 B5
Brake discs for Audi A4 B5
We're all used to it when changing brake pads, but brake pads wear out as the pads wear out. When the thickness of the brake disc is small, it needs to be replaced. When changing discs, it is recommended to replace the spacers to improve grinding, which means braking properties.
8D0 615 601 Brake disc for Audi A4 B5
- JZW 615 301 F - Front brake disc, price from RUB 1,778 .
- 8E0 615 301 Q - Ventilated brake disc, cost from 1975 rub .
- 4A0 615 301 D - Front brake disc, cost from 1558 rubles .
- 8D0 615 601 A - Rear brake disc, cost from 1,793 rubles .
To save money, you can install analogues; they are cheaper than the originals, but at the same time not much inferior in quality. Popular analogues for Audi A4 B5:
- 24.0125-0105.1 July (Germany) Ventilated front brake disc, price from 1945 rub .
- 24.0110-0210.1 July Rear brake disc, cost from 1200 rubles .
- TRW DF2652 (Germany) Ventilated front brake disc, price from RUB 1,832 .
- TRW DF2771 Rear brake disc, price from RUB 1,293 .
- NiBK RN-1050 (Japan) Front ventilated front brake disc, starting from RUB 2,386 .
- NiBK RN-1074 Rear brake disc, price from 1380 rub .
- Brembo 09.5745.24 (Germany) Front ventilated front brake discs, starting from RUB 1,767 .
- Brembo 08.6911.10 Rear brake disc, cost from 920 rubles .
- Textar 92057603 (UK) Ventilated brake disc, “PRO” front, price from RUB 1,972 .
- Textar 92088503 Rear brake disc, cost from 1129 rubles .
Replacement of front brake pads of Audi A4 B5, preventive maintenance
Volkswagen Passat Replacing pad B5
. Article: 0390.22 Re1 8E0615123A Caliper housing 1 8E0615124A Housing.
Replacement of front brake discs and pads from Volkswagen / Audi / Skoda
Replacing the front brake
Audi
rims This video is primarily useful.
These are the five best analogue brake discs for the Audi A4 B5. They are all in the same price range, slightly cheaper than the original discs. All presented discs are of high quality, comparable to the original . Of course, on these discs the likelihood of an unpleasant squeak and loss of brake quality is slightly higher than with the original, but not much. First of all, ATE is a major company that is well established in the market and its quality remains the same regardless of the make and model of the car. TRW is also not inferior to ATE and can be put on equal terms.
If you don't like standard discs and their full analogues, you should pay attention to improved brake discs :
- Otto Zimmermann 460.1513.50 (Germany) Perforated brake disc, “Sport” rear, price from 1023 rub .
- Otto Zimmerman 100.1216.52 (Germany) Ventilated brake disc, perforated at the front, price from RUB 3,832 .
Otto Zimmermann is another German company that sells high quality wheels. These wheels are suitable for extreme driving with heavy loads. to the braking system, when fast and high-quality heat removal is required to prevent overheating. Along with high quality and excellent features, these brake discs are more expensive , even compared to the original ones. Therefore, it is advisable to choose brake discs depending on your driving style.
Removing and installing brake pads for the rear wheels of the Audi A4-2000
- Repair manuals
- Repair manual for Audi A4 2000+.
- Removing and installing rear wheel brake pads
Removing and installing rear wheel brake pads
Using the illustration, find out the type of caliper installed on your car.
C38 rear wheel brakes
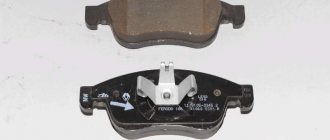
| 1 — Bolt, 35 Nm Self-locking, be sure to replace. When loosening and tightening, it is necessary to keep the guide pins from turning. 2 - Brake pads. Be sure to replace all 4 pads of one axle 3 - Bolt with a toothed shoulder, 75 Nm . Be sure to replace 4 - Guide complete with guide pins and protective cover. Supplied as a spare part with lubricant. | If the protective covers are damaged, install a repair kit. Use the supplied grease pack to lubricate guide pins 5 - Serrated shoulder bolt, 75Nm. Be sure to replace 6 - Brake disc. Both brake discs on one axle must be replaced. To remove, first remove the caliper 7 - Caliper body. The hose cannot be disconnected to replace the brake pad. |
Caliper C38
| Various rear brake designs are available. Therefore, first, using the illustration, find out which version is used on your car. |
Removal
| Lifting and placing the vehicle on stands is dangerous! Therefore, before carrying out the operation, read the Section Jacking and Towing . |
Installation
| EXECUTION ORDER | |
| |
| |
| When the brake pads are removed, do not press the brake pedal, otherwise the piston may be pushed out of the housing. In this case, it is necessary to remove the caliper and piston as a set and take them to a service station for repair. |
Caliper C43 with automatic installation
| EXECUTION ORDER | ||||
| ||||
| ||||
| ||||
| ||||
| ||||
| ||||
| ||||
| ||||
| ||||
| ||||
| Rear brakes are available in various designs. Therefore, first establish with the help of the illustration what version your car has. |
| This section only covers the differences with respect to the C38 rear brake. All safety instructions are retained. |
Removal
| EXECUTION ORDER | |
| |
| |
| |
Installation
| EXECUTION ORDER | ||
| ||
| ||
| Install the 4 self-locking bolts provided in the repair kit. Make sure that the brake hose does not become twisted. | ||
- Connect the parking brake cable to the caliper and secure with a lock washer.
- Adjust the parking brake, refer to Section Adjusting the parking brake .
↓ Comments ↓
1. Introduction
1.0 Introduction 1.2 Audi A4/S4 cars - abstract 1.3 Vehicle identification numbers 1.4 Purchasing spare parts 1.5 Maintenance technology, tools and workplace equipment 1.6 Jacking and towing 1.7 Starting the engine from an auxiliary battery 1.8 Automotive chemicals, oils and lubricants 1.9 Fault diagnosis 1.10. Controls and safe operating practices
2. Routine care and maintenance
2.0 Routine care and maintenance 2.1 Specifications 2.2 Maintenance due indicator 2.3 Routine maintenance schedule 2.4 General setup information 2.5 Checking fluid levels, checking leaks 2.6 Checking the condition of tires and their pressure. Designation of tires and wheel rims. Rotation and replacement of wheels 2.7 Replacement of engine oil and oil filter 2.8 Checks of the brake system. Adjusting the parking brake 2.9 Checking the fuel system 2.10 Checking the condition and replacing engine compartment hoses, localizing leaks 2.11 Checking the condition of the ribbed serpentine drive belts of auxiliary units 2.12 Checking the functioning of the cooling system and frost resistance of the coolant 2.13 Checking the condition of the exhaust system 2.14 Checking the automatic transmission oil level 2.15 Visual inspection of the gearbox and final drive for leaks, checking the level and adding oil 2.16 Checking the condition of the suspension and steering components 2.17 Checking the condition of the protective covers of the drive shafts 2.18 Checking the fluid level of the power steering system 2.19 Checking the air conditioning system 2.20 Lubricating door stops and lock cylinders , hood hook, sliding sunroof panel 2.21 Visual inspection of the seat belt and airbag unit 2.22 Checking the functionality of the headlights and horn 2.23 Checking the condition, adjusting and replacing the wiper blades 2.24 Checking the condition of the battery, caring for it and charging 2.25 Replacing the emergency battery of the Telematik system 2.26 Replacing the cabin air filter element/charcoal air purification filter 2.27 Replacing the brake fluid 2.28 Checking and replacing spark plugs. Checking the condition of high-voltage wires 2.29 Replacing the engine air filter element 2.30 Replacing the fuel filter 2.31 Checking the condition and tension of the toothed belt
3. Engine
3.0 Engine 3.1 Removing and installing the upper engine cover/lower protection of the engine compartment/subframe 3.2 Checking the compression in the engine cylinders, identifying leaks 3.3 Checking the engine using a vacuum gauge 3.4. 4-cylinder petrol engines 3.5. 6- and 8-cylinder petrol engines 3.6. 4-cylinder diesel engines 3.7. 6-cylinder diesel engines 3.8. Engine lubrication system
4. Cooling, heating and air conditioning systems
4.0 Cooling, heating and air conditioning systems 4.1. Cooling system 4.2. Ventilation, heating and air conditioning systems
5. Power supply, exhaust and emissions reduction systems
5.0 Power supply, exhaust and emissions reduction systems 5.1. Power supply systems for gasoline and diesel engines 5.2. Fuel injection system of a gasoline engine 5.3. Diesel engine fuel injection system 5.4. Exhaust systems and exhaust emission reduction systems. Turbocharger
6. Engine electrical systems
6.0 Engine electrical systems 6.1. Ignition and engine control system 6.2. Diesel engine preheating system 6.3. Diagnostics of electronic control systems and diagnostic equipment 6.4. Charging and starting systems
7. Manual gearbox
7.0 Manual gearbox 7.1 Specifications 7.2 Removing and installing the gearbox 7.3 Checking the oil level in the manual gearbox 7.4 Adjusting the gearshift drive 7.5 Checking the gearshift lever adjustment
8. Automatic transmission
8.0 Automatic transmission 8.1 Specifications 8.2 Troubleshooting - general information
9. Clutch, drive shafts and differential
9.0 Clutch, drive shafts and differential 9.1. Clutch 9.2. Wheel drive shafts 9.3 Models with all-wheel drive
10. Brake system
10.0 Brake system 10.1 Specifications 10.2 Bleeding the brake system 10.3 Removing and installing the front brake pads 10.4 Removing and installing the rear brake pads 10.5 Checking the thickness of the brake disc 10.6 Removing and installing the brake disc/caliper 10.7 Adjusting the parking brake 10.8 Removing and installing the stop switch -signal 10.9 Removing and installing the brake hose
11. Suspension and steering
11.0 Suspension and steering 11.1 Safety measures during work 11.2. Front wheel suspension 11.3. Rear wheel suspension 11.4. Vehicle wheel alignment angles 11.6 Steering and airbags 11.7 Removing and installing the airbag unit 11.8 Removing and installing the steering wheel 11.9 Removing and installing the tie rod end 11.10 Removing and installing the steering gear protective cover
12. Body
12.0 Body 12.1 General information and safety precautions when carrying out body work 12.2 Cleaning and maintenance 12.3 Repair of minor damage to body panels 12.4. External equipment 12.5. Interior equipment
13. On-board electrical equipment
13.0 On-board electrical equipment 13.1 Specifications 13.2 Diagnosis of malfunctions of on-board electrical equipment - general information 13.3 Disconnecting connectors 13.4 Checking the wiper motor 13.5 Checking the heated rear window 13.6 Checking the brake lights 13.7 Removing and installing the sound signal 13.8 Removing and installing parking sensors 13.9 Replacing the remote control battery ignition key control 13.10 Relays and fuses 13.11 Replacing incandescent lamps of external lighting devices 13.12 Removing and installing headlights 13.13 Removing and installing a side turn signal 13.14 Removing and installing an additional brake light 13.15 Removing and installing a rear light 13.16 Removing and installing a license plate light 13.17 Removing and installing lampshades interior lighting 13.18 Removing and installing the dashboard 13.19 Removing and installing the steering column switch 13.20 Removing and installing the front door switches 13.21 Removing and installing the light switch 13.22 Removing and installing the power window switch in the rear door 13.23 Removing and installing the trunk lid switch 13.24 Removing and installing the parking brake switch 13.25 Removing and installing the glove box light switch 13.26 Removing and installing the center console switches 13.27 Removing and installing the radio/navigation device/CD changer 13.28 Removing and installing loudspeakers 13.29 Removing and installing antennas 13.30 Removing and installing the windshield washer fluid reservoir/pump motor 13.31 Removing and installing installation of the windshield wiper electric motor 13.32 Removal and installation of the electric motor on the rear window (Universal) 13.33 Single lock - general information 13.34 Removal and installation of the fuel tank cap locking element 13.35 Digital CAN data bus
14. Schematic diagrams of electrical equipment
14.0 Schematic diagrams of electrical equipment 14.1 Power distribution diagram 14.2 Charging system 14.3 Starting system, manual transmission models 14.4 Starting system, models with CVT 14.5 Cooling system fan 14.6 Automatic air conditioning system 14.7 Engine management system 1.8 l 14.8 Engine management system 3.0 l 14.9 Diagnostic connector DLC 14.10 On-board computer 14.11 Data exchange bus (CAN) 14.12 AT shift lock, models with CVT 14.13 AT shift lock, models with Tiptronic 14.14 Standard automatic transmission 14.15 CVT automatic transmission 14.16 AT shift lock, models with 5-speed AT 14.17 Electronic power steering 14.18 Brake pad wear warnings 14.19 Anti-lock brakes (ABS) 14.20 Supplemental Restraint Systems (SRS) 14.21 Standard headlights 14.22 HID headlights 14.23 Headlight washers 14.24 Heated washer fluid nozzles 14.25 Horn 14.26 Reversing lights, models with AT 14.27 Reversing lights, models with manual transmission 14.28 Interior lighting when opening doors 14.29 Dashboard 14.30 Instrument lighting 14.31 Heated seats 14.32 Electric seats 14.33 Electrically heated door mirrors 14.34 System for storing the position of seats/rearview mirrors 14.35 Electric door mirror drive , models with folding mirrors 14.36 Electric door mirrors, models without folding mirrors 14.37 Interior rear view mirror with automatic Day/Night switching 14.38 Electric rear window heating 14.39 Electric sunroof/convertible top 14.40 Electric rear window sunshade 14.41 Electric windows 14.42 Bose audio system 14.43 Audio system with amplifier 14.44 Audio system without amplifier 14.45 Single lock 14.46 Navigation system 14.47 Trunk lid lock release drive 14.48 Anti-theft system
Replacing Front Brake Pads Audi A4 B5
Brake discs for Audi A4 B5
We're all used to it when changing brake pads, but brake pads wear out as the pads wear out. When the thickness of the brake disc is small, it needs to be replaced. When changing discs, it is recommended to replace the spacers to improve grinding, which means braking properties.
8D0 615 601 Brake disc for Audi A4 B5
- JZW 615 301 F - Front brake disc, price from RUB 1,778 .
- 8E0 615 301 Q - Ventilated brake disc, cost from 1975 rub .
- 4A0 615 301 D - Front brake disc, cost from 1558 rubles .
- 8D0 615 601 A - Rear brake disc, cost from 1,793 rubles .
To save money, you can install analogues; they are cheaper than the originals, but at the same time not much inferior in quality. Popular analogues for Audi A4 B5:
- 24.0125-0105.1 July (Germany) Ventilated front brake disc, price from 1945 rub .
- 24.0110-0210.1 July Rear brake disc, cost from 1200 rubles .
- TRW DF2652 (Germany) Ventilated front brake disc, price from RUB 1,832 .
- TRW DF2771 Rear brake disc, price from RUB 1,293 .
- NiBK RN-1050 (Japan) Front ventilated front brake disc, starting from RUB 2,386 .
- NiBK RN-1074 Rear brake disc, price from 1380 rub .
- Brembo 09.5745.24 (Germany) Front ventilated front brake discs, starting from RUB 1,767 .
- Brembo 08.6911.10 Rear brake disc, cost from 920 rubles .
- Textar 92057603 (UK) Ventilated brake disc, “PRO” front, price from RUB 1,972 .
- Textar 92088503 Rear brake disc, cost from 1129 rubles .
Replacement of front brake pads of Audi A4 B5, preventive maintenance
Volkswagen Passat Replacing pad B5
. Article: 0390.22 Re1 8E0615123A Caliper housing 1 8E0615124A Housing.
Information about the repair of Volkswagen AG cars with photos.
We remove the wheel (I will describe this function in a separate report another time) and see the caliper. We unscrew the upper locking bolt at 13, holding the finger from turning it with a key at 15 (hello from the burghers for you). In the photo I called it a lock nut, although in fact it is a hexagon on the body of the finger. Not an entity at all.
There is a similar pin with a locking bolt at the bottom.
To be honest, it is not necessary to unscrew it, you can unfasten the bracket and change the pads, but pushing the piston back into the caliper will be awkward (the handbrake cable will be springy), and you won’t be able to check the condition of the lower pin. In short, I usually unscrew it. Then, placing the assembly in the hole of the bracket and using it as a lever, unfasten the caliper.
We see that as the pads wear out, the piston comes out a little far from the cylinder. For that. To return it to the starting position you will need an adaptation. In my case, I purchased this one.
And on the device itself there are pins for these grooves.
Since this device is nothing more than cheap Chinese bullshit, I was not very surprised when it turned out that the diameter of the pins and their center-to-center distance did not correspond to the required ones and this device did not fit on the piston. I was not upset and made some modifications to the design using a grinder.
Well, now everything magically fits onto the piston.
And secure it with a locking strip.
Next, we rotate the rod and drive the piston into place.
When installing new pads, do not forget to remove the stickers from them, as requested by the instructions. By the way, the kit also includes new locking bolts for the bracket. In principle, if you haven’t licked the edges on the old ones, then their only difference from the new ones is the absence of a thread lock. In short, it's still better to replace it.
We remove the stickers, install new pads in place and fasten the bracket.
Then, pressing the bracket and overcoming the force of the block springs, we insert the upper bolt and tighten it too.
That's actually the whole operation. When the bracket is removed, do not forget to check the condition of the pins and guide bushings. To do this, remove the fingers from the caliper and add grease to the boot if it is not there.
I had lubricant in sufficient quantity, in my opinion.
Cookie could have lasted until spring for sure, but taking into account the lack of sensors on the rear pads and my love for sound sleep, I decided to replace them with Ozari. It's still warm.
When performing the entire procedure described, you should carefully inspect all the anthers for integrity. When using a similar device, you must make sure that the boot does not get caught between it and the piston, otherwise you will tear the boot. In general, be careful and take your time.