Advice from experienced motorists and repairmen on the topic of Lada Granta, replacing the rear wing - come in, we have become even more convenient. We have posted a video course on how to repair a car yourself. How to repair a car yourself at home. We will help you with repairs and repair the car yourself. We know how to restore a car with minimal investment. I have attached video instructions.
Category: Auto repair instructions
Laughter on topic: Usually, in every company there is always an asshole. If you think yours doesn't have it, then I have bad news for you.
Published by Admin: at the request of Abdullah
Reviews from a car owner: We all juggle three balls, which are called: “work”, “family” and “friends”. So, the work is a rubber ball. If you accidentally drop it, it will jump into your hands again. And all the other balls are made of glass. Remember this.
Contact the professionals! This will be the first step towards ensuring that your Lada Granta shines again and gives pleasure not only from fast and safe driving, but also from contemplating the beauty of your car.
Replacing the rear wing of the grant
Advice from experienced motorists and repairmen on the topic of Lada Granta, replacing the rear wing - come in, we have become even more convenient. We have posted a video course on how to repair a car yourself. How to repair a car yourself at home. We will help you with repairs and repair the car yourself. We know how to restore a car with minimal investment. I have attached video instructions.
Category: Auto repair instructions
Laughter on topic: Usually, in every company there is always an asshole. If you think yours doesn't have it, then I have bad news for you.
Published by Admin: at the request of Abdullah
Reviews from a car owner: We all juggle three balls, which are called: “work”, “family” and “friends”. So, the work is a rubber ball. If you accidentally drop it, it will jump into your hands again. And all the other balls are made of glass. Remember this.
Contact the professionals! This will be the first step towards ensuring that your Lada Granta shines again and gives pleasure not only from fast and safe driving, but also from contemplating the beauty of your car.
Wing arch repair using welding
I’ll show you the example of repairing the rear wing of a Golf 2. I’m showing an example, the quality is “4”, since the car is for sale, with clients everything is a little different. To begin with, all the plasticine was picked out, which the previous owner used to repair the hole in the arch :) After that, the rot was cut out with a grinder to the living metal, the edge was cleaned for welding. After the outer part of the arch was cut out, it turned out that the inner part was also slightly rotten.
Rotten areas cut out
After this, repair inserts were made; first, the inner part was welded.
Welded insert for the inner part of the wing arch
Prices for replacing load-bearing body elements for LADA Granta
| Hood replacement (removal and installation) | 1,000 RUB |
| Front left or right fender replacement (removal and installation) | 800 rub |
| Front door right or left replacement (removal and installation) | RUB 1,520 |
| Rear door right or left replacement (removal and installation) | 1,200 rub. |
| Front or rear bumper replacement (removal and installation) | 800 rub |
| Trunk lid replacement (removal and installation) | RUB 1,500 |
| Car roof - replacement | from 9,000 rub. |
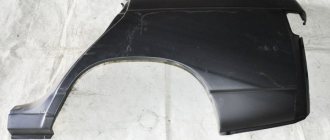
| Rear fender right or left - replacement | from 8,600 rub. |
| Rear or front spar - replacement | from 8,000 rub. |
| Threshold right or left - replacement | from 5,000 rub. |
| Car door pillar - replacement | from 6,500 rub. |
Slip works on LADA Granta: | |
| Installation on a slipway with measurement of base points for checking, as well as for restoring the geometry of the body | 2,000 rub. |
- Prices for car painting (Lada Granta)
- Prices for local repairs (Lada Granta)
Why should you trust only specialists?
1. Body repair requires experience that only professionals have. There is not enough knowledge of the technical features of car systems or a banal replacement of a spare part. In this case, you need real skills and practical experience, since ruining the appearance of the body can be much easier than it seems. Only the hands of service professionals will guarantee high-quality body repair of your LADA Granta.
2. Only real professionals can undertake body repairs after very severe accidents, when it is necessary to replace a large number of parts and level out extremely complex dents. Where amateurs will immediately refuse repairs or quote an exorbitant price for their work, professional service specialists are ready to offer reasonable prices even for complex types of repairs, taking into account slipway work.
For more detailed information, please call in Nizhny Novgorod 8,
Leave a request for repairs right now
The wing is removed from the car during body repairs and when it is replaced. The front fender of the Lada Granta car is mounted on dismountable joints, which allows you to replace the part without the use of welding.
You will need: a screwdriver with a Phillips blade, keys “8”, TORX T20, socket head “10”.
Note Removal of the front fender on the left side of the vehicle is shown. The front fender on the right side is removed in the same way.
1. Disconnect the wire from the negative terminal of the battery.2. Remove the wheel arch liner (see “Removing and installing mudguards and wheel arch liners on the Lada Granta”)
3. Remove the bolt from the rear fender to the A-pillar located in the wheel arch.
4. Remove the front bumper (see “Removing and installing the front bumper of the Lada Granta”)
5. Remove the side turn signal (see “Replacing the side turn signal”).6. Remove the air supply duct linings (see “Removing and installing the air supply duct linings”).
7. Remove the bolt from the side securing the wing to the bracket.
8. Remove the headlight unit (see “Replacing the headlight unit of a Lada Granta”).
9. Remove the three bolts of the upper fender-to-body mounting.
10. Open the front door and remove the bolt from the rear upper fender to the front pillar.
11. Remove the bolt from the lower fender to the sill.
The wing can now be removed from the car. Installing the wing is done in reverse order
Removing and installing the front wing of the Lada Granta
The wing is removed from the car during body repairs and when it is replaced. The front fender of the Lada Granta car is mounted on dismountable joints, which allows you to replace the part without the use of welding. You will need: a screwdriver with a Phillips blade, keys “8”, TORX T20, socket head “10”. Note Removal of the front fender on the left side of the vehicle is shown. The front fender on the right side is removed in the same way. 1. Disconnect the wire from the negative terminal of the battery. 2. Remove the wheel arch liner (see “Removing and installing mudguards and wheel arch liners on the Lada Granta”)
3. Remove the bolt from the rear fender to the A-pillar located in the wheel arch.
4. Remove the front bumper (see “Removing and installing the front bumper of the Lada Granta”)
5. Remove the side turn signal (see “Replacing the side turn signal”). 6. Remove the air supply duct linings (see “Removing and installing the air supply duct linings”).
7. Remove the bolt from the side securing the wing to the bracket.
8. Remove the headlight unit (see “Replacing the headlight unit of a Lada Granta”).
9. Remove the three bolts of the upper fender-to-body mounting.
10. Open the front door and remove the bolt from the rear upper fender to the front pillar.
11. Remove the bolt from the lower fender to the sill.
The wing can now be removed from the car. Installing the wing is done in reverse order
The front wing on a Lada Granta car is removed for its repair (straightening, painting) or complete replacement, if restoration work is impossible. The wing is also removed when carrying out work in which its presence will interfere with the progress of their implementation.
Prepare a standard set of tools and perform the following sequence of actions:
- First of all, you need to de-energize the car by disconnecting the minus terminal from the battery.
- Remove the wheel arch liner.
- Then, using a ten-point socket, unscrew the bolt of the rear wing fastening to the front pillar of the body, located in the wheel niche.
- Remove the front bumper.
- Remove the side turn signal from the fender.
- Unscrew the screws and remove the air supply duct covers.
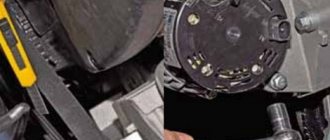
- We unscrew the bolt of the side fastening of the wing to the bracket.
- We remove the front headlight unit, and then unscrew the bolts of the upper fender-to-body mounting.
- Open the door and unscrew the rear fender mounting bolt and one lower fastening to the sill.
- We remove the wing.
- Having completed the necessary repairs, we carry out the installation in the reverse order.
At this point, the repair work to remove the front wing on the VAZ 2190 has been completed.
Source
How to dismantle the front wing of Lada Granta
Lada Granta is a modern popular vehicle that was first released in 2011. The car enjoys a wide range of advantages and is in demand among buyers. This is due to the fact that it not only has an attractive aesthetic appearance and a moderate price range, but also has decent driving characteristics.
The operating experience of such a car suggests that it is a good option for traveling in an urban environment. At the same time, such a unit has high performance qualities, which allows the driver to feel comfortable and comfortable in any driving situation.
Special Features
Owners of the LADA Granta car highlight some criteria that attract special attention from both manufacturers and users. These criteria can hardly be called positive or negative sides of the vehicle. That is why a list of some special characteristics is presented, based on which each potential buyer or owner can draw their own conclusions:
- The car interior is designed in a minimalist style. It has a fairly simple appearance and is equipped with high-quality fabric upholstery. Many parts are made of high quality hard and dense plastic.
- An increased level of visibility, which allows the driver to see a fairly complete picture. Without much difficulty, you can adequately assess various situations during the movement.
- Unclear gearbox shifting. Car owners repeatedly notice that at various times the gear lever stops working, which makes driving difficult.
- Powerful high quality engine.
- The specific sound of the gearbox operating, which causes surprise from the first moments of using the unit.
- Affordable price category.
- Moderately priced components that can be purchased at any car market or store.
- Convenient spacious trunk.
This car is considered not just an ideal solution for large cities, but also an excellent family car. That is why many domestic car enthusiasts choose the Lada Granta.
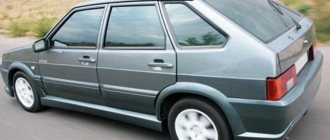
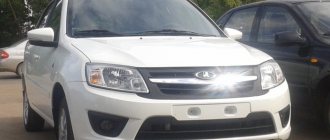
This is what a modern Granta looks like
Recommendations from professionals
Experienced service center experts recommend that if any malfunctions or questions related to the Lada Granta arise, contact a professional directly. However, domestic owners have a different opinion, as a result of which they repeatedly independently remove the front wing of the car. Often this subsequently causes some difficulties due to the fact that car owners do not have experience.
Replace the rear wing on a VAZ-2110 with your own hands
To begin with, it is worth understanding that the process itself has many subtleties and nuances. On the other hand, it is necessary to have a supply of tools and equipment for body work, as well as to have special skills and knowledge.
First of all, it is worth identifying the reasons why it is necessary to replace the rear wing of the VAZ-2110:
- A traffic accident that led to deformation of the total area of more than 70%, folds, tightening and ruptures of the metal. In other cases, you can not change the part, but repair it.
- Corrosive damage to a body element that has a large cavity or through holes.
- Tuning a car that will require cutting out part of the rear wing.
Actually, there are no other reasons why a car enthusiast would agree to cut a body part.
Let's look at the brief process of replacing the rear wing:
- We turn off the power supply to the vehicle by removing the battery.
- We draw marks for cutting along the body. We focus on the new wing, leaving a small gap for welding.
- Cut off the rear fender from the body.
- We weld a new part instead of the old one.
- We grind the weld seam.
- Clean the surface. We prime the surface. To level the surface, apply putty.
- The wing is ready for painting.
To work with the tools you will need a welding machine and a grinder.
Stages of partial arch replacement with your own hands
- Disconnect the wheel arch from the trunk floor, the bulkhead frame and the suspension spring support using a drill, pneumatic hammer, plumber's hammer, and chisels.
- Identify and mark the damaged area.
- Remove damaged metal according to the markings. This should be done using protective gloves and goggles.
- Cut an identical blank from a metal sheet.
- Prepare the surfaces for welding, remove the remaining pieces of metal from the ends with wire cutters or pliers, and set the minimum gap between the parts.
vendor code
Part markings on the VAZ-2110 are divided into right and left parts. To select the correct wing, you must have the catalog number, as it can be confused with another model. Part numbers look like this:
- 2110-8404014 – rear right wing of VAZ-2110;
- 2110-8404015 – rear left fender of VAZ-2110.
There are also markings in which a zero is placed instead of a hyphen, and numbers are added at the end: -10 or 77.
1200 rub. for the photo report
We pay for photo reports on car repairs. Earnings from 10,000 rubles/month.
Write:
One of the unreliable places in the VAZ 2110 body is the car’s wings. Having turned to a car repair shop for help, many motorists, to their regret, discover that replacing the fender for their pet is quite expensive. For example, replacing a front fender at a service station costs 400 rubles, and replacing a rear fender costs 3,200 rubles. The question arises, how to change the wing on a VAZ 2110 with your own hands? This photo report will help you understand this issue.
When the wing of a VAZ 2110 requires replacement
- The wings of the VAZ 2110 are susceptible to corrosion , as a result of which they rust and collapse. Mainly due to the fact that it is this part of the car that is exposed to moisture and other aggressive environmental factors, such as reagents and salt, which are sprinkled on roads during icy conditions.
In these cases, the need to change the wing becomes obvious. To perform this procedure you will need the following tool :
- wrench with 8 and 13 mm head;
- extension cord and ratchet;
- flat and Phillips screwdriver;
- new left wing of VAZ 2110.
By the way, the price from the VAZ manufacturer for the original front left fender with article number 21100840301500 or the front right fender with article number 21100840301400 will be about 1,550 rubles. The rear left fender with article number 21100840401500 or the rear right fender with article number 21100840401400 costs about 3080 rubles.
The average cost is indicated for spring 2022 in Moscow and the region.
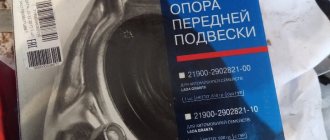
Right front fender mounting bracket 2190 Lada Granta
1.1 Delivery by courier in Moscow
We carry out delivery in Moscow after agreement with the client by phone. At the same time, delivery time can be agreed upon. In the city of Moscow (any area within the Moscow Ring Road) the cost of the service ranges from 600 to 1200 rubles.
- this service is paid for in any case, regardless of whether the customer purchased the product or refused it;
— if the order is paid for in cash, then both the customer himself, that is, the person for whom the goods were registered, and his authorized representative can receive it. You need to know the order number, the name of the recipient, and also pay for the order in full.
— upon receipt, the customer must check the contents and quality of the product and find out the rules for returning it. This takes about 20 minutes. — if the delivery was completed within the time agreed in advance, but the customer was unable to receive it due to his own fault, the next delivery is carried out on a new date agreed with the company manager, and the service is paid for again.
1.2 Pickup from the warehouse
Customers can receive the order themselves at the company’s office, provided that the manager has informed about the receipt of the goods at the warehouse and the formation of the order. For pick-up, the following conditions apply:
— it is necessary to evaluate on the spot the completeness of the package and the appearance of the goods, and also pay attention to the integrity of the packaging.
— upon receipt, you have the opportunity to partially refuse the product. Payment is made in cash after personal verification of the order.
— the order is stored in the warehouse for seven days; by agreement with the manager, this period can be extended.
1.3 Delivery by transport company
If the client wishes, we can send the order by a transport company. The main advantage of such companies is prompt delivery times and options for transporting large cargo, which Russian Post does not accept.
— a list of cities served by a particular transport company, as well as offices, can be found on official websites or with us when placing an order and choosing a shipping method. Service rates are also presented here.
— delivery is paid by the customer upon receipt according to the prices of the transport company. Packing is also carried out by the transport company according to its own rules and tariffs.
— fragile goods are usually packed additionally so that the goods are not damaged during transportation, for which a separate fee is charged.
— the client can decide to order additional packaging for the product, and he needs to inform him about this by phone or in writing to the manager of the online store, as well as in the comments to the order.
— the transport company assumes responsibility for the safety of the cargo and the timing of transportation when accepting the cargo, therefore, upon receipt, the client must check the goods. Possible claims are submitted immediately.
How to change the rear wing (instructions)
Replacing a rear wing is a rather labor-intensive process, but if you have the necessary tools, you can do it by following the instructions:
- We empty the trunk of unnecessary and flammable items, as well as the trunk mat.
- Unscrew and remove the bumper.
- We remove the headlights.
- We dismantle the fuel tank.
- Using a thin chisel, gently press out the rear wing, but try not to damage the car body.
- We drill out the rivets at the junction of the wing and the transverse frame.
- We remove the rear wing.
- Using wire cutters and a chisel, we get rid of the strips of metal that remain on the wing.
- We straighten and polish the edges of the wing.
- Prime with reactive primer.
- Prime with regular primer.
- We clean the welding points down to metal.
- We attach the new wing by welding.
- We paint the new wing in the body color.
Remove the front bumper and, if present, the wheel arch liner.
Replacing the wing of a VAZ 2110
Remove the front bumper and, if present, the wheel arch liner.
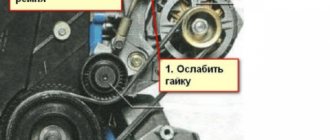
Using a 10mm wrench, unscrew the rear (lower) wing mounting screw.
Then use the same head “10” to unscrew the front (bottom) screw to the bracket.
Move the side turn signal slightly forward and pull out its rear part.
Next, use a 10mm head to unscrew the two screws securing it to the front pillar (under the wing).
They are approximately here, only on the reverse side.
Using a 10mm wrench, unscrew the four upper screws securing the wing to the body.
We remove the side turn signal one hundred percent. By pulling, we disconnect the socket with the lamp from the turn signal lamp.
VAZ 2110 replacement of the rear wing, rear panel.
VAZ 2110 rear wing replacement
,
rear
panel. Painting will be done later. Sorry for the long video.
Replacing the rear wing 2110
Carefully bringing the wing out from behind the headlight groove.
We install the new wing and assemble everything in the reverse order.
One of the unreliable places in the VAZ 2110 body is the car’s wings. Having turned to a car repair shop for help, many motorists discover to their own chagrin that replacing the fender for their pet is expensive. For example, replacing a front fender with a 100 costs 400 rubles, and replacing a rear fender 3,200 rubles. The question arises, how to change the wing on a VAZ 2110 with your own hands? This photo report will help you understand this issue.
Wheel arch replacement technology
ATTENTION! A completely simple way to reduce fuel consumption has been found! Don't believe me? An auto mechanic with 15 years of experience also didn’t believe it until he tried it. And now he saves 35,000 rubles a year on gasoline! Read more"
First of all, a visual assessment of the degree of corrosion of the metal is made. The necessary measurements are taken. Depending on the level of damage, arches are replaced partially or completely. Everything will depend on how worn it is. For the most minor damage, you can get by by coating the inside of the arch with a protective anti-corrosion agent.
When the wing of a VAZ 2110 requires replacement
- The wings of the VAZ 2110 are susceptible to corrosion , as a result of which they rust and collapse. Mainly due to the fact that this very part of the car is exposed to water and other brutal environmental factors, such as reagents and salt, which are sprinkled on roads during icy conditions.
In these cases, the need to change the wing becomes trivial. To perform this procedure you will need the following tool :
- wrench with 8 and 13 mm head;
- extension cord and ratchet;
- flat and Phillips screwdriver;
- new left wing of VAZ 2110.
By the way, the price from the VAZ manufacturer for the original front left fender with article number 21100840301500 or the front right fender with article number 21100840301400 will be about 1,550 rubles. The rear left fender with article number 21100840401500 or the rear right fender with article number 21100840401400 costs about 3080 rubles.
The average cost is indicated for spring 2022 in Moscow and the region.