Gear shift and lever position
Manual transmission
The gear shift positions are shown on the handle. Before engaging reverse gear, you must lift the ring under the lever handle.
When changing gears, fully depress the clutch pedal and then release it smoothly. It is not recommended to drive the car with one hand on the gearshift lever, as this increases wear on the gearbox.
When shifting from fifth to fourth gear, do not push the lever laterally to avoid accidentally engaging second gear, which could cause the engine to overspeed and cause engine damage.
Before engaging reverse gear, make sure that the car is at rest and your foot is not on the accelerator pedal. Move the lever from neutral to the right all the way, and then engage reverse.
The table below shows the driving speeds at which you should engage the next gear for maximum fuel economy.
Gear change
Travel speed
Gear shift - automatic transmission
At the base of the selector lever there is an illuminated dial with selector range position symbols.
“P” — Park “R” — Reverse “N” — Neutral position
Forward gears:
"D" - 1st - 4th gear "3" - 1st - 3rd gear "2" - 1st - 2nd gear "1" - 1st gear only
You cannot set the position “P”, “R”, or “N” while the vehicle is moving. If the driving position is reset, it may cause an accident or damage to the transmission.
Selector lever positions
Pressing the accelerator pedal while moving the selector lever can cause increased wear on the transmission.
Always keep your foot on the brake pedal when setting the driving position. Do not place your hand on the selector lever as this may cause wear to the transmission.
Gear shift lever
Between placing the lever in the drive position and accelerating, you should pause for a few seconds to allow the gear to engage. In some positions, the selector lever is locked, and to move it you must press a button on the lever handle. Locking occurs between the following positions.
This position can only be set when the vehicle is stationary. The selector lever and transmission are locked. The engine can be started.
This position can only be set when the vehicle is stationary. You must press the button on the lever handle.
Before driving off, you should wait a few seconds for reverse gear to engage.
In this position, the engine is disconnected from the transmission. The engine can be started. To prevent the vehicle from rolling on a slope, use the handbrake. To avoid overheating of the engine and transmission, the position “N” should be set when the vehicle is stopped for long periods of time (for example, in traffic jams). When waiting for a traffic light to allow movement, you should set the position to “D”.
This position applies when driving under normal conditions. The car starts off in first gear and then automatically shifts between 2nd, 3rd and 4th gears. The switching moment depends on the position of the accelerator pedal and the driving speed.
In this position, 4th gear is locked. The car starts off in first gear and then automatically shifts between 2nd and 3rd gears. Position 3 is recommended when driving on winding roads and in heavy city traffic. When moving the lever from position "D" to position 3, the transmission immediately shifts to 3rd gear, which causes a strong engine braking effect. This should not be done at speeds above 130 km/h.
This position is recommended when driving on mountain roads. This makes better use of engine power and increases the engine braking effect. The transmission automatically shifts between first and second gears. Third and fourth gears are locked.
When moving the lever from position “D” or from position 3 to position 2, switching from third to second gear occurs only at a speed lower than a certain predetermined speed, in order to avoid increasing engine speed to unacceptable values.
This position is recommended when ascending and descending very steep slopes. On the one hand, effective engine braking is ensured, on the other hand, constant gear changes are eliminated, leading to overheating of the transmission fluid.
If you move the lever from position “D” to position 1, you immediately switch to 3rd gear; then, as the speed decreases to 70 km/h, it will switch to 2nd gear; and then, as the speed decreases to 30 km/h, it will switch to 1st gear. The selector lever should not be placed in this position at speeds exceeding 130 km/h. Manual shifting is also undesirable on icy roads. In this position of the selector lever, there is no shift to higher gears.
Squeezing the accelerator pedal to the floor (“kick-down”)
When the accelerator pedal is pressed to the floor – in the “kick-down” position – it shifts to a lower gear to provide a reserve of power, for example for overtaking. Shifting to the next gear occurs only at high engine speeds or when the accelerator pedal is released.
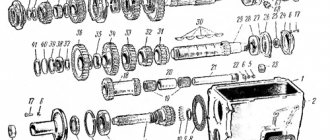
Checkpoint diagram
The gearbox design is as follows:
- To ensure gear shifting, the gearbox contains a primary shaft consisting of a gear block. They are constantly engaged with the drive gears from the first to the fifth speed (that is, those that are oriented towards driving forward);
- The secondary shaft is equipped with a drive gear for the main transmission, and it also has gear synchronizers that ensure forward movement of the driven gears. There are also bearings plus an oil sump;
- VAZ two-satellite differential, with the driven gear of the main gear attached to the flange of its box;
- the gearbox drive consists of a gear shift knob, a ball joint, a selector rod, a rod, gear selection mechanisms, and gear shifting mechanisms;
- Jet thrust is designed to protect the gearbox from flying out of gear. Its ends are attached to the support and the power unit.
Gear shift drive diagram
CPT diseases
VAZ 2110 owners often complain that the first gear is difficult to engage or crashes.
- often the synchronizer is to blame;
- perhaps the clamp spring has burst, the lever is hanging loose, the speeds are switched on as desired;
- The stem and fork may need replacement.
Another complaint is that second gear is difficult to engage and often gets knocked out.
Here you can suspect the main culprits:
- the second one flies out most often because the gear teeth do not mesh well with the clutch that turns on the speeds;
- The tips of the gear teeth and clutch are already worn out, so the speed is difficult to engage. If you don’t intervene, it will soon fly out;
- as an option, when it knocks out on bumps, the clutch dies.
Sometimes (albeit rarely) when the second one does not turn on well enough and falls out, replacing the retaining spring helps. If the speeds often drop out, some of them are difficult to turn on, which means that half-measures will no longer help - the box needs to be overhauled.
Whether you do it yourself, or go to a service center where they will repair it for you and also adjust the gear shift mechanism, decide for yourself, based on your own experience and skills.
If you find an error, please select a piece of text and press Ctrl+Enter.
A slightly worse option
Often, reverse gear is lost due to problems with the solenoids in the gear locking mechanism. This is how you should proceed for verification purposes.
Find the correct one in the fuse box, marked F21. He is 8th from the left; if it is burnt out, replace it; Raise the cover on the gearshift knob
There is a connector that is connected to the switch, you need to carefully disconnect it; The connector contacts are closed directly. If the missing gear appears, we change the switch, if not, we dig further; The connector is removed from the solenoid, and the voltage is measured in it
It should be 12 V, you can throw in a 5-watt light bulb to control it.
If everything is in order, things are worse than you thought - the cause has not been found. If there is no voltage, check the wires and look for an open.
Big trouble
Sometimes the reason for poor gear shifting lies in a more serious problem than described above. We are talking about damage to the spring, which is present in any box. A piece of the spring gets stuck in the groove and prevents the gear from changing normally. In some cases, reverse gear disappears completely, and sometimes works intermittently.
The problem is quite serious, because you will have to go deep into the unit, and not every car owner can do this. It is better to contact a car service if the reverse gear on the VAZ 21099 is difficult to engage. The technician will conduct an inspection and decide on further actions. You can replace the spring or install a new gear shift mechanism assembly. The second option is more preferable, since a separate spring may soon break again.
There are several reasons why the reverse gear on a VAZ 21099 does not engage. The breakdown must be identified and repaired in a timely manner in order to prevent serious consequences.
How to adjust the link?
You should drive the car onto a lift, pit or overpass. It is not recommended to carry out the procedure alone; you will need an assistant to switch the lever. You must proceed as follows:
- Crawl under the bottom, loosen the clamp located on the gearbox rod and remove the drive from the rod.
- Pull off the boot or remove this part altogether, unscrew the screw on the cardan.
- Use a hammer to carefully knock down the cardan shaft and remove the boot, if this was not done initially.
- If necessary, replace the oil seal.
- Installation is carried out similarly, but in reverse order.
After the above steps, you will need the help of a second person. He should sit behind the wheel, set the gearbox lever to neutral and tilt it slightly to the right. It should be held in this position until the universal joint clamp is properly tightened.
Backstage for VAZ 2112
According to Zetsche, cited by Autocar, in the near future cars will become not just vehicles, but personal assistants that will greatly simplify people’s lives, ceasing to provoke stress. In particular, the CEO of Daimler said that soon special sensors will appear on Mercedes cars that “will monitor the body parameters of passengers and correct the situation...
The ease of driving with an automatic transmission is achieved at the expense of the loss of other qualities of the car: efficiency, dynamics, and precise fulfillment of all the driver’s desires. Therefore, the manual transmission is still rated higher by experienced drivers and is in great demand.
Troubleshooting
Many transmission malfunctions that cause the reverse gear to disappear or fall out can be eliminated without removing the unit from the car.
If the cause is a loosening of the bolt securing the clamp on the rod, then to correct the defect it is necessary:
- Place the car on a lift.
- Completely loosen the clamp nut.
- Place the gearshift lever in the fully engaged reverse gear position.
- Fully engage reverse gear at the gearbox using the shift rod on the crankcase.
- Tighten the clamp mounting bolt.
Backstage adjustment
If tightening the clamp does not help get rid of the problem, then you need to check the condition of the shift drive parts. One of the reasons why the reverse gear does not engage may be a poorly adjusted rocker.
To make adjustments to the mechanism, you may need the following tools:
- two wrenches with a size of 13 mm, preferably a socket design;
- any wrench or 10 mm socket;
- small hammer;
- slotted screwdriver.
Since the cause of malfunction of the link can be wear of parts, spare parts may be needed:
- universal joint of the rocker;
- Sometimes the shift rod seal may need to be replaced.
Two people are required to adjust the rocker or replace parts of its drive. One person must change gears from the passenger compartment, and the second must adjust the travel of the shift rods.
The order of work is as follows:
Provide access to the bottom of the car by placing it on a pit or a lift. Using a 13 mm wrench, loosen the clamp installed on the gear shift rod. Remove the rod from the box rod. Using a screwdriver, carefully remove the boot. Using a 10 mm wrench, unscrew the fixing bolt on the cardan shaft. Knock off the cardan with light blows of a hammer
It is important not to damage the shaft. Remove the universal joint seal boot. If there is an oil leak, the sealing gland on the box rod must be replaced. Install a new boot (or leave the old one if it is intact) and install the universal joint on the shaft. Align the hole on the cardan with the notch on the shaft. Tighten the 10 mm clamp and install the boot completely in place. Install the rod on the cardan rod and adjust the gearshift lever travel. The second person should sit in the driver's seat, set the gear shift lever to neutral, move it slightly to the right and hold it in that position. After this, you need to tighten the 13 mm nut of the clamp. Usually, with such a repair, the reverse gear starts to engage without problems
In addition, the operation of the entire gear selection mechanism on the VAZ-2109 becomes clearer
Typically, after such a repair, the reverse gear starts to engage without problems. In addition, the operation of the entire gear selection mechanism on the VAZ-2109 becomes clearer.
Why do you need a gearbox slide?
In fact, most often the gearbox is in good condition, but the rocker may fail.
You can replace the unit with a new one, or you can get by with proper adjustment of the rocker. Adjusting this element will help troubleshoot problems and make sure that the problem is related specifically to the gearbox linkage. It happens that a car owner simply begins to change one component after another without understanding the problem, wasting money and time to no avail.
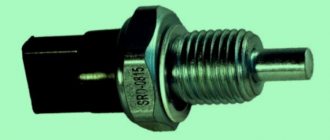
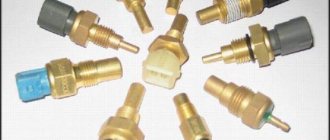
Replacing the sensor
And now it’s time to consider the process of replacing the reverse sensor on various VAZ cars - from 2106 to 2115. Here are the instructions.
VAZ 2107
Let's start with the VAZ 2107 car. On VAZ Classic models everything is done exactly the same.
So:
First, we look for the sensor - it is located on the right side of the gearbox, if you look at the car as it moves. It is very difficult to make a mistake - this is the only part in the gearbox where two wires fit.
- If the wires are broken, then look for protruding contacts.
- If the wires are still on the sensor, then disconnect them.
- Next, you will need a 22 key. They need to unscrew the sensor. For convenience, it is better to take a longer wrench, since over time the sensor will stick to the crankcase.
- If you cannot unscrew the reverse sensor using a wrench (head), then you need to do this using a hammer and chisel.
- Then clean the seat from dirt using a knife.
- Remove the metal washer along with the dirt and replace it with a new one.
- Insert the sensor and tighten it using the same wrench until it stops.
- Next you need to put the wires back on. If necessary, crimp the contacts with pliers.
- And now, the replacement of the reverse sensor on the VAZ 2107 is completed!
Some people have a question about oil - whether it will leak or not. In this case it will not leak.
VAZ 2109
Let us remind you that this point applies to the Samara family as a whole, and not just to the VAZ 2109 car:
- Remove the protection from the car engine, if any.
- The location of the sensor on a VAZ 2108 and similar cars is slightly different than on a Classic, since the car has front-wheel drive.
- As the vehicle moves, the sensor is located on the left side.
- If the Classic had to be driven into a viewing hole, then cars with front-wheel drive can simply be lifted under the left front wheel using a jack.
- Again, the electrical wiring leads to the sensor.
- Remove the wires.
- To remove the sensor you will need an extended 22mm socket and a wrench.
- Using the head, remove the sensor.
- Prepare a container and, as soon as you unscrew the sensor, place it so that the oil does not spill on the floor.
- Insert the new sensor as quickly as possible.
- Screw it in by hand first and then tighten it using the same socket and ratchet.
- Connect the electrical wiring wires.
- Add the required amount of oil.
All is ready!
VAZ 2110
Cars of the VAZ 2110 family are equipped with engines from the VAZ 2108. Therefore, there is no point in writing the same information a second time. The answer is: VAZ 2110 replacement of the reverse sensor - see the information above.
VAZ 2114
Replacing the reverse sensor on a VAZ 2114 or cars of the Samara-2 family. Instructions:
- The essence of the process is the same.
- Raise the car using a jack.
- If necessary, remove the engine protection, but this may not even be necessary.
- Find the sensor; on new Samara-2 models it has a slightly different location, but finding it will also not be difficult.
- Disconnect the electrical wiring connector from the sensor.
- Using a 22mm wrench (it’s more convenient to use a head, but you can also use a wrench) unscrew the sensor.
- Before removing the sensor from the connector, place an oil container.
- Take out the old sensor and insert the new one along with a new ring.
- Screw the sensor using a wrench or socket.
- Wipe the gearbox housing from oil traces.
- Connect the wires.
- Top up the level to the required level.
- Reinstall the engine protection (if necessary).
So, the sensors have been changed. Now you can start checking their functionality.
VAZ 2110 gearbox device
The mechanism of operation of the manual transmission can be visually assessed by watching the posted video. [Expand][Hide]The five-speed gearbox of the VAZ 2110 consists of 2 shafts, has 5 front input gears, one rear, and is armed with synchronizers for switching front gears.
It is structurally combined with the differential and the main gear. The VAZ 2110 gearbox housing is made of aluminum alloy and consists of 3 parts: gearbox housing (7), clutch housing (25) and rear gearbox housing cover (1).
The crankcase socket is equipped with a special magnet on which iron residues are collected
How to change gears on a VAZ, ZAZ
Priora has difficulty engaging first gear
Priora has difficulty engaging first gear
Sell and buy a normal car
Priora is not a car, and if it is not a car, it means there is no first gear
But to get to the point, you need to look at the clutch, possibly the gearbox itself, a friend had the gearbox disassembled under warranty, and there was simply no synchronizer in 2nd gear...
Sorry for the taftology, but a priori everything cannot be normal in Priora, this is so, a digression. But in principle, like at any checkpoint, you need to look.
I should have bought a car, not a Priora
First of all, look at the clutch setting. Well, if it doesn’t help, then look at the box (synchronizers). May help sometimes
Do not worry! I've been turning on the first through the second since new. That is, when you release the clutch, the second one first. And then, without releasing the clutch pedal, the first one. This technique was often used by taxi drivers on the Volga. I can do this almost automatically. I don't even bother. It looks like this is a family feature of the korobas. It's been over a year now. True, the first one now turns on easier. But sometimes again after a second time. Try to forcefully try to break it. And to those who scream that the Priora is not a car, spit in the litso! They don’t even have a muzzle... They have a normal apparatus. Frisky. Especially in second gear... Mona will accelerate up to 70 without revving the engine! And about the power steering. Don’t hold the steering wheel firmly when you turn it all the way, let go a little. So that there is no hard stop on the steering wheel side. The electric booster doesn't like this. It might end. You really have to get used to it. And so, no special problems. The noise, however, was made by myself. I took apart the doors and trunk. But there was silence in the car. Now I want to do the same for the interior floor and engine shield. But there is no room to dismantle the entire interior for 3 days...
Look at the condition of the cushions on which the engine rests...
ladaru.com
At what speeds and what gears should the VAZ 2110 be turned on?
But they all, without exception, work on the same principle. Main functions Before you figure out how to smoothly change gears on a manual transmission, you will definitely need to familiarize yourself with the main functions of the box itself. Now the node in question performs the following tasks in a modern car:
How to Shift Manual Transmission Gears Correctly. Driving video lesson
- configuration of the amount of torque on the engine;
- increasing the period of continuous operation of the motor;
- wheel speed configurations;
- optimization of fuel consumption in different modes.
At the same time, the introduction of this type of box is practiced specifically on internal combustion engines of various types.
The break is at least 10-15 minutes, since the basket will also have to cool down... In order to increase the clutch life, it is enough to: start at low speeds, and press the accelerator pedal only by releasing the clutch pedal;
What to do?
Next, we will look at several ways to solve the problem that can be done at home. The process of repairing a transmission is not such a simple task, so if you are not confident in your abilities, then do not try to do it yourself. It is better to contact specialists, because if you make even a small mistake, it can develop into more serious problems in the future.
Tools
Regardless of what kind of breakdown you have, prepare in advance all the necessary tools that you may need to disassemble the gearbox:
slotted screwdriver; a set of heads for unscrewing bolts; set of wrenches; mounting blade; hammer; pliers with thin jaws; Phillips screwdriver; Litol lubricant; jack; container for draining transmission oil from the gearbox; technological plug for the hole in your robotic gearbox.
A set of tools for dismantling and repairing the VAZ Priora gearbox
Removing the manual transmission
- First of all, before disassembling the gearbox, it is necessary to drain the transmission fluid from the gearbox. To do this, find an oil drain hole under the bottom of the vehicle, place a previously prepared container and unscrew the plug. Wait 40-60 minutes until the oil is completely drained. Now you can begin dismantling the gearbox.
- To begin, find in the cabin under the instrument panel the fastening nut of the clutch cable housing, which is connected to the pedal. It needs to be unscrewed. To do this, you will need an "8" socket or wrench. When the nut is unscrewed, remove the stop from the bracket.
- Then you need to dismantle the locking element and the housing of the wear compensation device for the driven shaft linings from the clutch pedal pin. To do this, take a slotted screwdriver and pry out the element.
- Now remove the plastic bushing from the pedal and then inspect it. If the bushing shows signs of wear or any physical damage, the bushing should be replaced. Before installing it directly, take “Litol” and lubricate the element so that it does not become dry.
- Next, dismantle the rubber seal of the clutch pedal cable sheath - it is located in the engine compartment.
- Then you need to remove the end element from the cable fork, after pulling it forward in the direction of travel of the vehicle.
VAZ Priora gearbox disassembled
Remove the nut securing the clutch cable end to the bracket, which is located directly on the gearbox. To do this, use a wrench set to “17”. Remove the cable end from the bracket hole. Then you need to remove the cable from the car. Now remove the plastic retaining plug and remove the wiring block from the speed sensor. Using a 10mm wrench, you need to unscrew the three mounting bolts on the front crankcase cover and remove it. Now you should support the engine of your vehicle with a reliable support or secure it using a device for lifting loads. Next, remove the nut securing the rear suspension support of the power device directly to the bracket. To do this you will need a key or socket on “15”. Now you need to remove the rear airbag upper limiting device. Unscrew the bolts securing the airbag to the vehicle body. Remove the cushion and its lower stop.
What to do if reverse gear does not engage
1. If noises and grinding noises are heard: turn off the engine and stop trying to turn it on - the gearbox or clutch has failed. The solution is to contact a specialist, or push the car out and drive to the nearest workshop, without engaging reverse gear. 2. If there are no extraneous sounds when you turn it on, but you can’t turn it on, try again, taking into account the characteristics of your car: perhaps you do not recess the lever, or do not move it to the side enough. And lastly: any actions to turn on the speed must be carried out with the clutch pedal depressed.
Read how to adjust the gear shift control drive on a VAZ 2110. A diagram of the device is presented.
If during operation of the car you have problems with gear shifting (there is no clear shift), then it’s time to adjust the drive that controls this mechanism. Also, this work must be carried out immediately after you have removed the gearbox, repaired it and reinstalled it, since after such actions the entire gear shift mechanism “diverges”.
We did the setup on a VAZ 2110 car.
Manual transmission bearings
And the last thing that could be the bearings - although they are very strong in the box, sometimes they also “stick”. The box will work like a tractor, especially when warm.
In any case, if you have problems in the gearbox itself, then this is an expensive repair. It is also better to entrust it to professionals, because the gearbox is a very complex mechanism.
As you can see, there are quite a few reasons, but in fairness it is worth noting that mechanical transmissions are a fairly reliable unit; they themselves break down quite rarely, especially if you change the transmission fluid on time and pour a branded one of very good quality.
If the gears do not engage, then these are most likely “attached” problems, starting from the rockers and cables, ending with the basket, clutch disc and flywheel.
Now let’s take a look at a short video version of my article.
(10 votes, average: 4.70 out of 5)
Similar news
How to change the oil in an automatic transmission (automatic transmission) or variator (CVT). .
How much does it cost to change the oil in an automatic transmission? Detailed material.
Why does the automatic transmission kick and jerk? Or when switching.
In general, nothing is wrong, not in 5th gear, there is not a sound, nothing (nothing is bothering me (What could be the matter, please help me with advice)
Comments 111
remove the cover from the top and you will see the problem in the form of a stopper 2101-1701192 its number
I think the fifth bolt was unscrewed and the joke was that the fifth plug was holding the bolt and didn’t show that it was
a friend’s 4 didn’t turn on, everything was just as quiet without noise, they found that the corkscrew ring had expanded and was not allowing the clutch to synchronize, they changed it and that’s it
enters the 5th place but does not go?
no finally nnewkl
Then the autopsy will show. There are many options and all only with trepanation of the box
I had this. defective fifth gear gear. freely, the bastard, rotated...
Problems with the VAZ-2109 gearbox
There can be many reasons for a gearbox malfunction in a VAZ-2109. First, determine what signs characterize the breakdown. If difficulties arise when switching speeds, the malfunctions may be as follows:
- Not enough or too little lubricant mixture.
- The gearshift shaft is jammed.
- The integrity of the gearbox gears is damaged.
- A foreign object accidentally entered the gearbox.
- A part called the synchronizer slide has worn out and can no longer be repaired.
If, while the vehicle is moving, a gear slips out or the gear lever returns to the neutral position, the reasons are indicated in the following list:
- The defect indicates a defect during the production of the VAZ-2109 unit. That's why, when buying a car, you need to carefully monitor the correct operation of all devices; do not hesitate to ask the seller tricky questions, after all, you pay. Warranty car repairs also do not mean that the part will eventually be repaired.
- The teeth of the gears are worn out, then the crown with teeth becomes like a cone and the destruction of the fixation of the gears becomes obvious.
- If the condition of the VAZ-2109 gearbox shaft, gears or bearings leaves much to be desired, then the bearing moves out of place or moves slightly to the side.
Car enthusiasts on forums dedicated to the maintenance and repair of the VAZ-2109 indicate additional defects and malfunctions of the car’s gearbox:
- Noises appear, indicating wear of the bearings and gears; the result of such a malfunction may be the lack of adequate adhesion of the components. The damage most likely affected the synchronizer or the box structure. The noise may be accompanied by knocking. Driving such a car is dangerous to the health and life of the driver and passengers.
- If you notice oily spots under the vehicle, you should assume that the transmission is leaking. Why does this problem occur? If the crankcase cover does not fit tightly or it is time to replace the oil seal shaft. You can fix problems yourself without resorting to the expensive services of service station specialists.
- Overheating of the gearbox is another unpleasant factor, which means that too little oil is filled.
Gear Features
The car's highest torque is in first gear. It is not difficult for the engine to rotate the wheels, but the speed of the car will not exceed 40 kilometers per hour. When such a speed is reached, the tachometer needle is usually in the red scale. Therefore, to move further, you need to switch to a weaker but faster gear. Then to the third, quadruple and so on. All switching must be done sequentially. The engine power is not enough to confidently accelerate the car at 20 kilometers in 3rd gear. Unless, of course, it's a 5.0-liter V-8.
In our case, this is a VAZ 14th model, and for normal acceleration dynamics you need to sequentially switch speeds, reducing the gear ratio. The fastest is “fifth”. The load on the engine is minimal here, hence the low fuel consumption. If a car spends 11-13 liters in the city, then on the highway this figure will not exceed seven. But this transmission has one drawback. It has virtually no torque. It will take a long time for the engine to gain speed further. Therefore, when overtaking, it is better to use a “reduced” speed, in our case it is “straight”, fourth speed.
Gear shift procedure for VAZ 2110
To avoid this, you need to make a gas boost, i.e. lightly press the gas before releasing the clutch. This is done very quickly: the foot hits the accelerator pedal, in our case quite deeply, almost to the floor, and immediately releases it. Here the clutch is released, and the right foot presses on the gas again, but this time to accelerate. The purpose of accelerating in this case is to raise the engine speed to 5000 rpm or a little higher. If you do everything correctly and then quickly release the clutch, you will not feel anything at all, and the car will begin to smoothly accelerate when you press the gas again.
Now the difference between the speed of the engine and the gearbox is 4000 rpm. If you release the clutch, the engine and wheels will have to match speeds very quickly. The engine will spin up sharply to 5000 rpm and will transfer a lot of stress to the wheels (equivalent to a sharp, brief application of the brakes), which in this case may lose traction if they are subject to strong lateral forces or if the road is simply slippery. If you release the clutch slowly, the stress will be much less, but then the clutch will burn.
The fifth gear has a reduced gear ratio of 0.70.8. The crankshaft rotates at a lower speed than the wheels. This economical transmission is used for straight sections of the road, without heavy loads, since it is very weak. The reverse gear is also powerful and transmits a lot of torque and has a large gear ratio. It is used for reversing. The neutral position of the gear shift lever disengages all gears.
The speed in this gear is up to 40 km/h. Second, third and fourth gears respectively transmit less torque. The crankshaft rotation speed decreases, and the wheel rotation speed increases. The second gear is used to accelerate the car and move it at speeds from 20 to 60 km/h. The third gear is used to accelerate and move the car at speeds from 30 to 90 km/h. Fourth gear (direct) creates less torque and has the largest speed range, from 40 km/h to maximum.
READ Which bumpers are suitable for VAZ 2107
Fixing the problem
Let's look at several ways to help fix the problem with engaging reverse gear.
Backstage adjustment
Before you begin solving the problem, take with you everything you might need:
- new gearbox driveshaft;
- speed selector shaft oil seal;
- two ring wrenches 13;
- wrench 10;
- hammer;
- screwdriver.
To fully replace the cardan, you will need to drive into a pit or overpass. In addition, you will need an assistant who will shift the gearbox lever while you adjust it.
Let's start replacing the cardan and adjusting the rocker:
You need to crawl under the bottom of the 2109 and find your gearbox. Take two 13mm wrenches and loosen the clamp located on the transmission drive rod. After this, you can remove the drive from the gearbox mechanism rod. Then take a screwdriver and, with a little force, pull the boot closer to the unit. If you accidentally damage the boot, you can simply dismantle it so that it does not bother you
Now take a 10mm wrench and unscrew the locking screw on the cardan. Next, take a hammer and very carefully knock the gearbox driveshaft off the shaft. Do this carefully so as not to damage the shaft
Remove the cardan boot if you did not remove it initially. If necessary, replace the speed selector shaft oil seal. At this point we can consider that half the work has already been done. Now you need to install the driveshaft of the box. We install the element in the reverse order. First, install the new boot in place, and then place the cardan on the shaft. Remember that the position of the retaining screw must coincide with the recess on the shaft. When the universal joint is in place, tighten the fixing screw and install the boot on the universal joint. You also need to put the gear shift drive rod on the cardan rod, but there is no need to tighten the clamp. Next, you will need the help of another person, since you need to adjust the gearshift lever. Ask your assistant to sit in the driver’s seat: he should set the gearshift lever to “neutral” and move it slightly to the right. In this position, an assistant should hold the lever while you tighten the cardan clamp.
When the cardan adjustment is completed, you need to check how the speeds on the lever are switched on. If the problem that caused the reverse gear to not engage in your VAZ 2109 was in the cardan, which is most likely, then after replacing the element the fault should disappear.
Changing gearbox oil
Also, one of the common reasons why reverse gear in a VAZ 2109 does not engage is poor gear oil. As stated above, the liquid has already lost its properties and its further use does not make sense. But how do you understand that the transmission fluid has already exhausted its service life? This issue should be taken seriously, because the fluid replacement procedure is not that cheap. Therefore, you need to know for sure that the gear oil has lost its properties.
- Pull the dipstick out of the gearbox hole to measure the level and drop a drop of liquid onto a white cloth. If at least one of the following conditions occurs, change the oil immediately.
- The lubricating fluid is discolored and may have a slightly black tint. Also, even in a small drop of oil you can see metal particles or other dust.
- The transmission fluid is opaque and appears very viscous. If you try it by touch, the substance will stick to your hands. In addition, if you drop this oil onto a piece of cloth or napkin, it will be absorbed very slowly compared to new oil.
- Very cloudy or foamy liquid. This may mean that transmission oil has entered the engine. If so, then the problem with engaging reverse gear is the first thing you will notice. If the car continues to operate on poor transmission fluid, then it may be necessary to completely repair the gearbox and the entire transmission system.
How to drive a car with a manual transmission? How to change speed on a car? :
Despite the fact that many drivers now prefer cars with an automatic transmission, which has only two pedals - gas and brake, many are still loyal to cars with "mechanics".
In this article we will tell you how to change gears on a car.
Advantages of a car with manual transmission
- Manual transmissions are much more reliable than automatic ones.
- The cost of repairing manual transmissions is lower than complex automatic transmissions.
- A car equipped with a manual transmission consumes much less fuel than one with an automatic transmission.
- Driving a vehicle with a manual transmission is much safer in winter.
- A manual transmission allows you to have much more opportunities for extreme driving and advantages at the start.
- A vehicle with a manual transmission allows you to brake if the brake fails by downshifting.
Features of driving a car with a manual transmission
When working with a manual transmission, excellent reaction and coordination are required, since you have to simultaneously perform several operations simultaneously while driving. All actions performed and movements of the arms and legs must be brought to automaticity. It should be remembered that you cannot make a mistake here, it is life-threatening.
In order to be able to drive a car with a manual transmission without difficulty, you need to know how to change the speed of the car and remember the purpose and location of the pedals. There are three of them and each of them performs its own function:
1) Left pedal – clutch. This is the main pedal, without which the car simply will not move. It is important to know that the gearbox can only be changed if the clutch pedal is fully depressed.
2) The middle pedal is the brake. Its meaning does not need to be explained.
3) Right pedal - gas.
The pedals can have deep or low travel, depending on the make of the car. The gas and brake are pressed alternately with the right foot, and the clutch with the left, which will always be in the working position. The pedals must be pressed very smoothly, otherwise the car will jerk and the engine may stall.
On the right side of the driver's seat there is a gear shift lever - a mechanism that changes gears on a car. A diagram is drawn on the handle of this lever, which is, so to speak, a mini-instruction for its use. Moreover, in different cars the principle of its operation may be different. Gears should change without any additional effort or sounds.
The car can have from four to six speeds. In addition, there is a reverse speed, which ensures movement in the opposite direction (without turning the car around). It is designated by the letter R on the shift lever.
When the lever is centered, this is the neutral position, indicated by the letter N.
Before starting a vehicle with manual gear shift, it is necessary to check whether it is in neutral, and only then turn on the ignition.
How to start moving?
1) Depress the clutch pedal.
2) While holding the clutch pedal, engage first gear.
3) Release the clutch pedal and gently press the gas.
When does the gear change occur?
Being able to and know how to change gears in a car is very important for a driver. Incorrect actions can lead to serious engine damage and, accordingly, quite expensive repairs in the future.
Speeds are switched in order.
There is a calculation of the average speed range of gear use.
1st speed – up to 15 km/h, then switch to second.
2nd – from 15 to 30 km/h and go to third.
3rd - up to 50 km/h and go to fourth.
4th – from 50 to 80 km/h and, accordingly, turn on the fifth.
How to change speed on a car?
- Initial position - the lever is in neutral, the car is not started.
- The car starts with the key.
- The clutch is depressed all the way.
- The lever shifts to 1st gear.
- The clutch releases smoothly and lingers slightly when the car slowly moves away.
As soon as the movement begins, the gas pedal is pressed. - As speed develops, the clutch is depressed and second gear is shifted. The clutch releases smoothly.
- Gas is added until the speed reaches 20 km/h.
The clutch is depressed and the next gear is shifted, etc. They can be reduced sharply. For example, from 4 to 2, or from 3 to 1, slowing down to the required mileage on the speedometer. - If it is necessary to stop, the brake is pressed smoothly and the clutch is depressed just before stopping.
The lever is switched to the neutral position and all pedals are released. When leaving the car, you need to put the handbrake on.
Repair process
- If reverse gear is lost, the following procedure must be performed. By participating in the circuit of the fuse link “F21”, +12V power is sent to the winding of the solenoid “L1”. There is a switch “S1” in the handle, which closes the ground contact, which causes the solenoid coil to activate.
- The fuse we are interested in is located inside the mounting block and is installed in the eighth socket of the LADA Kalina, if you count from the left. The current strength for this insert is 10A. If suddenly the fuse turns out to be faulty, then replace it with a similar insert with the specified characteristics.
- Next, we check the switch itself. For this purpose, lift the handle cover and find the connector. It is connected directly to the switch. We carefully disconnect.
- We take a regular paper clip and use it to close the corresponding contacts in the connector.
- We make an attempt to engage reverse gear on the LADA Kalina, and when this action was successful, we conclude that the switch is unsuitable. If we fail, then we continue to diligently search for the source of the trouble.
- Remove the solenoid connector and insert two pins into its contact grooves. Now we call for help with a tester, which we use to measure the voltage. The display of the device should display the number 12 (naturally, Volts). We load this local circuit by connecting a light bulb. A 5-watt device will be sufficient. If the lamp refuses to light, then we are dealing with a break. The presence of voltage here can be explained by the presence of resistance resulting from the natural formation of copper oxide.
- In 99 percent of cases of wiring malfunction, expressed in fractures or breaks in the supply wires, the cause is the harness, which is located next to the clamp on the pallet.
- We dismantle this clamp by carefully squeezing its fastening elements.
- Disconnect the rear brake light switch connector. We take out the tourniquet. Remove the insulating tape from the corrugated shell and remove the wires. If there is a break, it can be easily detected.
- Using wire cutters, we pinch off the remains of the damaged wiring and install new wires, which we select with a similar cross-section. We recommend soldering the connecting node itself. Now let's isolate. Alternatively, you can use a new corrugation. Our goal is to prevent moisture penetration during operation.
- We fix the harness with a new plastic clamp.
- We connect the previously removed connectors and turn on the power to the solenoid.
- The presence of a malfunction within the solenoid itself is a rather rare case, but possible. To check, we use the same tester. We measure the resistance at the terminals. Its value should be 2.2 ohms. If it turns out that the solenoid is the culprit, replacing it will require draining the transmission oil. Some dodgers manage to do without draining. After dismantling, they, with a deft movement of their hands, plug the hole with a suitable gag, and before installation, they sharply remove it. A slight loss of oil will still occur, but these crumbs can be topped up without any problems.
- When installing the solenoid on the Lada Kalina, do not forget to lubricate the threaded part with sealing glue, otherwise after a while the oil will begin to treacherously ooze out of the box.
Description, gearbox drive, differential of a VAZ 2110 car
The input shaft 5 is designed as a block of drive gears, which are in constant mesh with the driven gears of all forward gears. The secondary shaft 40 is hollow (for supplying oil to the driven gears), with a removable drive gear of the main gear 17. Driven gears 31, 33, 34, 36, 38 and synchronizers 32, 35, 39 for forward gears are located on it. The front bearings of shafts 18 and 12 are roller, the rear bearings 3 and 37 are ball. The radial clearance in roller bearings should not exceed 0.07 mm, in ball bearings - 0.04 mm. Under the front bearing of the secondary shaft 18 there is an oil sump 19, which directs the flow of oil into the shaft.
The differential is two-satellite. The preload in the bearings 29 (0.25 mm) is adjusted by selecting the thickness of the ring 28 installed in the gearbox housing housing under the outer ring of the differential bearing. The driven gear of the main gear 27 is attached to the differential box flange.
In order to equalize the speed of the clutch disc and basket and minimize slipping of the disc when the clutch is engaged; in order to facilitate the work of synchronizers and increase their service life; etc. You won’t believe it, but regular “torsional” loads on the body, inevitable with conventional gear shifting, even make the body “loose” twice as fast. After all, every jerk is a significant and absolutely unmotivated “test” of the body for rigidity. Not to mention the suspension elements, including engine and gearbox mounting mounts. And this happens hundreds of times a day, and tens of thousands a year.
Contrary to popular belief, keeping your foot on the clutch pedal within its (pedal) free play is harmless to the clutch. And holding the clutch pedal down for a long time (for example, at intersections) mainly harms the release bearing, and then mostly on cars where the release bearing rotates freely when the clutch pedal is released (GAZ, UAZ, “classic”, Niva, etc. .).
- Gears change the speed of rotation between the shafts. By changing the size of the gears, switching to an up or down gear occurs;
- Without a clutch, changing gears on the move is impossible. Its job is to separate the engine and transmission. This procedure helps you change gears without breaking the gears and shaft.
The gearbox shift mechanism consists of forks 3, 7, 8 (see Fig. 96), mounted on sliders 27 - 29, a lever / shifter pressed by a spring 2 to the spherical surface of the cover 26, ball retainers 25, which prevent spontaneous switching on and off of gears , a lock that prevents the simultaneous engagement of two gears, and a spring fuse that makes it difficult to engage reverse gear.
How to change gears correctly on a manual transmission? Beginners are your salvation!
Sources:
https://clustertech.ru/avtoyurist/poryadok-pereklyucheniya-peredach-vaz-2110
How to repair a gearbox on a VAZ 2110
Adjustment does not always achieve the desired effect. Therefore, the motorist will need to carry out repair work. Practice shows that repairing a VAZ 2110 gearbox involves dismantling and reassembling the gearbox. Now I will tell you in detail how to do this.
How to remove/dismantle a VAZ 2110 box
How to remove the box? Before disassembling the gearbox, it must be cleaned
It is important that water does not get inside the box.
- Power from the battery is turned off.
- The block is disconnected from the speed sensor.
- Transmission fluid is drained.
- The bolts securing the jet thrust are removed.
- It is necessary to remove the constant velocity joints from their standard location.
- The existing ball joint bolts are loosened.
- Using a tool, unscrew the nuts holding the clutch cover to the gearbox housing.
- The bolts securing the gearbox to the engine are disconnected.
- The power plant must be lifted (use a jack).
- The engine mounts must be removed.
- To pick up the gearbox, you can use a screwdriver.
- The speed box slides off the guides. The input shaft should disengage from the clutch.
How to properly disassemble a VAZ 2110 gearbox
- We remove dirt and wash the outside of the gearbox (do not allow water to enter the crankcase).
- Using a 17mm wrench, unscrew the bolt securing the power unit suspension bracket.
- Using a 13mm socket, unscrew the six nuts securing the rear crankcase cover.
- Remove the bracket.
- Tapping with a copper hammer (or an ordinary one through a soft metal mandrel) on the tides of the lid, and remove it along with the sealing gasket from the studs.
- Having pressed the gear selection rod all the way, we turn on the third gear, or, by retracting the rod all the way, we turn on the fourth.
- Using a 10mm spanner, unscrew the bolt securing the fifth gear fork.
- Using a soft metal drift, we strike the fork downwards, including the fifth gear of the VAZ 2110
- Use a beard to straighten dents in the nuts of the primary and secondary shafts
- Using a 32" socket with a powerful wrench, unscrew the shaft nuts.
- Using a screwdriver, pry off the fifth gear fork and remove the fifth gear assembly. Remove the fifth gear shift fork.
- Remove the synchronizer sliding clutch from the hub. Remove the synchronizer blocking ring. We take out the thrust plate.
- We move the hub inside the sliding clutch of the Synchronizer and remove the hub, springs, clamps and crackers of the fifth gear synchronizer.
- Using a copper hammer we strike the end of the input shaft. Insert two screwdrivers into the resulting gap between the thrust plate and the fifth gear drive gear. Prying up the gear with screwdrivers, we press it
- Using the “13” socket, unscrew the three plugs of the gearshift rod clamps. Remove the springs and retaining balls from their sockets.
- Using a Phillips impact screwdriver, unscrew the four screws securing the thrust plate. The screws have special lock washers.
- Remove the thrust plate. Use two screwdrivers to pry off the thrust washer of the fifth gear driven gear bushing. We insert the puller arms into the resulting gap between the end of the rear bearing and the thrust washer and compress the gear sleeve and the thrust washer.
- Use two screwdrivers to separate the retaining ring on the input shaft and remove it. In the same way, remove the retaining ring from the secondary shaft.
- We insert a screwdriver into the socket of the latch and, applying a magnet to it, remove the ball.
- Using a “13” socket, unscrew thirteen nuts and one bolt securing the gearbox housing to the clutch housing.
- By inserting a screwdriver into the groove at the junction of the crankcase mating planes, carefully lift the box crankcase and remove it.
- Using a 10mm spanner, unscrew the bolt securing the 1st-2nd gear shift fork to the rod. We lift the rod up and disengage the fork. Using a 10mm spanner, unscrew the bolt securing the 3rd-4th gear shift fork to the rod. Use a screwdriver to remove the rod from the gear selection mechanism.
- Raise the rod up and remove the fork from the groove of the synchronizer sliding clutch.
- By turning the 5th gear engagement rod, we remove it from the gear selection mechanism. We take out the axis of the reverse intermediate gear.
- Remove the reverse intermediate gear. We simultaneously remove the primary and secondary shafts from the roller bearings of the clutch housing.
- We take out the differential assembly.
Gearbox ratios for VAZ 2110 table
Improving the gearbox by choosing gear ratios A lot of the technologies used in tuning the gearbox have been tested in motorsport. For any car, especially a sports car, the gearbox is an important mechanism in the implementation of the dynamic parameters of the unit.
READ Which Thermostat Is Better To Install On A VAZ 2115
Correctly selected gear ratios can make a fast car with a relatively weak engine on board. The gearboxes used in motorsport are synchronized (which are equipped with “road” cars) and unsynchronized (the so-called cam). They are also distinguished according to the shifting principle: traditional (H-pattern), sequential (alternating gear changes, like bikes). Cars that belong to a severe level of training use cam gearboxes. They are characterized by a number of advantages - they are able to withstand higher loads (due to the shape of the tooth and the gear-claw coupling)
How the system works
The sensor itself is a limit switch with normally open contacts. Under external influence, the contact group begins to move and closes. A special feature of this device is its aggressive operating conditions, as it is located in the engine compartment. That is, the electrical part must be sealed and protected from vibration.
The body of the device is metal, on one side there is a movable rod with an oil seal, on the other there is a contact group. The connection between the plastic dielectric and the metal main body is protected against the penetration of liquids.
The sensor is screwed into the gearbox in a strictly defined place. When moving the mechanism (scene) for engaging reverse gear, a special protrusion sets the sensor rod in motion. The contacts close and current can flow through the wires.
What the car electronics do next:
- activates the relay coil for turning on the reverse lights;
- gives a signal to turn on the parking assistance system;
- when a rear view camera is installed, it supplies power to it (again, through a relay).
The return spring is located inside the housing. After the impact on the rod has ceased, that is, the reverse gear has returned to a state of rest, the contact group returns back and opens. All involved electrics are switched off:
- The reversing lights go out;
- rear parking sensors are disabled;
- The rear view camera turns off.
Advice: If you install additional electronics on a VAZ 2110 or 2112, such as parking sensors or a rear view camera, then it is not recommended to connect to the contacts of the reversing lights.
It is better to find the primary circuit from the sensor using the electrical diagram of your car, and route this signal to a new device. Of course, you should use a relay rather than connecting the device directly. A fuse must be added to the circuit.
Why does the reverse gear sensor break?
Any moving mechanical system is designed for a certain number of cycles of use. Therefore, this device has a service life and can break simply due to mechanical aging.
Important: The cause of the reverse lights going out may not be the sensor at all. No one is immune from light bulbs burning out or wiring being broken. The failure may be in the control relay or in the safety unit.
We will look at the reasons relating specifically to the sensor:
- Corrosion of internal contacts due to a leak in the seal and moisture entering the housing. It occurs due to temperature changes and the appearance of deformation gaps.
- Oxidation of connector contacts, up to complete corrosive destruction. The reason is the lack of protective lubricant inside the connector.
- Mechanical destruction of internal parts due to manufacturing defects.
- Fracture or loss of the switching rod from the housing. Occurs in counterfeit products.
- The control rod is jammed into the “on” position. The reason is oil seal wear or internal corrosion.
- Grinding the surface of the slide clamp to the sensor rod.
Gearbox oil drain
First of all, drain the oil from the box. If you do not know how to remove the gearbox, then use the following instructions:
- Place the car on a flat surface
- We place wheel chocks on both sides under the rear wheels.
- Disconnect the car.
- The mounting bolts are unscrewed from the crankcase and its protection is removed.
- The ground wire connected to the crankcase is unscrewed.
- Unscrew the nuts on the clutch cable.
- Completely remove the clutch cable. We disconnect it from the box.
- Remove all wires from the starter.
- We remove the starter. To do this, unscrew the bolts that hold it in place.
- The drive rod, which switches speeds, is disconnected from the hinge.
- Disconnect the speedometer and cable that drive it.
- Unscrew the bolts and nuts securing the rod.
- The hinge pin is removed from the strut arm.
- The suspension joint and steering knuckle are separated.
- The CV joints are removed.
- The shield is removed.
- The box is attached to the engine with bolts. We unscrew them.
- We remove the box.
We will prepare a gearbox switching diagram in advance.
Reinstalling the gearbox
Gearbox assembly:
- we change all non-working elements;
- workers clean with a rag;
- assembly is carried out;
- degrease parts with threads;
- if necessary, lubricate the elements;
- change gaskets;
- insert the balls and bearings into place;
- we assemble the synchronizer;
- We put all the springs in place and tighten the bolts. When assembling, lubricate all connections with sealant;
- attach the box to the engine;
- add oil;
- connect the battery;
- we start the car and check it.
The VAZ 21099 gearbox is adjusted during assembly. Also, after installing the gearbox, you need to adjust the gearshift lever
It is important to properly adjust the gearbox and gear lever
It should be remembered that prevention can help avoid repairs and troubles along the way. Taking good care of the gearbox is the key to its long-term operation.
Recommendations from experts
Sometimes the driver is forced to drive a car with a faulty gearbox in order to get to the repair site. But how to turn on the speed if the clutch is faulty or the synchronizer is worn out?
- If first gear does not work, you can carefully move away in second gear.
- If difficulties arise when turning on the engine while the engine is running, you can do this with the engine stopped and then start it. But this method can only be used by experienced drivers, as it can damage the transmission.
- Double squeezing and re-gasping. It is necessary to set the gearshift knob to the neutral position, then press the clutch pedal, and lightly press the gas (up to 2500 rpm according to the tachometer). After this, you need to slow down and disengage the clutch again, and then engage the gear. If this does not work, then you need to repeat all the operations again. While driving, experienced drivers know how to change gears without a clutch mechanism.
- When engaging reverse, the lever may not reach all the way. Then you need to slightly release the clutch pedal, the gear will turn, the teeth will engage, and the handle will reach the end.
- After pressing the pedal, it is recommended to wait 3 seconds and then engage reverse gear.
- You can try turning on the reverse by first setting the handle to 4th, then to the rear.
- Repeatedly squeezing the clutch and returning the gearshift lever to neutral sometimes also helps solve the problem.
How to determine the cause?
At the first stage, the motorist needs to make sure that it is the controller that is damaged, and not the lamp or fuse. Therefore, you need to check the integrity of the fuse. On the “ten” it is located in the mounting block, directly under the dashboard. The switching device is designed for 7.5 A and is installed at No. 19. Then you need to check the light bulb and wires. If everything is in order with them, then you need to move on to checking the controller.
Before replacing the device in question, you need to determine its location.
To find the sensor you need to:
- drive onto the overpass;
- pay attention to the gearbox. On the left side of this assembly is the reverse controller;
- in this place there is only one sensor with wires from the gearbox. The motorist will not find any other elements in this unit.
Thus, finding the element you are looking for will not be difficult. But before replacing it, you need to make sure that there is no loss of performance.
To do this, you need to perform a number of actions:
- disconnect the terminal from the controller;
- use a multimeter, having previously turned it on in resistance measurement mode;
- connect a multimeter to the controller connectors;
- engage reverse gear;
- start the power unit.
Next, you need to act based on the readings of the device. If the resistance corresponds to 0, then everything is in order with the sensor. If the measuring device shows infinity, then the controller needs to be changed.