Print this article Font size 16
Any car intended for public roads has a reverse gear. It allows you to drive the car in reverse. In order for other road users to know about your intentions, the corresponding signals - the reversing lights - must be activated on the rear optics.
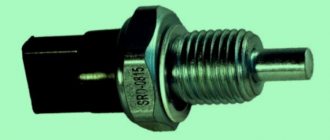
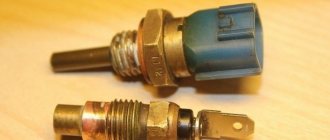
Reverse sensor for VAZ 2110
It is in this case that the reverse sensor on the VAZ 2110 comes into play. It transmits information, the voltage to the lights is turned on, thereby the drivers around you see that you are about to reverse. For safety purposes, having a working reverse sensor is incredibly important.
Where is the reverse sensor located on the VAZ 2110?
Any car intended for public roads has a reverse gear. It allows you to drive the car in reverse. In order for other road users to know about your intentions, the corresponding signals - the reversing lights - must be activated on the rear optics.
Reverse sensor for VAZ 2110
It is in this case that the reverse sensor on the VAZ 2110 comes into play. It transmits information, the voltage to the lights is turned on, thereby the drivers around you see that you are about to reverse. For safety purposes, having a working reverse sensor is incredibly important.
Principle of operation
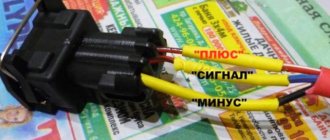
Connection
This regulator works more than simply:
- You shift the gear stick to reverse;
- Simultaneously with turning on the reverse speed, the shift fork is pressed against the sensor;
- A wire short to ground is created;
- The light turns on, indicating that the car is starting to move in reverse.
Symptoms of malfunctions
Of course, it is very easy to suspect that the reverse sensor is not working - when you engage reverse gear, the lights do not light up.
In such a situation, there are only three options for the development of events:
- The light bulb itself has burned out, so the element itself may be intact.
- The power fuse has stopped working. It’s not uncommon for him to simply burn out.
- The sensor itself does not work. This does not happen so often, but you will have to check its condition.
Is it because of the sensor?
Indeed, how can one determine that it is the one that has failed and not a fuse or light bulb that has blown? Everything is quite simple.
- You will have to remove the fuse and check it for integrity. For a VAZ 2110 car, it is planned to install a fuse number 19, the rated current of which is 7.5A. It is located in the mounting block, and the mounting block is under the dashboard.
- Check the condition of the lamp. If everything is fine with it too, then there is only one option left - the reverse sensor has broken.
How to determine the cause?
At the first stage, the motorist needs to make sure that it is the controller that is damaged, and not the lamp or fuse. Therefore, you need to check the integrity of the fuse. On the “ten” it is located in the mounting block, directly under the dashboard. The switching device is designed for 7.5 A and is installed at No. 19. Then you need to check the light bulb and wires. If everything is in order with them, then you need to move on to checking the controller.
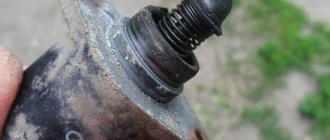
Before replacing the device in question, you need to determine its location.
To find the sensor you need to:
- drive onto the overpass;
- pay attention to the gearbox. On the left side of this assembly is the reverse controller;
- in this place there is only one sensor with wires from the gearbox. The motorist will not find any other elements in this unit.
Thus, finding the element you are looking for will not be difficult. But before replacing it, you need to make sure that there is no loss of performance.
To do this, you need to perform a number of actions:
- disconnect the terminal from the controller;
- use a multimeter, having previously turned it on in resistance measurement mode;
- connect a multimeter to the controller connectors;
- engage reverse gear;
- start the power unit.
Next, you need to act based on the readings of the device. If the resistance corresponds to 0, then everything is in order with the sensor. If the measuring device shows infinity, then the controller needs to be changed.
Where is it located and how to check it
To begin replacing the reverse sensor on a VAZ 2110, you must first determine its location.
Device location
But really, where is he? There is nothing difficult in finding this element.
- You will need a trestle or pit. One way or another, you should end up under the car.
- Now look towards the rear wheels of the car and raise your eyes to the gearbox. To the left of it is your desired sensor.
- Can it be confused with other devices? Hardly. Only for this element is provision for wiring from the gearbox. Therefore, you definitely won’t find other similar devices nearby.
Let's start checking. We need to make sure that the sensor has failed, and that replacing it will actually produce results.
To check, do the following:
- Disconnect the terminal from the meter;
- Connect a multimeter to the connectors and turn it on in resistance measurement mode;
- Put the gearbox in reverse mode;
- Start the engine;
- Look at what the device produces;
- If the device shows a resistance of 0 Ohm, plus a beep sounds, then everything is fine, the sensor is working;
- It's bad if the meter shows infinity. This indicates that the sensor has served its purpose and needs urgent replacement.
Location and details of checking the sensor
Many novice car enthusiasts do not know where the reverse sensor is located. In fact, everything is simple here. It is necessary to drive the car onto an overpass (pit) and go under it.
A sensor will be installed on the left side of the gearbox (looking towards the rear wheels of the car).
It is very difficult to confuse it with any other unit, because only this element of the gearbox has wires. Now let's move on to the verification.
The sequence of actions is as follows:
- Discard the terminal from the sensor;
- connect a multimeter to the connectors and set the switch to measure resistance;
- move the gearshift knob to the reverse gear position;
- turn on the ignition;
- look at the multimeter readings.
If the display shows a resistance of 0 Ohm and the beeper rings, then everything is normal. If the multimeter shows infinity, then the VAZ 2110 reverse sensor needs to be replaced.
Replacement
Should I rush to replace the reverse sensor? And how. After all, this device ensures traffic safety on the road. If other motorists do not know about your intentions to back up, then accidents and collisions cannot be avoided. You need to think not only about yourself, but also about others.
We take out the plug
The procedure for replacing the reverse sensor on a VAZ 2110 does not involve anything complicated. Even a car owner without much experience and skills can handle it.
By following the step-by-step instructions, you can quickly and efficiently change the meter and continue driving in a fully functional car.
- Clean the unit of any accumulated dirt, as during removal, all this debris can get into your gearbox oil. Nothing good will come of this, so think about the safety of the checkpoint.
- The machine is placed on a pit or overpass. Again, you need access to the bottom.
- Remove the crankcase protection. This is done by unscrewing several fasteners.
- Take a small container into which the lubricant will be poured. The fact is that when you remove the sensor, a small amount of oil spills out along with it. It’s unlikely that you want it to end up on the floor, under your feet.
- Disconnect the wiring from the reverse sensor.
- Unscrew the meter from its seat.
- Clean the socket a little so that the new unit fits well into its new place.
- Place the purchased high-quality reverse sensor in place of the old one that has served its purpose.
- Add the required amount of oil. Just see how much lubricant has leaked out and pour the same amount back in. Although the oil level may be lower than expected as a result of operation. Take appropriate measurements to determine the missing amount of gear lubricant.
- Return all wires to their original places. If you have problems finding the location of the connections, mark them when disconnecting the wires. Although it is actually difficult to get confused there.
- Check the functionality of the new reverse sensor.
If all the manipulations were performed correctly, you made sure that the fuse and the light bulb are working, then a simple procedure for replacing the reverse sensor can return the functionality of the gearbox to its previous level.
With a careful approach, even for a beginner, such repairs will take a maximum of 30 minutes. You don’t have to spend a lot of time, and even more so, you can get by with minimal financial costs compared to going to a car service.
Let's hope that now the sensor will work for a long time and effectively, and your maneuvers on the road will always be safe and understandable for surrounding road users. Plus we wish the same for the motorists and pedestrians already around you.
Source
Precautionary measures
Household gas is very dangerous. The main threats posed by propane are:
Reminder about domestic gas
- Fire hazard.
- Unsuitable for breathing.
- Explosion hazard when the maximum concentration of propane in the air is reached, as well as when the temperature in a closed volume rises sharply.
- During a gas leak, the temperature drops sharply and frostbite is possible.
To preserve the life and health of people and their property, precautions should be taken:
Read also: The height of the mirror above the dressing table
Rules for using gas
- Avoid proximity to open flames and heat sources.
- Avoid the presence of other flammable materials in the work area.
- Eliminate the presence of nitrates and perchlorates near gas equipment due to their chemical activity.
- Do not use the reducer for a propane cylinder if it is damaged or leaking.
How the system works
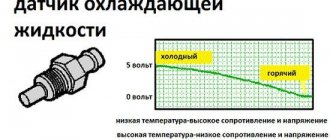
The sensor itself is a limit switch with normally open contacts. Under external influence, the contact group begins to move and closes. A special feature of this device is its aggressive operating conditions, as it is located in the engine compartment. That is, the electrical part must be sealed and protected from vibration.
The body of the device is metal, on one side there is a movable rod with an oil seal, on the other there is a contact group. The connection between the plastic dielectric and the metal main body is protected against the penetration of liquids.
The sensor is screwed into the gearbox in a strictly defined place. When moving the mechanism (scene) for engaging reverse gear, a special protrusion sets the sensor rod in motion. The contacts close and current can flow through the wires.
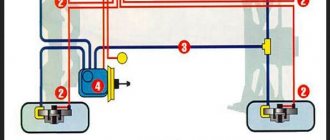
What the car electronics do next:
- activates the relay coil for turning on the reverse lights;
- gives a signal to turn on the parking assistance system;
- when a rear view camera is installed, it supplies power to it (again, through a relay).
The return spring is located inside the housing. After the impact on the rod has ceased, that is, the reverse gear has returned to a state of rest, the contact group returns back and opens. All involved electrics are switched off:
- The reversing lights go out;
- rear parking sensors are disabled;
- The rear view camera turns off.
Advice: If you install additional electronics on a VAZ 2110 or 2112, such as parking sensors or a rear view camera, then it is not recommended to connect to the contacts of the reversing lights.
It is better to find the primary circuit from the sensor using the electrical diagram of your car, and route this signal to a new device. Of course, you should use a relay rather than connecting the device directly. A fuse must be added to the circuit.
Where is the reverse sensor located on a VAZ 2110 car?
As already mentioned, this element is installed in the gearbox. This is logical: there is no need to install remote control rods. Why not on the gearshift lever? The sensor must record exactly the moment the gear is engaged, and not the change in the position of the control mechanisms. The exact location is the gearbox housing.
You can only find it while under the car: either in a hole or using a lift. It is screwed into the crankcase in the same way as an oil drain plug: using a threaded connection. The sensor is located horizontally, on the side wall of the gearbox, on the driver's wheel side. A connector and a signal wire are connected to it: there is no other such device in this area.
Common problems with brake lights
There may be several reasons:
- blown fuse;
- faulty sensor;
- frayed or broken power cord.
The most common cause is a blown fuse responsible for protecting the signal light circuit. This fuse is located on a block built to the left of the steering column. This capacitor can withstand a current of 7.5 amperes, as evidenced by the inscription on it. It is located in the bottom row, fourth from the right edge.
If after replacing this circuit element the problem has not been resolved, other possible causes of failure should be considered.
The next troubleshooting point is to check the brake light sensor. To do this, you need to check whether voltage is entering and exiting the sensor. In this case, you need to use a control lamp. If the lamp does not light up when connected in front of the sensor, then the problem may be in the wires going to the sensor. If the lamp works before the sensor, but not after, then the problem lies in this part. You can also simply disconnect the input and output of the sensor and close it “directly” using a copper wire; if after these manipulations the lights in the brake lights light up, then the reason is precisely in the sensor. The sensor cannot be repaired, and the only way out is to replace this part with a new one.
Why does the reverse gear sensor break?
Any moving mechanical system is designed for a certain number of cycles of use. Therefore, this device has a service life and can break simply due to mechanical aging.
Important: The cause of the reverse lights going out may not be the sensor at all. No one is immune from light bulbs burning out or wiring being broken. The failure may be in the control relay or in the safety unit.
We will look at the reasons relating specifically to the sensor:
Symptoms of a malfunctioning reverse sensor
Actually, they boil down to:
- No signal from the sensor. That is, when reverse gear is engaged, lights with known good lamps and wiring do not light up.
- Functional rear parking sensors are not activated.
- The rear view camera does not turn on when the equipment is in working order.
Information: If several devices activated by the reversing sensor suddenly and simultaneously stop working, it is the one that needs to be replaced. Searching for other problems is pointless.
Wiring test for non-working brake lights (ground test)
Let's look at the basic diagram: the brake lights and the reversing lamps have a common ground pin. If contact with this pin is broken, the reverse lamps will not turn on. Well, brake lights too.
On the left side there is a connector through which the wiring goes to the fifth door. The connector has black and red wires. Check the voltages on them. Most often the ground on the black wire does not ring. But maybe the connector itself needs to be cleaned.
Usually, if the ground breaks, another pin is used - the one that is connected to the glass heating coil.
If the “plus” does not come to the red wire, we check the “frog”. It's simple here:
- Disconnect the connector with two wires from the limit switch;
- Using 17mm wrenches, loosen the two nuts: holding the lower nut, rotate the upper one;
- The end switch is removed as an assembly and checked with an ohmmeter.
By the way, one of the connector terminals receives a voltage of “12 Volts”. Check it!
If all the steps do not lead to results, there is only one thing left: contact a qualified electrician. We wish you success.
Sensor diagnostics
First of all, an external inspection is carried out. We check the integrity of the wiring and the condition of the contact group. It is better to test the wiring with a multimeter from the removed connector to the nearest input into the car's distribution contact box. Next, we test the sensor itself:
- We put the car on a pit or on a lift.
- Disconnect the connector and move it to the side.
- Turn on the ignition without starting the engine.
- We connect the multimeter probes to the sensor and ask an assistant to engage reverse gear.
- A working sensor will show zero resistance between the contacts.
If the test fails, the sensor must be removed from the transmission. In this case, some of the transmission oil will leak out of it, so it is better to prepare a plug in the form of a bolt with the same thread or temporarily screw in another sensor.
Tip: Do not throw away the broken sensor; it may be useful for temporarily closing the hole.
After washing the outside of the housing and cleaning the contacts, you can check the sensor with the same multimeter. The pressing force on the rod is small, provided that it is not blocked by corrosion. Therefore, just press it with your finger and look at the results of measuring the resistance.
Join the discussion
You can post now and register later. If you have an account, log in to write on your behalf.
Reply to topic...
× Pasted as formatted text. Paste as plain text
A maximum of 75 emoji are allowed.
× Your link has been automatically embedded. Display as link
× Your previous content has been restored. Clear editor
× You cannot paste images directly. Upload or paste images from the link.
×
- Computer
- Tablet
- Telephone
Replacing the sensor
How to choose a new sensor instead of a broken one? In fact, nothing complicated: just don’t buy products from counterfeit manufacturers. Given the availability of packaging technologies, it will not be possible to determine authenticity on your own. Therefore, the only “recipe” is to visit AvtoVAZ brand stores.
When replacing the sensor, you must follow certain steps:
- Before installing a new sensor, you must wait until the gearbox oil drains and clean the threaded hole.
- Be sure to check the sealing washer; without it, oil will leak out of the box.
- After tightening the sensor in the gearbox housing, add oil to the standard level.
- The final touch - before connecting the connector, lubricate the contacts with a special anti-corrosion compound.
Thus, the installation of the sensor will be successful.
Which sensor should you choose? What analogues are there?
A new one costs about 900 rubles for the original and 150-600 rubles for analogues. FAE sensor has proven itself well , costing about 450 rubles. It lasts a long time, I've had it for a year and a half now. If in doubt, take the original.
Cheap “frog” stops are made by the well-known company LOGEM . More precisely, he doesn’t do it, but takes away the rejects from the Renault plant. Their sensors look like original ones, or rather they are original, only defective. They last from two weeks to one and a half months and can be replaced. Unfortunately, they cannot be distinguished from the original. The only thing that gives them away is their cheap price of 150-180 rubles. I do not recommend purchasing!!
Z.Y. Alternatively, you can try to repair it, as described here.