Replacing the coolant temperature sensor is necessary for the correct operation of the engine cooling system. First, it’s worth understanding what a coolant temperature sensor (hereinafter referred to as DTOZH) is and what functions it has.
Coolant temperature indicator sensor as an element of the cooling system
The cooling system is a set and coordinated interaction of devices that supply coolant to hot areas and remove excess heat outside. It constantly maintains the optimal thermal conditions of the parts, adjusting the indicators through the control unit under different operating conditions of the motor.
Deviations in the direction of excessive cooling are also unacceptable. Under such conditions, the fuel mixture, interacting with the cold walls, condenses on them and flows into the crankcase, contaminating and diluting the oil. Low temperatures cause an increase in oil thickness, making it difficult to supply it to the cylinder, which again negatively affects the operation of the engine.
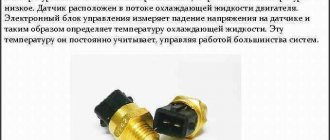
The coolant temperature sensor (CTS) is the informational and signaling part of such a system. With its help, data is transferred to the ECU about temperature changes during the heat exchange process. There, the operating parameters of the engine are determined and decisions are made to regulate it.
Operating principle and functions of the device
The design and operating principle of the temperature meter have changed little since its first use on a car. Due to modern materials used in the manufacture of the sensor, it has decreased in size, and the accuracy of the readings has increased. The device is a thermal variable resistor enclosed inside a metal case with a threaded tip . When heated, the thermoelement reduces the resistance of the electrical circuit, which allows the electronic control unit (otherwise known as the controller, ECU) to determine the temperature of the coolant.
The following functions depend on the operation of the temperature sensor:
- Traditionally, the coolant temperature indicator operates from meter signals.
- Timely activation of forced engine cooling fans when the antifreeze reaches the set temperature threshold (about 100 °C).
- Enriching the air-fuel mixture and increasing idle speed on a cold engine.
- While driving, the controller collects readings from all sensors and, on this basis, forms the ratio of fuel and air in the mixture. The temperature meter is also involved in this process.
The design of a modern car may provide for the installation of several heating meters responsible for certain functions. Their location varies:
- on the upper pipe leading from the cylinder block to the radiator;
- in the thermostat housing;
- in the cylinder head;
- directly into the radiator.
It is not difficult to distinguish thermocouples from other types of sensors . All devices built into the engine cooling system and connected by wires to the controller are designed for temperature measurements. The only point: when you start looking for the location of the temperature meter for the purpose of checking, do not confuse the device with the knock sensor built directly into the cylinder block. When a machine has several thermal elements, their functions are usually distributed as follows:
- a meter built into the pipe is involved in preparing the fuel mixture for the engine;
- a device located in the radiator ensures that a cooling fan (or two) is turned on;
- The sensor in the cylinder head is responsible for the coolant temperature gauge.
Most low- and mid-price cars use one temperature sensor that performs all functions simultaneously. Usually it is located on the thermostat housing or on the upper radiator pipe .
What is DTOZH
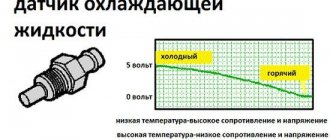
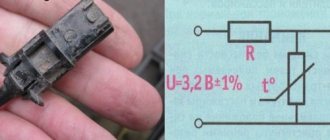
Modern sensors are thermistors, with a semiconductor whose resistance easily changes with temperature fluctuations. An increase in t entails an increase in the number of free electrons in the semiconductor material, which is the reason for the drop in resistance. Those. has an inversely proportional relationship, with a negative coefficient. The initial resistance corresponds to a voltage of 5V. As the engine heats up, the resistance drops to 0, and vice versa, when the engine is cold, it is maximum. Deviations from this parameter are recorded by the ECU.
The semiconductor resistor is placed in a metal case with high thermal conductivity. There is also a threaded mount and an electrical connector for connecting to the on-board computer.
The device is miniature, built into the output line of the cylinder block, or rather, its head. It simply screws into a hole specially designated for it. In different car models, it may be located in or near the thermostat. The main thing is that there is contact with coolants.
To obtain the most accurate information about temperatures, an additional sensor is installed at the radiator outlet.
What is it, where is it located and why is it needed in the car?
DTOZH is a device that is necessary to measure the temperature of the coolant in the engine. All indicators of the device are stored by the engine control unit, and the amount of incoming fuel and the ignition timing are automatically regulated.
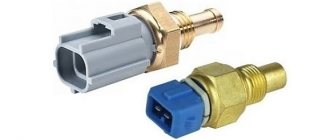
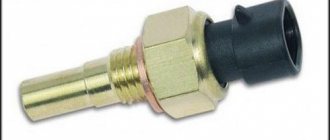
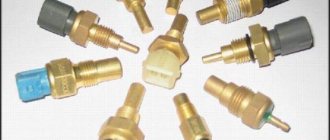
Did you know? The DTOZH, regardless of the make of the car, is absolutely identical in appearance, so it is almost impossible to confuse it with any other part.
For most cars, DTO indicators are displayed on the dashboard.
Modern DTOZh have wide functionality and a very low probability of breakdown. Such devices are also called thermistors; they can very quickly adapt to temperature conditions, changing the resistance data.
Typically, thermistors are made of nickel or cobalt - semiconductors, due to which, as the temperature increases, free electrons increase significantly and the resistance decreases as much as possible. The device has a protective shell that conducts heat well, the body is equipped with an electrical connector and fastening thread.
Learn how to check the density of coolant fluids.
The device may have the following effects on an internal combustion engine:
- enrich the warm air mixture. If the device determines that the temperature is below normal, it adjusts the duration of the signals to enrich the fuel mixture. When the temperature takes the required values, the fuel becomes depleted, the possibility of excessive fuel consumption is reduced and the amount of exhaust is reduced;
- set the ignition and make it late or early. As the temperature rises, the device is able to adjust the ignition timing to reduce exhaust toxicity;
- influence the proper recirculation of gases during the warming up of the car;
- promotes purging of the filtration system that captures fuel vapors;
- blocks the gearbox torque converter while the engine is warming up;
- activates and deactivates the engine cooling fan, according to the temperature controller, selecting the optimal temperature.
The thermistor may have:
- negative temperature coefficient indicators, when maximum resistance is possible only with a cold engine;
- positive indicators of the temperature coefficient, which is characterized by an increase in resistance if the temperature increases.
The location where the sensor is installed in your car may vary depending on the brand. Most often this is the top of the radiator, the cylinder head, or the thermostat housing.
Important! Wherever the sensor is installed, an outlet hose is fixed next to it, which is the conductor of the coolant into the radiator.
What is the sensor for?
The sensor reads the temperature of the fluid in the cooling system and transmits this data to the ECU (electronic control unit). And based on this data, the on-board computer maintains the optimal temperature regime for the engine (which is about 80–90 degrees Celsius). That is, the ECU “understands” when it is necessary to slow down the fan and increase the engine temperature (when warming up), and when, on the contrary, it is necessary to reduce the temperature as quickly as possible and prevent the coolant from boiling. Thanks to this, the motor will definitely not jam, and the wear of its mechanical parts will be minimal (for example, if overheated, the same rings will quickly “burn out”).
Maintaining the correct temperature is also important for maintaining the correct viscosity of the engine oil. Only in this case will the motor be able to operate at full power, but without accelerated wear.
If the temperature sensor is faulty, then the ECU receives incorrect information. Accordingly, when the engine is cold, it can force the fan to turn on “full,” which will only complicate warming up the engine. Or vice versa: if it overheats, the fan will not work at all, which may result in engine failure without the possibility of further repair (if it jams, not only the cylinder block is damaged, but also the camshaft, crankshaft, and in some cases the flywheel).
How does DTOZh affect the operation of the internal combustion engine?
Based on the parameters supplied to the control device, the module performs the following functions:
- Enrichment of the air-fuel mixture or its depletion. If the controller detects that the temperature is too low, it will begin to increase the duration of the signal sent to the injectors, which helps to enrich the fuel mixture. In accordance with the normalization of the temperature regime, the fuel is gradually depleted, which prevents possible excessive consumption of gasoline and reduces the volume of exhaust gases. If the sensor breaks down, it can regularly lower the temperature in the engine, which will lead to fuel contamination and increased consumption.
- The control unit sets the ignition. It can be early or late. If the temperature increases, the control module adjusts the ignition timing to reduce exhaust toxicity.
- Thanks to DTOZH, proper recirculation of gases is performed during warming up. The recirculation valve closes tightly when the power unit warms up. If the car’s engine is still cold, then recirculation will cause fluctuations in idle speed and random engine stops.
- With the help of DTOZH, the control unit purges the filtration system, which traps fuel vapors. To achieve better machine controllability, the carbon filter element is not purged until the engine is completely warmed up.
- Locking of the gearbox torque converter when the internal combustion engine warms up. The control module should not limit the operation of the device until the machine warms up.
- The ECU controls the operation of the unit's cooling fan. Based on the temperature controller readings, the module activates and deactivates the ventilation device to correctly select the temperature of the unit. If the DTOZ gives incorrect impulses, there is a possibility of the motor overheating.
Overview of types of DTOZH: design and principle of operation
Let's take a closer look at the operating principle and types of controllers.
Magnetic
Such controllers consist of coils located on the sides of a steel armature. The arrow of the controller located on the instrument panel in the cabin is connected to the latter. The first coil is connected to the vehicle's on-board network, and the second to a cable with varying resistance. This parameter changes according to the temperature values in the engine. The voltage passing through the coils creates a magnetic field that controls the armature. The element displacement parameter is determined by the field difference depending on the current value.
User Irimiya Evgeniy showed in his video how unstable the DTOZh is.
Bimetallic
The operating principle of bimetallic controllers is based on the expansion of elements during heating. The device is equipped with a rod that changes size as the temperature of the internal combustion engine increases. The stripes in the coil rotate the arrow on the control panel in the car's interior in accordance with the current value.
Modern antifreeze temperature sensors can use two types of sensors:
- semiconductor;
- bimetallic.
The latter are practically not used today. The strip in such controllers moves to the coil and opens the contacts, helping to change the amount of current flowing to the dashboard. And semiconductors are used everywhere. The control unit supplies a signal to the device thermistor with a negative coefficient through a resistive element with constant resistance. As the temperature increases, the resistance in this circuit drops. Accordingly, the voltage level decreases. The control module detects a decrease in this parameter and determines the temperature of the consumable material, displaying it on the control panel with an indicator.
Capillary
It is considered the oldest and irrelevant type of sensor for use today. The arrow on the device is directly connected to the device. The controller is made in a housing in the form of a container with consumables, which has a low boiling point. The reservoir is connected to a pointer as well as a steel tube. When the power unit warms up, the refrigerant in the container begins to boil and evaporate, resulting in an increase in pressure in the flask. This parameter is sent to the pointer where the Bourdon tube is located. This element begins to straighten as a result of pressure and moves the arrow on the control panel.
This type of controller is almost never used for several reasons:
- the measuring element itself runs through the entire engine compartment, connecting to the tube on one side and to the control panel on the other;
- The capillary tube is quite thin and is quickly damaged during operation.
Photo gallery “Varieties of DTOZH”
Diagrams of different types of sensors are shown in the photo.
Magnetic type DTOZH
Bimetallic sensor
Capillary sensor circuit
Where is the coolant temperature sensor located?
In 99% of cases, the sensor is installed on the exhaust pipe of the cylinder block. This is the place where the coolant “leaves” the engine (that is, it is at the highest possible temperature) and then enters the radiator. In some modern cars, 2 controllers are installed: on the outlet and inlet pipes (for more precise temperature control). The sensor itself is connected to a cable (of 2, less often - 3 wires).
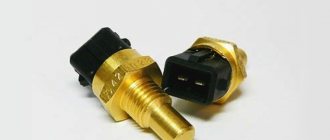
Visually, the DTOZH looks like a plastic “plug”, with a metal thread and an additional contact pad at the end. It must be taken into account that the sensor is in direct contact with the coolant. Accordingly, if there are signs of engine overheating, then you should not pull it out (which is necessarily indicated in the technical instructions for the car).
Video: where is the temperature sensor located, how to replace the DTOZH
Two-color LED temperature indicator on two transistors
The blue LED indicates a lower temperature, the red LED indicates a higher temperature. A decrease in temperature entails an increase in the resistance of thermistor Th1. This increases the voltage at the base of transistor VT2, which in turn opens it. Opening VT2 turns off transistor VT1. As a result, LED HL1 lights up, but LED HL2 doesn't light up.
As the temperature rises, the thermistor resistance decreases and the voltage at the base of VT2 decreases. VT2 is closed. Current begins to flow to the base of VT1 through R2, as a result it opens. This causes the HL2 LED to light up. Since both LEDs share a common current-limiting resistor R1, and the red LED HL2 has a lower voltage drop than the blue LED HL1, the blue LED will not light. This eliminates the need for any additional transistors for the HL1 LED.
If the HL1 LED does not have a high enough voltage drop, this can be solved by connecting a diode in series with it, for example 1N4007. Potentiometer R3 sets the threshold temperature. If you cannot set the desired temperature, you may need to change the value of R3 or R4.
Causes of failure of the coolant temperature sensor
Structurally, the coolant sensor is quite simple, and accordingly, it rarely fails. Usually this happens simply due to its old age or mechanical damage. For example, corrosion of contacts and metal parts of the case may occur due to the fact that instead of antifreeze or antifreeze, ordinary water was poured into the cooling system (and even more so if this water is “hard”, that is, with a high content of metal salts). Also, the reasons for the failure of this device may be:
- Hull damage . This can be expressed in various aspects. Often, leaks of coolant are visible, which flows from the threads of the sensor or its housing. Also, the electrical contacts and/or the thermistor itself may be damaged, which will produce an incorrect signal.
- Oxidation of contacts . Sometimes situations arise when, under the influence of fumes or simply from old age, the contacts on the sensor oxidize, so the electrical signal does not pass through them.
- Damage to the chip . In some cases, due to mechanical damage, the so-called “chip” may fail, that is, a group of contacts that is connected to the coolant temperature sensor. Simply put, the wires at the base of the connector fray. According to statistics from reviews found on the Internet, this is one of the most common malfunctions that occurs with the sensor and the corresponding system.
- Lost electrical contact inside the sensor . In this case, unfortunately, repair is hardly possible, since usually its body is sealed and does not allow access to the insides of the DTOZH. Accordingly, in this case the sensor only needs to be replaced with a new one.
- Violation of wire insulation . In particular, we are talking about the power and signal wires that go to the sensor from the electronic control unit and back. The insulation can be damaged due to mechanical stress, abrasion, or even simply from old age, when it “peeles” in pieces. This is especially true for those machines that are operated in conditions of high humidity and sudden changes in ambient temperature.
If it is possible to simply clean the body/threads/contacts of the sensor, then to restore its normal operation it is enough to carry out the appropriate measures. However, if the housing is damaged and/or the internal thermistor is damaged, then repair is hardly possible. In this case, you just need to replace the sensor with a new one. Its price is low, and the replacement process is simple and will not take much time and effort even for novice car owners.
Causes of malfunctions
DTOZh breakdown rarely bothers motorists due to its simple design. But there are still enough reasons for failure. The use of low-quality antifreeze and motor oil leads to the destruction of the surface of the DTOZH. The sensing element of the sensor may become covered with sediment in the form of crystals. The reason may also lie in a manufacturing defect. You should not buy DTOZH at flea markets and various cheap auto parts markets. DTOZH purchased on such a market will often not meet the declared parameters and the slightest damage will lead to sensor failure. An antifreeze leak can cause the gasket to wear out. A voltage surge in the on-board power supply and corrosion of contacts can also cause sensor failure.
Signs of a malfunctioning coolant temperature sensor
Coolant temperature meter test
Now that you have installed ECT on your vehicle, you are ready to test it.
- Disconnect the sensor electrical connector.
- Obtain engine surface heating values using an infrared thermometer or a suitable cooking thermometer. Measure the engine temperature at a location near the ECT.
Before we move on to the next step, let's digress here for a second:
Okay, at this point you may be wondering why you would need to measure engine heat to troubleshoot a faulty meter. The main reason is that you are trying to check two common potential faults here: the ECT sensor and the thermostat.
Engine temperature indicator: features
Let's start with a common situation. Let’s say that a car has a standard dial temperature indicator, but on such devices the scale may often not have calibrations, and the engine operating temperature needle in the middle position displays the real picture only conditionally.
At the same time, during operation, the driver notices that if the middle on the scale is the norm, then in various situations the needle can rise noticeably higher (for example, in traffic jams). It would seem that the motor is overheating.
Naturally, the movement of the car immediately stops, the owner hurries to turn off the engine and open the hood. However, upon inspection of the unit, there are no signs of coolant leakage. Then the device is restarted and it turns out that the radiator fan does not even turn on, although the device is operational.
When you feel the upper radiator pipe has an acceptable temperature, antifreeze does not “press” anywhere, the lower pipe may be completely cold, etc. Further checking the coolant level and the condition of the antifreeze/antifreeze itself also shows that the cooling system fluid is normal, the interior heater (stove) is working normally, there are no air pockets in the system, and the pump is also working.
It also happens that if you let the engine cool completely, then start the engine and warm up the power unit to operating temperatures, this process can take a long time (judging by the indicator on the instrument panel). In this case, you can notice that although the needle has only risen a little, the radiator fan is already working, the lower radiator hose is warm, etc.
If we consider that everything is in order with the fan and cooling system, then the signs described above indicate a large error or problems with the engine temperature gauge. It is quite obvious that in such a situation it becomes difficult to understand when the engine reaches operating temperatures, whether the internal combustion engine is overheating, how long it is necessary to warm up the engine before driving, etc.
At the initial stage, many drivers begin to look for the cause. Some right away:
Currently reading
Tubeless tire repair kit: how to “heal” punctures?
Winter starting a diesel engine: how to start it correctly...
- flush the cooling system
- change coolant and thermostat
- the standard temperature sensors on the engine and in the dashboard are checked;
- wiring is ringing, etc.
In some cases, the problem can be solved, while in others, it is still not possible to achieve correct operation of the standard temperature indicator. The fact is that often the culprit is control electronic modules that give a certain failure.
Replacing such modules is expensive and impractical. In this situation, a quality solution is a digital engine temperature indicator. Such an electronic sensor has a very reasonable cost (on average, from 15 to 55 USD), and is relatively easy to connect and install. The range of measured temperatures is also very wide (on average, from -65 to +240).
Please note that installation features may differ slightly on different types of internal combustion engines.
- The device is usually powered from the ignition switch.
- The digital panel is installed in a convenient place inside the car.
- As for the sensor itself, for accurate readings it must be immersed in coolant.
In other words, the device must be screwed into the block or cut into the pipe. To do this, some drivers replace the standard temperature sensor by simply screwing in a new one instead. However, this cannot be done on cars with an ECU for a number of reasons.
The fact is that the controller receives readings about the coolant temperature. In this case, it is necessary to separately install the digital indicator sensor, since it is strongly not recommended to remove the standard temperature sensor from the system.
How to determine a faulty DTOZH?
If the pointer functions correctly and the wiring is intact, plug the sensor back into the circuit, start the engine and warm it up as normal. If, at the same time, readings are stored on the pointer that do not correspond to normal values, or the pointer arrow has not even moved, then the problem lies precisely in the sensor. In this case, you simply need to replace it.
By the way, you can learn about the signs of a malfunctioning coolant temperature sensor by following this link. After reading this material, you will learn in more detail about methods for testing the sensor for functionality, as well as its role in the car engine.
Another way to check the temperature sensor
There is another way to check the sensor, your actions should be as follows. First of all, you need to disconnect the negative terminal from the car battery and drain the antifreeze from the engine so that the liquid does not spill after removing the sensor.
Next, you need to remove the sensor from the engine and test it with an ohmmeter. One contact must be attached to the sensor contact. The second terminal of the device must be closed to the DTOZH housing. The ohmmeter reading at normal temperature should be about 700-800 Ohms.
Try checking the sensor in other conditions, for example, by immersing it in hot (about 70-80 degrees) water: in this case, the resistance will be less. It's also worth testing it in cold water, where resistance will naturally increase. If the ohmmeter readings at given temperatures differ from normal values, or there is no decrease or increase in resistance when the sensor is heated and cooled, then this is the problem - it should be replaced. Otherwise, you need to look for a fault in the indicator or the wires going to it.
We recommend watching a useful video about checking the coolant temperature indicator and sensor. In this video you will learn where the pointer sensor is located, how to check it, and also determine what exactly is the problem in the pointer sensor itself or the instrument panel, be sure to watch:
What symptoms indicate problems with the sensor?
During long-term operation of the car, obvious and indirect signs may be observed indicating problems with the temperature sensor or its electrical circuit. The first ones directly indicate the need to check the functionality of the device:
- The engine heating indicator on the dashboard stopped working;
- the cooling fan stopped turning on, although the engine water jacket had already warmed up to 100 °C;
- antifreeze leakage from under the part body;
- The fan starts at random, including when the engine is cold.
Recommended: Minimum brake pad thickness
If your car exhibits the listed signs of a malfunction of the coolant temperature sensor, then feel free to proceed to diagnosing it and fixing the problem, which will be discussed below. Indirect symptoms may indicate a breakdown of the meter or other elements of the cooling system or power unit. Here are the most common ones:
- Cold starting of the engine is difficult. The car starts, but immediately stalls, you need to make several repeated attempts. The cause may be a thermocouple, throttle position sensor, insufficient compression or ignition problems.
- Unstable operation at idle. In addition to the temperature meter, it is affected by the serviceability of the spark plugs, mass flow sensor, injectors and many other factors.
- The temperature is within normal limits, but the coolant begins to boil. If the thermostat fails or the level of antifreeze in the jacket decreases, then the readings of the device may differ from the real state of affairs.
The serviceability of an electronic temperature meter can be checked at home. If indirect symptoms of a malfunction are observed, the test will help to identify them or exclude them from a number of parts that are “under suspicion.” If you successfully check the problem, you will have to look elsewhere or contact the nearest auto repair shop.
Checking the coolant temperature sensor with a multimeter
- Using an ohmmeter or multimeter, measure the resistance value of the coolant temperature meter by connecting one of the meter leads to one of the terminals on the meter's electrical connector and the other lead to the other terminal on the ECT electrical connector.
On vehicles with older single wire meters, connect the meter leads to the connector terminal and the gauge body (ground) to obtain a reading.
- Check your vehicle's repair manual for the correct resistance value for your ECT. However, not all service manuals have this information.
Most meters of this type have a resistance value of 3000 ohms or more at about 55 °F (13 °C). You can try searching online for a table of resistance values for your specific ECT if you know the brand.
However, if you find resistance values for your specific ECT sensor, continue with these tests anyway; the meter's behavior and temperature readings can give you a clue about its operating condition.
- Record the resistance.
Now you are going to do another test
- This time, start the engine and let it idle.
- Place the transmission in neutral and set the parking brakes.
- Wait about a minute or two and measure the engine temperature and resistance of the meter as you did before.
- Write down this new pair of values.
- With the engine running, wait about one to two minutes and repeat this procedure again.
- Do another pair of readings after a minute or two again, always noting the meanings.
- Then turn off the engine.
Video “How to change the controller correctly”
A visual guide to replacing an antifreeze temperature sensor is described in a video filmed by user Vasily Kalugin.
Do you have any questions? Specialists and readers of the AUTODVIG website will help you ask a question
Was this article helpful?
Thank you for your opinion!
The article was useful. Please share the information with your friends.
Yes (100.00%)
No
X
Please write what is wrong and leave recommendations on the article
Cancel reply
Rate this article: ( 5 votes, average: 5.00 out of 5)
Discuss the article:
Replacing the coolant temperature sensor
You can only replace a failed DTOZ with a similar device.
Required Tools
To complete the task you will need:
- container for collecting waste liquid;
- wrench 19;
- sealant.
Step-by-step instruction
Dismantling and installing the controller is performed as follows:
- Some of the coolant must be drained from the radiator; this will be required to dismantle the sensor.
- Disconnect the connected wires from the device.
- The controller itself is disabled using a 19mm wrench.
- Run device diagnostics if necessary. If you are changing the device, then before installation it is necessary to treat its threads with sealant.
- Screw the new controller into place and connect the wiring to it.
- Fill the cooling system with previously drained antifreeze. Make sure that there is no refrigerant leaking through the unit.
How to check
To independently determine the malfunction of the device, you need to check it: to do this, it is initially recommended to turn off the power to the car by removing the connectors from the battery. Next, you need to drain the coolant to the last drop.
The sensor is disconnected from the car by removing all the wires connected to it - usually this is only one connector. Then unscrew the fastening and remove the DTOZH. The terminals intended for attaching the DTOZH to the car must be connected to an ohmmeter to test the device.
To proceed directly to the test, you need to prepare a shallow container with hot water in which to place the sensor so that the leads are above the surface of the water.
Next, you need to monitor changes in resistance values on the ohmmeter. As the water cools, the resistance decreases, which indicates the serviceability of the unit - if the DTOZH is not working properly, then the readings on the ohmmeter do not change.
Find out what these sensors are responsible for: crankshaft position, parking sensors, rain, coolant level, Hall ignition.
To finally verify that the unit is faulty, it is recommended to compare the ohmmeter readings you obtained during the test with the readings in the table compiled by specialists.
How to check DTOZH: video
[/video]
Recommendations for care and maintenance of sensors
- Strictly adhere to vehicle maintenance schedules;
- Buy parts with original catalog numbers. The exact data is indicated in the instruction manual for your technical device;
- Carry out preventative maintenance, install consumables and spare parts at certified service stations. Relevant while the car is under factory warranty. There are frequent cases of warranty cancellation due to third-party intervention.
- When the first signs of engine malfunction appear, contact a service station.
Performance test
To check the thermal sensor, it will have to be removed from the car. To do this, follow these steps:
- Allow the engine to cool to 40-50 °C to avoid burning your hands during operation. Partially or completely drain the antifreeze from the cooling system.
- Disconnect the battery from the on-board power supply by removing the negative cable.
- Disconnect the block with wires from the thermoelement.
- Unscrew the part using a wrench of the appropriate size.
If the device is installed at the top point of the system, then it is not necessary to empty it entirely; it is enough to drain a third of the liquid into the container. All antifreeze must be drained when the thermocouple is located at the bottom of the radiator.
To carry out the tests you will need:
- a multimeter or other device capable of measuring circuit resistance;
- a small container for water (you can use a regular glass);
- thermometer with a scale up to 100 °C.
A thermometer is essential if you want to make accurate resistance measurements by referring to the reference chart for your vehicle. When there is no table, the serviceability of the part is checked without a thermometer according to its operating principle: the hotter the water in the glass, the lower the resistance at the contacts should be.
Before checking the coolant temperature sensor under heating, test its contacts with an ohmmeter. It may happen that the device has burnt out or has a short circuit. Then further manipulations become meaningless and the element must be changed, since it cannot be repaired.
If the multimeter shows a certain resistance, then immerse the thermocouple in a glass of cold water and record the readings. Then add hot water and watch the resistance change, it should decrease. If there are no changes, purchase and install a new temperature sensor.
If the tests were successful and the device changes resistance when heating the water, then it is worth checking the connecting wires and cleaning the contacts. Little things like this often cause major problems.
Features of checking for VAZ 2110
The “tens” configuration includes two types of engines – 8 and 16 valves. But the features of the DTOZH, location and replacement are identical.
On these VAZ 2110 you can use the Lusar LS 0101 temperature sensor. The car has two coolant temperature meters installed, one near the thermostat and it interacts with the computer, the second on the radiator and transmits data to the instrument panel.
The procedure for checking is the same; resistances at different temperatures are shown in Table 1.
Replacement
Replacing a faulty DVT is very simple.
Step-by-step instruction:
- Wait until the engine has completely cooled down.
- If necessary, drain the antifreeze from the system.
- Disconnect the negative terminal on the battery.
- Disconnect the plug terminal from the sensor.
- Unscrew the element.
Replacement is carried out in the reverse order. After completing the procedure, you need to turn on the ignition without starting the engine. The ECU must read the new part and conduct internal diagnostics. If the cause of the problem cannot be clarified, it is better to contact a specialized service.
The coolant sensor is a very important part of the car. Therefore, for replacement it is necessary to purchase only original spare parts. You can determine the original production of DTOZH by the article number indicated on the packaging. Sensors for domestic VAZ cars are marked with article number 2101-3808600. The originality of models from foreign manufacturers for VAZ cars and foreign cars can be determined from the table below.
You should not install similar components from cars of other models. The electronic circuit may be different, the sensor will produce premature, late, inaccurate data, which will affect the overall performance of the vehicle. Each sensor is assembled taking into account engine volume, its power, and the total volume of coolant in the system.
The cooling system is an important part of car systems. A faulty sensor can affect both the operation of the engine and the integrity of its components. This part is quite cheap in terms of cost. Replacing it will help avoid a number of engine problems, as well as large financial investments.