Why the stove on the VAZ 2107 does not heat well, reasons:
A common cause is an underheated engine.
Signs: The temperature gauge is in the white zone, the engine takes a long time to warm up. At an outside temperature of -20, within 8-10 minutes of idling the engine, it should warm up to 40-50 degrees (the very beginning of the white zone of the temperature gauge). If the temperature rises less, it’s bad (the thermostat is faulty), higher is good. Next, you need to drive in 1-2 gears, and in 5-8 minutes the temperature should rise to 80 degrees (the border of the green and white zones). If the engine has not warmed up to 80, replace the thermostat!
Air in the cooling system.
First of all, you need to check the antifreeze level in the expansion tank and the serviceability of the radiator cap. If the radiator cap is faulty, air will remain in the system, which will result in poor circulation of coolant and, accordingly, cold air in the cabin.
The stove blows poorly to the left
The lower flap is completely open, or its latch is broken. To fully blow the glass, this damper must be closed. If it does not lock, you can use an elastic band, hooking it onto the “choke” handle, or somewhere else.
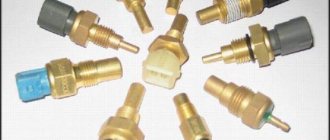
What is a temperature sensor used for?
The main function of the “six” temperature sensor is to control the heating of antifreeze in the engine and display information on the car’s dashboard. However, the functions of such sensors are not limited to this.
The sensor is responsible not only for the engine temperature, but also for the quality of the fuel mixture
In addition, the sensor is connected to the vehicle control unit. Engine temperature data is also transmitted there. And the block, in turn, makes corrections when supplying the fuel mixture to the engine, depending on the temperature obtained. For example, if the engine is cold, then the control unit, based on previously received data, will set a rich fuel mixture. This will make it easier for the driver to start the car. And when the engine warms up, the control unit will make the mixture leaner so that the car does not suddenly stall. That is, not only the driver’s awareness of the condition of the engine, but also fuel consumption depends on the correct operation of the antifreeze sensor.
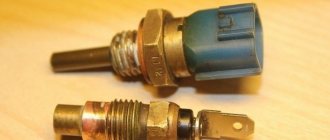
How does a temperature sensor work on a VAZ 2106
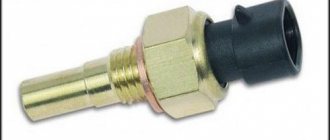
The main element of the sensor is a thermistor. Depending on the temperature, the resistance of the thermistor may change. The thermistor is installed in a sealed brass housing. The resistor contacts are located on the outside of the housing. In addition, the body has a thread that allows you to screw the sensor into a standard socket. There are two contacts on the sensor. The first one connects to the car's electronic unit. The second is to the so-called mass.
The main element of the sensor is a resistor
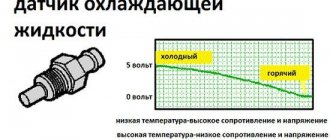
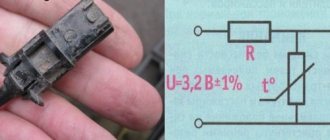
For the thermistor in the sensor to operate, a voltage of five volts must be applied to it. It is supplied from the electronic unit. And voltage stability is ensured by a separate resistor in the electronic unit. This resistor has a constant resistance. As soon as the temperature of the antifreeze in the engine increases, the resistance of the thermistor begins to drop.
The sensor is connected to ground and to the coil of the measuring device
The voltage supplied to the thermistor also drops sharply. Having detected a decrease in voltage, the control unit calculates the temperature of the motor and displays the resulting figure on the dashboard.
Where is the temperature sensor located?
On the VAZ 2106, temperature sensors are almost always installed in sockets on the cylinder blocks.
The temperature sensor on the “six” is usually installed in the cylinder block
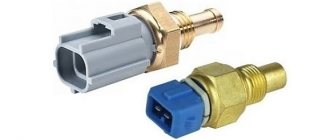
In later models of “sixes” there are sensors installed in thermostat housings, but this is very rare.
In later models of "sixes" temperature sensors can also be located on thermostats
This sensor on almost all cars is located next to the pipe through which hot antifreeze goes into the radiator. This arrangement allows you to take the most accurate temperature readings.
Modification of the VAZ 2107 stove so that it heats better.
As practice shows, the stove radiator gives off a sufficient amount of heat and its improvement is not required. This means that in order to increase the efficiency of the heater, the airflow system needs to be modified. Coat all air ducts with sealant, especially at their connections. This especially applies to VAZ 2105 - 2107 cars, due to their design features of the air ducts.
Replacing the stove motor.
The stove can be improved by installing a snail instead of an engine with an impeller, as used in VAZ 2108-2109 models. This tuning will increase air flow and reduce noise. The motor used in these models differs from the seven in its increased speed and greater power. To install it, a slight modification to the stove body will be required - due to its larger size, it is necessary to remove the comb, which directs the air flow to the feet.
You can leave the original impeller, but you need to enlarge the hole in it with a diameter of up to 7 mm, for the motor shaft from the figure eight.
Such modification of the stove also requires replacing the switch and resistor. Both parts are taken from the same model as the motor. The VAZ 2107 switch is designed for a lower current, and when used with a powerful engine it can simply melt. The native resistance of the VAZ 2107 will not allow the motor to operate at full power, which is why the resistor is changed.
We start by completely disassembling the heater housing. Almost everything is cut off from the bottom of the stove, except for the fasteners and frame. Next, we make the body for the snail. For this purpose, you can use any durable material - polycarbonate, plastic, plexiglass, etc. The four walls of the future body are cut out of the material (that you have chosen) and screwed to the bottom of the stove.
After all the steps done, we put the lower part on the middle one, first remove the diffuser. The dimensions must be adjusted so that the snail fits exactly into the body and does not protrude beyond the radiator mounts located on the middle part.
Methods for checking temperature sensors
If the driver wants to make sure that the cause of problems with the car is the antifreeze sensor, then he will have to carry out a simple checking procedure. But before you start, you need to make sure the integrity of the car wiring. As mentioned above, for the sensor to work normally, it must be continuously supplied with a voltage of 5 volts. To make sure that the supplied voltage does not deviate from this value, you should start the car, and then remove the wires from the sensor and connect them to a multimeter. If the device clearly shows 5 volts, then there are no problems with the wiring and you can begin to examine the sensor itself. There are two verification methods. Let's list them.
Hot water test
The sequence of actions in this option is simple.
- The sensor is placed in a pan of cold water. An electronic thermometer is also placed there (it is much more convenient than a regular one, because the measured temperatures will be quite high).
The thermometer and sensor are placed in a container of water - A multimeter is connected to the sensor (it should be switched so that it measures resistance).
- A saucepan with a sensor and a thermometer is installed on a gas stove.
- As the water heats up, the thermometer readings and the corresponding resistance values given by the multimeter are recorded. Readings are recorded every five degrees.
- The obtained values should be compared with the figures given in the table below.
- If the readings obtained during testing deviate from the table values by more than 10%, it means that the sensor is faulty and needs to be replaced.
Table: temperatures and corresponding resistances, characteristic of serviceable VAZ 2106 sensors
| Temperature, °C | Resistance, Ohm |
| +5 | 7280 |
| +10 | 5670 |
| +15 | 4450 |
| +20 | 3520 |
| +25 | 2796 |
| +30 | 2238 |
| +40 | 1459 |
| +45 | 1188 |
| +50 | 973 |
| +60 | 667 |
| +70 | 467 |
| +80 | 332 |
| +90 | 241 |
| +100 | 177 |
Checking without an electronic thermometer
This method of checking the sensor is simpler than the previous one, but less accurate. It is based on the fact that the temperature of boiling water reaches one hundred degrees and does not rise higher. Therefore, this temperature can be used as a reference point and find out what the sensor resistance will be at one hundred degrees. The sensor is connected to a multimeter switched to resistance measurement mode, and then immersed in boiling water. However, you should not expect the multimeter to show a resistance of 177 ohms, which corresponds to a temperature of one hundred degrees. The fact is that the temperature of water constantly decreases during the boiling process and averages 94–96 °C. Therefore, the resistance on the multimeter will vary from 195 to 210 ohms. And if the numbers produced by the multimeter differ from the above by more than 10%, the sensor is faulty and it’s time to change it.
Causes
If the car takes a long time to warm up or cold air is blowing directly into your cabin, then there can be many reasons - from banal inattention to really serious problems. For this:
- check the thermostat. This may be the reason; if the hoses are hot, it is most likely jammed open;
- The air intake may be closed: check and open manually if necessary;
- gasket: if it is broken, gases from the combustion chamber can flow towards the cooling system. To understand whether this is really the reason, you need to look into the expansion tank in a warm car: if there are bubbles there, the gasket is broken. These bubbles most often can get stuck in the pump and stove;
- check the pipes from the stove. If they are cold, and you have a whole gasket, then you can simply remove the air from the stove. Poor pump flow is also possible;
- It may also be that the cable at the heater valve drive cannot open it because the cable braid comes off and does not push the valve handle. In this case, you can correct it manually;
- Another reason that the stove does not work well may be a violation of the polarity of the heater engine brushes: if you have reverse polarity of the air, then it will move from the passenger compartment to the engine compartment. It shouldn't be this way.
What to do if the carburetor freezes in winter?
The switch is in the Cold position when the partition inside the filter is open and the carburetor takes air from the street. This position is used in summer. The Hot position closes the access of air from the outside and opens it for the intake of hot air from the manifold. This position is used in winter and prevents ice from forming in the carburetor components described above. The intermediate position partially opens the partition and air is taken in both from the collector and from the street. Optimal position for the spring-autumn period. The OZONE 2107 carburetor air filter has a manual thermal switch. In some models from foreign manufacturers, the supply of hot air is automatically regulated. I will be pleased if you express your opinion about this post.
Removal process
- Drain the coolant.
- Loosen the clamps and disconnect the pipe that comes from the radiator and the inlet.
- Loosen the clamps themselves.
- Remove the pipes by disconnecting them from the water pump.
- We take out the thermostat. Disconnect the remaining pipes.
When installing the thermostat, you need to take note that this is a serious operation and must be carried out carefully:
- Clean all surfaces thoroughly and replace the O-ring.
- Correctly orient and place the thermostat in the housing.
- Next, tighten all existing cover bolts. To be able to do this, you need to try.
- Reinstall all hoses in their original locations, then fill with coolant.
- You should also start the engine until it reaches operating temperature to make sure there are no leaks.
FakeHeader
Comments 21
I'll take note! I’ve been eyeing this place for a long time, but I liked your implementation
The option with the original radiator is ok. After installing the radiator 21045.1301.012 you will have to come up with something else...
I have almost a native one (Luzar sport).
You can also make a hole in the sleeve
I removed the original corrugation and left the original one with holes. I left after the repair exactly in the rain))) So my baptism of fire was over! And the intake was dry, although I was driving in a dense stream, the rain was pouring normally (not downpour), there were puddles but not deep.
I also stood like that (approximately), it was of no use, now there’s a tattered piece there
You can also make a hole in the sleeve
So if you do it at your own peril and risk) and the effect, together with the split gear on the stock camshaft, is noticeable!
Well, maybe the effect is mainly from the gear - from the adjusted phases...
By the way, the car became less dull in the heat, or rather it doesn’t get dull on the gas; it reacts cheerfully!
in hot weather it always stalls until it warms up, even with the corrugation outside...
Replacing the heater valve for better heater operation
It is best to use ceramic faucets rather than metal ones. So let's get started:
- you need some kind of container;
- find the plug on the block and unscrew it to drain the coolant;
- You will still need the container with the liquid, but for now put it away;
- we find the pipes, then unscrew the clamps;
- using a metal brush, clean the threaded connections of the two studs (you can moisten them with brake fluid to make them unscrew better);
- While this whole thing is settling down, we remove the pipes and go to the interior, where we remove the side panel of the torpedo;
- unscrew the pipe clamps;
- Having removed the pipes, we replace them;
- You need to find the nuts under the car that secure the heater valve. Unscrew;
- Returning to the salon, remove the tap and spring retainer;
- Next you need to disconnect the control cable from the crane;
- We install a new heater valve, but first connect the cable and attach the valve to the body.
Product delivery options
Note! Below are the shipping methods available specifically for this product. Payment options may vary depending on the shipping method. Detailed information can be found on the “Delivery and Payment” page.
Parcel by Russian Post
Available payment methods:
- Cash on delivery (payment upon receipt)
- Using cards Sberbank, VTB, Post Bank, Tinkoff
- Yandex money
- QIWI
- ROBOKASSA
Shipping throughout Russia. Delivery time is from 5 to 12 days.
Parcel by Russian Post 1st class
Available payment methods:
- Cash on delivery (payment upon receipt)
- Using cards Sberbank, VTB, Post Bank, Tinkoff
- Yandex money
- QIWI
- ROBOKASSA
Shipping throughout Russia. Delivery time is from 2 to 5 days. More expensive than regular delivery by Russian Post, approximately 50%. Parcel weight up to 2.5 kg
Express Parcel EMS
Available payment methods:
- Cash on delivery (payment upon receipt)
- Using cards Sberbank, VTB, Post Bank, Tinkoff
- Yandex money
- QIWI
- ROBOKASSA
Shipping throughout Russia. Delivery time is from 3 to 7 days. More expensive than regular delivery by Russian Post, approximately 100%.
Transport companies
Available payment methods:
- Using cards Sberbank, VTB, Post Bank, Tinkoff
- Yandex money
- QIWI
- ROBOKASSA
Delivery is possible to any locality where there is a representative office of the transport company. Delivery time is from 2 to 10 days. Sending large parcels is approximately 50% more profitable than by Russian Post.
Pickup from our warehouse
Available payment methods:
- Cash upon receipt
- Credit, installments
- Using cards Sberbank, VTB, Post Bank, Tinkoff
- Yandex money
- QIWI
- ROBOKASSA
Replacing the heating fan
If your car is cold, it could be the fan. Now we will tell you how to replace it:
- Remove the bottom of the heater, then the old fan.
- Cut off one of the aerodynamic ridges that supplied air to the legs.
- Increase the diameter of the hole in the impeller. Push the new shaft into it.
- You need to check the operation of the fan, adjust the resistor and reassemble everything in reverse order.
We hope that our recommendations will help you put your classic VAZ-2105 in order!
Diagnostics of VAZ 2106 starter faults
All starter malfunctions can be divided into two groups:
- electrical (failure of conductive elements);
- mechanical (wear of drive parts).
To correctly diagnose the starter, the car owner needs to know the signs corresponding to a particular malfunction.
Signs of a faulty starter
The main symptoms of starter failure include:
- when you turn the ignition key, the starter and traction relay show no signs of life;
- the traction relay makes frequent clicks;
- the traction relay is activated at startup, but the rotor rotates too slowly;
- when you turn the ignition key, a cracking sound is heard from the starter;
- When starting, there is a hum from the starter.
Common starter faults
Each symptom of a malfunction has its own causes.
When starting, the starter and traction relay do not operate
The reasons for the lack of response of the starter to turning the ignition key may be:
- complete or almost complete discharge of the battery;
- oxidation of battery contacts;
- lack of contacts between the battery terminals and the tips of the power wires;
- lack of contact between the wire tip and terminal “50” on the traction relay;
- malfunction of the ignition contact group;
- break in the control wire going from the ignition switch to the traction relay.
Oil pressure
On “sixes” and other classic models, a VAZ 2106 oil pressure sensor of type Mm393A is installed. The pressure indicator works on the principle of converting this parameter, which is created in the lubrication system, into resistance. The oil pressure sensor is installed in the engine cylinder block. A regulator is also installed here, which turns on the oil pressure light.
This element is triggered as a result of the closing and opening of contacts at a particular level of pressure in the system. The corresponding indicator on the control panel may light up if the characteristics are violated, namely, if there is little liquid in the system.
Designation of part elements
How to check the controller? You can check the engine fluid pressure sensor by removing the regulator from its installation location. After removal, you should turn the starter; you do not need to start the power unit. If everything is fine with the supply of consumables, then you need to change the regulator. You can tell about the oil supply by the splashing of liquid from the controller seat.
Bottom line
As you can see, replacing the coolant sensor on a VAZ 2114, VAZ 2106 or VAZ 21124 does not differ enough to describe each model separately.
The difference in engine types - carburetor (injection of the fuel mixture due to the difference in pressure) or injection (nozzles through which fuel is injected into the combustion chamber) - is not fundamental - the DTOZh works the same everywhere and also fails according to the same scenario.
There is no need to be afraid of breakdowns, even if you are a novice car enthusiast. Domestic cars are designed so intuitively that even someone who has spent less than a year behind the wheel can cope with replacing the sensor.
Connection
Connecting the VAZ-2106 temperature sensor is extremely simple. There is a single contact on the tail part of the DTOZH, screwed into the cylinder block. It is connected to the wire going to the dashboard. It has a corresponding terminal. To connect, just connect the terminal to the contact on the sensor, and then the dashboard will show the heating of the coolant, and therefore the engine temperature.
Purpose
So, what functions does the sensor perform? This element is necessary to control the coolant temperature, so that in case of overheating the driver can react to the situation in time. Information from the sensor is displayed on the instrument panel. The driver can observe how hot or cold the coolant is in the engine system. In this car, the VAZ-2106 temperature sensor no longer performs any functions.