The VAZ-2106 model car began to be produced in 1976. It differed from its predecessor VAZ-2103 by a more powerful engine, the volume of which is 1.6 liters, and a modified body and interior. At the time of its release it was the most prestigious and comfortable car. Below is a high-quality color diagram of the electrical equipment of the domestic VAZ-2106 passenger car. As with any machine, this model may experience electrical faults, so an electrical diagram will be indispensable for identifying and eliminating such problems. With its help, you can find out exactly where the breakdown occurred in the electrical circuit and make appropriate repairs. Based on the information provided, you can find out which instrument panel lamp or headlight is not working, which sensor has failed, repair the generator breakdown, check the fuses, and other repair actions.
VAZ 2106 diagram
1 — side direction indicators; 2 — sidelights VAZ-2106; 3 — external headlights; 4 — internal headlights; 5 — sound signals; b — electric motor of the VAZ 2106 engine cooling system fan; 7 — sensor for switching on the electric motor of the VAZ 2106 fan; 8 — relay for turning on sound signals; 9 — relay for switching on the VAZ 2106 fan electric motor; 10 - voltage regulator; 11 — ignition coil VAZ 2106; 12 — electric motor for windshield washer; 13 — sensor of insufficient brake fluid level; 14 — ignition distributor; 15 — electric motor of the windshield wiper; 16 — spark plugs VAZ 2106; 17 — oil pressure warning lamp sensor; 18 — oil pressure indicator sensor; 19 — coolant temperature indicator sensor; 20 — engine compartment lamp; 21 — solenoid valve of the VAZ 2106 carburetor; 22 - generator; 23 — starter; 24 - battery; 25 — battery charge warning lamp relay; 26 — relay for turning on low beam headlights; 27 — relay for turning on the high beam headlights; 28 — windshield wiper relay; 29 — additional fuse block; 30 - main fuse block; 31 — reverse light switch; 32 — parking brake warning lamp switch; 33 — plug socket of a portable lamp; 34 — relay-interrupter for direction indicators and hazard warning lights; 35 — heater electric motor; 36 — brake light switch; 37 — rear window heating relay*; 38 — heater motor resistor; 39 — glove box lighting lamp; 40 — external lighting switch; 41 — rear window heating switch*; 42 — ignition switch VAZ 2106; 43 — low-high beam switch; 44 — direction indicator switch; 45 — horn switch; 46 — wiper switch; 47 — windshield washer switch; 48 — switch (controller) for instrument lighting; 49 — alarm switch; 50 - cigarette lighter; 51 — heater switch; 52 — brake fluid level warning lamp; 53 — switches for alarm lights of open front doors; 54 — alarm lights for open front doors; 55 — lamp switches located in the front door pillars; 56 — fuel level indicator with fuel reserve warning lamp; 57 — coolant temperature indicator; 58 — oil pressure gauge with warning lamp; 59 — tachometer; 60 — parking brake warning lamp; 61 — battery charge indicator lamp; 62 — control lamp for the carburetor air damper; 63 — speedometer; 64 — indicator lamp for external lighting; 65 — turn signal indicator lamp; 66 — control lamp for high beam headlights; 67 — relay-interrupter for the parking brake warning lamp; 68 — switch for the carburetor air damper warning lamp; 69 — clock; 70 — lamp switches located in the rear door pillars; 71 — lampshades; 72 — rear window heating element; 73 — trunk lighting lamp; 74 — sensor for level indicator and fuel reserve; 75 — rear lights; 76 — license plate lights.
Removing the instrument panel
To remove the shield 2 from the instrument panel 1 to replace a faulty device or a burnt-out lamp, press the brackets 3 with the firmware 4 through special holes in the lower part of the instrument panel, then disconnect the plug connections of the instruments and disconnect the flexible drive shaft from the speedometer.
When removing the instrument panel, pay attention to how the flexible shaft of the speedometer drive was routed, and when installing the panel, place the flexible shaft along the same route so that there is no strong bending of the shaft (so that the bending radii are more than 100 mm).
Coolant temperature gauge UK-193. Used with sensor TM-106. With a sensor resistance of 640-1320 Ohms, the needle should be at the beginning of the scale, with 77-89 Ohms - at the beginning of the red zone, and with 40-50 Ohms, it should deviate to the end of the red zone of the scale.
When the pointer needle is constantly at the beginning of the scale, then with the ignition on, disconnect the wire from the pointer sensor and connect the tip of the wire to ground. If the arrow deviates, then the sensor is faulty and is replaced, and if it does not deviate, remove the instrument panel and, with the ignition on, connect the indicator plug “V” to ground. The deviation of the arrow in this case will indicate the serviceability of the device and damage to the wire connecting the sensor to the pointer.
If the arrow does not deviate, replace the temperature gauge. When the pointer needle is constantly in the red zone, then with the ignition on, disconnect the wire from the sensor. If the sensor malfunctions, the needle should return to the beginning of the scale. If it remains in the red zone, then either the wire is shorted to ground or the device is damaged. The serviceability of the device is checked by disconnecting the green wire (going to the sensor) from the indicator. When the ignition is on, the needle should be at the beginning of the scale.
Fuel level indicator UB-193. Used in conjunction with the BM-150 sensor installed in the fuel tank. This sensor also turns on the fuel reserve warning lamp if there are 4-6.5 liters of gasoline left in the tank. With a sensor resistance of 285-335 Ohms, the needle should be at the beginning of the scale, with a resistance of 100-135 Ohms - in the middle of the scale, and with a sensor resistance of 7-25 Ohms, it should deviate towards the end of the scale.
The verification procedure is similar to that described above. When the pointer needle is constantly at the beginning of the scale and does not deviate after the tip of the wire disconnected from the “T” plug of the sensor is connected to ground, then the device is checked. To do this, remove the instrument panel and, with the ignition on, connect the indicator plug “S” to ground. If the device is working properly, the needle should deflect to the end of the scale. When the pointer arrow is constantly against o, the serviceability of the device is checked by disconnecting the pink wire from the pointer (going to the “T” plug of the sensor). In this case, with a working device, when the ignition is turned on, the arrow should be against the o.
Oil pressure indicator UK-194. Used in conjunction with sensor type MM393A. With a resistance of 285-335 Ohms, the pointer needle should be against o, with a resistance of 100-135 Ohms - in the middle of the scale, and with a resistance of 0-25 Ohms - at the end of the scale. The device has a warning lamp for insufficient oil pressure, which is turned on by the MM-120 sensor. The sensor contacts should close and open at a pressure of 20-60 kPa.
The method for checking the device is similar to that described above. When troubleshooting, connect the indicator plug “H” to ground or disconnect the gray wire with black stripes going to the pressure sensor from it.
Tachometer TX-193. The operating principle of the tachometer is based on measuring the frequency of voltage pulses in the primary circuit of the engine ignition system.
The tachometer is checked on a stand that simulates the car’s ignition system. By connecting the tachometer to the stand circuit in the same way as on a car, set the voltage in the primary circuit to 14 V and the gap in the stand spark gap to 7 mm. Rotate the ignition distributor shaft at such a speed that the tachometer needle reaches one of the scale divisions. At this point, check that the distributor shaft rotation speed is within the following limits:
Speedometer SP-193. It consists of a dial indicator of the vehicle speed (km/h), a final distance meter (km) traveled by the vehicle, and a daily vehicle mileage meter. The speedometer is checked by comparing its readings with the standard ones. The verification data is given below.
Top of page
Modifications
Switching diagram for electric windows of the front doors
1 – main fuse block; 2 – relay for turning on electric windows; 3 – left door power window switch; 4 – right door power window switch; 5 – gear motor for the right door electric window; 6 – gear motor for electric window lifter of the left door; 7 – additional fuse block; 8 – ignition switch; A – to terminal “30” of the generator; B – to the instrument lighting switch; B – conventional numbering of plugs in the gear motor block.
Carburetor solenoid valve control circuit
1 – ignition switch; 2 – generator; 3 – battery; 4 – ignition coil; 5 – switch; 6 – control unit; 7 – carburetor solenoid valve; 8 – carburetor limit switch.
Engine cooling fan motor
1 – generator; 2 – battery; 3 – ignition switch; 4 – main fuse block; 5 – electric fan activation relay, 6 – electric fan activation sensor; 7 – electric fan; 8 – additional fuse block
Fuses and relays VAZ 2106
- No. 1 protects the circuits of the horn, clock, brake lights, cigarette lighter, and front door open alarm lights. Fuse rating is 16A.
- No. 2 protects the circuits of the windshield washer, windshield wipers, and electric heater motor of the VAZ 2106. The fuse rating is 8A.
- No. 3 left high beam headlights, as well as the high beam indicator lamp in the speedometer (blue). Fuse rating is 8A.
- No. 4 protects the right high beam headlights. Fuse rating is 8A.
- No. 5 protects the left low-beam headlights from short circuits. Nominal 8A.
- No. 6 protects the chain of the right low beam headlights. Nominal 8A.
- No. 7 protects the trunk light circuit, instruments, license plate, cigarette lighter, left front side light and right rear side light. Nominal 8A.
- #8 protects the parking light circuit, license plate light, engine compartment light, right front side light, and left rear side light. Nominal 8A.
- No. 9 protects the tachometer circuit, rear window heating relay coils, reverse lamp, glove box lighting, battery charge warning lamp, parking brake activation, brake fluid level, carburetor choke control, oil pressure gauges, coolant temperature and fuel level, turn indicators . Nominal 8A.
- No. 10 protects the battery charging circuit, namely the generator excitation circuit and the relay regulator. Nominal 8A.
- No. 11, 12,13 in the basic configuration are in reserve and can be used for additional equipment. The denomination is selected depending on the consumer.
- No. 14 serves to protect the rear window heated element circuit, if one is installed. Nominal 16A.
- No. 15 electric engine cooling fan, if installed in the vehicle. Nominal 16A
- No. 16 protects the turn signal and hazard warning light circuits. Nominal 8A.
It is important not only to keep the contact groups clean, but also to use fuses of the ratings recommended by the manufacturer. Ignoring these requirements may result in electrical equipment failure.
Oil pressure
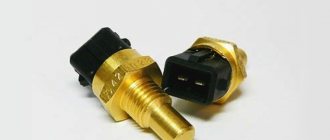
On “sixes” and other classic models, a VAZ 2106 oil pressure sensor of type Mm393A is installed. The pressure indicator works on the principle of converting this parameter, which is created in the lubrication system, into resistance. The oil pressure sensor is installed in the engine cylinder block. A regulator is also installed here, which turns on the oil pressure light.
This element is triggered as a result of the closing and opening of contacts at a particular level of pressure in the system. The corresponding indicator on the control panel may light up if the characteristics are violated, namely, if there is little liquid in the system.
How to check the controller? You can check the engine fluid pressure sensor by removing the regulator from its installation location. After removal, you should turn the starter; you do not need to start the power unit. If everything is fine with the supply of consumables, then you need to change the regulator. You can tell about the oil supply by the splashing of liquid from the controller seat.
Purpose
So, what functions does the sensor perform? This element is necessary to control the coolant temperature, so that in case of overheating the driver can react to the situation in time. Information from the sensor is displayed on the instrument panel. The driver can observe how hot or cold the coolant is in the engine system. In this car, the VAZ-2106 temperature sensor no longer performs any functions.
Device
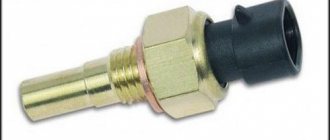
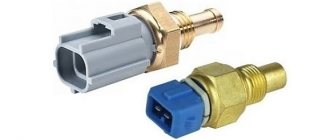
If we consider the device, there are two types of temperature sensors. The first is a thermistor. This is a thermal resistor whose resistance changes as the temperature increases or decreases. The thermistor is located inside a threaded metal housing. There is a plastic tail part on the body. Contacts are installed at the rear. There is one contact (positive) on the tail section. It goes to the dashboard. The role of the second contact is performed by the housing - it is connected to the total mass.
The second type of sensor is a special contactor with a bimetallic strip inside. The latter, depending on the heating of the antifreeze, closes or opens.
The first temperature sensor of the VAZ-2106 is used only to display data on the heating of antifreeze in the cooling system. As the temperature rises, the resistance of the sensor changes. A certain voltage is applied to the instrument scale. The device is installed in the engine cylinder block in the channels of the cooling system.
The second temperature sensor is designed a little differently. It also reacts to the temperature of antifreeze or antifreeze, but is designed to turn on the electric fan on the radiator. This sensor is installed on the radiator.
Where is
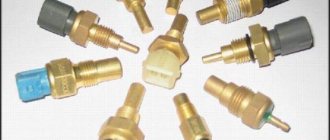
Over the entire production period of the car of the model in question, quite a lot of different modifications were produced. But it is worth noting: on most VAZ 2106 cars, sensors are installed in special sockets on the cylinder blocks.
The latest models of the VAZ 2106 car were equipped with specially designed thermostats. A temperature sensor monitoring the state of antifreeze was located in them. But such designs are relatively rare.
In the latter case, the sensor is located next to the pipe - it is through it that hot antifreeze enters the radiator. Thanks to this arrangement, it is possible to obtain the most accurate data. The sensor itself, due to the simplicity of its design, fails relatively rarely. Problems arise during long-term use. Gradually the thermistor changes its resistance. As a result, the electronic control unit receives incorrect data.
Main signs of sensor malfunction:
- the presence of a large amount of oxides on the surface of the case - if there is a green coating (brass oxide), the cause of the breakdown lies precisely in it;
- a significant increase in gasoline consumption - incorrect data transmitted to the electronic control unit often leads to an increase in the amount of fuel supplied when there is no need for it;
- problems with the engine - it is difficult to start it when cold, the engine suddenly stalls, and idles unstable.
There is no point in repairing the temperature sensor on a VAZ 2106. If a breakdown occurs, it should simply be replaced with a new one. Its cost is from 200 rubles.
Principle of operation
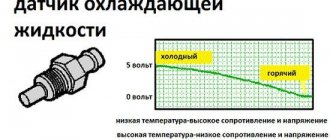
For normal operation of the VAZ-2106 cooling temperature sensor, a voltage of 5 V is required. Since the thermistor has a negative temperature coefficient, as the antifreeze heats up, the resistance on the sensor will drop. Accordingly, the tension will decrease. The instrument panel determines the temperature based on the level of voltage drop.
In different VAZ models, the sensor can be located in different places - in the cylinder head, in the thermostat housing or on its body. The element must be placed in the area of the outlet hose, which is needed for the passage of fluid into the radiator. In the VAZ-2106, DTOZH can be found in the cylinder head.
What is a temperature sensor used for?
The main function of the “six” temperature sensor is to control the heating of antifreeze in the engine and display information on the car’s dashboard. However, the functions of such sensors are not limited to this.
The sensor is responsible not only for the engine temperature, but also for the quality of the fuel mixture
In addition, the sensor is connected to the vehicle control unit. Engine temperature data is also transmitted there. And the block, in turn, makes corrections when supplying the fuel mixture to the engine, depending on the temperature obtained. For example, if the engine is cold, then the control unit, based on previously received data, will set a rich fuel mixture. This will make it easier for the driver to start the car. And when the engine warms up, the control unit will make the mixture leaner so that the car does not suddenly stall. That is, not only the driver’s awareness of the condition of the engine, but also fuel consumption depends on the correct operation of the antifreeze sensor.
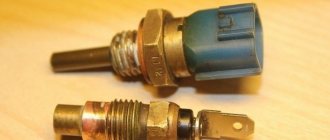
How does a temperature sensor work on a VAZ 2106
The main element of the sensor is a thermistor. Depending on the temperature, the resistance of the thermistor may change. The thermistor is installed in a sealed brass housing. The resistor contacts are located on the outside of the housing. In addition, the body has a thread that allows you to screw the sensor into a standard socket. There are two contacts on the sensor. The first one connects to the car's electronic unit. The second is to the so-called mass.
The main element of the sensor is a resistor
For the thermistor in the sensor to operate, a voltage of five volts must be applied to it. It is supplied from the electronic unit. And voltage stability is ensured by a separate resistor in the electronic unit. This resistor has a constant resistance. As soon as the temperature of the antifreeze in the engine increases, the resistance of the thermistor begins to drop.
The sensor is connected to ground and to the coil of the measuring device
The voltage supplied to the thermistor also drops sharply. Having detected a decrease in voltage, the control unit calculates the temperature of the motor and displays the resulting figure on the dashboard.
Where is the temperature sensor located?
On the VAZ 2106, temperature sensors are almost always installed in sockets on the cylinder blocks.
The temperature sensor on the “six” is usually installed in the cylinder block
In later models of “sixes” there are sensors installed in thermostat housings, but this is very rare.
In later models of "sixes" temperature sensors can also be located on thermostats
This sensor on almost all cars is located next to the pipe through which hot antifreeze goes into the radiator. This arrangement allows you to take the most accurate temperature readings.
Connection
Connecting the VAZ-2106 temperature sensor is extremely simple. There is a single contact on the tail part of the DTOZH, screwed into the cylinder block. It is connected to the wire going to the dashboard. It has a corresponding terminal. To connect, just connect the terminal to the contact on the sensor, and then the dashboard will show the heating of the coolant, and therefore the engine temperature.
What is a temperature sensor used for?
The main function of the “six” temperature sensor is to control the heating of antifreeze in the engine and display information on the car’s dashboard. However, the functions of such sensors are not limited to this.
The sensor is responsible not only for the engine temperature, but also for the quality of the fuel mixture
In addition, the sensor is connected to the vehicle control unit. Engine temperature data is also transmitted there. And the block, in turn, makes corrections when supplying the fuel mixture to the engine, depending on the temperature obtained. For example, if the engine is cold, then the control unit, based on previously received data, will set a rich fuel mixture. This will make it easier for the driver to start the car. And when the engine warms up, the control unit will make the mixture leaner so that the car does not suddenly stall. That is, not only the driver’s awareness of the condition of the engine, but also fuel consumption depends on the correct operation of the antifreeze sensor.
How does a temperature sensor work on a VAZ 2106
The main element of the sensor is a thermistor. Depending on the temperature, the resistance of the thermistor may change. The thermistor is installed in a sealed brass housing. The resistor contacts are located on the outside of the housing. In addition, the body has a thread that allows you to screw the sensor into a standard socket. There are two contacts on the sensor. The first one connects to the car's electronic unit. The second is to the so-called mass.
The main element of the sensor is a resistor
For the thermistor in the sensor to operate, a voltage of five volts must be applied to it. It is supplied from the electronic unit. And voltage stability is ensured by a separate resistor in the electronic unit. This resistor has a constant resistance. As soon as the temperature of the antifreeze in the engine increases, the resistance of the thermistor begins to drop.
The sensor is connected to ground and to the coil of the measuring device
The voltage supplied to the thermistor also drops sharply. Having detected a decrease in voltage, the control unit calculates the temperature of the motor and displays the resulting figure on the dashboard.
Where is the temperature sensor located?
On the VAZ 2106, temperature sensors are almost always installed in sockets on the cylinder blocks.
The temperature sensor on the “six” is usually installed in the cylinder block
In later models of “sixes” there are sensors installed in thermostat housings, but this is very rare.
In later models of "sixes" temperature sensors can also be located on thermostats
This sensor on almost all cars is located next to the pipe through which hot antifreeze goes into the radiator. This arrangement allows you to take the most accurate temperature readings.
Symptoms of a problem
The VAZ-2106 temperature sensor is a practically fail-safe device. Its design is very simple. Hence such reliability. But even with it, motorists may have problems. The reliability of modern spare parts leaves much to be desired.
Problems with the sensor boil down to violation of readings, violation of calibration and resistance. But the only trouble is the risk of engine overheating, since the driver does not see the real temperature. On injection cars, the damage from a broken sensor will be much greater - there the sensor is also connected to the ECU, and the proportions of mixture formation depend on the engine temperature.
If we talk about another VAZ-2106 temperature sensor, which is responsible for turning on the fan, then its malfunction can lead to disastrous consequences. Due to the exceeded temperature of its activation, the fan will not work on time. In order for the cylinder head to overheat and begin to deform, the temperature needs to rise only a couple of degrees above normal. The second malfunction that can lead to no readings on the dashboard is a break in the wiring to the sensor.
Fuel level
On the “sixes” a fuel level indicator of the BM-150 type is installed, the controller itself is mounted in the gas tank according to the scheme, and it is fixed with bolts. The FLS includes a resistor device and a float. In order for the controller to indicate the correct level of gasoline in the system, a resistor device is controlled by the movement of the float.
The fuel level indicator float itself is directly connected to the resistor using a lever, at the end of which there is a sliding element. Thanks to the latter, the gasoline reserve lamp on the dashboard can light up. If the controller adjustment is correct, then this light comes on when there are 5-6 liters of gasoline in the tank.
The controller diagnostic procedure is carried out by measuring the resistance level of the resistor device. If the gas tank is empty, this parameter should be about 315-345 Ohms, if it is half full - 108-128 Ohms, if full - about 70 Ohms. Diagnostics is carried out using a combined tester (the author of the video is VAZ 2101-2107 REPAIR AND MAINTENANCE).
How to check?
Since the VAZ-2106 coolant temperature sensor is extremely simple, the methods for diagnosing it are extremely simple. But before diagnosing the element, you should inspect the wiring and its integrity. You can also check whether voltage is coming to the sensor.
The most accurate way to check functionality is to measure the resistance using a multimeter. But during the measurement process, the element will have to be boiled in water. As the temperature changes, the resistance of the sensor will change. But since in the VAZ-2106 the DTOZH does not affect anything, it is easier to simply replace the faulty element. Moreover, its price is not higher than two hundred rubles.
How to replace an element?
To replace the VAZ-2106 engine temperature sensor, it is enough to cool the engine if it was previously heated. In the process, you will have to unscrew the element from the cylinder head cooling jacket, and you can get burned by the hot liquid. The sensor has an M14 thread. In order to unscrew it, you will need a 19mm wrench. The faulty element is unscrewed, and a new one is screwed in its place. In some cars, it is recommended to drain the coolant a little before replacing it.
You can replace the sensor with any one that is sold in the store and fits the thread in the cylinder head. The main thing is that the contacts on the element are similar to the plug in the car wiring. Then everything will connect and work without any problems.
Leaking cylinder head gasket
This problem is one of the rarest causes of engine overheating in VAZ 2114 cars. When it occurs, overheating is a secondary symptom that may be accompanied by a number of others:
- oil leaks from under the cylinder head;
- uneven engine operation and low compression;
- increased oil consumption, noisy engine operation and gas flow, black exhaust.
In this situation, at best, the solution would be to replace the cylinder head gasket. At worst, a major overhaul of the engine with cleaning of all internal cooling channels.
When the engine gets hot, it is dangerous not in itself, but because of its consequences. Long-term driving at elevated operating temperatures first leads to loss of properties of elastic parts: valve stem seals and piston rings. Because of this, oil consumption increases, and engine operation becomes uneven and dirty. All this leads to expensive major repairs.
The consequences of severe overheating are even more severe: the cylinder head and cylinder block are deformed and sometimes crack. An engine that has survived this can no longer be repaired.
Operating temperature of the VAZ 2114 engine - is this indicator so important for the operation of VAZ 2114 systems? What could be the reason for the change in operating temperature and how to get rid of this problem? Such questions are often asked by car owners, but they do not receive clear answers. Let's try to systematize the available information.
First point: is it really so important that the operating temperature of the VAZ 2114 engine is maintained? Yes, this is really very important, as it affects many performance indicators of the car as a whole; if the temperature drops or rises, the systems stop working as usual. The normal operating temperature of the engine is considered to be 95-102 degrees for the VAZ 2114; when it decreases, fuel consumption increases and parts wear out faster, the same thing with increasing temperature
When the operating temperature of the engine changes, you should first pay attention to the sensor itself (in the VAZ 2114, unfortunately, they very often fail and begin to show deviations in one direction or another), check its contacts and condition, it is possible that the problem in it and it will be enough to simply replace it. When choosing a sensor, be very careful, as there is now a very large number of counterfeit products on the spare parts market. It is better to consult with friends or first visit special websites or forums, where they will help you decide and advise you on the products whose company best meets quality standards
It is better to consult with friends or first visit special websites or forums, where they will help you decide and advise you on the products of whose company best meets quality standards.
If the sensor is in order, and there is no smell of operating temperature in the VAZ 2114 engine, then you need to check and, if necessary, replace the thermostat, as well as the radiator fan (it is quite possible that it simply does not turn off). If you cannot find the reason on your own, you will have to go to a service center, since the problem will not go away on its own.