Replacing the fuel pump for a VAZ 2107 injector, installing an electric fuel pump and replacing the mesh
Cases when a VAZ 2107 injector fuel pump needs to be replaced are not that frequent, and its service life depends not only on the quality of the gas pump itself, but also on the condition of the gas tank. The reason I had to change it was because a small speck got into it because the filter came off.
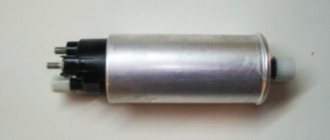
Electric fuel pump device
The design of an injection fuel pump is simple and can be divided into two parts:
- electric motor;
- water pump.
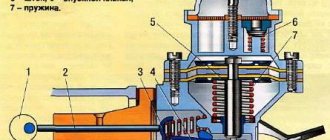
The most important thing is its structure itself. The electric fuel pump itself is hermetically sealed to protect against fuel ingress. The fuel enters the pump through the filter and the intake hole and is supplied to the power system through the outlet hole (sealed from the electric motor).
Here is a diagram you can find. I would like to note that it does not happen that the motor rotor rotates in liquid and even in gasoline. Firstly, a spark forms on the commutator when the engine is running. You understand that this will lead to a fire. Secondly, rotor rotation in liquid is so difficult that gaining speed and creating pressure is simply out of the question.
Therefore, gasoline passes through the engine through a special channel, and the design of the engine itself is hermetically sealed.
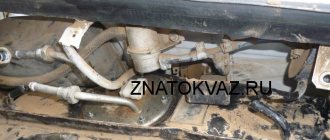
Where is the fuel pump on the VAZ 2107 injector?
On carburetor engines, the fuel pump is installed on the right side of the block and is visually accessible. On the injector, it is located in the gas tank and only the output tubes coming from it are visible, and replacement is somewhat more complicated.
Symptoms for replacement
Signs of a malfunction of the VAZ 2107 injector fuel pump appear both when starting the engine and during operation:
- “heavy”, long engine start;
- jerking when moving;
- uneven operation at idle;
- The fuel pump doesn't pump.
Diagnostics
The primary conclusion whether the fuel pump is working or not can be assessed by ear when the ignition is turned on. If you don’t hear a quiet buzzing noise from behind, then you need to check the voltage supply to the gas tank block and then draw a conclusion about its malfunction.
You can check the serviceability of the fuel pump using the MTL-2 pressure gauge; this is the most correct way. You can somewhat roughly estimate the pressure using air pressure gauges to check tire pressure. To do this, screw a rubber hose to the sensor and connect it to the fuel system.
You can do without instruments at all; to do this, unscrew the fuel hose from the filter, place a container and turn on the ignition. In one minute, about 1 liter should be poured into the container.
The pressure of the VAZ 2107 injector fuel pump when the ignition is on should be 4.0 atmospheres, and when the ignition is running 2.8-3.2. In reality, the pump pressure is different and was slightly less, but this may be an error in the pressure gauge.
The carburetor pump is checked by setting the camshaft position by cranking the engine so as to ensure free movement of the pump foot. The hose is unscrewed from the carburetor or filter and the presence of fuel supply is determined by pressing the foot.
How to replace a VAZ injector fuel pump
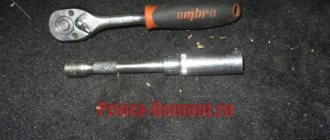
To replace the fuel pump on an injection vase you will need:
- key to 10;
- 2 keys for 17;
- key to 7;
- crosshead screwdriver;
- a simple screwdriver.
I recommend removing the gas tank mount for ease of repair work. To remove the fuel pump you need:
- disconnect the pressure relief pipes in the gas tank;
- Unscrew the main pipelines using 2 17mm wrenches;
- remove the gasket from the gas tank neck;
- unscrew the tank mount;
- move the tank to the side;
- remove the power and fuel level block;
- unscrew the fuel pump flange;
- remove the fuel pump filter;
- remove the tube from the pump after heating it;
- We take out the old pump and install a new one.
When installing the filter, do not hesitate to give it a good tap, otherwise it may fall off like mine. The fuel pump mesh on the VAZ injector is replaced if the old one is dirty or torn. Its replacement is carried out in the same way. Usually it is sold complete with a fuel pump; if not, you will have to buy it, the price is 25 rubles.
Reassemble in reverse order. We heat the hose again in boiling water; if the mounting location of the old electric fuel pump does not allow the part to be properly secured, then we cut it off.
Check the integrity of the gasket between the flange and the gas tank; if it is torn, there will be a smell of gasoline in the cabin.
Important
When choosing, pay attention to performance and maximum pressure. I had a Bosch 0 580 454 456 and replaced it with a close analogue of FR 453-453 from WEBER
Characteristics:
- OEM part number 21083-1139009-01;
- Installation of VAZ 2108 - 2115;
- Pressure - 580 kPa;
- Productivity - 60 l/min;
- Voltage - 13.5 V.
Consumption per 100 km at a speed of 120 is about 8 liters. Very pleased.
Replacing the fuel pump VAZ 2107 injector video:
Gas tank protection for Lada X Ray
- Drive the car onto a viewing hole or lift.
- Prepare the necessary bolts and fasteners.
- Using a socket, unscrew the standard suspension bolt of the front part of the tank and attach the additional angle that comes with the protection to it.
- Using a knife, remove part of the heat shield to loosen the second mounting bolt. Screw the next bracket onto it.
- Attach the module to the rear axle of the gas tank suspension through a special bushing.
- Using the supplied bolts, tighten the shield to the installed fasteners and fully tighten the bolts.
The reinforced fuel line module is installed using standard fasteners with original bolts. The design shape is similar to the factory one, which greatly simplifies the installation procedure.
The capacity of the factory tank is sufficient for full use of the vehicle for its intended purpose. The standard design of highways does not imply reliable protection of elements from mechanical damage, but the defect can be quickly eliminated by installing attachments.
VAZ 2104 injector where is the fuel pump located on
Lada 2107 Logbook Electric trunk lock VAZ 2107
Dear visitors of the “Cars” website! We will be very grateful for your comments on the video clip “VAZ 2104 injector where the fuel pump is located”; registration is not required for this. We also ask you to let us know if you have any problems playing the video.
fuck, how do you repair cars, diagnostician...... learn the materiel, the law specialist bought it, didn’t buy it to drive, that’s how it works out for you
I look and smell gasoline...
Hello How many liters of petrol should the petrol light be on? Waiting for an answer. Thank you.
I have a VAZ 2107 injector meaning.
Hello, can you please help??? I have a 2107 fan, the injector turns on at 102 degrees, how can I turn it on at 70 degrees? or a forced adventure is needed if the forced one is connected. In our city there is no repairman, you need to go to the region. help me I will be very grateful.
Hello. Tell me how to flash the Itelma ECU 21067-1107010-12 January 7.2 on the classic? There is a KKL adapter. Could you please tell me the connection diagram? I'm interested in the firmware for HBO.
Why is there a rubber smell coming from the injector?
Actually, when the second lambda is turned off, the controller switches the injection mode to Open loop, and gasoline consumption normally increases. Another thing is that the injection classics did not have a second lambda installed from the factory, kmk.
eh, in my city you came with such equipment and were rich
the cabin smells like gasoline when I'm driving when my purse is standing there disappears what are they doing
Hello. I have this problem. When there is little gasoline in the car, it works well and is faster. And when I fill up with gas, it works hard. Why is this? Help please. Thank you
NOT IN UKRAINE, BUT IN UKRAINE AT MOSKALANDIA KHUILOSKAYA
who saw the sunglasses in the tank like for everyone to see....
whoever called the video is a fagot. you saw the asshole there
Why do you show your ignorance?..
every 30 you need to change the filter and finally it’s beautiful to have so many devices to deceive the client
so what was in the tank?
If anyone knows, please tell me. KIA Spectra 2005 Cerato 1st generation doristyle 2.0 liter 5 speed American manual. 1. Problem with refueling. The pistol shoots constantly. 2. After each refueling, it starts poorly, you have to turn the starter for 2-3 or more seconds with a boost of gas, and if you let off the gas, it stalls. The pump has been replaced. The filter has been replaced. The mesh is replaceable. What could be the problem? Even if you refuel carefully, that is, without shooting, the problem is still the same.
injection classic??? Are they still being collected??? and who???
explain to me the logic, the pressure in the ramp is 2.5 when the return line is clamped 4, so the check valve does not allow pressure to be created above 2.5, why change the fuel pump even if it pumps up 100 atmospheres, the check valve will drain everything into the return line
What fuel pumps were equipped with classic VAZ models?
Lada 2107 Logbook Body repair VAZ 2107 Part 1
Classic VAZs include all models of the Zhiguli family, produced from 1970 to 2012 and their modifications:
- VAZ 2101;
- VAZ 2102;
- VAZ 2103;
- VAZ 2104;
- VAZ 2105;
- VAZ 2106;
- VAZ 2107.
Depending on the year of manufacture, the engines of these vehicles were equipped with different fuel systems. In all the first Zhiguli models, the fuel mixture was injected into the cylinders using a carburetor, and the fuel was supplied by a mechanical fuel pump. The latest modifications of the VAZ 2104, 2105 and 2107 had an injection system and an electric fuel pump.
Carburetor cars of the Zhiguli family were equipped from the factory with mechanical fuel pumps of the diaphragm type DAAZ 2101 (catalog number 1106010) produced by the Dimitrovgrad Automotive Unit Plant. Thanks to their simple design, reliability and maintainability, they have proven themselves well not only on the “classics”, but also on cars of the Sputnik and Samara families, which were equipped with their modified versions.
Carburetor VAZ 2101–2107 were equipped with DAAZ mechanical fuel pumps
Injection Zhiguli models were equipped with domestically produced electric fuel pumps. They were produced by the Pekar and Utes enterprises under catalog number 21073–1139009. The latest modifications of the Zhiguli were equipped with products (catalog number 2112–1139009). The same devices were installed on all models of the Samara and Lada families.
Injection models of classic VAZs were equipped with electric fuel pumps “Pekar”, “Utes”, “Bosch”
Modifications
- VAZ-2105 - 1.3 l. carb. VAZ-2105 engine with 4-speed Checkpoint.
- VAZ-21050 - 1.3 l. carb. VAZ-2105 engine with 5-speed Checkpoint.
- VAZ-21051 - 1.2 l. VAZ-2101 carburetor engine with 4-speed gearbox.
- VAZ-21053 - 1.5 l. carb. engine VAZ-2103 or injection VAZ-2104 with 5-speed. Checkpoint.
- VAZ-21054 is a small-scale modification produced for the traffic police, the Ministry of Internal Affairs and the FSB with an additional gas tank and battery.
- VAZ-21055 - 1.5 l. diesel VAZ-341 produced by Barnaultransmash, small-scale modification for taxis.
- VAZ-21057 (Lada Riva) - an export version of the VAZ-21053 with right-hand drive, produced in 1992-1997 for the UK.
- VAZ-21058 is an export version of the VAZ-21050 with right-hand drive, produced in 1982-1994 for the UK.
- VAZ-21059 - 1.3 l. rotary engine VAZ-4132 with a power of 140 hp.
| 2105 | 21051 | 21053 | 21055 | 21059 | |
| Performances | Four-stroke, gasoline, carburetor, four-cylinder | diesel | rotary | ||
| Body type | sedan | ||||
| Number of doors | 4 | ||||
| Places | 5 | ||||
| trunk volume, dm 3 | 345 | ||||
| Overall dimensions, mm : | |||||
| length | 4130 | ||||
| width | 1620 | ||||
| height | 1446 | ||||
| own weight, kg | 995 | ||||
| payload, kg | 400 | ||||
| Wheelbase, mm | 2424 | ||||
| Front wheel track | 1365 | ||||
| Rear wheel track | 1321 | ||||
| Drive wheels | rear | ||||
| Ground clearance to floor pan | 182 | 182 | 182 | ||
| Clearance to rear axle beam | 170 | ||||
| Clearance to front suspension beam | 175 | ||||
| Engine | 2105 | 2101 | 2103 | 341- diesel | VAZ 4132 |
| working volume, cubic meter cm | 1290 | 1198 | 1452 | 1524 | 1308 |
| Max. power, kW (at rpm) | 46,8 (5600) | 43,2 (5600) | 37(4600) | 103 (6000) | |
| Max. power, l. With . | 63,6 | 58,7 | 71,1 | 50,3 | 140 |
| Max. torque, Nm (at rpm) | 92(3400) | 85 (3400) | 103,9(3400) | 92,0 (2500) | 186 (4500) |
| supply system | carburetor | carburetor | carburetor | ||
| KP | |||||
| Number of gear stages | 5 or 4 | 4 | 5 or 4 | 5 | 5 |
| Gearbox ratios: | |||||
| I | 3,67 | 3,67 | 3,67 | 3,636 | 3,636 |
| II | 2,1 | 2,1 | 2,1 | 1,95 | 1,95 |
| III | 1,36 | 1,36 | 1,36 | 1,357 | 1,357 |
| IV | 1 | 1 | 1 | 0,941 | 0,941 |
| V | 0,82 | 0,82 | 0,784 | 0,784 | |
| reverse | 3,53 | ||||
| Final drive ratio | 4,1 | 4,3 | 4.1 or 3.9 | 3,9 | 3,9 |
| Maximum speed, km/h | 145 | 142 | 150 | 125 | 180 |
| acceleration to 100 km/h, s | 18 | 20 | 17 | 23 | 9 |
| Fuel consumption, l/100km: | |||||
| fuel consumption at 90 km/h | 7,5 | 5,8 | 9,5 | ||
| fuel consumption at 120 km/h | 10,1 | 8,0 | 12,5 | ||
| fuel consumption in the urban cycle | 10 | 6,7 | |||
| Fuel tank capacity, l | 39 | ||||
| Front brakes | disk | ||||
| Rear brakes | drums | ||||
| Braking distance loaded from 80 km/h | 38 | ||||
| Parking brake drive | cable | ||||
| Clutch drive | hydraulic | ||||
| Front suspension | independent | ||||
| Rear suspension | five-rod | ||||
| Steering | worm - roller | ||||
| Smallest turning radius | 5,6 | ||||
| The weight of the towed trailer is storm. | 600 | ||||
| Towed trailer weight without brakes | 300 | ||||
| Max, roof rack weight | 50 | ||||
| Maximum lift without acceleration | 34 | 34 | |||
| Resource until the first cap. repair, km | 150 000 | ||||
| Cold start temperature, C | -25 | ||||
| Tires | 13″ | 13″ | 13″ | 165/70R13 175/70R13 | 13″ |
| Dashboard | 2105 | ||||
| Seats | 2105 | ||||
| Rear window defroster | + | + | + | + | + |
| Cooling fan | mechanical | mechanical | mechanical | ||
| Bumpers | aluminum | ||||
| Exterior mirrors | left | ||||
| Seat upholstery | is . leather | ||||
| Headlining | film | ||||
| Door trim | unified |
* - as you master it ** - installed on special equipment
Procedure for replacing the fuel pump VAZ 2107
Lada 2107 Arkano-mobile Samara Logbook Replacing the heater tap in a VAZ 2107 with a tap from a VAZ 2108 with its removal from the passenger compartment under the hood
To replace the fuel pump, you will first need to dismantle the failed device; for this it is recommended to use the algorithm of actions described below:
Taking into account the peculiarities of the location of the fuel pump in the VAZ 2107, you will first need to remove the upper surface of the engine. A large amount of dust and other dirt often accumulates on the cylinder block and the pump itself, so they need to be wiped with a damp cloth or a brush with soft bristles; you can use special means.
It is recommended to prepare several bolts with a diameter of 8 mm in advance. They will be used as plugs for the hoses, and during the process of dismantling the pump there will be no time to search for them, since fuel will immediately begin to flow out of the holes.
At the incoming and outgoing hoses, you need to loosen the side clamps that secure them. This can be done using a screwdriver or a wrench specially designed for such purposes. Immediately after loosening their position, it will be possible to remove the clamps from the fittings and dismantle the injector.
The cylinder block will also need to be removed, since the device is securely fixed to it. This is quite easy to do if you unscrew a few nuts using a 13mm wrench.
Immediately after removing the nuts, the position of the fuel pump will weaken and it can be removed
It is also worth paying attention to the gasket located between the pump and the spacer - it has an extremely short service life, so it is best to replace it along with the main device.
The spacer is necessary to ensure reliable protection of the fuel pump from high temperatures; When replacing the device, it should be cleaned of accumulated dust and dirt. There is another gasket between the spacer and the cylinder block; it is also recommended to replace it due to rapid wear.
After removing the old fuel pump, you can proceed to installing a new device, for this you should use the instructions below:
- If the car has a mileage of 100,000 km or more, you will first need to check the minimum protrusion of the pusher - the location of the new fuel pump and the correct functioning of it will depend on it. Otherwise, there is an increased risk of a significant reduction in fuel injection, which can lead to diaphragm rupture. Changing the protrusions of the pusher usually does not cause difficulties; it is enough to simply select and install suitable gaskets that will be located between the spacer and the cylinder block.
- Once the correct minimum projection is set, you should start turning the crankshaft at a low speed. At this time, the spacer should be pressed tightly against the cylinders, which will make it possible to measure the indicator of the pusher protrusion. The value can be dynamic and fluctuate constantly, but only within 0.8-1.3 mm. The gasket is changed in cases where the pusher is outside the specified range: depending on whether the value is too small or too large, its thickness is also reduced or increased.
- At the final stage, all dismantled parts and devices are installed. This process is not difficult; to implement it, it is enough to use the previous instructions, repeating all the described steps in reverse order.
Repair
The first step is to check the gasket between the pump housing and the insulating spacer. Its thickness must be at least 0.3 mm. The second gasket, between the spacer and the cylinder block, with a thickness of 0.8 mm, may also require replacement.
Between the heat-insulating spacer and the fuel pump body there should be a gasket 0.3 mm thick
If the car has a mileage of more than 100 thousand km, it is necessary to measure the amount of protrusion of the pusher. To do this, both gaskets are installed between the spacer and the cylinder block. You need to press the spacer tightly and, slowly turning the crankshaft, use a caliper to measure how much the pusher protrudes in the extreme position. The numbers should be in the range of 0.8-1.3 mm. Otherwise, replace the 0.8 mm shim with a thicker one, for example 1.25 mm (if the protrusion is greater than 1.3 mm), or a thinner one (if the pusher does not protrude enough). The store specifically sells a repair kit for this purpose with different gaskets. You can also cut the gasket yourself from poronite.
The basis of malfunctions of VAZ carburetors
The first signs of a carburetor malfunction may be the engine turning off immediately after starting or unstable operation at idle speed. The causes of these problems are:
- Clogged fuel nozzle channels XX. To fix this problem, you need to remove the nozzle, disassemble it and blow out the channel from the end with compressed air.
- Malfunction of the EPHH control system or electromagnetic jet (malfunction of the VAZ-2107 carburetor). In this case, you should check the power supply to the valve from the control unit using a test lamp. The performance of the valve itself can be checked using a tester.
- Violation of the tightness of the float mechanism. In this case, the specified fuel level in the chamber is not maintained. As a rule, gasoline overflow occurs. To eliminate the malfunction, you must first replace the needle along with the seat, and then adjust the required fuel level.
- Insufficient clearance at breaker contacts. A sign of this may be unstable speed due to strong sparking of the contacts or a poor-quality spark. To eliminate the malfunction, it is necessary to adjust the contact gap (0.4 mm) and check that there is no play in the bearing.
- Failure of the resistor, which is built into the distributor runner, can lead to poor spark quality. In this case, you will have to replace the resistor. If a breakdown occurs on the way and you need to continue moving, you can temporarily repair the broken circuit with a thin wire, wrapping it around a resistor.
- Wear or large play of bearing 800706U in a distributor with a vacuum corrector can be determined by an unstable spark. The damage can be eliminated by replacing the bearing.
- Air leaks into the intake pipe can be the result of the following problems:
violation of the tightness of the hose or the vacuum brake booster system itself;
- burnout of the head gasket or failure of the pipe connection;
- wear or deformation of the crankcase ventilation system spool, which is located on the axis of the first chamber;
- failure of the drainage tube;
- coking of the annular slot zone of the quantity screw and sprayer.
The car accelerates poorly or with dips
If the engine speed in idling mode is stable, but the car has dips or picks up speed rather slowly, malfunctions of the VAZ-2109 carburetor can be caused by the following problems:
- the fuel level in the float chamber is low;
- insufficient fuel injection due to improper operation of the accelerator pump;
- late ignition;
- sticking of the centrifugal regulator of the ignition system interrupter-distributor;
- the dimensions of the nozzles or air and main fuel jets do not correspond to the specified parameters;
- clogging of the channels of the quality and quantity jets;
- plaque on the emulsion tube of the primary chamber due to water ingress;
- suction in the intake manifold or mismatch of the XX jet, which is typical after installation of a gas installation;
- malfunction of the coil, slider, resistor, spark plugs or broken wire.
Getting rid of rust
If dirt can be removed from the tank without additional equipment, then it will not be possible to get rid of rust so easily.
Today, car enthusiasts have come up with several ways to clean the device from the effects of corrosion, the most popular of which are:
- Cleanse with Coca-Cola soda without sugar. It is necessary to empty the tank using the drain hole and fill it with soda heated to 40 degrees. It is enough to take 5-7 liters of liquid. Thanks to orthophosphoric acid, the tank will be cleared of rust in 4-12 hours, depending on the degree of contamination. After this period, the drink is drained and the tank is dried.
- Removing rust with acetone. This cleaning method is quite dangerous, since during it a large amount of flammable gases are released. For this reason, the procedure must be carried out outdoors, equipped with rubber gloves and safety glasses. For effective cleaning you need to:
- drain fuel;
- fill the tank with warm water and drain it (repeat the action several times);
- dry the container;
- pour acetone in a ratio of 1 liter of reagent per 100 ml of water for 2-3 hours;
- drain the liquid and rinse the tank with soda solution (100 g per 10 liters of water);
- rinse off the remaining soda with clean water and dry the tank.
The second method is more labor-intensive, but still effective.
Reasons for the malfunction of the VAZ 2107 fuel pump
- Depressurization of the working chamber due to wear of the sealing gasket. This causes fuel to leak out of the pump or air to be sucked in instead of gasoline.
- Clogged valve channels (intake and exhaust), as a result of which the valves cease to perform their functions. The problem can be prevented by installing a fine filter in the fuel line in front of the fuel pump.
- Wear and distortion of valve parts. The result of the misalignment is the same as when the valves are clogged, but identifying and eliminating the problem is quite difficult.
- Rupture of the working membrane. Pressure drops cease to form in the working chamber, and the pump loses its functionality.
- Damage to the safety chamber. Gasoline begins to enter the engine crankcase, where it dilutes the engine oil. If the problem is not noticed in time, the engine may seize.
Removal
1. Relieve the pressure in the power system (see “Relieving pressure in the power system”).
2. Disconnect the wire from the negative terminal of the battery (see “Battery - removal and installation”).
4. 7 mm
Unscrew the eight nuts securing the electric fuel pump to the fuel tank around the perimeter of the flange.
5. Lift the electric fuel pump and tilt it, removing the float of the fuel level indicator sensor from the hole.
6. To remove the receiving mesh filter, carefully pry it off with a screwdriver.
7. Remove the filter from the pump tip.
8. Wash the filter in acetone or a similar solvent, clean it with a hard brush and blow it with compressed air.
9. To replace the fuel level indicator sensor, use a screwdriver to release the clamp of the sensor and pump wire block. Disconnect the block.
10. Using a slotted screwdriver, press the wire clamp and remove it.
11. Mark the position of the wires in the block so as not to confuse them during assembly. Use an awl to press out the ends of the sensor wires and disconnect them from the block.
12. Using a slotted screwdriver, unscrew the screw securing the ground wire of the pump and the lower mounting of the sensor.
13. Using the same tool, unscrew the screw of the upper sensor mounting.
14. Remove the fuel level indicator sensor.
Electrical circuit of the fuel pump VAZ 2107
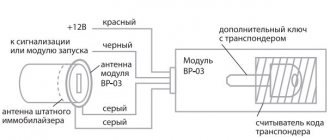
In fact, there are many electrical wiring diagrams on the Internet, but for some reason unknown to us, they are so uninformative and confusing that it is very difficult for an ordinary person to understand it. Therefore, we decided that it was worth drawing it in a more accessible and visual form:
From this you can already understand where to look for a fault. So, we have familiarized ourselves with the diagram, now we will describe the driver’s action if, after turning the key or while driving, the electric fuel pump stops working:
1. We need to check the electromagnetic relay REL1, in the seven, this relay is located in the glove compartment area, in addition to this relay, there are two more relays on the mounting strip, but we don’t need them today. Therefore, we unscrew the mounting plate and begin to check the middle relay:
A) find the thick pink wire and turn on the ignition, if everything is fine with the wire, then a voltage of +12 Volts should appear on it (pin 30). If voltage comes, then take the wires from the tester and connect it with gray (pin 87). If the pump does not work, then the problem is not in and then we move on to the next point “B”, and if it works, then to point “D”.
B) we move into the trunk, find the location of the fuel pump and check two “chips”: black - more elongated and white, which is located directly on the VAZ 2107 fuel pump. The engineers who developed the fuel pump probably put some hidden meaning into its design, because in 90 % of pump breakdowns are caused by the white connector, which is impossible to get to without dismantling the pump. If you have reached this point, we recommend replacing the white connector with a conventional solder connection. The very reason for the failure of the white connector lies in the miscalculation of the load: significant currents flow through this contact, and the contact itself is small in area and simply burns out over time. If everything is in order with these connectors, move on to the next point.
C) we check the integrity and reliability of the “ground” contacts - this is a black wire, the end of which is connected to the lower points of the trunk using a self-tapping screw.
D) check the power to the coil of relay 1; if it comes, but the fuel pump does not work, replace the relay.
If there is no power, then we need to make sure that there is no plus or minus coming to the relay. There should be a minus on the thin black-gray wire; if the minus is missing and the wire is intact, we recommend contacting a service station, as you most likely won’t be able to do it on your own. If there is no plus or minus, then we call fuses F1, F2, F3 in sequence.
We hope that our article and photographs helped to find a fault in the control and power supply circuit of the fuel pump on a VAZ 2107.
Our readers often contact us with problems that arise during the maintenance and operation of vehicles. Lately we have been receiving a lot of questions like “...the VAZ 2109 injector fuel pump does not work. What to do?". We will try to carefully analyze this malfunction and find ways to eliminate it. In the case when the car’s starter “turns” normally, but the engine does not start, it is necessary to check whether the fuel pump turns on. On Russian-made cars, the operation of this device can be heard directly from the cabin - by the sound coming from under the rear seat. If, when you turn on the ignition, you do not hear a characteristic “buzz” from the trunk of the car, then you will need to check the integrity of the fuses, the operation of the engine control system relay (main) and the fuel pump relay.
What is a fuel pump and why is it needed?
So, the first thing I want to talk about is what a fuel pump is and what it is intended for. As you can already understand from the name, the gas pump comes from two words: gasoline and pump, that is, it is a pump that pumps gasoline, everything seems to be clear here, and there is nothing complicated about it. In the fuel system, the fuel pump - if compared with the human body, can be called a heart, since our heart is also a kind of pump or pump that pumps blood, providing the body with everything vital. Life is impossible without a heart (fuel pump), and this also applies to a car with a non-working gas pump. The car turns into a static pile of metal that is incapable of anything.
Where is the VAZ 2107 fuel pump located?
Depending on the type of engine power supply, the location of the fuel pump also changes. Moreover, carburetor “sevens” have conventional mechanical pumps. They are installed in the engine compartment, on the side of the cylinder block. A distinctive feature is the presence of a manual drive lever.
The photo shows a VAZ 2107, the problem unit of which is the fuel pump
Fuel line hoses are connected to the unit on both sides. But owners of injection Ladas should look for the fuel pump in the rear of the car. More precisely, the electric pump is located directly in the fuel tank, which, in turn, is fixed in the area of the right rear fender, under the trunk trim.
How to check the fuel pump (carburetor) for malfunctions:
- Loosen the clamp and remove the hose supplying fuel to the carburetor from the fitting.
- To prevent gasoline from flowing out of the hose, plug it with a pre-prepared M8 bolt.
- Pump the hand drive lever several times.
- A strong stream of fuel should shoot out of the outlet fitting. If so, the pump is working. Otherwise, continue checking.
- Loosen the clamp, remove the second hose and plug it in the same way as the first.
- Cover the inlet fitting with your finger and swing the lever a couple of times. You should feel a vacuum, that is, your finger seems to be sucked into the hole. If suction is present, the fuel line must be checked. If the finger is not sucked in, you need to replace the pump or repair it.
Video about fuel pump malfunctions
Replacement:
- Using a metal brush, WD-40 (or white spirit), clean the area where the pump meets the cylinder block.
- Disconnect and plug both hoses with M8 bolts.
- Using a 13 mm wrench, unscrew the two fastening nuts.
- Remove the fuel pump from the studs.
- Install the new pump in reverse order.
How to remove the gas tank on a Lada X Ray
Dismantling the unit is necessary for washing or repairing it. The process does not require deep knowledge or the presence of a highly specialized instrument, which makes it possible to perform the operation independently. The sequence of actions is as follows:
- Put the car on the lift.
- Release the pressure inside the pressure lines. To do this, you need to turn off the power to the fuel pump and start the engine until the fuel runs out (stops).
- Fold down the rear seats to access the pump.
- Disconnect the power supply from the battery and loosen the mounting bolts. Then you can remove the unit from the cylinder.
- Open the filler flap and unscrew the mounting flange screws (2 pieces in total).
- Remove the rear wheel.
- At the top under the arch, near the filler pipe, there is a body weight mount. You need to unscrew it with head No. 10 and disconnect the wire from the stud.
- Next we go down. 5 nuts and 1 bolt of the pipeline protective casing are unscrewed and the part is removed.
- Using a flat-head screwdriver and pliers, disconnect the fastening clips of the TB thermal protection fasteners.
- Remove the foil screen from the seat.
- Remove the exhaust system from the brackets and move it to the left side in the direction of travel of the car.
- Next, you need to disconnect the fuel supply and steam return pipes from the absorber. To do this, the latches are pressed in and the tubes are pulled off the fittings.
- The next step is to remove the handbrake line clamps (you can simply move the lines apart).
- The suspension bolts are unscrewed with a wrench and the tank is removed from the car.
The assembly of the structure is performed in the reverse order.
Main causes of malfunction
The fuel pump can stop functioning only for two main reasons - lack of fuel in the beam or the occurrence of malfunctions.
In the second case, the causes of breakdowns are usually as follows:
- Using poor fuel that does not meet quality standards.
- Valve failure. Most often, they simply become clogged, in which case it will be enough to dismantle the lid and mesh of the device and then clean them. If the valves are loose and their position is unreliable, the pump will need to be completely replaced.
- A blockage in the filtration system through which the fuel passes, causing excessive pressure to be applied to the pump, preventing it from functioning properly.
- Lack of timely refueling and driving a car with a minimum amount of fuel in the tank. This causes the device to idle, which quickly leads to its malfunction.
- Relay or fuse failure.
The VAZ 2107 is equipped with an injection pump - this is a fairly reliable device that rarely fails.
In most cases, all breakdowns occur due to the driver’s fault; If you suspect a malfunction, you can check the fuel pump in the following way:
- Using a screwdriver or a special wrench, loosen the clamp of the incoming hose through which the fuel is supplied, after which it can be removed from the studs.
- Install a plug using a bolt with a diameter of 8 mm; it will prevent fuel from leaking out.
- Make several movements using the hand drive lever. At this moment, it is necessary to monitor the outlet fitting - a sufficiently strong stream of fuel should shoot out of it, which will indicate that the device is in good condition. If this does not happen, you will need to move to the next step to continue the diagnostic process.
- It is necessary to loosen the clamp of the outlet hose and install a plug in the same way as was done before.
- A damper is placed on the inlet fitting; you can simply hold it with your finger, and then operate the manual drive lever again. The absence of a feeling of vacuum and suction of the finger inside will indicate that a breakdown has been detected: the fuel pump should be replaced or repaired.
- If no faults are detected at the previous stages, it is necessary to check the fuel line; most likely, it will be the cause of the breakdown.
Unlike older models, the VAZ 2107 was equipped with an electric fuel pump, so its transition to operating mode and the start of operation is indicated by a characteristic buzzing sound that occurs after turning the winding key. Its absence may indicate a failure of the relay and fuse, so these parts of the device should be checked first.
It's quite easy to do this:
- You need to find a bracket with fasteners for these elements; it is located under the front panel near the glove box. It should have 3 relays and 3 fuses installed.
- Initially, the outermost fuse on the left side is inspected; there should be no signs of burnout on it.
- Next, the relay located in the middle is checked - you will need to check the voltage readings between the body negative after turning on the ignition and the pink wire.
- If there is a voltage of 12V, you need to short the pink wire to the gray wire, which will allow you to connect contacts 30 and 87 of the relay. The start of operation of the fuel pump will indicate a failure of the relay. This can be checked by temporarily installing a working relay removed from another vehicle.
Modifications
- VAZ-2105 - 1.3 l. carb. VAZ-2105 engine with 4-speed Checkpoint.
VAZ-21050 - 1.3 l. carb. VAZ-2105 engine with 5-speed Checkpoint.
VAZ-21051 - 1.2 l. VAZ-2101 carburetor engine with 4-speed gearbox.
VAZ-21053 - 1.5 l. carb. engine VAZ-2103 or injection VAZ-2104 with 5-speed. Checkpoint.
VAZ-21054 is a small-scale modification produced for the traffic police, the Ministry of Internal Affairs and the FSB with an additional gas tank and battery.
VAZ-21055 - 1.5 l. diesel VAZ-341 produced by Barnaultransmash, small-scale modification for taxis.
VAZ-21057 (Lada Riva) - an export version of the VAZ-21053 with right-hand drive, produced in 1992-1997 for the UK.
VAZ-21058 is an export version of the VAZ-21050 with right-hand drive, produced in 1982-1994 for the UK.
VAZ-21059 - 1.3 l. rotary engine VAZ-4132 with a power of 140 hp.
Number of gear stages
Final drive ratio
Maximum speed, km/h
165/70R13 175/70R13
Rear window defroster
| Performances | Four-stroke, gasoline, carburetor, four-cylinder | diesel | rotary |
| Body type | |||
| Number of doors | |||
| trunk volume, dm 3 | |||
| Overall dimensions, mm: | |||
| own weight, kg | |||
| Wheelbase, mm | |||
| Front wheel track | |||
| Rear wheel track | |||
| Drive wheels | |||
| Ground clearance to floor pan | |||
| Clearance to rear axle beam | |||
| Clearance to front suspension beam | |||
| Engine | 341- diesel | VAZ 4132 | |
| working volume, cubic cm | |||
| Max. power, kW (at rpm) | |||
| Max. power, l. With. | |||
| Max. torque my., Nm (at rpm) | |||
| supply system | carburetor | carburetor | carburetor |
| Gearbox ratios: | |||
| reverse | |||
| acceleration to 100 km/h, s | |||
| Fuel consumption, l/100 km: | |||
| fuel consumption at 90 km/h | |||
| fuel consumption at 120 km/h | |||
| fuel consumption in the urban cycle | |||
| Fuel tank capacity, l | |||
| Front brakes | disk | ||
| Rear brakes | drums | ||
| Braking distance loaded from 80 km/h | |||
| Parking brake drive | cable | ||
| Clutch drive | hydraulic | ||
| Front suspension | independent | ||
| Rear suspension | five-rod | ||
| Steering | worm - roller | ||
| Smallest turning radius | |||
| The weight of the towed trailer is storm. | |||
| Towed trailer weight without brakes | |||
| Max, roof rack weight | |||
| Maximum lift without acceleration | |||
| Resource until the first cap. repair, km | |||
| Cold start temperature, C | |||
| Dashboard | |||
| Cooling fan | mechanical | mechanical | mechanical |
| aluminum | |||
| Exterior mirrors | |||
| Seat upholstery | |||
| Headlining | |||
| Door trim | unified |
* - as you master it ** - installed on special equipment
In the line of models coming off the assembly line of the Volzhsky Automobile Plant, the VAZ-2105 occupies a special place, primarily due to the fact that this particular car is considered the first-born of the second generation of rear-wheel drive Zhiguli. For its time, the design of the “five” was close enough to fully comply with the trends of European automobile fashion, and for the USSR in the early 80s, according to many experts and car enthusiasts, it was the most stylish car. Despite the fact that the VAZ-2105 was never destined to become the most popular model, the car continues to enjoy well-deserved respect among car enthusiasts. Today in the automobile market, the status of the VAZ-2105 can be determined in accordance with its direct purpose, that is, as a means of transportation, if not the most comfortable, but quite reliable and time-tested.
Electrical circuit of the fuel pump VAZ 2107
In fact, there are many fuel pump wiring diagrams on the Internet, but for some reason unknown to us, they are so uninformative and confusing that it is very difficult for an ordinary person to understand it. Therefore, we decided that it was worth drawing it in a more accessible and visual form:
From this you can already understand where to look for a fault. So, we have familiarized ourselves with the diagram, now we will describe the driver’s action if, after turning the key or while driving, the electric fuel pump stops working:
1. We need to check the electromagnetic relay REL1, in the seven, this relay is located in the glove compartment area, in addition to this relay, there are two more relays on the mounting strip, but we don’t need them today. Therefore, we unscrew the mounting plate and begin to check the middle relay:
A) find the thick pink wire and turn on the ignition, if everything is fine with the wire, then a voltage of +12 Volts should appear on it (pin 30). If voltage comes, then take the wires from the tester and connect it with gray (pin 87). If the pump does not work, then the problem is not in the relay and then we move on to the next point “B”, and if it works, then to point “D”.
B) we move into the trunk, find the location of the fuel pump and check two “chips”: black - more elongated and white, which is located directly on the VAZ 2107 fuel pump. The engineers who developed the fuel pump probably put some hidden meaning into its design, because in 90 % of pump breakdowns are caused by the white connector, which is impossible to get to without dismantling the pump. If you have reached this point, we recommend replacing the white connector with a conventional solder connection. The very reason for the failure of the white connector lies in the miscalculation of the load: significant currents flow through this contact, and the contact itself is small in area and simply burns out over time. If everything is in order with these connectors, move on to the next point.
C) we check the integrity and reliability of the “ground” contacts - this is a black wire, the end of which is connected to the lower points of the trunk using a self-tapping screw.
D) check the power to the coil of relay 1; if it comes, but the fuel pump does not work, replace the relay.
If there is no power, then we need to make sure that there is no plus or minus coming to the relay. There should be a minus on the thin black-gray wire; if the minus is missing and the wire is intact, we recommend contacting a service station, as you most likely won’t be able to do it on your own. If there is no plus or minus, then we call fuses F1, F2, F3 in sequence.
We hope that our article and photographs helped to find a fault in the control and power supply circuit of the fuel pump on a VAZ 2107.
Power check
You can establish the presence of voltage at the TN connector using a simple test to check electrical circuits. To check the fuel pump, in the electrical diagrams for your car model, find the pinout of the electrical connector of the fuel module. For the pump motor to operate, “–” and “+” are required. If, after turning on the ignition and connecting the control contacts to the corresponding pins of the block, the light comes on, then everything is in order with the supply voltage. Using this method, you can check for the presence of +12V and ground in the fuel pump relay connector, and establish the presence of supply voltage from the ECM to the relay. If the fuel pump does not turn on, but there are no problems with the components of the electrical circuit, the reason is in the fuel pump itself.
The most convenient way to determine why there is no power to the fuel pump is to use a multimeter. Let's say that + 12V to the pump comes from the relay, but does not reach the fuel module connector. In this case, it is necessary to ring the wires from the relay to the fuel section. In ohmmeter mode, you will not only find an open, but you will also be able to see the parasitic resistance in the circuit. When considering possible reasons why the fuel pump does not pump, do not forget about the immobilizer failure. Often in such cases the engine starts, but stalls after a few seconds.