One of the car maintenance operations is replacing the VAZ 2110 fuel pump grid. The procedure is quite simple; you only need knowledge of the procedure for performing the work and a minimum set of several tools. Therefore, it is usually performed by car enthusiasts themselves, without the involvement of service station specialists.
Why doesn't the fuel pump deliver gasoline?
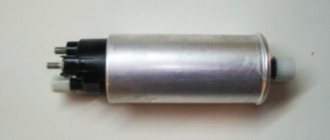
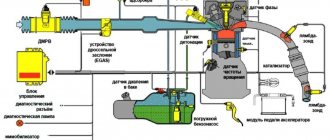
One of the most important elements of the fuel injection system of a gasoline engine is the electric fuel pump, which is located in the fuel tank of the car. The fuel pump pumps fuel into the system from the gas tank, creating a certain pressure.
Auto repair experts identify the following common fuel system problems that are related to the fuel pump:
The fuel pump pumps poorly and does not create the required pressure; the fuel pump does not pump when the ignition is turned on; Considering that the fuel pump is an electromechanical device, the most common fuel pump malfunctions are related to both the mechanical and electrical parts. Next, we will look at what signs indicate a breakdown of the fuel pump and why the fuel pump stops pumping partially or completely.
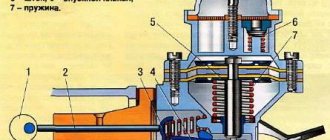
Checking the fuel pump of a carburetor car (mechanical)
Mechanical fuel pump - diagram
To check the operation of the fuel pump, you should:
- Remove the fuel hose from the carburetor inlet fitting.
- Immerse the hose in a specially prepared transparent bottle. By actively using the pumping lever manually, we notice how strong and dense the fuel is supplied. Air impurities should not be visually noticeable.
Delayed jet output is not a sign of a breakdown, especially if the car has been parked for a long time. As a rule, diaphragms eight and nine are the main cause of malfunction.
Be that as it may, you need to inspect both the strainer and the inlet/outlet valve.
Even if the gaskets are replaced, fuel may leak. In this case, the problem lies in the tightness of the fuel pump housing due to deformation during repairs.
Let's summarize:
The causes of fuel pump problems, both electrical and mechanical, are varied, and the need to find/fix a breakdown may take you by surprise along the way. By following the above recommendations, you will be able to independently carry out the entire necessary set of measures to diagnose this device. And you should start with the power supply (if it is an electric fuel pump) and the operation of the diaphragm when checking a mechanical fuel pump. Very often, the unstable operation of a fuel pump is not due to its breakdown, but to related parts - a filter, check valve or injectors.
Source
Signs of fuel pump malfunctions
The main symptoms of fuel pump failure, as well as malfunctions in its operation, are:
- the car starts with difficulty, the engine runs unstable, there are dips, jerking when pressing the gas pedal, etc.;
- the pump does not pump after turning on the ignition, does not turn the starter and does not pump the fuel pump, the engine does not start;
There have also been cases when the fuel pump stops pumping while driving. In such a situation, the engine begins to malfunction and stalls immediately after the remaining gasoline in the fuel line is used up. The problem can occur either regularly or periodically.
Replacing a VAZ-2112 fuel pump - features of a car with 16 valves
In cars with such an engine, pressure is relieved by disconnecting the device in question and the pad. Then the internal combustion engine is started - it stalls. Try again twice. If the engine does not start the third time, the goal has been achieved. Disconnect the two tube tips by pressing the latches. Next, take the wrench (or extension) and put the cap on it. Unscrew the eight nuts securing the fuel pump to the tank. Remove the clamping ring.
When installing the mechanism in a 16-valve car, make sure that the cutout on the seal coincides with the protrusion on the cover. The tip is placed on the inlet pipe.
The fuel pump does not pump: causes and diagnostics
Let's start with the fact that if the gas tank is full, the battery is charged, the spark plugs are dry and there is a spark, the starter turns the engine normally, but the engine does not seize, then you should pay attention to the gas pump. A common problem is that there is no power to the fuel pump after the ignition is turned on. In a similar way, the malfunction manifests itself in motion, when the power to the fuel pump is lost and the engine suddenly stalls.
An equally important point is how much the fuel pump pumps. In other words, the pump may hum and buzz (power is being supplied), but not create the required pressure in the fuel line. The pressure in the fuel system with a working fuel pump must be more than 3 bar (which depends on the specific car model). The indicated pressure is accumulated in the fuel rail and has an indicator of 300 kPa and above.
To check, you need to measure the pressure in the fuel rail with a pressure gauge, taking into account the indicators that are the norm for a specific car model. Using the example of injection VAZs, the pressure when the ignition is turned on is 3 atmospheres, at idle the figure is 2.5 atmospheres, when you press the gas 2.5-3 atmospheres. This method will help you accurately determine:
- malfunction of the fuel pressure regulator in the rail;
- breakdown of the fuel pump or a noticeable decrease in its performance due to wear;
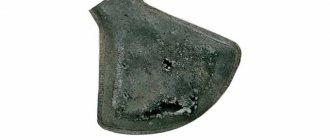
- severe contamination of filters (fuel filter and/or fuel pump mesh);
In the second case, when you press the gas, the pressure does not increase; in the latter case, the pressure gauge needle rises, but very slowly or jerkily.
A decrease in pressure below the norm will lead to the fact that the engine may not start or start with difficulty, stall, jerk, operate unstably and with failures. If this happens due to the fault of the pump and not the fuel filter, then there is a high probability that the coarse filter screen of the fuel pump is clogged. In this case, there is no need to change the fuel pump itself, since it will be enough to replace or even clean the mesh.
If you suspect that there is no voltage to the fuel pump, there is a quick way to check. It is enough to turn the ignition key and listen, as when you turn the key you should hear a slight hum from the fuel pump. If such a buzzing noise is not heard, it means there is no power to the fuel pump, there are problems with the wiring, etc.
We add that this method of determining the operation of the pump by sound is not suitable for all cars. On some models (especially premium ones), sound insulation is at a high level and the fuel pump turns on immediately after opening the driver's door, and not when turning the key in the lock. In this case, it may seem that the fuel pump does not work when the ignition is turned on, and the sound of the pump may simply not be heard.
Also in the general list of possible reasons why the fuel pump does not pump, the following are noted:
- failure of the fuel pump fuse;
- fuel pump relay failure;
- problems with the ground of the fuel pump;
- malfunction of the electric motor of the fuel pump;
- oxidation or damage to fuel pump contacts and terminals;
- the fuel pump itself is faulty;
When to replace
During this procedure, you can replace the air and oil filters, as well as the fuel pump mesh. If you make it a habit to change this mesh only after it is completely clogged, the pump will constantly work with increased load, as a result of which repair or even replacement of the VAZ 2110 fuel pump will quickly be required.
If after this the car engine does not start or even the sound of the VAZ 2110 pump cannot be heard, then you need to check the presence of gasoline pressure in the line. This is done using the bleed valve on the ramp. The verification procedure will be discussed below. If there is no fuel, it becomes clear that the fuel pump is not working or its screen is clogged.
Wiring to the fuel pump
On most cars, the wiring to the fuel pump consists of three wires: “plus”, “minus”, and also a wire for indicating the amount of fuel in the gas tank. If the fuel pump does not pump, then the cause may be a lack of power.
To check the power to the fuel pump, just take a 12-volt light bulb and supply it with power from the external connector of the fuel pump. After turning the ignition, the control lamp should light up. If this does not happen, then the problem is in the external circuits. If the lamp comes on, it will indicate the need to check the internal contacts of the fuel pump.
To check the external wiring, you should alternately connect the positive and negative contacts, which are removed from the fuel pump power connector, to the ground of the pump. The contacts must also be connected to the fuel pump relay. If you place the negative contact on ground, after which the ignition is turned on and the light comes on, then this means that this contact is faulty. If the light bulb does not light up, then problems with the “plus” are obvious. If you place a contact on the relay and the light comes on, there is probably damage to the wire on the section that connects the relay and the fuel pump itself.
Fuel pump electric motor
If checking the pressure in the fuel rail and the external wiring to the fuel pump gives positive results, then you should check the fuel pump motor. This electric motor is responsible for circulating gasoline inside the fuel pump.
When checking, you need to take into account that the terminals on the fuel pump themselves tend to oxidize, as a result of which power is not supplied and the pump does not pump. In this case, the motor is working, but the terminals need to be cleaned or re-soldered.
To check the fuel pump motor, you will need to attach the test lamp wires to a cleaned and serviceable terminal of the electric motor, after which you should turn on the ignition. If the light comes on, this will indicate that the fuel pump motor is not working.
Instructions on how to change the fuel pump yourself
To begin, move the rear seat to the side and fold back the piece of carpet that covers the fuel module hatch.
Next, unscrew the two bolts securing the hatch and remove it.
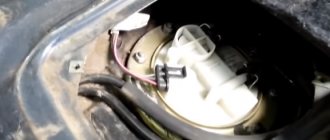
A fuel module with two tubes will be visible in front of us.
Before removing the pipes, it is necessary to relieve the pressure in the fuel system. To do this, you will need to remove the fuel pump fuse, or turn off the power to the module and start the engine. After the remaining fuel in the system has been used up, the car will stall and you can begin replacing the fuel pump.
Our fuel module can be of different types - quick-release and screw-on, depending on the year of manufacture of the car. If the fuel pipes are on nuts, unscrew them with a 17mm wrench; if they are on quick releases, then simply tighten the clamps and remove them from the module.
Now, using a 7mm wrench or tube, unscrew the 8 bolts securing the fuel module clamp.
We move the fuel pipes to the sides, lift the clamp and carefully, so as not to spill gasoline, pull out the module.
Disconnect the fuel pump plug
Remove the lock shown in the photo
Using a flat screwdriver, unscrew the two bolts
Remove the rubber bushing and the plastic part underneath it
Now you can remove the fuel pump from the module and replace it with a new one.
To install a new fuel pump and perform assembly, you will need to put a corrugated hose on the pump. To ensure that this hose does not allow air to pass through, it must be heated when it is put on the pump.
Then we reassemble in reverse order.
Fuel pump relay
The fuel pump relay is often mounted next to the fuel pump ground, that is, under the dashboard. A normally operating relay after turning on the ignition for a couple of seconds allows the pump to create pressure in the system and immediately turns off.
When the ignition key is turned, the driver hears a characteristic click (the relay is turned on), then a similar click will indicate that the fuel pump relay is turned off. If such clicks are not heard, this indicates a malfunction of the relay or its contacts. The optimal solution would be to replace the fuel pump relay with a new or known-good device. Let us add that the cost of spare parts is quite affordable.
Description of the work
- open-end wrench 13 and 17 mm;
- Phillips screwdriver;
- 7 mm tubular socket wrench.
- Loosen the nut securing it to the negative terminal of the battery, remove the clamp along with the wire.
- Relieve pressure from the fuel line. At the end of the ramp, near the outer nozzles, there is a bleed valve with a rubber cap on it. Having removed it and substituted a plastic cup, you need to press the valve stem. Fuel will leak out from there and the pressure in the system will drop.
- Using a Phillips screwdriver, unscrew the 2 screws securing the hatch cover, remove it and put it aside.
- Disconnect the fuel pump electric drive connector and move it out of the way.
- Using an open-end wrench, loosen and unscrew the 2 nuts that secure the fuel line pipes to the fuel pump fittings.
- Pull the tubes out of their sockets. The round rubber rings attached to their ends must be removed and replaced with new ones, since they are designed for one-time use.
- Using a long tubular wrench, unscrew the 8 nuts that hold the flat flange that presses the VAZ 2110 fuel pump to the bottom surface. Remove the flange from the studs.
- There is a rubber gasket on the mounting studs under the clamping part of the body. The latter must be removed from the studs, otherwise it will not make it possible to pull out the fuel supply device. Then carefully remove the fuel pump from the tank cavity along with the float. If the rubber gasket is worn out, then it is better to replace it too.
If the ring is strongly stuck to the tube, it is recommended to pry it off, for example, with a flat screwdriver. Next, a new mesh is placed and fixed by pressing the hand all the way. Now you can reassemble, which is done in reverse order. There is an arrow stamped on the top of the unit; it should point to the rear of the car.
If it is necessary to replace the fuel pump on a VAZ tenth model or repair it, then the system is disassembled as described. When replacing, you need to remove the float and level sensor from the unit and move them to the new pump. The entire procedure, if performed in conjunction with replacing other consumables, will take you no more than half an hour.
Fuel pump fuse
During diagnostics, be sure to check the fuel pump fuse. The specified 15 A fuse is usually located in the fuse box in the engine compartment and is marked FUEL PUMP, which means fuel pump.
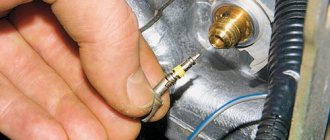
The fuel pump fuse needs to be pulled out and its contact inspected. The integrity of the contact will indicate that the device is normal. A damaged contact will indicate that the fuel pump fuse has blown. In this case, you need to install a new fuse, which has a very low cost (as in the situation with the fuel pump relay).
Other causes of fuel pump malfunctions
Quite often, unprofessional installation of additional electrical equipment or security anti-theft systems leads to the fact that the power to the fuel pump is lost due to mixed up contacts or other connection errors.
Also, one should not exclude the possibility that a malfunction occurred in the car alarm or security system, after which the power supply to the fuel pump is blocked. In other words, the alarm blocks the engine from starting.
Finally, let’s add that the gas pump in the gas tank is immersed in gasoline, in which it is actively cooled. The habit of driving with an empty tank can quickly damage the electric motor of the fuel pump, as it burns out.
Didn't find the information you are looking for? on our forum.
Replacing the filler neck of the gas tank pipe
In my practice, there were many cases when, when removing the gas tank on a VAZ 2110, I had to cut off the hose or even the filler neck, since everything was stuck so tightly that it was simply impossible to do otherwise. If for some reason you have damaged the gas tank filler pipe, then the article below will show you the process of replacing this part with a new one.
Tools you will need to complete this job:
- Phillips screwdriver
- Head for 8 mm, 10 and 13 mm
- Ratchet handles
- Extension Cords
- Penetrating lubricant
- Flat blade screwdriver
Removing and installing the tank filler neck on a VAZ 2110
So, the first thing you need to do is remove the rear right wheel and first jack up the car to make it easier to carry out all the repairs. After this, unscrew the clamp bolt that secures the hose and pipe.
Now we go up a little higher and unscrew the neck fastening nut using a 13 mm wrench. This is clearly shown in the photo below.
And another clamp is located above. There you will need a key for 10.
And remove the clamp, putting it aside so as not to lose it. Next, open the gas tank flap and remove the rubber casing.
And now you can carefully move the filling pipe down to bring it to a more convenient position.
And now all that remains is to disconnect the hose from the top of the pipe, which is shown in the photo. We loosen the clamp that tightens this thin hose.
And after trying a little, we remove the hose from the tube:
Now the neck is almost completely freed, and all that remains is to disconnect it from the hose from below, the clamp of which we unscrewed at the very beginning.
After which we remove it without any problems. The end result is shown in the photo below.
The price of a new neck (filler pipe) of a gas tank on a VAZ 2110 is about 1000 rubles, but the same version can be bought at a disassembly site for half the price. Installation occurs in reverse order.