The steering rack began to knock. How to tighten it up?
- ESD on VAZ Priora turns off - 2 answers
- Should the steering wheel turn over bumps? – 1 answer
- On a Priora, the steering rack check light is on - 1 answer
- Why does the steering wheel shake when braking - 1 answer
This is possible. Remove the battery and its stand, which is secured with 13 bolts. You don’t have to remove it completely, but move it away so that your hand can freely crawl under the rail.
Then use your hand to feel the rack adjustment mechanism and pull out the rubber plug. It is used when you need to lubricate the mechanism. Next, we put our hand under the left rail, put a special wrench into the hole and slightly tighten the nut inside.
There is no need to tighten it too much, just turn it 20-30 degrees clockwise. If you overtighten, the steering wheel may bite during sharp turns. By the way, you can also tighten the steering rack on Kalina.
Subscribe
to our channel in
Index.Zen
Even more useful tips in a convenient format
When does the steering rack need to be tightened on a Priora?
The first sign indicating the need to adjust the rack is the appearance of a knocking sound when driving over small uneven surfaces. The knocking will be felt especially clearly when driving on country roads. In this case, the driver will feel shocks and vibrations on the steering wheel, which will also be transmitted to the entire car body.
In addition, if the steering wheel adjustment nut is loosened when driving on the highway, the car will “float” a little, and additional steering will be required from the driver, which will also immediately become noticeable.
Experts also say that a tightening is necessary if the driver begins to notice the appearance of a clearly audible crunching sound in the area of the steering column, as well as an increase in the amplitude of the steering wheel rotation.
Complex car radio malfunctions
In this article we will try to answer the questions:
What is a complex fault?
How can error codes help when repairing car radios?
In the practice of repairing car radios, there are often cases when, in order to restore the operation of the car radio, it is necessary to find and eliminate not one specific malfunction, but several. It’s good if the breakdowns are not related to each other or relate to different electronic components of the car radio (for example: no sound - the amplifier chip is faulty; no disk reading - the laser reader lens is dirty).
What if both faults are in the CD drive? With such malfunctions, the process of diagnosis and repair becomes difficult, since, having eliminated one malfunction, we are immediately faced with the manifestation of another. Such a malfunction with several causes can be called complex.
Let's look at troubleshooting a complex problem using the example of repairing a Pioneer DEH-P3500MP car CD receiver. This is a case from real repair practice and its consideration will be useful for those who are interested in the topic of repairing car radios with their own hands.
The Pioneer car radio came to the repair table due to the lack of reading from the CD.
Upon external inspection, it was noticed that when the disk eject button is pressed, the process of ejecting the disk occurs slowly. The car radio was also heavily soiled with dust.
It is no secret that when heavily soiled, the optics are the first to suffer - the surface of the laser reader lens becomes covered with fine dust and this prevents the laser beam from focusing on the surface of the CD. In this case, there may be failures during playback (the sound “hiccups”), failures during the initial loading of the disc (“NO DISK”, “Error”), a long search for a recording when switching to another song. Do not forget that the cause of such a malfunction can be not only contamination of the optics, but also degradation of the laser diode in the optical unit.
For car radios, if any malfunctions occur, an error code appears on the display. Knowing the decoding of the error code, you can more quickly find the faulty unit and not waste time on diagnostics. So, for example, on the Pioneer DEH-P3500MP car radio in question, when turning on and loading a disc, the message “ERROR-11” appeared on the display. At the same time, spinning of the disk was observed - which means the spindle motor is in order.
ERROR-11
If you refer to the service documentation for this car radio model, the code “ERROR-11” stands for: – No beam focusing. Well, everything is quite simple here, as already mentioned, the violation of the focusing of the beam is associated with contamination of the car radio with dust.
In this case, it may be necessary to completely clean all mechanical parts of the car radio and its housing. Cleaning the laser reader lens is made more difficult by the fact that it is necessary to disassemble the CD mechanism and remove the laser reader from it. Read about how to disassemble the CD mechanism here and here (another type of drive).
After the laser unit is cleaned of dust, the operation of the car radio can be completely restored. But we are considering a complex malfunction.
Upon further testing the operation of the car radio on several MP3 discs, it turned out that when switching several songs forward or backward, a failure occurs. After a long and unsuccessful search for the desired track, the ominous inscription “ERROR-30” appeared on the car radio display.
When tightening doesn’t help and the mechanism needs to be changed
It’s worth thinking about replacing the rack when tightening it does not in any way affect the car’s behavior on the road, and also does not help get rid of the unpleasant knocking noise. A failed steering rack will cause significant play in the steering wheel. Moreover, it may begin to jam (this happens extremely rarely, but similar cases are known). If the rack begins to jam, then it is better to stop using the car, as this can lead to the most dire consequences.
You cannot do without a replacement even if after tightening it you managed to get rid of knocks and vibrations, but they reappeared later.
Some operating tips
To make a full repair, you need to have not only knowledge and a sufficient set of tools, but also time. If you don’t have anything, it’s better to contact a car service. But their services are not cheap, so in order not to visit them often with the same problem, you should adhere to these simple rules:
- Try not to run over curbs and rails. This leads to cracks appearing on the rail. But most importantly, the steering shaft may become deformed.
- Try to twist the steering wheel to extreme positions as little as possible. This contributes to very rapid wear of the car's steering elements.
- Be sure to monitor the condition of the anthers. If they have cracks or cuts, replace them as quickly as possible. It's cheaper than replacing the entire rack.
- If your car has a hydraulic booster, be sure to keep track of what kind of fluid is in it. If it leaks or changes color, this will cause the Priora steering rack to break.
Be sure to carry out a complete diagnosis of the vehicle's suspension, steering and braking system. This way you will ensure that the car is operated as safely as possible.
What is needed for work and how to tighten the steering
To perform the tightening you will need the following tools:
- Slotted screwdriver (in simple terms, a “flat” screwdriver);
- Wrench 13;
- A special 17mm wrench designed to adjust the steering rack.
To make the work more comfortable and faster, it is recommended to drive the car into a special inspection hole or overpass, and also use an assistant, whose role even a child can handle.
To get to the rail, you should perform a number of simple steps:
- Disconnect the battery terminals and dismantle it;
- Using a 13mm wrench, unscrew the bolt securing the battery stand, and then remove it;
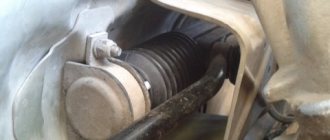
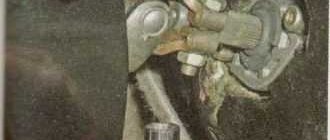
- Directly under the steering rack, using a slotted screwdriver, you need to pull out the small plug of the adjustment system.
After this, you will have access to the nut responsible for adjusting the thermal gap in the rail.
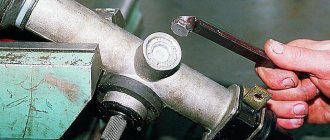
Next, you need to put your hand under the steering rack and try to put the rack wrench on the nut. It is necessary to tighten the nut clockwise, but since the rack itself is located upside down, from the outside it may seem that the nut must be tightened counterclockwise. Experts recommend tightening the nut no more than 25–30 degrees at a time, after which you should try to rotate the steering wheel, which should turn without jerking or biting.
It is also necessary to listen to the sounds coming from the steering wheel - if there are no knocks when turning the steering wheel, and there are no other noises, then the rack is tightened correctly, and you can put the battery and rubber plug in their place.
The tightening process on video
Major failures of the EUR
Experienced drivers and Prior owners can observe the following trend - breakdowns occur in the same parts, weak points of the system. Why is this happening?
The first thing you need to pay attention to is the operation of the electric power steering. After the system has been completely turned off, a code should appear on the on-board computer - it reports the cause of the breakdown. Each code has its own interpretation. However, very often the real reason for the cessation of operation of the amplifier can be determined only after a full diagnosis has been carried out. In order to find out about the nature of the breakdown of the Lada Priora electric power steering, do the following:
- The engine is turned off and the steering wheel is turned a couple of times.
- The engine turns on and the steering wheel turns several times.
The absence of changes in the applied efforts is a sure indicator that the power steering is disabled.
It is quite possible to drive with the system turned off, but it is not recommended. It is very difficult to understand the features of control with and without an electric booster. Therefore, it is better to perform a diagnosis. It will help determine which component has failed, whether it can be repaired or whether it is better to replace it with a new one.
Sometimes you can observe the following situation: the speedometer and the sensor stop functioning at the same time. This most often occurs due to a malfunction of the speed sensor. The sensor provides data to the control unit, which processes the information on the speedometer and determines the supply of the required amount of force.
If the cause of the breakdown is the sensor, the solution to the problem is simple. It is enough to check the quality of the wires and, if necessary, replace them with new ones. If the wires are in good condition, it is recommended to replace the sensor itself.
Stopping the operation of the electric power steering can also occur due to insufficient voltage. This occurs due to violations of the wire insulation - short circuits can occur. For the same reason, the generator stops working. The sensor has a huge number of wires, which over time can become dusty or clogged. In this case, you need to disassemble it and carry out “general cleaning”.
Fuse removal process
If, during smooth and smooth movement forward, the car turns sharply to the side, it is recommended to carry out unscheduled diagnostics. After all, such unpredictable behavior of the Priora’s electric power steering will not happen without emergency situations. Park and unplug the unit: Disconnect the fuse to stop power supply to the amplifier.
To remove the fuse, you need to do the following:
- we find the cover of the mounting block, localization is near the driver’s left foot;
- rotate the clamps;
- disengage the clutch;
- we find the block in which the fuse is located;
- we extract it.
A car malfunction indicates problems with the ESD. There can be many reasons for this, the breakdown of one part or several. To determine the cause as accurately as possible, seek specialized diagnostics. And you can replace or repair a damaged part yourself.
The process of removing the electric amplifier
If you decide to replace the electric power steering on a Prior car or make sure that its individual parts are in working condition, you need to remove the unit completely. For this you will need:
- chisel;
- head for 8 or 13;
- extension;
- ratchet.
The process of removing the EUR is simple and fast. The process is lengthy: you need to remove the steering wheel, grab the airbag, then remove the cover and finally, the ignition switch. After all this, you can take out the electric amplifier.
How to tighten the steering rack
Before we begin describing this repair, if it can be called such at all, let's look at the main reason why you have to tighten the steering rack on a Priora.
So, I think that many owners know that when a knock appears from the steering rack or its rod, it is necessary to make an adjustment, or rather, tighten the rack using a special nut, which is located on the inside of the case, which is clearly visible in the photo below.
To understand where this nut is located, look at the photo below, everything is shown from above - from the hood side, of course, in this case this nut is located on the reverse side:
To get to this adjusting nut, you will most likely have to remove the battery, since without it there is more free space under the hood. Although the good news is that even the battery in the Priora does not interfere with this repair (unlike cars such as Kalina or Granta).
It is worth noting that you may need the following tools for work:
- 10mm wrench or socket wrench
- key for 13
- the key for tightening the rack is exactly 2110 and not 2108
Now, using a special key from the inside, as shown in the photo below, insert it into the hole:
It is enough to make less than half a turn, and then try the play on the rods. If it disappears and there is no more knocking, then there is no point in tightening it further, since you can overdo it, and in this case the rail may bite. For a more visual example and description of the entire procedure, watch the video report below.
Tools for repairs
In order to independently repair the Priora steering rack, you will need certain tools and equipment. In particular, the following tools are needed:
- Slotted screwdrivers (flat).
- Spanners, open-end wrenches, heads 13.
- Special wrench 17 for adjusting the steering rack.
In order to complete all the work as quickly as possible, you need to install the machine on an inspection hole, lift or overpass. Help won't hurt you either, so you should have a partner. He will not be required to know the components and assemblies of the car, so you can use the help of your child or wife.
About the rake
The steering mechanism on Lada cars, starting with model 2108, has a steering rack. It is designed to move steering rods along a horizontal plane, which helps turn the car's wheels.
The design of the slats is quite simple and reliable, with the exception of one small drawback - a plastic bushing.
This bushing is made by the manufacturer from low-quality plastic, which soon leads to play in the rasp in it and the appearance of an unpleasant knock when moving on paving stones.
There is a rail between the engine and the passenger compartment, perpendicular to the exhaust manifold and attached with two brackets to the engine shield.
Briefly about the mechanism
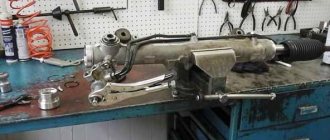
The element is a cylindrical body containing the following parts:
- the gear rack itself, moving inside the bushings;
- drive shaft with helical gear, rotating on 2 bearings (connected to the steering column);
- 2 rods connected to the ends of the rack and pinion mechanism and the steering knuckles of the hubs;
- a system of stops and springs that limit the travel of the rack and select the backlash of the gear transmission;
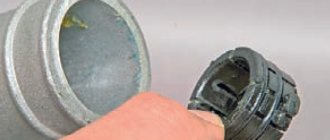
- rubber covers (anthers) in the form of round “accordions” that protect the mechanism crankcase from dirt;
- the element body is filled with liquid lubricant.
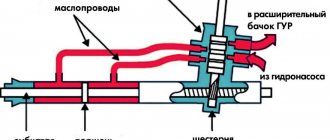
This is the design of a conventional mechanical and so-called electric rack, operating in conjunction with an electric power steering (EPS). If the car is equipped with a hydraulic booster (power steering), then the design of the mechanism is supplemented with cylinders and pistons that help move the gear bar in one direction or another.
The element works on a simple principle: when the steering wheel rotates, the drive shaft moves the rack through a gear in the required direction. The ends of the part connected to the rods cause the front wheels to turn. The power steering or electric power steering reacts to the movement of the steering wheel and “pushes” the rack and pinion mechanism in the desired direction, relieving physical stress from the driver.
Design
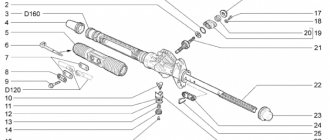
Steering rack design: 1 – shaft boot, 2 – cover mounting bolts, 3 – Belleville washer, 4 – worm shaft oil seal, 5 – worm gear cover, 6 – sealing collar, 7 – thrust bearing, 8 – worm shaft with bearing, 9 – rasp, 10 – left boot, 11 – binoculars, 12 – binocular bracket, 13 – nut plug, 14 – thrust nut, 15 – thrust spring, 16 – locking collar, 17 – thrust piston collar, 18 – thrust rasp piston, 19 – piston liner, 20 – steering rod bolt, 21 – stopper, 22 – plate, 23 – plastic clamp, 24 – steering rack boot, 25 – left side boot, 26 – steering rack pipe.
Video
This video shows how to repair the steering mechanism on Kalina.
Knock in Kalina steering rack. How to remove.
Installation of Kalina steering rack.
Repair of the steering column gearbox and the RR itself on Priora, Kalina, Grant.
How to install a steering rack from Kalina 2 to Kalina 1.
Steering rack for Lada Kalina Sport with a gear ratio of 3.1 instead of 4.02.
Do-it-yourself repair of the steering rack, but not Kalina, but Daevoo Sens / Daewoo Sens.
Kalina control rack - VAZ 11183 Kalina rack repair
Have you ever had a chance to monitor knocks and noises from the side? Probably it happened. They changed the control tips, changed the ball tips, even changed the springs with support bearings, but does the knocking continue? It's time to tug, make sure there is free play and start sorting out the rack. In this article I will talk about repairing the VAZ 11183 rack, but the development is identical to all other VAZ front-wheel drive racks.
The most interesting thing is that these motherfuckers from AvtoVAZ do not fundamentally change anything except the gearbox housing, I bought a repair kit 2110-2112, the rack is listed in catalogs as 2110, but the splined part is longer than 2110, and the gearbox is slightly different, so just change Unfortunately, 11183 for 2110 will not work, although 2110 costs 2500 in my town, and 11183 5500 costs 6000 rubles. The difference per pocket is very noticeable.
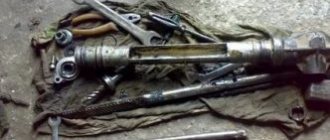
Well, it doesn’t fit and doesn’t fit, so we give the engineers a hard time and start disassembling it. Unfortunately, there won’t be a photo for the article, because I was up to my elbows in mud and didn’t want to wash myself for the sake of pictures, but I’ll try to describe everything carefully.
Removing the steering mechanism.
1. For convenience of work in the future, and so as not to climb into the interior with stains, unscrew the bolt securing the splined connection from inside the cabin (you will see it near the floor of the control shaft).
2. We lift the car on a lift, throw it down, and knock out the control tips from the steering knuckles.
Signs of play in slats
When driving over small irregularities such as a gravel road, shocks and knocks in the suspension are clearly audible and are transmitted to the steering wheel. These signs will not always refer to play in the rack. Similar impacts to the steering wheel can occur due to broken steering ends or a broken crosspiece of the steering mechanism. Before you begin repairing the rack, you must exclude the tips and steering cross from suspicion.
- Impacts to the steering wheel when driving over bumps
- Creaking sound when turning the steering wheel
- Biting the steering wheel in different positions
- The steering wheel does not return to zero position
Checking for play
Checking for play is done by rocking the swing arms up and down. To do this, we find the steering rods under the hood and pull each of them up and down; there should be no play or knocking. If any, then the rack should be maintained.
Airbag installation
Installation is carried out in reverse order. While working, stay outside the pillow deployment area. When you first turn on the ignition, stand outside the vehicle and turn on the ignition with your hand under the steering column.
Have you experienced a knocking sound in your steering? Let's solve this problem together.
Good day! Status: Verified
Story
: (Can be skipped). The steering rack was repaired, with removal and partial disassembly (without removing the steering tips, or as they are called “steering rods”). So, after installing the rack back, in order to get the bolt into the slots of the steering wheel with the rack, I had to turn the latter by 30 degrees, which ultimately resulted in an uneven position of the steering wheel.
In fact:
The steering wheel is not level relative to the level position of the wheels. Correction options:1.
Rearranging the steering rack by pulling out the steering wheel mounting with the steering rack from the splines. (I advise you to do this only if you need to re-assemble the rail). Time costs: 2 days .2.
Perform wheel alignment and tell people to set the steering wheel straight. Cost: 1 hour.
1000 rubles 3. Turn the steering wheel 30 degrees.
Costs: 1 hour, +1 neighbor.
I made decision No. 3 and after that go to the alignment. Does anyone think he did the right thing? I’ll add that the car was re-shoeed with summer wheels that were balanced.
Tools:
socket wrench (head) “24”, screwdriver with a flat blade, hex key “5”. Work:
Using the instructions “Removing and installing the steering wheel of Lada Priora, VAZ 2170, VAZ 2171, VAZ 2172” we do this:
1. Take a screwdriver with a 5 mm hex head. We insert it into the hole in the airbag mounting in the steering wheel. Unscrew the 2 bolts (They cannot be removed from the passes).
2. As soon as the bolts are unscrewed, the cushion will move slightly relative to the steering wheel.
3. Carefully turn the pillow sideways. Inspect the connector fastening.
4. Pry up the green clamp of the control wire block (which is in the center).5. Now we pull out the entire connector from the mounting groove.6. The pillow is removed and put aside.
Lift
If knocking is detected in the steering wheel, it can be tightened, but tightening will be effective only if there is knocking from the worm gear. If the knocking noise comes from a broken plastic bushing, then tightening is useless.
As is known from practice, the worm mechanism is quite reliable and is very rarely the culprit of knocking. Most often the bushing is to blame.
You can determine the culprit of the knock by pulling the steering rods one by one.
- If there is a knocking sound when applying forces to the right link, then the bushing is to blame.
- If there is a knocking sound when you apply force to the left linkage, then the worm gear is to blame.
In the first case, a lift is not advisable. Since the tightening nut only tightens the worm mechanism. To eliminate the knocking noise, it is necessary to remove the steering rack from the car and have it repaired.
Preparing for repairs
In order to dismantle the steering rack yourself, you need to do several manipulations aimed at preparation:
- Disconnect both terminals from the battery. Next you will need to completely remove the battery.
- Unscrew the bolt securing the stand under the battery using a 13 mm wrench.
- There is a plug at the bottom of the steering rack that covers the adjustment system. It must be removed using a thin flat-head screwdriver.
After carrying out these simple manipulations, you will have access to the adjustment mechanism. Only now can adjustment work begin.
Repair kit
In a Priora with an EUR, a rack from Kalina was installed with catalog number 11183-3400010 20. Therefore, the repair kit must be purchased specifically from Kalina.
Steering rack number
The repair kit includes a large number of parts necessary for repairs.
The price of a new rack starts from 5,000 rubles and higher, depending on the manufacturer, but new does not mean good, and the cost of a repair kit varies from 500 to 1,000 rubles, which is almost 10 times cheaper than a new rack.
Features of operation with power steering
The Priors were equipped with electric and hydraulic power steering. But the presence of such units does not affect the repair procedure, so you can safely follow the algorithm described above.
But there is one small nuance - on cars with a hydraulic booster installed, when replacing the rack, you will have to completely drain the fluid from the reservoir. And if a steering rack is installed on a Priora with an electric power steering system, you will need to disconnect the battery. But if you refer to the above procedure, you can see that the battery is completely removed at the first stage of repair.
Assembly
Assembly is performed in the reverse order of disassembly. Before installation, all parts should be lubricated with the oil used in power steering. This is done to avoid scuffing during assembly and adjustment.
PTFE parts should be handled carefully; they are fragile and will burst from impact or excessive load. A socket head and an extension to it will help to carefully press in the bushings.
When inserting a gear rod, it must be centered according to the marks made before disassembly. After this, attach the drive shaft. Insert the pressure sleeve and washers behind it, tighten the adjusting nut to the required number of turns.
Manually turn the mechanism in both directions until it stops (twisting by the drive shaft). The rod should move without difficulty, this means that the assembly is done correctly. After this, the locknut is tightened. Tighten the mechanism rods and install the anthers.