About the rake
The steering mechanism on Lada cars, starting with model 2108, has a steering rack. It is designed to move steering rods along a horizontal plane, which helps turn the car's wheels.
The design of the slats is quite simple and reliable, with the exception of one small drawback - a plastic bushing.
This bushing is made by the manufacturer from low-quality plastic, which soon leads to play in the rasp in it and the appearance of an unpleasant knock when moving on paving stones.
There is a rail between the engine and the passenger compartment, perpendicular to the exhaust manifold and attached with two brackets to the engine shield.
Alarming symptoms
No matter how often you change the steering rack lubricant, unfortunately, it cannot extend the life of all parts of the mechanism indefinitely. Therefore, if the following factors are detected, it is recommended to immediately stop using the vehicle and contact a service center.
- Increased steering play.
- Turning the steering wheel requires more effort than before.
- Traces of steering rack lubricant leakage were found.
Knocking and extraneous sounds in the steering mechanism. They usually appear when making a sharp turn or turning the steering wheel, or when hitting protruding parts of the road. To make sure that the cause is in the rack, you need to:
- place the car on a flat surface;
- get out of the car and open the hood;
- unscrew the wheel until it stops in both directions;
- Listen carefully to where the sound comes from when you turn the steering wheel sharply.
Timely diagnostics will protect your car from possible future serious breakdowns and sudden expenses.
All lubricants have a different set of characteristics (composition, properties, cost). And if the question arises about which lubricant to use, then it is better to give preference to lithium. The best on the market are considered to be Litol-24, Fiol, Tsiatim and Severol. They are moisture-resistant, have a long processing interval, reduce vibration, do not wash off, and contain antioxidant and wear-resistant additives. Steering rack lubricant must have a high load-bearing capacity to avoid extrusion.
If a low-quality lubricant is used in operation, which does not meet the listed qualities, then this will soon lead to wear of individual parts and assemblies of the steering mechanism. It is important to always listen to your car, pay attention to warning signs in time, carefully choose which lubricant to lubricate, lubricate the steering rack in a timely manner and be responsible in choosing a lubricant.
Design
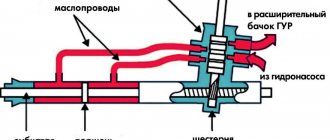
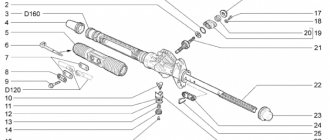
Steering rack design: 1 – shaft boot, 2 – cover mounting bolts, 3 – Belleville washer, 4 – worm shaft oil seal, 5 – worm gear cover, 6 – sealing collar, 7 – thrust bearing, 8 – worm shaft with bearing, 9 – rasp, 10 – left boot, 11 – binoculars, 12 – binocular bracket, 13 – nut plug, 14 – thrust nut, 15 – thrust spring, 16 – locking collar, 17 – thrust piston collar, 18 – thrust rasp piston, 19 – piston liner, 20 – steering rod bolt, 21 – stopper, 22 – plate, 23 – plastic clamp, 24 – steering rack boot, 25 – left side boot, 26 – steering rack pipe.
Signs of play in slats
When driving over small irregularities such as a gravel road, shocks and knocks in the suspension are clearly audible and are transmitted to the steering wheel. These signs will not always refer to play in the rack. Similar impacts to the steering wheel can occur due to broken steering ends or a broken crosspiece of the steering mechanism. Before you begin repairing the rack, you must exclude the tips and steering cross from suspicion.
- Impacts to the steering wheel when driving over bumps
- Creaking sound when turning the steering wheel
- Biting the steering wheel in different positions
- The steering wheel does not return to zero position
Checking for play
Checking for play is done by rocking the swing arms up and down. To do this, we find the steering rods under the hood and pull each of them up and down; there should be no play or knocking. If any, then the rack should be maintained.
You can't ruin the rack with oil
I have a VAZ-21104. After six years of operation, at a mileage of 200 thousand kilometers, the steering rack began to jam when the steering wheel was in the “near zero” position. At the bottom of the steering mechanism there is a thrust (adjusting) nut with a hole that is closed with a rubber plug. I filled a medical syringe with gear oil and put a rubber tube on the nozzle. He took out the plug, poured oil into the cavity, and then immediately closed the hole with the plug. Five years have passed since then, the total mileage is 355 thousand kilometers, and the rack does not jam. And further. The habit of leaving the front wheels in the “straight” position when parking will help keep the protective steering gear cover intact longer.
Lift
If knocking is detected in the steering wheel, it can be tightened, but tightening will be effective only if there is knocking from the worm gear. If the knocking noise comes from a broken plastic bushing, then tightening is useless.
As is known from practice, the worm mechanism is quite reliable and is very rarely the culprit of knocking. Most often the bushing is to blame.
You can determine the culprit of the knock by pulling the steering rods one by one.
- If there is a knocking sound when applying forces to the right link, then the bushing is to blame.
- If there is a knocking sound when you apply force to the left linkage, then the worm gear is to blame.
In the first case, a lift is not advisable. Since the tightening nut only tightens the worm mechanism. To eliminate the knocking noise, it is necessary to remove the steering rack from the car and have it repaired.
A few words about types of devices
The differences in such mechanisms can be easily seen by owners of cars that have driven different models. They can immediately point out not only external and design differences, but also the sensations when driving a car. Today, several types of such mechanisms are installed on cars, they can be like this:
- Mechanically driven devices;
- Hydraulic driven mechanism;
- A unit based on an electric drive.
Today, the most modern devices are electrically driven racks, but the most widespread are still devices with mechanics or hydraulics as a drive. The electric drive and hydraulics in this device are designed to reduce the force on the steering wheel when the driver rotates it.
Repair kit
In a Priora with an EUR, a rack from Kalina was installed with catalog number 11183-3400010 20. Therefore, the repair kit must be purchased specifically from Kalina.
Steering rack number
The repair kit includes a large number of parts necessary for repairs.
The price of a new rack starts from 5,000 rubles and higher, depending on the manufacturer, but new does not mean good, and the cost of a repair kit varies from 500 to 1,000 rubles, which is almost 10 times cheaper than a new rack.
Repair
The first thing you will need to carry out your own repairs is a repair kit.
They are available at almost any auto parts store. However, we strongly recommend that you buy only high-quality kits so that the result of your DIY repair lasts as long as possible. What you need for work
The proposed kits are incomplete and complete. You will definitely need the following kit components:
- Needle bearing;
- A pair of rubber seals for the bushing;
- Support sleeve made of plastic;
- Set of gaskets;
- Spring;
- Retaining rings;
- Support bearing;
- Drive gear;
- Boot cover;
- Rail;
- Set of ties for the boot.
Repair kit Now that the kit is ready, the tools are available, and there is enough free time, you can get to work.
- First, remove the boot, end caps and stops. As you disassemble elements, even the smallest and insignificant at first glance, be sure to evaluate their current condition. If necessary, all worn-out elements will be replaced with new ones taken from the repair kit.
- Using an octagon, unscrew the screw plugs, which will allow you to remove the springs, retaining rings, and thrust bushings.
- Remove the bearing and check if it has any play. The repair kit includes a new bearing, so if the old component is in satisfactory condition, it is better to replace it immediately. It’s not for nothing that you took on such a complex process to get everything done 50%.
- Remove and inspect the drive gear. Next, you can completely remove the rail itself.
- Be sure to replace the support shaft bushing, not forgetting about the rubber bands. They are also included in the kit.
- Take your time to remove the rubber bands from the sleeve. First, insert the element into the crankcase, after which you can cut off the elastic with scissors or a sharp knife.
- The most difficult step is replacing the needle bearing. To remove it, you will need a special key. But you can do without it. In this case, arm yourself with a 1.5 mm drill bit and a drill. Using a drill, make a hole in such a way as to loosen the end of the bearing. Use a punch to knock out the old bearing from the crankcase.
- Before installing the new needle bearing, be sure to thoroughly clean the steering rack housing of accumulated debris and steel shavings from drilling.
- The hole made cannot be left. To eliminate it, you can mix metal filings with superglue. This mixture will harden quickly and give an excellent result.
- Lubricate literally everything that can be lubricated in the steering rack assembly. Experts advise using Litol 24 or other lubricants of similar quality. It wouldn't hurt to lubricate the CV joints.
- Reassemble the unit by following the reverse sequence of dismantling.
If you don’t have a key to remove the needle, repairing the steering rack yourself allows you to significantly save on replacement, plus gain a lot of experience in performing far from the simplest work related to your VAZ 2109. But you can do it easier, without taking any risks, by contacting a trusted car service center.
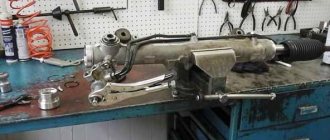
Unit in a vice
Checking status
Having completed the repair, you should not think that now the steering rack will serve tens of thousands of kilometers and will no longer cause you trouble. Like many other components, the condition of the rack must be periodically monitored.
What to look for
Your actions
Mounting nuts and bolts
These fasteners are subject to vibration after repair as they are used. Therefore, it is recommended to check and tighten them every 250-300 kilometers.
You can check it a little less often, approximately every 500-1000 kilometers, depending on the operating conditions of your car. Due to different quality, some anthers can last quite a long time, while others will require replacement after 10 thousand kilometers. The choice is yours which parts to use
The rack itself should be constantly monitored
Listen to the behavior of the steering mechanism, pay attention to the above signs of malfunction. As part of a scheduled technical inspection, be sure to include a check of the steering racks in the list of activities.
The repair cannot be called complicated, but it takes a lot of time
Plus, it is extremely important to perform all operations as carefully and efficiently as possible. Otherwise, the result will not last long and you will soon have to interfere with the design of the VAZ 2109 steering unit again
Steering rack removal and repair
Removal work must be carried out with the necessary tools. Such as:
- Ratchet;
- Head at “13”, “15”, “17”;
- Key to "14";
- Hexagon at "6";
- Screwdriver "-";
- Hammer;
- The beard is blunt;
- Wrench for tightening the steering rack;
- Steering wheel end remover;
- Mount;
- WD-40 lubricant;
- Lubricant "Litol - 24";
- Steering rack repair kit;
Steering wheel removal process
- We align the steering wheel exactly in the center.
- Raise the left side of the car with a jack
- We unscrew and unscrew the steering end nuts, then use a puller to squeeze them out of the strut bipod.
- We unscrew the steering cardan in the car with a head on “13”, and forget the screwdriver into the slot of the cardan without damaging the splines. This is necessary for its easy removal from the rack splines.
Which lubricant is better, we analyze the manufacturers
Any experienced driver who repairs cars himself in a garage will list the magic list:
Moreover, these can be both names and “common nouns”. The main issue is the composition of the additives.
Calcium, sodium-calcium and graphite lubricants are not suitable for steering racks. They cannot withstand low temperatures and absorb moisture. The situation is similar with copper lubricants.
Barium and hydrocarbons resist moisture, but at low temperatures they turn into ordinary soap (in consistency). So that leaves lithium.
Among domestic manufacturers we can highlight:
- . While maintaining recipes proven over the years, new technologies are used.
- Gazprom and Rosneft produce good quality Litol-24.
- Import manufacturers are represented by well-known companies Molykote and EFELE.
It is difficult to single out any manufacturer for the top step of the pedestal; they all meet the standards. For car enthusiasts, it is not the choice of a specific brand that is important, but the timeliness of lubrication. Otherwise you will have to change the steering rack
Lubricating the steering rack of a Priora with EUR without removing it
- To the beginning of the forum
- Forum Rules
- Old design
- FAQ
- Search
- Users
I want to fill the steering rack with lubricant and at the same time minimize all the hemorrhoids associated with the need to remove and disassemble it. I'm going to cut the clamps directly on the car, move the boot on both sides and put lubricant in accessible places. In this regard, the question is: what kind of rake can you step on here? It seems that the ends of the boot should move relatively easily and there should be no problems with its return back? I'll install new clamps.
I'm ready to listen to any thoughts on this matter.
I want to fill the steering rack with lubricant and at the same time minimize all the hemorrhoids associated with the need to remove and disassemble it. I'm going to cut the clamps directly on the car, move the boot on both sides and put lubricant in accessible places. In this regard, the question is: what kind of rake can you step on here? It seems that the ends of the boot should move relatively easily and there should be no problems with its return back? I'll install new clamps.
What is used for lubrication?
Recommendations for performing such operations are usually carefully prescribed in the operating instructions for the machine. This takes into account the design features of the unit, the region of use of the vehicle, and other important aspects of its operation. The most effective lubricants for such mechanisms are products that are made on a lithium basis.
Such products include Litol-24, Fiol, Tsiatim
Severol
is well suited for areas with severe frosts . During their manufacture, additives are added to the composition to increase moisture resistance, wear resistance, counteract oxidative processes, and maintain conservative properties. We told you how to lubricate the steering rack, but in addition to replenishing the lubricant, you should pay attention to the condition of the steering protective covers. Sand, dirt and other foreign objects get into breaks and cracks, which greatly accelerates the wear of rubbing pairs.
About the rake
The steering mechanism on Lada cars, starting with model 2108, has a steering rack. It is designed to move steering rods along a horizontal plane, which helps turn the car's wheels.
The design of the slats is quite simple and reliable, with the exception of one small drawback - a plastic bushing.
This bushing is made by the manufacturer from low-quality plastic, which soon leads to play in the rasp in it and the appearance of an unpleasant knock when moving on paving stones.
There is a rail between the engine and the passenger compartment, perpendicular to the exhaust manifold and attached with two brackets to the engine shield.
Preparation for repair
Since we are talking about intervention in the steering system, suspension, special attention should be paid to preparation
- If you have a lift or inspection pit, you will be able to perform operations much faster and easier, which is the most important thing.
- Be sure to get a set of sockets and spanners. It is extremely difficult to work without them. In addition to the wrenches, you will need wire cutters, pliers, a hammer, a flat head screwdriver, and a tie rod end remover.
- To remove all fasteners that have been tightened for a long time, a can of WD40 will certainly not hurt. It removes oxidation from nuts and removes rust. In addition to the almighty WD40, buy graphite lubricant or grease. By treating the fasteners with them, you will be able to remove them much easier in the future.
- The presence of rags, a metal brush, fresh gasoline or solvent is welcome.
- Ask your friend to help you with your work. It's much easier to change steering wheels with four hands.
Be sure to remove the negative terminal from the battery in order to de-energize the car. We don't want short circuits or burned out wiring.
Repair kit
Hanging the axle
To safely and independently change the steering rack in your own garage, it is extremely necessary to correctly and securely hang the front axle of the car.
Sometimes this issue is not given due attention, as a result of which the car falls, this leads, at best, to damage to the elements of the car, and at worst, to injuries to the repairer himself.
In order to do everything in accordance with safety standards, you need to:
- Place your VAZ 2109 on a level surface. Typically, garage floors are fairly level;
- Install wheel chocks, shoes, bars or other similar means under the rear wheels. Block each wheel front and rear;
- Pull the handbrake all the way to stop the wheels. Just make sure first that the handbrake works;
- Set the steering wheel in neutral position;
- Slightly loosen the fasteners on the wheels;
- The front of the car needs to be raised. Here it is better to use two reliable jacks at once;
- Near the jacks, additionally place metal stops that are adjustable. If there are no special devices, an ordinary block of wood, boards or some kind of stump will do. The main thing is that when you make contact with the body, when you pull or push it, the car does not tip over;
- Remove the front wheels completely and begin replacing the steering racks.
Optimal working conditions
Dismantling
Before installing a new steering rack, you need to get rid of the old one. For this:
- Get to the place where the rack is attached in the engine compartment. To do this, you will probably have to remove the alarm and gas adsorber, at the same time dismantling the hoses.
- Disconnect the rack from the steering column shaft. Before this, the plastic casing is removed, blocking the path to the spline joints. The rack shaft is released by unscrewing one bolt.
- Next, remove the steering ends from the levers. Here haste can significantly harm you. Gradually brush the threaded connections, tip pin and mounting nut with a metal brush. Then apply WD40 to these areas. Give the product a little time to react. Then you can use pliers and a screwdriver to remove the cotter pin from the connection. Once the solvent has taken effect, the nuts should come off without much effort.
- If the tip is in normal condition, it is recommended to remove this element from the strut lever with a puller. A more barbaric method can lead to damage, so you will have to change the tips.
- Unscrew the rack fasteners using keys. It is better to treat them with WD40 in advance.
- After unscrewing the nuts, pry the steering rack with a flat screwdriver and remove it from the studs.
- Call a partner to work together to remove the element through the opening in the wheel arch.
Design
Steering rack design: 1 – shaft boot, 2 – cover mounting bolts, 3 – Belleville washer, 4 – worm shaft oil seal, 5 – worm gear cover, 6 – sealing collar, 7 – thrust bearing, 8 – worm shaft with bearing, 9 – rasp, 10 – left boot, 11 – binoculars, 12 – binocular bracket, 13 – nut plug, 14 – thrust nut, 15 – thrust spring, 16 – locking collar, 17 – thrust piston collar, 18 – thrust rasp piston, 19 – piston liner, 20 – steering rod bolt, 21 – stopper, 22 – plate, 23 – plastic clamp, 24 – steering rack boot, 25 – left side boot, 26 – steering rack pipe.
Signs of play in slats
When driving over small irregularities such as a gravel road, shocks and knocks in the suspension are clearly audible and are transmitted to the steering wheel. These signs will not always refer to play in the rack. Similar impacts to the steering wheel can occur due to broken steering ends or a broken crosspiece of the steering mechanism. Before you begin repairing the rack, you must exclude the tips and steering cross from suspicion.
- Impacts to the steering wheel when driving over bumps
- Creaking sound when turning the steering wheel
- Biting the steering wheel in different positions
- The steering wheel does not return to zero position
Checking for play
Checking for play is done by rocking the swing arms up and down. To do this, we find the steering rods under the hood and pull each of them up and down; there should be no play or knocking. If any, then the rack should be maintained.
What is it for?
Many devices, including steering ones, have units in which parts made of different materials interact. This relationship is never without friction. Probably, many drivers remember from a school physics course that in places of friction there is always an increase in temperature in the area of work of the rubbing pairs. In these places, the process of wear of parts accelerates.
In order to somehow reduce this wear and significantly extend the service life of such components, various types of lubricants are used.
In addition, lubrication reduces the amount of effort required to turn the steering. This fully applies to mechanisms with electric and hydraulic drives. In some cases, to carry out such work it is necessary to remove it from the machine, completely disassemble it, clean it, wash it, and only then apply new lubricant.
Lift
If knocking is detected in the steering wheel, it can be tightened, but tightening will be effective only if there is knocking from the worm gear. If the knocking noise comes from a broken plastic bushing, then tightening is useless.
As is known from practice, the worm mechanism is quite reliable and is very rarely the culprit of knocking. Most often the bushing is to blame.
You can determine the culprit of the knock by pulling the steering rods one by one.
- If there is a knocking sound when applying forces to the right link, then the bushing is to blame.
- If there is a knocking sound when you apply force to the left linkage, then the worm gear is to blame.
In the first case, a lift is not advisable. Since the tightening nut only tightens the worm mechanism. To eliminate the knocking noise, it is necessary to remove the steering rack from the car and have it repaired.
Replacing the steering column of a VAZ 2107
Replacing a steering column is a rather difficult task, but it can be done independently if you have some experience in car repair. You will need the following tools:
- Wrenches 17 (socket and open-end).
- Socket heads for 17 and 30.
- Handle with ratchet.
- Mount.
- Hammer.
- Collar.
The column is removed in the following order:
- Disconnect the battery.
- Remove the steering wheel.
- Remove the steering shaft housing.
- Remove the wire block from the ignition switch.
- Remove the ignition switch.
- Remove the steering column switches.
- Remove the steering shaft clamped in the column.
- Using a 30mm socket and a powerful wrench, unscrew the steering column mounting nut. The tightening force here is significant, so the knob must be a fairly long lever. If you can’t unscrew it, you can lengthen the knob by putting a piece of pipe on it.
- Unscrew the 3 bolts securing the column to the body. The procedure is not easy - the distance between the parts and the body is too small, the bolts are difficult to keep from turning. A handle with a ratchet will come in handy here, which will speed up the process.
- Remove the column from the shaft. To do this, you need to knock the column off the tie rod splines using a pry bar. This must be done in jerks, resting your feet on the body.
- Unscrew and remove the shaft seal installed at the bottom of the column.
After dismantling the old column, it is necessary to clean the seat from dirt. Before installing a new column, you should check the condition of its hinge joints and needle bearings. If everything is in order, you can begin installation, which is done in the reverse order of removal.
When installing a new VAZ 2107 steering column, you must pay special attention to ensure that all fastening bolts and nuts are well tightened. Considering how important this unit is for driving a car, play, and even more so, slippage of the steering column splines can lead to tragic consequences
When installing the steering wheel, pay attention to the position of its spokes. After completing the installation of parts and connecting the wire block to the ignition switch, you can connect the battery
Column replacement completed
After completing the installation of parts and connecting the wire block to the ignition switch, you can connect the battery. Column replacement is complete.
Steering rack removal and repair
Removal work must be carried out with the necessary tools. Such as:
- Ratchet;
- Head at “13”, “15”, “17”;
- Key to "14";
- Hexagon at "6";
- Screwdriver "-";
- Hammer;
- The beard is blunt;
- Wrench for tightening the steering rack;
- Steering wheel end remover;
- Mount;
- WD-40 lubricant;
- Lubricant "Litol - 24";
- Steering rack repair kit;
Steering wheel removal process
- We align the steering wheel exactly in the center.
- Raise the left side of the car with a jack
- We unscrew and unscrew the steering end nuts, then use a puller to squeeze them out of the strut bipod.
- We unscrew the steering cardan in the car with a head on “13”, and forget the screwdriver into the slot of the cardan without damaging the splines. This is necessary for its easy removal from the rack splines.
- Remove the steel washer retainer from the tie rod bolts and unscrew the left steering arm from the rack and pull it out into the left window of the tie rods
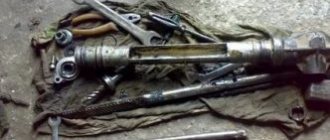
The process of disassembling the rack
- We unscrew the steering rods with a head at “15”
- We remove the anthers by biting off the plastic clamps with side cutters. We pull out the central steering boot to the right side without damaging it.
- Place a mark as shown in the picture and unscrew the nut securing the rack pipe using a punch and a hammer
- We take out the pipe
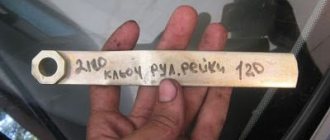
- We unscrew the steering tightening nut using a special wrench (don’t be afraid to turn it very tightly), take out the rubber ring and the pressure piston.
- To remove the pressure piston, you need to hit the back of the rack and the piston will fall out.
- We take out the rasp
- We unscrew the two bolts with a hexagon “6” and carefully remove the “worm” cover without damaging the oil seal.
- We clamp the worm shaft into the yew through a block and remove it by hitting the body of the rack
- Next, remove the old plastic sleeve from the pipe using a screwdriver
The rail is disassembled, we proceed to the assembly process using new parts
Assembly
- We install rubber rings on the bushing and insert it into the rack pipe
- We wash the worm shaft from the old grease, lubricate it with new and insert it into place, put a plastic bearing on it.
- Place a disc spring into the worm cover, and then a thrust washer on top. Lubricate well and close the lid.
- We lubricate the rasp and insert it into the worm mechanism, and then insert the pipe into the mechanism body and tighten the nut, aligning the previously placed marks.
Centering the steering rack
When assembling the steering wheel, it is necessary to follow a certain rule, which in the future will not lead to the rearrangement of the steering wheel on the splines.
- When the rasp is placed in the rack body, it is necessary to set it to “zero”, that is, the position in which the steering wheel will stand exactly in the center. To do this, you need to measure 235 mm from the right end of the case and put a mark with a marker. This will be “zero”. Next, you need to align the center of the rasp with this mark. The center of the rasp will be the recess under. We combine this notch with the previously installed mark.
- It should also be noted that when combining these marks, the worm shaft should face the flat to the right side at an angle of 90 degrees to the rack body.
- To combine all these parameters, you need to rotate the worm shaft with a key at “14” until all the parameters are combined.
Attention: the rack pressure piston should not be installed when the marks are aligned.
After the marks have been set, we continue assembling
- We install the pressure piston with the cuff on it into the “worm” body. We insert the cuff into the body, then the pressure spring, the nut and tighten it with a little force.
- We insert the binoculars onto the rasp, put on the anthers and secure them with clamps
- Then we screw the right swing arm to the rack and install the rack in place.
- We carry out assembly in reverse order.
- It should be noted that the easiest way to install the steering universal joint is by removing it from the steering wheel. Using a key set to “13”, unscrew the nut and remove the bolt, and then the cardan itself.
When installing, make sure that the steering wheel is centered.
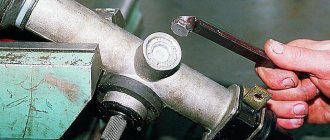
- After the rail is installed, it is necessary to tighten it. To do this, tighten the nut until it stops, and then loosen it 90 degrees.
The rack nut has a left-hand thread, but when it is installed on a car, the nut must be tightened counterclockwise. Because the nut is pointing up.
The steering rack repair process is complete.
Lubricating the rack (at the request of readers)
For a long time I didn’t have the opportunity to write a continuation of the article about adjusting the steering rack (you can read it in the BZ).
And so, I myself did not dare to turn the adjusting bolt on the rail, although I had already hung up the front end, removed the protection, and at the last moment I changed my mind. I went to two service stations, they checked everything possible (from the suspension and steering), everything was fine, everything was within the tolerances. I was shaking my mustache all right. (maybe just a slight, barely noticeable play, maybe it seemed like there was nothing to compare it with) In the end, I decided to just lubricate the rack without removing it from the car. I’ve had Mobil xhp 222 blue plastic heat- and frost-resistant lubricant lying around in the garage for a long time, well, I think I won’t buy another one to lubricate the rack, I’ll take this one.
I read somewhere the official answer from an AvtoVAZ employee www.drive2.ru/b/468404/ about lubrication of the rack, they say, the toothed part of the rack is lubricated with a layer of 1 mm of FIOL-1 lubricant, and the cylindrical part with a layer of 0.5 mm, and if you find that there is not enough lubricant, you can add using a syringe; excess lubricant will not prolong the service life of the rack. But we know that you can’t spoil porridge with oil, especially not with grease. Let's smear thoroughly))) Let's start!
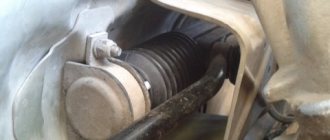
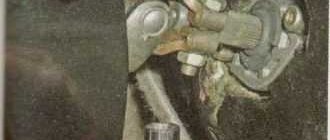
The rail has two rubber caps on both sides, stretched over the base of the rail and tightened with ties. In order to remove this cap, you need to cut off the tie and simply pull the cap off.
As you can see in the photo, it’s not that there is no lubricant, or maybe 0.5 mm at the end of the cylindrical part there should be). In general, we smear
turn the steering wheel one way, then the other, add lubricant, and so on several times.
We fill the cap with grease and put it in its rightful place.
Tighten with a tie and cut off the rest of the tie.
On the other hand, it’s a little inconvenient, but you can crawl up. I removed the battery and cut off the tie on top from the engine compartment (I put on a new tie, by the way, from the same place). You can also remove the wheel for normal access from the arch side.
I don’t recommend removing the elastic completely; putting it back on, I think, won’t be comme il faut.
We fill the lubricant a little more than on the opposite edge of the rack, because... here is the gear part, where the worm mechanism works. Turn the steering wheel in different directions several times and add lubricant. We put the cap back on in the same way as on the other side.
The ties were large in thickness, similar to the factory ones.
I didn’t really understand how it felt, it seemed like it became easier to spin, although with the electric booster it was already easy to spin. The most important thing is that the knocking went away, maybe, of course, we didn’t encounter a rough road, but it still got better. Don't be too hard on me for the photo, I took it on my phone. Well, dress warmly or do this work in a warm room, preferably in the summer.
Good luck to everyone on the roads, subscribe and like)