How to fix a steering rack
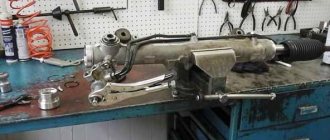
steering rack
To repair the rack, you will need a steering rack repair kit 2110. The main task is to replace the rack stop and bushing, this will get rid of play and noise when overcoming small potholes.
For repairs we will need: the rack stop and bushing, the rack stop O-ring, the stop nut. You will also need a central corrugation; it is very likely that you will have to change it.
The inside of the rack may be rusty or extremely dirty; in this case, it needs to be washed with diesel fuel or gasoline.
When you assemble the rack, you will have to actively lubricate it, so it is better to buy lubricant in advance, preferably FIOL.
After removing the rail, you need to cut off the clamps; the clamp attaching to the body does not need to be removed, but we remove the other one with an elastic band. You can also remove the gasket, which is located at the point of contact between the rack and the hole in the engine shield.
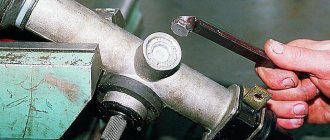
After this, we begin to try to unscrew the stop nut, and you will need a good wrench. Next, we take out the spring, as well as the rubber band, turn it over with the hole down and hit it on some piece of wood to get the stop itself.
Next, we take out the old steering rack bushing. To do this, you need to bend the two protrusions and use a wire to pull the sleeve out of the body.
After you take out the rail, you need to wash it; the same diesel fuel will do for this. Also, it needs to be cleaned of grease and dirt.
To perfectly clean the rack, you can blow it out. In this case, you need to rotate the worm shaft. This will allow dirt to be blown out from the back.
After these procedures, everything needs to be lubricated and assembled. Lubricate the worm shaft by turning it.
Next, remove the bushing from the rack and insert it into the housing, which has been lubricated in advance. Watch the locking tabs on the bushing.
You need to tighten the bolt that attaches the rods to the rack, position the body so that the bushing faces down, and place the rack on it.
We look for the middle of the window in the slat body, we need to mark it, and set the slat to the middle position. The central hole must be opposite your mark.
Next, generously lubricate everything and install a new stop, seal and spring, and tighten the stop nut.
We use a wrench to tighten the nut tightly, after which, as in the instructions, we move it in the opposite direction by 2 divisions. After installing the rack, the steering wheel may become “heavier,” but this is temporary.
We put everything back together, while trying not to leave any unnecessary parts.
Replacing the Kalina steering rack
How to Remove the Steering Rack of a Ford Focus 2
Is the steering rack knocking on Kalina? Try to pull it up. If the problem recurs again, then you will have to repair the Kalina steering rack, and for this it must be removed.
Removing the Kalina steering rack
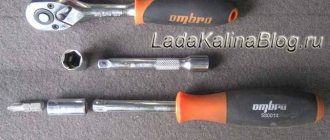
You will need: sockets '10', '13', '15', '17', '27', spanner '19', pliers, mounting blade, hammer, flat screwdriver.
Inside, unscrew the nut and remove the bolt securing the lower cardan joint to the steering gear shaft (steering rack), using a 13-inch socket. If the bolt turns, hold it with a 13mm wrench.
In the engine compartment:
Unscrew the steering rack housing upper mounting nut using a 10mm socket. Unscrew the 2 nuts securing the steering rack casing from the bottom of the car with a '10' socket. Remove the casing.
We hang up the front of the car and remove the wheels. To remove the steering rack without tie rods, they should be disconnected:
Remove the locking plate of the steering linkage bolts by prying it up with a screwdriver. Then unscrew the 2 bolts securing the steering rods to the rack. Unscrew the nuts securing the steering rack brackets to the front panel using a '13' socket. Move the steering rack forward, removing the pinion shaft from the hole in the front panel. Remove the Kalina steering rack along with the rods.
To remove the steering rack along with the tie rods, then you need to disconnect the tie rod ends from the swing arms of the shock absorber struts, to do this:
Remove the cotter pin using pliers. Unscrew the ball pin fastening nut partly using a 19mm spanner. Loosen the tie rod end pinch bolt using a 17mm socket. We press the ball pin out of the lever by inserting a mounting blade between the swing arm and the tip, pressing the tip away from the lever, and striking the end of the swing arm with a hammer.
Unscrew the ball stud mounting nut completely. Remove the ball pin from the hole in the swing arm. Unclip the tie rod end groove using a screwdriver. Unscrew the tip, holding the adjusting threaded bushing with a '27' wrench. We count the number of turns in order to screw the tip the same number of turns when installing. At the same time, we maintain the position of the threaded bushing on the steering rod. This will help approximately maintain the same wheel toe angle.
We remove the Kalina steering rack along with the rods:
Installation of the Kalina steering mechanism
Before installation, check that the rail is installed in the middle position. To do this, using sliding pliers, use the flat on the gear shaft to rotate the shaft in any direction until it stops, then turn the shaft in the opposite direction two full turns and turn the shaft so that the flat on the shaft is located vertically on the right side along the direction of the car. Otherwise, the installation of the rack is carried out in the reverse order.
Thus, it will take at least 1 hour to replace the steering rack on Kalina. If it is not possible to repair it, then you will have to buy a new one. The steering rack of the Lada Kalina is the same as the rack of the Priora or VAZ 2110-2112 of the new model and has a catalog number: 11183-3400010 (rasp inside 21100-3401068). Price approximately 3500 rub. For Kalina Sport:
- 11183-3400010-10 inside rasp 11183-3401068-00 (3.1 turns)
- 11183-3400010-12 inside rasp 11183-3401068-01
- 11183-3400010-01 without EUR inside rasp 21100-3401068-00 (4.1 turns)
- 11183-3400010-10 with EUR inside rasp 11183-3401223-00
Steering rack Kalina 2: 11183-3401068
By the way, do you know how to adjust the steering rack?
A little theory: front suspension design
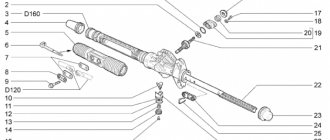
Before attempting to fix any problem, there is a tendency to look at the blueprints or repair manual. It is known that the VAZ-2192 parts catalog contains the following object:
This is what the steering rack looks like in the drawing
Whether the knock will remain in the steering rack of Kalina-2 depends on the following: how accurately element “14” is adjusted. The adjusting nut, marked “14”, looks almost invisible here. But first impressions are deceiving. In the catalog, by the way, the element is called “Stop Nut”.
It is important to know that the thrust nut has external threads. And it spins clockwise. And the words “tighten the rack” mean screwing in the specified nut, and nothing more.
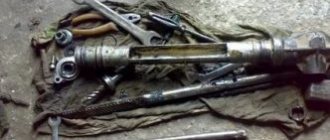
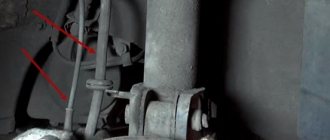
Now let's move on to practice and see what the node in question looks like in reality:
If you remove the rail, it looks like this
The nut has a non-standard notch, and it can only be rotated with a special tool. By the way, the recess will be closed with a cap. In the catalog it is designated by the number “15”, and now, let’s look at the appearance of the special key:
Rack adjustment key
The thrust nut is turned at small angles. We are talking about values of 10-15 degrees. What happens if you overdo it with tightening the rack? The knocking noise will disappear, but the steering wheel will turn with difficulty. Therefore, if necessary, the nut can be pulled back.
Why do you need a steering rack tightening on Kalina?
How to tighten the steering rack
The working parts of any, even the most reliable and most expensive car, inevitably fall into disrepair and need to be replaced. What to say about Russian economical models like Lada
Kalina?
It’s time to get used to the fact that repairs are a common condition for such cars. Regarding the control mechanism, it should be noted that although it is similar, just like on other models, and tightening the control rack on Kalina is also often done, just like on its brothers in the assembly line.
Do-it-yourself Mazda 6 steering rack repair.
To find out the reason for the need to tighten the control rack on Kalina, you should remember the design of the control mechanism:
- The control wheel transmits rotational motion to the drive gear through the column and flexible coupling;
- the gear, having a movable connection with the rack, transmits rotational motion to it and forces it to move;
- The ends of the control rods are attached to the rack, which turn the wheels.
An elementary-simple device, just like in many cars. In this entire structure there is a very small part that can only be seen from the inspection hole - this is a pressing spring that regulates the force with which the rack is pressed against the gear.
The video is essentially how I repair steering racks
and cardan shafts
Kalina
, Granta, Priora. Significantly suffered from the steering.
The spring is made of a cone type, but during operation it rapidly loses its elasticity and the pressure force decreases. In this regard, you need to clamp the spring harder to return the required force.
Tightening the steering rack on Kalina is done using a special key, but due to the design features of this particular model, the operation can only be performed by removing the rack from the car.
Do-it-yourself repair of the VAZ 2112 steering rack.
Therefore, services are reluctant to take on this function. Work for 5 minutes, and with dismantling. fuss.
their steering wheel repaired.
Kalina slats without the help of others, this is not so difficult, especially if you just need to tighten the spring.
conclusions
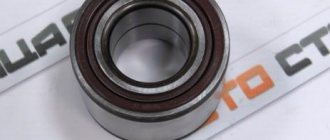
Experience shows that it is possible to repair the Lada Kalina steering rack with electric power steering with your own hands. Of course, this procedure will take a day, maybe two. The main thing is not to rush and choose all the parts of high quality and correct. It is recommended to install new bearings, since even if there is no play, it is not known how long it may appear.
A properly functioning steering mechanism is one of the main conditions for ensuring the safety of any vehicle. If the owner of a Lada Kalina detects suspicious signs of failure of any component components of this unit, then he urgently needs to take effective measures to find and eliminate the malfunction. The main characteristic symptom of problems is knocking. It is clearly audible when driving over bumps or when turning the steering wheel while driving. When the owner determines that the steering rack requires steering rack repair, then he has two options: go to the station to the experts or dare to repair the steering rack on his own. You can make the replacement with your own hands; of course, it is not easy and troublesome, but nevertheless it is possible. Especially if you have a repair kit on hand.
Disassembling the Lada Kalina steering rack without problems
Lada Priora hatchback Logbook Steering rack repair
A knock on the control rack, or, in other words, an increase in the free play of the control wheel on Kalina, can be eliminated by turning a special key 10-12 degrees, but in order to perform this second operation, you must remove the rack, following this method:
- the front part of the car can be suspended, which can be done using a lift or by installing the car on trestles;
- While your hands are not dirty, unscrew the bolt of the splined connection of the column control in the cabin. Doing this is not entirely comfortable, because the place is under the pedal block;
- Having removed the front wheels, unscrew the steering knuckle nuts and remove them;
- Preparations should also be made under the hood: remove the battery together with the platform and the heat reflector;
- At the final step, we unscrew the nuts that hold the rack to the body and take the latter out into the light of a snow-white day.
Holding the rack casing in a vice, you should try to move the rack by the “whiskers” to the right and to the left. If the free play is noticeable, in other words, try tightening the spring nut, but by less than 10 degrees, then you should check again for the presence of free play.
Do-it-yourself Audi 80 steering rack repair.
This function must be continued until the free play disappears. You should keep in mind that if the spring is overtightened, the steering wheel will be impossible to turn.
Preparatory actions, dismantling unnecessary parts
To remove the crankcase protection, you need to unscrew 4 screws located in one row near the bumper. Also, unscrew two screws having a standard size of M6x16. In some configurations, the protection consists of two parts, but in this case they are attached only with self-tapping screws. These words are illustrated by the following photo:
This is how the crankcase protection works in different configurations
First, unscrew the “10” screws, and then the two “18” screws. In the second case, there will be more screws (eight).
Now let's look at how to remove the battery. First of all, disconnect its terminals. Then, you need to move the additional fuse box to the side. In general, actions are performed according to the photo:
You also need to remove the mounting platform itself, for which you unscrew 4 screws. You will need a 13mm wrench, as well as a 10mm spanner. We will repeat the entire sequence again:
- Unscrew the nuts holding the battery terminals using a wrench 10;
- Remove both terminals;
- Move the fuse box to the side by unscrewing 2 fastening screws;
- Unscrew the nuts with a 10mm wrench and remove the battery;
- Unscrew the screws with a 13mm and remove the metal plate.
Just in case, here is a look at the fuse box mountings:
Mounting screws are located under the casing
Manuals usually recommend removing the negative terminal first. But when it comes to dismantling both terminals, the order in which they are disconnected is not important.
How to disassemble and repair a rack when jammed
The repair procedure, like replacing the steering rack, begins with disassembling the unit. To perform a set of actions, we purchase a repair kit.
- To disassemble the rack, unscrew the adjusting nut and then remove the thrust bushing. If at the moment we are experiencing difficulties, then we use a mallet, with which we apply gentle blows to the rack body.
- We dismantle the side plugs along with the boot. First cut off the plastic fasteners.
- We must replace the boot with a new product.
- We also use a mallet to remove the shaft from the rack body.
- Inside the freed crankcase we find a plastic sleeve, which we remove using a screwdriver. We also replace this component with a new analogue (present in the repair kit).
- We clean the internal cavity of the rack housing from old grease. Wash and dry.
- Apply new grease. We lubricate the gear pair with special care.
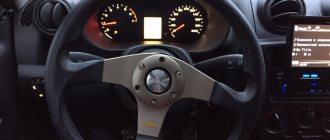
- We inspect all other components of the rack and pinion mechanism and if wear is suspected, we replace them. Removing the steering wheel in a Lada Kalina works like this.
1. Disconnect the battery.
2. Turn off the airbags. Loosen the clamps and move them to the side.
3. Disconnect the two-wire horn connector.
4. We move on to the steering shaft and in the area where the arrow is present, we outline the location (until removal).
5. Loosen the steering wheel nut, but do not completely unscrew it.
6. We take the steering wheel and, using rocking movements to the sides, move it close to the indicated nut.
7. Now we align the wheels and place the steering wheel in a strictly straight position.
8. We take out the pin, and then insert it into the switch block located directly under the steering wheel. At this moment, the steering wheel rim should be clearly fixed.
9. After removing the wires, we proceed to removing the steering wheel itself.
10. We check the integrity of all elements.
11. Assembly is carried out using the reverse algorithm.
Design features
The structure of the Lada Kalina steering unit includes:
- electric amplifier;
- steering column, adjustable for reach and tilt;
- electric power steering rack with gear ratio change mechanism;
- rods with tips, as well as rotary levers.
In the mechanism housing there is a unit with mechanical gearing, where the main operating element is a helical gear, the pitch of the teeth of which varies depending on the length of the rack.
The figure shows the design of the Lada Kalina rack and pinion unit.
The pressure in the rack-and-pinion pair is carried out by means of a spring, and the plastic liner present is designed to reduce the friction force. The compression level of the spring element is adjusted using a nut. The factory gap between the steering shaft and the rack is 0.1 mm in the LADA Kalina model.
If a knock appears inside the unit, it can be eliminated by adjusting the gap with your own hands. The steering shaft is centered using two bearings, one of which is located in the column bracket, and the second is located inside the electric power steering housing. The bracket is connected both to the pedal mounting unit, or rather to its front part, and to the body. Structurally, the bracket together with the pipe forms a hinged connection from a pair of plates. This unit provides a change in the position of the steering wheel, where the width of the range of movement is limited by slots in the designated plates.
The specific position of the pipe is fixed by a lever, which is connected to a special bushing that performs an adjustment mission. It is screwed onto a coupling bolt located just in the slots of the plates. When the lever is turned, the sleeve rotates synchronously. At this moment, the fixation of the plate weakens, and the steering wheel begins to change its position. Springs located in the middle of the bracket and plates, when the fastening is loosened, pull the pipe in the upward direction.
Let us repeat, the steering unit of the Lada Kalina has two rods and rotary levers. The rod design includes two tips, one of which is external, and the second is internal. The process of adjusting the length of the rod is carried out by rotating the threaded bushing present here. Having completed the adjustment manipulation, the position of the tips should be fixed with specially designed bolts. The outer rod end is connected to the swing arm bracket via a ball joint.
The power steering mechanism, operating on an electric drive, changes its degree of gain depending on the driving speed. When the car is stopped, the amplifier produces maximum torque, and the steering wheel turns very easily. As the speed increases, the force on the steering wheel of the Lada Kalina increases, which is facilitated by a decrease in the torque generated by this unit. The mechanism is based on an electric motor, which transmits rotation through a gearbox “hidden” under the column casing. The amplifier is controlled using an electronic unit, which is supplied with impulses from speed sensors, recognizes the amount of force when rotating the steering column shaft, and also reads the number of revolutions of the engine shaft. The instrument panel has a special indicator that allows you to monitor the operation of the amplifier.
The process of removing and installing the steering rack
Technologically, repairing the Kalina control rack is not much different from repairing this part on other VAZs. The necessary tools, as needed, can be found in the repair kits of other VAZ models.
Removal technology:
- You need to unscrew the bolt securing the spitz mechanism.
- Having previously raised the car on a jack. The front wheels need to be removed. You also need to knock out the control tips from the steering knuckles.
- Next, using a ratchet, you need to unscrew the nuts securing the control mechanism.
- remove the battery and pad from under it.
- It is necessary to unscrew the upper nut on the heat-reflecting plate, it is located near the passenger seat, behind the exhaust manifold. bend the plate itself towards itself.
Let us immediately describe the process of installing the rack backwards:
It is better, of course, to work together, in this case one presses the rack, and the second attaches it to the flange of the control shaft. If you are not lucky enough to work alone, then it is recommended to attach nuts to the body and press down the rail with something.
When the shaft splines and the axle with the flange are aligned, you can begin to screw the rack. A ratchet wrench is used in such cases, but do not use excessive force.
Next we screw the rods to the rack; the bolts that secure the rods must be tightened quite a lot. You need to put a locking plate on top to prevent the bolts from unscrewing.
Making adjustments yourself
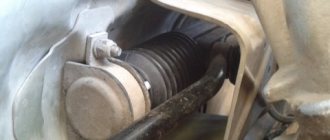
You can access the adjusting nut from the engine compartment, but to do this you will need to remove the battery, as well as the battery mounting pad. It is better to drive the car into a pit and then remove the crankcase protection (engine mudguard). If you look from under the bottom, the required element is immediately visible:
You need to turn this nut
And when you open the hood, you can feel the nut, but not see it. Its location is marked in the figure:
To make adjustments, place the key here
Before adjustment, remove the rubber cap from the recess. Its appearance is shown in the photo:
Remove the cap and install the key
If it is not entirely clear what exactly needs to be done, it is better to contact the service. The key is installed in the recess and then rotated 10-15 degrees.
When looking at the rack from above, turning the key clockwise corresponds to unscrewing it. The handle of the key comes from the center of the car - which means tightening is being done. By the way, the latter is true provided that the handle faces forward.
Basic steering rack faults
Seal leakage
French and Japanese cars usually suffer from leaks in the input shaft seals. It occurs due to corrosion of the oil seal area.
Wear of the central tooth of the control rack
Due to the fact that the steering wheel remains in the central position most of the time, the vast majority of all loads fall on the central part of the rack.
Support bushing knocks
The support bushings are designed to centralize the shaft in the control rack housing; when it wears out, the shaft begins to knock on the rack housing.
Remove knock in steering wheel
rack LADA
Kalina
.
Describes the nuances when installing the steering rack
per car. Helper needed. Music .
Knocks of the pressure block
Over time, a sample forms on the surface of the cracker and the gasket wears off. At the same time, the cracker begins to knock on the steering rack, dangling in its body.
Steering wheel turns tight to one side
This effect is observed when the hydraulic fluid is contaminated and grooves are formed inside the distributor.
Tight steering in both directions
There could be many reasons:
- grooves described above.
- The Teflon ring on the piston could rupture.
- wear of the working pair could have occurred on the pump.
- The distributor torsion bar could have broken.
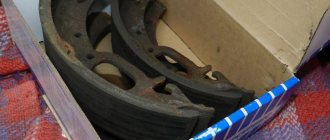
Correct fault determination
- The right edge of the rack should shine, otherwise a steering rack repair kit is needed.
- The presence of even the slightest traces of rust, which will act as an abrasive material, is not allowed.
- You should check the integrity of the bushing: if it knocks or shows signs of wear, it needs to be replaced.
- It is necessary to carefully inspect all the fasteners: if places with loose clamps are found, tighten them.
You need to be very careful with the last factor. Excessive physical force will only do harm here. If you decide to diagnose and replace it yourself, you must use lubricant and a wrench. A heavily threaded bolt or nut simply requires the use of oil. In some cases, it can be moved 1-3 divisions, but do not despair. This is enough for a visual inspection.
There shouldn’t be any difficulties, because information on how to tighten the part is contained in the vehicle’s operating instructions.
Vehicle Maintenance
Before replacing the steering rack on Kalina, you need to decide on the desired number of revolutions - 3 or 4. This indicator characterizes the maximum possible number of turns from the extreme right to the extreme left position of the steering wheel. If the vehicle is not equipped with a power steering system, then the steering rack is selected by 4 turns. A lower value will make it more difficult to control the car.
You can cope with replacing the steering rack on Kalina yourself in a few hours. First you need to buy a new original steering rack. It’s not worth saving on it by choosing Chinese analogues. The initial benefit will lead to many problems in the future. The retail chain offers a set with steering rods, so you won’t be able to buy just the steering rack separately.
Experienced drivers recommend paying attention to ensuring that the steering rack has suitable tips for a specific vehicle model. Even with minor differences in size, installation will be possible. Problems will arise during the adjustment stage.
Having purchased the necessary part, it must be thoroughly lubricated. Manufacturers of the Lada Kalina car do not always supply the vehicle with a sufficient amount of lubricants. To perform the described procedure, you will need nylon ties, with which the rubber boots of the slats are secured. The minimum length of the ties is 28 cm.
Removal of old rods is carried out using a wrench whose head size is 15 mm. As an additional means, a piece of steel pipe is used. Further repair of the steering rack or its replacement includes removing the anthers and plastic ties. If a visual inspection shows that the new rack bushing is running dry, it must be thoroughly lubricated. Sometimes it requires a lift.
Hello, dear motorists! The happy owners of the brand new Lada Kalina do not even suspect that this small city car hides a lot of secrets.
And suddenly, the venerable craftsmen of car service centers, for unknown reasons, began to refuse the owners’ requests for adjustments or if Kalina was needed.
Judging by the descriptions in the specialized literature, the steering rack of the Lada Kalina is absolutely no different in design from all previous front-wheel drive VAZ designs.
What is the reason for this behavior? And another question that automatically arises: I wonder why on cars that are not even several years old, the steering has to be adjusted. Everything is in order.
Why do you need to tighten the steering rack on Kalina?
The working parts of any, even the most reliable and expensive car, inevitably become unusable and need to be replaced. What can we say about domestic budget models like Lada Kalina?