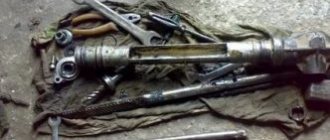
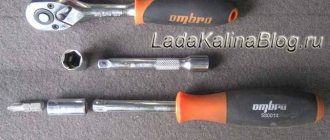
Steering rack knocking on Kalina is a fairly common occurrence. About a year ago, small tapping noises began to appear on broken primer or crushed stone. And over time, the knocking became stronger. I've been meaning to do this repair for a long time, but never got around to it. Although, it’s difficult to call it a repair, since you won’t have to disassemble anything, you just need to tighten the nut. Now about everything in order and in more detail. And for starters, as always, a list of necessary tools:
- Head with a knob or regular 10
- Wrench 13 (the head will be most convenient)
- Special wrench for tightening the steering rack of Kalina (VAZ 2110)
Wrench size for adjusting the Kalina steering rack
To adjust the steering rack clearance, hex and octagonal keys with a range from 10.0 (mm) to 55.0 (mm) are used.
A steering rack wrench is a special wrench that is inserted into the adjusting nut in the steering gear housing.
As a standard, wrenches with the following characteristics are used to tighten steering racks:
- Key for adjusting the gap (hexagon): from 10.0 (mm) to 55.0 (mm);
- Key for adjusting the gap (octahedron): from 17.0 (mm) to 24.0 (mm);
- Key for locking the locknut (open-end): from 24.0 (mm) to 54.0 (mm).
According to GOST 2838-80 ('Spanners') and GOST 11737-93 ('Wrenches for hexagon socket screws'), the tolerance dimensions for steering rack keys are:
- Key for adjusting the gap (hexagon): ±0.15;
- Key for adjusting the gap (octahedron): ±0.15;
- Key for locking the locknut (open-end): +0.72.
The strength of open-end wrenches is determined by the torque. Thus, according to GOST 2838-80, the test torque of keys 24.0-54.0 (mm) must be at least 143.5-858.0 N/m.
Important: before it needs to be tightened with a wrench, the new steering rack can move without knocking from 20,000 (km) to 40,000 (km).
| General view General parameters of keys for steering racks | Key for adjusting the gap (hexagon) Key for adjusting the gap in the gearing of the steering rack of a car |
Data are presented in millimeters.
| Parameter Description of parameter |
| Make and model of the car Name of the make and model of the car |
Caution: The above data are official figures from manufacturers, but please note that the information is for reference only and is not guaranteed to be completely accurate.
Comments. Have questions? We will answer everything.
Source
Other causes of knocking noise when turning the steering wheel
These reasons include different degrees of wheel inflation, which due to inexperienced drivers is not so rare. In addition, in rear-wheel drive cars, the cardan may knock and problems should be looked for in this unit. However, first of all, you need to check the above components, because most often they generate extraneous noise when turning the steering wheel.
If we summarize all of the above and give advice to beginners, we can say that a very important and effective prevention of the appearance of extraneous noise in a car, as well as the breakdowns that give rise to these noises, is to care for the car, regularly inspect it not only from the side and from above, but and from below, as well as careful and reasonable driving, especially at speed, especially on our roads. In this case, you will be able to drive for a long time and no extraneous noise will bother you. Although, of course, in due course you will have to change the steering tips, ball joints, CV joints and other components and assemblies of the car, because, alas, nothing lasts forever in this world.
Lifting the Kalina steering rack with removal
You will need : a special key for the Kalina steering rack (suitable for VAZ 2110), remove the steering rack along with the rods (mustache).
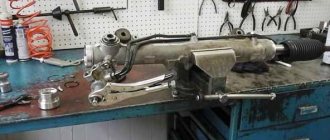
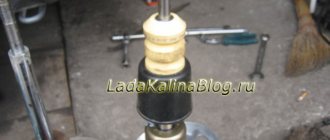
We fix the steering rack in a vice, placing bars so that it does not move. We take the rods of the racks (whiskers) with our hands and shake them, determining the amount of play. Now, to remove play in the Kalina steering rack, you should use a special key. We insert it and turn it counterclockwise about 10-15 degrees, after which we shake the mustache with our hands again. If during the next check the rack play remains, then tighten the rack again by 10-15 degrees. We do this until the play in the rack disappears altogether.
The output is different in each case, so there is no specific tightening torque. Please note that you cannot overtighten the steering rack, otherwise the steering wheel will be difficult to rotate. After the steering rack is adjusted, you need to tighten the stop nut by hammering the crankcase threads.
By the way, this is what the instructions for adjusting the rack from the service manual look like: Checking the gap between the rack stop and the stop nut
- Remove the steering gear from the car.
- Set the rack to the middle position, which is determined by the size (87±0.25) mm from the gear axis to the end of the rack. Using a special device, load the rack with a force P = (500±20) N, or (51±2) kgf, at a distance of 84 mm from the gear axis in the direction of the rack stop.
- The maximum permissible gap between the stop and the nut is 0.2 mm. The maximum permissible movement X of the rack, measured through the relative movement of the pressure punch 1, should not exceed 0.16 mm.
Tightening process, video
There are several ways to tighten. One of them is the method of removing the slats. The removed rail is clamped in a vice and then, using a special wrench, the nut is tightened 10-15 degrees by turning it counterclockwise.
This is followed by a check for backlash and, if necessary, the procedure is repeated, since the backlash can be more or less. It is not advisable to overtighten, it will be difficult to rotate the steering wheel. The advantage of this method is the ease of adjustment, but the disadvantage is that you have to remove and then put the steering rack back in place, and this requires time, certain knowledge and skills.
The second method is simpler, it does not require removing the steering rack, you just need to remove the battery and the platform under it with four bolts, but it is much easier and faster than removing and installing the steering rack. This way we gain access to the steering rack and steering rods.
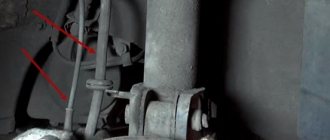
We take hold of the rod with our hand and begin to shake it with force. A characteristic knock will immediately indicate the presence of play. The stop nut is located on the rack behind the left link from the bottom; you need to feel it with your finger. Now the task is to get the wrench into the nut and then turn it counterclockwise. We check for play and, if necessary, tighten it further.
But in the video there is another tightening option, even without removing the battery:
How to tighten the steering rack on Kalina without removing it
Despite the fact that the repair manual for VAZ 1117, 1118, 1119 says that to adjust the steering mechanism it should be dismantled, craftsmen tighten the rack directly on the car to save time and effort. The most convenient way to get to the adjusting bolt is from below, using the inspection hole.
The adjusting nut is on the bottom, so if you look at it from below, then tighten the rack clockwise; if you can get to it from above, then counterclockwise. To determine the rack play, we use the steering wheel rather than our hands. The rest of the process looks similar.
If, even after adjustment, the steering rack on Kalina rattles again, then it should be replaced with a new one, or try to repair it.
Do you know that in order for the steering rack to last longer, you should change the boots on time.
Source
Identifying possible causes of knocking
Turning the steering wheel of front-wheel drive cars involves many joints, levers and rubber seals. A knocking sound in the steering wheel when turning may indicate wear of components or parts.
First of all, the assistant can turn the steering wheel, and you can listen to sounds under the car. Sometimes it is difficult to determine a breakdown by hearing, so you can touch various parts with your hand.
Wheel arch protection
One of the common causes of knocking is loosening of the wheel arch protection. In this case, it first turns under the action of the wheel, then returns to its original position, which gives rise to a characteristic “plastic” sound. Reliable fixation of the plastic protection takes a few minutes.
Hinges
Knocking when turning wheels can be generated by hinge joints: steering tips and rods, earrings and stabilizer rods. The noise occurs when a dirty or unlubricated joint jams. Sometimes it is enough to lubricate it, sometimes it is necessary to replace it.
A metallic crack that accompanies a full turn of the steering wheel may indicate a breakdown of the constant velocity joint, or in popular parlance, a “grenade”. A cracking sound when turning in both directions means that both “grenades” need to be replaced. Failure of CV joints is usually associated with a rupture of the rubber boot that protects the mechanism body. Even a small tear is enough to create the need to replace one of the most expensive components of the chassis. Therefore, it is better to check the anthers once a month for damage.
Silent blocks and ball joint
Noise can be caused by heavily worn-out rubber silent blocks and ball joints. In this case, when the wheels turn, the lever becomes skewed, which generates the sound.
Front pillar
If the steering wheel of a stationary car knocks when turning, then very often this means a breakdown of some part of the front strut. Some of these faults can be found directly, others can be found by dismantling and disassembling the rack.
Wrench size for adjusting the Kalina steering rack
- To the beginning of the forum
- Forum Rules
- Old design
- FAQ
- Search
- Users
there is a key for the 08 model, and there is a key for the 10 model, and on the old tens they installed only the mustache from the tens from the 08 model
Well, it costs 80 rubles somewhere, so why strain your brains?
45 rubles in auto49, it’s nonsense to save in this way. crazy
I saw someone who likes to save money. himself - the housekeeper - that one, but such
yes do it, who is against it?)
I found that the key goes to 24, but I’m also interested in the diameter of the shaft at the steering rack, since the key comes with a hole for the shaft
What are you writing about, about the rack tightening nut or the steering shaft housing cover? On the 10th there is no threaded cap for a hexagon, there is a cap for 2 screws with an internal hexagon.
All this can be found in the directory of designer ANURYEV
Source
Tie rods and tie rods
If the tips or the tie rods themselves begin to knock, as a rule, they have to be changed. As for the diagnosis of these elements, experienced drivers carry it out independently. To do this, you need to wobble the tip and the rod itself, but you need to know how, what, and in what direction to wobble. If the steering tips or steering rods are knocking, then in the first case, replacement is required, in the second, options are possible, for example, replacing the steering rod silent blocks. But it is very likely that the thrust will still have to be changed.
With significant wear, the ball joint of the wheel can also generate extraneous sounds when turning the steering wheel. The most important element for long service life of ball joints, as well as CV joints and steering ends, is regular inspection and replacement, if necessary, of their boots. It is the anthers that protect these components from dirt, water, lubricant leakage and other negative phenomena. And if you change the boots on time, both ball and CV joints, and actually the steering ends, last quite a long time.
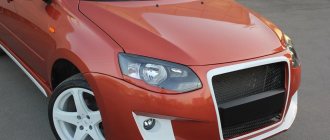
We adjust the Kalina-2 steering rack to eliminate knocking
Cars of the Kalina-2 family are equipped with a steering rack similar in design to the Granta rack. This part transmits force from the steering wheel to the front suspension links. If you feel a knocking sound from the rack while driving, it needs to be adjusted (tightened) correctly. The effect described here can be observed after 10-15 thousand kilometers, and more often it makes itself felt on uneven roads. Next we consider how this problem is solved in practice. And the solution comes down to turning one nut.
Quick Guide
The main reason for tapping is the formation of a gap in the joints. In the steering system, there may be knocking on the tips, ball joints of the rods, the rack, the “cardan” in the column, the steering wheel on the shaft, or the auto-folding system in case of an accident. The metallic sound is distinct and can be heard in place when rocking the steering wheel.
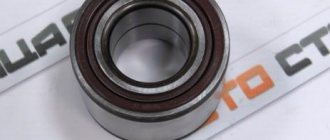
It is quite possible to mistake problems in the suspension for problems in the steering, since the initial stages of wear of bearings and supports only make themselves felt when cornering at speed. In the suspension part, the cause of the knock should be sought in the wheel bearings, ball joints and “supports”.
Car owners often encounter a problem: when turning in one or both directions, an unpleasant and disturbing sound is clearly heard. There may be several reasons. To independently find and eliminate the malfunction indicated by a knocking sound when turning the steering wheel, you need consistent diagnostics of the chassis.
Almost every driver has encountered a knocking sound when turning the steering wheel.
A little theory: front suspension design
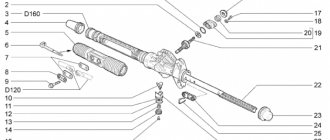
Before attempting to fix any problem, there is a tendency to look at the blueprints or repair manual. It is known that the VAZ-2192 parts catalog contains the following object:
This is what the steering rack looks like in the drawing
Whether the knock will remain in the steering rack of Kalina-2 depends on the following: how accurately element “14” is adjusted. The adjusting nut, marked “14”, looks almost invisible here. But first impressions are deceiving. In the catalog, by the way, the element is called “Stop Nut”.
It is important to know that the thrust nut has external threads. And it spins clockwise. And the words “tighten the rack” mean screwing in the specified nut, and nothing more.
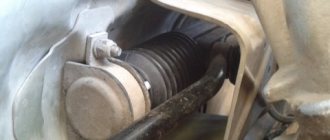
Now let's move on to practice and see what the node in question looks like in reality:
If you remove the rail, it looks like this
The nut has a non-standard notch, and it can only be rotated with a special tool. By the way, the recess will be closed with a cap. In the catalog it is designated by the number “15”, and now, let’s look at the appearance of the special key:
Rack adjustment key
The thrust nut is turned at small angles. We are talking about values of 10-15 degrees. What happens if you overdo it with tightening the rack? The knocking noise will disappear, but the steering wheel will turn with difficulty. Therefore, if necessary, the nut can be pulled back.
Design Features
The steering system of the Lada Kalina includes an electric power steering and a steering column that is adjustable in height and tilt. The steering mechanism is a steering rack with a variable transmission ratio. The rack engages with the engine crankcase through a gear having helical teeth, the pitch of which varies along the length of the rack. The figure shows the design of the Kalina steering rack.
The steering rack on Kalina is pressed against the gear by a spring. Friction is reduced by a plastic insert. The spring pressure is changed with an adjusting nut (the factory-set gap between the rack and the shaft is 0.1 mm). The second end of the rail rests against a plastic sleeve. Adjusting the gap helps eliminate knocking noises.
The steering system shaft is installed in bearings (one in the column bracket, the other in the electric booster housing). The column bracket is attached to the pedal bracket (front) and to the body bracket. The column bracket with the pipe is connected in the form of a hinge of two plates, which allows you to change the position of the steering wheel, and the range of movement is limited by the slots in the plates.
To fix the position of the pipe, there is a lever connected to the adjusting sleeve. It is screwed into a coupling bolt located in the slots of the plates. When you turn the lever, the bushing rotates, loosening the fixation of the plate, which allows you to change the position of the steering wheel. Springs between the plates and the bracket pull the pipe up when the fastening is loosened.
The steering system of the Lada Kalina has two tie rods and swing arms. The rod consists of external and internal tips and an adjusting threaded sleeve, which, when rotated, changes the length of the rod. The required adjustment of the rods is fixed with bolts. The rod is connected to the swing arm using an external tip that has a ball-type joint.
Kalina's electric power steering reduces the force applied to the steering wheel. It is assembled on the basis of an electric motor with a gearbox located under the steering system casing. The amplifier is controlled by an electronic unit that receives signals from sensors of vehicle speed, shaft rotation and steering torque.
The principle of operation of the amplifier is based on the fact that when the car is stationary, the torque on the steering shaft is the greatest, and when moving, it decreases with increasing speed. There is a power steering indicator on the dashboard.
Lyrical digression
In Lada Kalina, the steering rack never makes a knock when we are talking about a new car. This is also true for the break-in period. Let's say in your case this is not done. Then, do not try to repair anything, but go straight to the dealer. According to reviews, the defect in question is covered under warranty, and most car dealers do this: the steering rack assembly is replaced with a new one.
This is what the replacement unit looks like, the rack assembly
There is a logic here. At the factory, adjustments are made correctly (this is true in 99.9% of cases). If a defect appears, the dealer replaces the assembly without expecting that adjustment will solve the problem. The owner does not need to hope for this either. The choice is yours.
We change other details
We also pay attention to how the steering rack looks externally. “Kalina” can keep many secrets regarding maintenance, so if there is the slightest doubt about the serviceability of the rack elements, we replace them with new ones. Otherwise, you will have to remove this part again. The components themselves can be purchased in a repair kit. This will not pose much difficulty for the modern car enthusiast. Having replaced and adjusted all the necessary components, we assemble the rack in the reverse order. That's it, the repair has been successfully completed.
Making adjustments yourself
You can access the adjusting nut from the engine compartment, but to do this you will need to remove the battery, as well as the battery mounting pad. It is better to drive the car into a pit and then remove the crankcase protection (engine mudguard). If you look from under the bottom, the required element is immediately visible:
You need to turn this nut
And when you open the hood, you can feel the nut, but not see it. Its location is marked in the figure:
To make adjustments, place the key here
Before adjustment, remove the rubber cap from the recess. Its appearance is shown in the photo:
Remove the cap and install the key
If it is not entirely clear what exactly needs to be done, it is better to contact the service. The key is installed in the recess and then rotated 10-15 degrees.
When looking at the rack from above, turning the key clockwise corresponds to unscrewing it. The handle of the key comes from the center of the car - which means tightening is being done. By the way, the latter is true provided that the handle faces forward.
Preparing for diagnosis
You need to start by trying to determine the location and nature of the sound. A clear and loud knock in the steering wheel is generated by the impacts of metal on metal, while a muffled knock is generated by metal on plastic. Check the tire pressure: their difference can also cause noise.
Before inspection, you need to clean the front suspension, the easiest way is with a powerful jet of water. After it dries, you can put the car on a pit or viewing platform. There you need to wipe the parts dry with a rag and, if necessary, clean off dried dirt or rust with a brush. Among other things, this way you will save yourself from sand falling from above.
When preparing to diagnose the suspension, you should pay attention to the tightening of the threads, rubber cushions and boots.
Preparatory actions, dismantling unnecessary parts
To remove the crankcase protection, you need to unscrew 4 screws located in one row near the bumper. Also, unscrew two screws having a standard size of M6x16. In some configurations, the protection consists of two parts, but in this case they are attached only with self-tapping screws. These words are illustrated by the following photo:
This is how the crankcase protection works in different configurations
First, unscrew the “10” screws, and then the two “18” screws. In the second case, there will be more screws (eight).
Now let's look at how to remove the battery. First of all, disconnect its terminals. Then, you need to move the additional fuse box to the side. In general, actions are performed according to the photo:
You also need to remove the mounting platform itself, for which you unscrew 4 screws. You will need a 13mm wrench, as well as a 10mm spanner. We will repeat the entire sequence again:
- Unscrew the nuts holding the battery terminals using a wrench 10;
- Remove both terminals;
- Move the fuse box to the side by unscrewing 2 fastening screws;
- Unscrew the nuts with a 10mm wrench and remove the battery;
- Unscrew the screws with a 13mm and remove the metal plate.
Just in case, here is a look at the fuse box mountings:
Mounting screws are located under the casing
Manuals usually recommend removing the negative terminal first. But when it comes to dismantling both terminals, the order in which they are disconnected is not important.
Tools for work
To make it easier to carry out all repair work, you need to ensure that you have the following tools:
- The key is "10".
- 13" socket and wrench.
- Special key for tightening the rack. (Marking for VAZ 2110 – approx.).
The cost of such a key in stores is about 100-150 rubles
Step-by-step order of preparatory work
If you are not the lucky owner of a garage with a pit or a lift, work on tightening the steering rack can be done on the ground, but before doing this you need to prepare the work area.
- First of all, remove the battery, unscrew the terminals and fasteners of the batteries one by one (if available - approx.).
Remove the battery clamps carefully
By unscrewing these 4 bolts around the perimeter, the pillow can be easily removed
Steering rack tightening
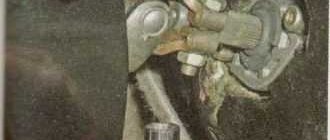
- In the very center of the steering rack, strictly on the opposite side, by touch we look for a rubber cap, which we remove from its place with our hands or with a screwdriver.
Any car enthusiast will enjoy this view from above.
It is on this seat (indicated by the yellow arrow) that the key should be fixed.