Welcome!
The engine flywheel is one of the most important parts in the design of a car engine, and therefore, if the flywheel is heavily worn, or if it is installed incorrectly, the car begins to “slip” when starting from a standstill - this means that when starting from a standstill or while driving, the speed is the engine will jump and the car itself will not accelerate, but will only roar.” Therefore, the flywheel must be changed in a timely manner, since driving on a worn one will bring pleasure but only bring discomfort.
Note!
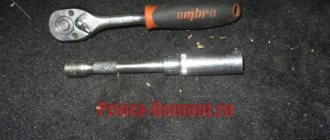
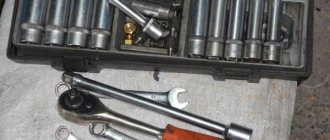
To replace, you will need to stock up on: A screwdriver, as well as an L-shaped socket wrench and, if possible, take a torque wrench with you!
When should you replace the flywheel?
It must be replaced when:
How will the car behave with a worn flywheel?
- As noted earlier, the first thing that will most likely happen is that the clutch will slip on the worn flywheel.
- And also, most likely, when starting from a stop, the car will move, but this will be accompanied by strong vibration, which as a result will be transmitted to the entire car.
Article: 2110-1005125
Order code: 113086
360 ₽
Payment methods: Cash upon receipt VISA, MasterCard Payment through bank
Manufacturer: Togliatti You can get information about the product or place an order by calling 8-800-600-69-66 .
- All characteristics
- 1 review
In stock Available for order – 6 pcs. Data updated: 05/30/2021 at 16:30
Order code
113086 Articles 2110-1005125 Manufacturer Togliatti Catalog group: ..Engine Engine Width, m: 0.012 Height, m: 0.28 Length, m: 0.28 Weight, kg: 0.62
Reviews of the product
Certificates
Reviews
There are no reviews for this product yet.
Write a review
- Flywheel ring VAZ-2110 Article number: 2110-1005125 Order code: 113086 360 ₽ or place an order by calling 8 800 6006 966
Availability of goods in warehouses and stores, as well as the price of the goods is indicated on
30.05.2021 16:30
.
Prices and availability of goods in all stores and warehouses are updated once an hour.
If there is a sufficient quantity of goods in the store you need, you can buy it without pre-ordering. Internet price
– valid when ordering on the website or through a call center operator by phone
8-800-600-69-66
. Subject to sufficient quantity of goods at the time of order.
Price in stores
– retail price of goods in store sales areas without pre-order.
The period for moving goods from a remote warehouse to the warehouse of an online store.
The parts data presented on this page is for informational purposes only.
6b4289340f36ef1adcd82c3e63f01b56
Add to cart
Available to order:
Order quantity:
Product successfully added to cart
!
How to replace the flywheel on a VAZ 2101-VAZ 2107?
Removal: 1) First, remove the transmission from the vehicle. (For information on how to remove the gearbox, see the article entitled: “Replacing the gearbox”)
2) Next, remove the clutch housing from the flywheel, together with the pressure and driven disk. (For information on how to do this, read the article: “Replacing the clutch on a VAZ”)
3) Next, secure the flywheel with a screwdriver so that it does not turn when unscrewing the bolts. After fixing, use a socket wrench to remove all six bolts securing the flywheel to the car engine.
Note! Unscrew the bolts crosswise, because this will be much more convenient!
4) Now remove the flywheel itself and remove the support washer along with the flywheel.
Note! When you remove the flywheel, be sure to look at the mark “indicated by the letter A in the photo” before removing it and then remember or take a photo of how the flywheel is installed relative to this mark in order to install the new flywheel in the same way! (Be sure to read the “Important” paragraph at the bottom of the article)
Installation: 1) First install the new flywheel in the same position as the old one. (Determine this position by the mark)
2) Then install all remaining parts in the reverse order of removal.
Note! When it comes to tightening the flywheel mounting bolts, tighten them evenly, crosswise. And when all the bolts are tightened, check how the flywheel is positioned; there should be no slopes or distortions, otherwise this will lead to rapid wear!
Important! After removing the old flywheel, try not to rotate the crankshaft, otherwise installing a new flywheel may be difficult.
Note! But if you still crank the crankshaft, then in this case set the piston of the fourth cylinder to the “TDC - Top Dead Center” position! (For information on how to set the piston to the “Top Dead Center”, see the article entitled: “Installing the piston of the fourth cylinder to the TDC position”)
After the piston is installed, install the new flywheel in its place, strictly vertically with the mark up and nothing else!
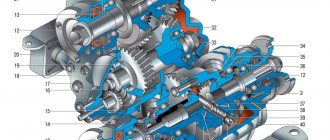
For newbies! Question: Where is the friction surface of the flywheel, as well as the ring gear, and all six mounting bolts? Answer: A – Flywheel friction surface. 1 – Ring gear. 2 – Flywheel mounting bolts.
Flywheel replacement
Replacement requires a car lift, transmission rack and standard plumbing tools.
Replacing the flywheel VAZ 2106
The engine of classic Lada cars has a conventional single-mass flywheel. Let's look at how to remove the flywheel and the technological sequence for replacing it:
- First you need to gain access to the flywheel. If the engine is removed, there will be no problems; if not, you need to remove the gearbox and clutch basket;
- Next, you need to keep the flywheel from turning. To do this, use a special clamp, but a regular screwdriver will do;
- Having removed the gearbox, you need to unscrew the six fastening bolts, then remove the flywheel;
- Installing a new flywheel .
Install the flywheel in the reverse order of dismantling. The flywheel bolts are tightened crosswise with a force of 60.1-87.4 N.m.
Remove the flywheel
4. Remove the support washer while holding the flywheel. 5. Remove the flywheel. 6. Check the condition of the ring gear; If the teeth are damaged, replace the flywheel. 7. The surfaces of the flywheel mating with the crankshaft and the clutch driven disc must be free of scratches, burrs and completely flat. If there are scratches on the working surface 3 (Fig. 4.5) of the flywheel under the clutch driven disc, grind this surface, removing a layer of metal no more than 1 mm thick. Then grind surface 2, maintaining the dimension (0.5+0.1) mm and ensuring parallelism of surfaces 2 and 3 relative to surface 1. The tolerance for non-parallelism is 0.1 mm. After grooving, install the flywheel on the mandrel, centering it along the mounting hole with the emphasis on surface 1, check the runout of planes 3 and 2. At the extreme points, the indicator should not show runouts exceeding 0.1 mm.
Rice. 4.5. Flywheel VAZ 2106: 1 - surface of attachment to the crankshaft flange; 2 — clutch mounting surface; 3 - supporting surface of the clutch driven disc
A detailed procedure for removing the flywheel on a VAZ 2110 car, troubleshooting it (identifying defects and eliminating them if possible) and reinstalling them.
Over time, our car has a significant mileage, problems with the clutch begin, and it deteriorates. Usually the flywheel does not require replacement until 200-300 thousand kilometers of the car or even more, but if it begins to fail after 50 or 100 thousand km, then you need to look for the reason for its rapid wear (this could be harsh driving, weather conditions or clutch defects that need to be repaired). The procedure for replacing the flywheel itself is not complicated, but it does require a certain amount of time, because because of this part you will have to dismantle the gearbox and disassemble the clutch (read about it on VAZ cars).
Flywheel mounting diagram
The factory has already taken care to minimize the possibility of incorrect installation of the flywheel bolt in the clutch system. The axis of the threaded hole where it needs to be inserted is offset by approximately 10 degrees. Despite this, you can additionally control yourself by making marks with paint. To replace and secure the flywheel, you need:
- Make a mark of the relative position of the crankshaft and flywheel.
- Unscrew the flywheel mounting bolts evenly by 1-2 turns.
- Without haste and, most importantly, turning them evenly, remove the flywheel.
- Apply thread sealant.
- Install the flywheel in reverse order.
- Tighten the bolts to a torque of 100 N*m.
- Adjust the position (you can install the gasket in the gap with the crankshaft).
It is recommended to use a torque wrench instead of tubular reinforcers.
Causes of bolt failure
Car manufacturers advise replacing the flywheel bolt set. When a car has covered a mileage of about 300-400 thousand, problems begin related to the wear of certain parts. Most often, the wear rate increases due to deterioration of the clutch and aggressive climatic conditions. As for replacement, even manufacturers announce this possibility in the instructions. There are several reasons, for example, the bolts are sheared because there is a backlash as a result of unscrewing and the lever for shearing forces has increased, or an error occurred when choosing the strength class. It is likely that unheated or incorrectly sized parts were used, there was a problem with balancing, or there was an unsuccessful factory assembly. In any case, if these parts are destroyed, it is necessary to resort to replacement.
Removing and troubleshooting the flywheel:
1. Before starting work, remove the battery (see article) from the car, drain the oil from the gearbox and remove it.
2. Remove the gearbox and disassemble it.
3. Now that you have reached the flywheel, unscrew the six bolts securing it. But to do this, put back one bolt securing the gearbox and insert a screwdriver into the teeth of the flywheel with one hand so that it does not rotate while unscrewing the bolts.
4. While holding the flywheel with one hand, remove the bolt locking plate from the final bolt with the other.
5. Now carefully remove the flywheel from the crankshaft flange. 7. If everything is in order with the rim of the teeth, then switch your gaze to the adjacent surface of the driven disk; it should not have deep abrasions or other defects.
8. Also carry out a similar troubleshooting on the back side of the driven disk, or rather, look at the adjacent crankshaft flange.
If such distortions are visible in points 7 or 8, then the flywheel must be replaced with a new one or repaired - sanded using special equipment in a car repair shop.
9. To carry out an accurate check or repair of the clutch driven disc, take it to a car workshop that has the required equipment. Actions and recommendations for repairing the flywheel:
- The defect of the adjacent surface of the clutch disc (3) should not be more than 0.06 mm.
- The parallelism between the upper contact surface of the driven disk and the lower surface (2) for fastening the clutch should not be more than 0.1 mm.
- On the clutch disc planes (1 and 3), the runout should not be more than 0.1 mm.
- When cleaning the surface of the flywheel (3) from abrasions and scratches, you should know that the maximum possible removal of a layer of metal is no more than 1 mm.
- At the same time as side (3), surface (2) should also be sanded. To do this, maintain a step between them with a height of 0.5±0.1 mm. When grooving, keep the adjacent surfaces (1 and 3) parallel.
10. Once you have finished cleaning the surface of the flywheel, proceed to reinstall it. First of all, degrease the bolts and threaded holes under them, and then apply sealant to their threads. Reinstall the part in the order of removal, only align the holes on the crankshaft flange and the flywheel correctly (they are located asymmetrically).
Installation of the VAZ 2114 flywheel
When installing the part, special attention must be paid to where the mark on the VAZ 2114 flywheel will be directed. The mark determines the position of the crankshaft and is used to guide when setting the valve timing when replacing the timing belt. If you install the flywheel with the mark offset, subsequent work on replacing the timing belt will be very difficult.
Therefore, the part should be placed so that the mark is located exactly opposite the connecting rod journal of the fourth cylinder. To prevent the bolts holding the flywheel from unscrewing during operation, thread lock should be applied to their surface and only then tightened. The sequence of operations when installing a flywheel on a car is the reverse of the procedure for dismantling this part.
Is a lightweight flywheel needed on a high-powered engine?
For a forced engine, the operating mode varies between 6 - 7 thousand revolutions. At such frequencies, a heavy product is a big obstacle, because such a mass needs to be turned quickly.
A lightweight product plus the rotation of a heavy crankshaft at high speeds will be sufficient to maintain stable rotation of the engine by inertia.
Therefore, in this case, a heavy flywheel will be superfluous; it can be lightened.
At the same time, a set of tuning measures has already been carried out on the forced engine.
General concept of the flywheel
The part of the car engine that is designed to regulate the supply of energy is called the flywheel. It is thanks to this unit that the accumulation of energy is ensured with a greater supply of rotational motion.
So, a flywheel in a modern car is needed in order to:
- start the internal combustion engine;
- connect the internal combustion engine to the gearbox and transfer the CM from the engine to the gearbox;
- regulate crankshaft rotation.
Representing a rather large metal disk with a crown placed around the edge, the flywheel easily engages with the starter after turning the ignition key. Thus, the engine starts.
Flywheel defect, removal
Problems with a car usually begin after a significant mileage. In particular, clutch performance deteriorates. The flywheel itself can last up to 200-300 thousand kilometers, but it also happens that it deteriorates much earlier. In this case, you have to look for reasons for rapid wear, most likely related to climate, clutch malfunctions, etc.
It is clear that if a car's clutch fails, the flywheel is also affected.
The algorithm for removing the flywheel from a car is as follows:
- First, the battery is removed, the oil is drained from the gearbox, and the starter is dismantled;
- then the gearbox and clutch are removed;
- After this, the bolts securing the flywheel are unscrewed.
Advice. When unscrewing the flywheel bolts, the flywheel may rotate. To stop it, you have to insert a screwdriver or pry bar between the teeth of the flywheel.
- hold the flywheel with one hand, and with the other, remove the last retaining bolt along with the lock washer for the bolts;
- It's time to carefully remove the flywheel from the crankshaft.
Now that the flywheel has been removed, you can inspect it, or, as is commonly called, carry out troubleshooting. The first step is to inspect the ring teeth, which grind down over time, and if initially installed incorrectly, become completely unusable, preventing the flywheel from engaging with the starter.
In this case, there is no need to think - if there are obvious damages and flaws on the crown, the flywheel needs to be updated or restored. It may be that everything is fine with the teeth, but the mirror of the friction linings has severe damage and other malfunctions.
Attention. Repairing the flywheel will involve replacing the crown.
Reinstalling the flywheel involves first of all degreasing the bolts and threaded holes for them. Then sealant is applied to the threads, the part is mounted back in the same order as it was removed. But it is important to be able to align the holes at the end of the crankshaft and the flywheel (they should be located asymmetrically).
How to install a clutch disc: step-by-step instructions
The clutch performs the most important function - it ensures smooth gear shifting, so that the car starts smoothly, the transmission and engine function correctly and do not fail ahead of time.
Due to the fact that the clutch experiences increased loads, it has to be changed quite often, every 100,000 kilometers. How do you know when it's time to install a new clutch disc?
The following signs indicate that this element has become unusable: slippage appears, the clutch does not disengage completely, gears are difficult to shift, the clutch pedal becomes too tight or falls, and the car loses traction.
Not every car owner is well versed in how to properly replace this element. What happens if you install the clutch disc incorrectly? The result of such a repair will be the following: you will have to disassemble the unit again, because the disk will not be able to function properly and will begin to malfunction.
Removing the flywheel
Before you begin dismantling the flywheel, you need to ensure comfortable work with this unit: take the car onto a lift, into a pit, and jack it up in the area of the front wheel. Then follow these steps step by step:
- Disconnect the car battery from power.
- Drain the gearbox oil.
- Remove the clutch, gearbox, starter.
- Disassemble the coupling.
- Make a mark of the relative positions of the flywheel and crankshaft.
- Treat bolts that have become stuck with an aerosol.
- Secure the flywheel with a screwdriver to the mounting bolt so that it does not turn.
- Unscrew the bolts halfway.
- Unscrew the 6 bolts first by 3 turns, and while removing the last one, hold the flywheel so that it does not fall.
- Remove the support washer.
- Inspect the holes and bolts in detail.
If the bolt is broken, you need to drill a blind hole in part of its fragment using an extractor that has a screw cone thread. Thanks to its shape, it is firmly fixed inside and rotates the damaged part.
There is another way to restore holes in which the threads are damaged. First, holes of a certain size are drilled for a complete set of bolts, a new thread is cut (this work is done using a tap), and then bolts with a larger diameter are used that meet all GOST criteria.
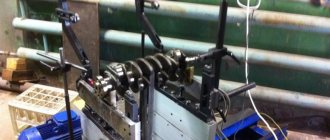
The following video shows how to remove and install a flywheel using a VAZ as an example.
What characterizes a lightweight flywheel?
A lightweight flywheel is a product from which a certain amount of metal has been extracted.
For example, many VAZ car owners from the classic series lighten their flywheel by one and a half, two, or even 3.5 kilograms. At the same time, the factory weight of the device is about 7.5 kg.
With the latter option, the product will weigh about 4 kg and it is believed that this is the limit for VAZ cars, since going beyond it to a lesser extent can affect the strength characteristics of the flywheel itself. It's not worth the risk. Although, with the right approach, the weight of the product on a VAZ can be reduced to 3 kg, but more on that later.
But usually on VAZ models the weight of the flywheel is reduced by 1.5 kg, which cannot negatively affect its strength characteristics.
But everything is not as simple as it seems; there are many pitfalls that are important to know about.
DIY replacement process
If you still have a great need to replace the flywheel crown with your own hands, perhaps my instructions will help you.
First, let's define the difficulties, let's assume that the flywheel has already been removed:
1) The crown sits firmly, you can’t just remove it, you need to heat it and then knock it down.
2) It is important to plant the new crown evenly, just like the old one was attached. We also heat it up to dress it, but the main thing is not to overheat it.
Well let's get started.
We shoot down
First, we need to heat the flywheel, and then knock off the damaged crown from it. Of course, many don’t bother and just “hit it cold”, but it may not work on all models, I mean that if it works on a VAZ, then on a foreign car it can stall. Therefore, the easiest way is to put the flywheel in the oven and heat it to 200 - 250 degrees. He will lie there for about 20 - 30 minutes.
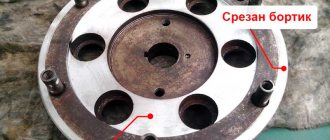
After this, take a soft chisel, preferably made of copper or brass, and use a hammer to remove the crown, simply knock it down (and to be honest, a heated one can be removed by hand). If we talk about the VAZ, then it has a side on one side, you need to hit it from it. If everything is done correctly, it will come off in a few blows with a hammer.
We stretch
This is where it gets more complicated - you won’t be able to simply hammer in a new crown (on a cold one), you will split it or damage it. It is MANDATORY to heat it up! The main thing is not to overheat, because you can change the metal if you heat it red hot, thereby reducing the strength.
My advice to you is to put it in the oven again and heat it up (250 degrees), you can put it on one or two electric stoves, but I don’t advise you to use direct fire.
We know from a physics course that if you heat a metal, it expands, and this part is made in such a way that when heated, it will change dimensions, and then simply and easily sit in its rightful place. Often you don't even need to hammer it in. The main thing is to plant it up to the stopper side!
After the metal has cooled, it will sit firmly on the flywheel disc (you can’t pull it off). That's all the replacement is.
Now we are watching a detailed video, I think it will help you.
That's all, read our automotive website.
Similar news
- The engine knocked, what is it? What to do in this case, and to...
- What can knock, rattle and squeak in the front suspension?
- DIY diagnostics of VAZ 2114 and 2115. Using a laptop...
Add a comment Cancel reply
Nuances of proper installation
Correct installation of the flywheel implies, first of all, that the marks match. If, when removing the flywheel, the position of the assembly relative to the crankshaft and the sensor was not noted (it is located right between), this leads to a problem.
Experts say that the 20th tooth after a flywheel break, counted up clockwise, should be facing the crankshaft sensor, and the shaft itself should be at TDC.
Attention. You can check the position of the crankshaft from the back of the engine. There is a special sign there.
In addition, knowledge of how to properly install the flywheel will help you fully realize the capabilities of the car engine. At the factory, the system is initially equipped with a standard unit. For example, on a VAZ the unit is of the old format, dating back to the era of the Fiat prototype.
Naturally, this was the reason for modernization and alterations. And today innovative techniques come to the aid of the tuner.
Let's consider these possibilities.
Installation of a 2-mass flywheel makes it possible to shift the RVK (mesomerism of oscillations) to a rotation amplitude two times smaller than the idle speed of the internal combustion engine. In a 2-mass flywheel, the spring system is not located in the clutch, but between the cast iron parts.
Despite such a large number of positive properties, a 2-mass flywheel is rarely the choice of tuners, since it is expensive, cannot be repaired in a garage due to high-precision manufacturing, and for a number of other reasons.
Attention. Among other things, the 2-mass flywheel often fails. When starting the internal combustion engine or stopping the engine, a characteristic creaking, noise and vibration is heard, which indicates problems with the unit.
A more effective way to reduce the load on the gearbox would be to install a lightweight flywheel model. In this case, the actual weight of the product is reduced by the maximum possible amount. The new unit ultimately weighs 4-5 kg less than the standard version.
Installing a lightweight node model involves a lot of nuances. First of all, this concerns the groove of the flywheel on both sides.
Summary: If for any reason the position of the shafts and flywheel is in doubt, it is recommended to do the following. Align the mark on the crankshaft with the mark on the lower timing belt casing. At the same time, a mark is placed on the flywheel, which should point to the crankshaft sensor. As for the camshaft mark, it should be at the level of the cylinder head edge.
The flywheel of an internal combustion engine serves to store energy. It helps the pistons pass bottom dead centers (especially when starting the engine). The flywheel transmits engine torque to the gearbox. There are three types of flywheels:
- ordinary;
- lightweight;
- damper (springs are installed inside the damper).
The flywheel resource is usually 120-150 thousand km. It all depends on how intensely and in what modes the engine worked. Typically, installing a new flywheel is done after two sets of clutch friction linings have worn out, so the flywheel is replaced together with the clutch.
Pros and cons of a lightweight flywheel
So, let's summarize briefly, what are the advantages of a lightweight flywheel compared to a regular one, and what are its disadvantages.
Pros:
- The lightweight version of the product has less centrifugal and inertial forces than the standard one, which means that the power take-off from the engine during acceleration will be less, this figure is approximately 2%;
- At high speeds, the efficiency of the motor increases, as inertial and centrifugal forces decrease;
- Starting the unit and reaching maximum speed occurs with less fuel consumption.
Minuses:
- If you install only a lightweight analogue on a regular engine, then the car will lose the low end, and the high end will not be added; as a result, the engine will not operate in its proper mode and will quickly die from increased loads. Therefore, an integrated approach is needed here where you need to correctly match all engine components to each other, and not just install a tuned product.
- After lightening the device, it is impossible to obtain a clearly visible result. A 2% increase in power and negligible fuel economy are not numbers worth bothering with. As a rule, the crankshaft is immediately lightened, and other work is carried out on tuning the engine, gearbox, clutch, camshafts, and exhaust system, which together provide a significant increase in power and savings. For example, a direct-flow muffler is installed.
- The method is not very effective when driving at low speeds, for example, when driving at 4 - 4.5 thousand rpm, and especially at 9, the result will be noticeable since the spinning torque will increase from 4000 to 8000 - 9000, and when driving up to 3 thousand rpm the result will be almost invisible. If the car constantly drives loaded, off-road, then with a light flywheel the car will jerk, quickly lose speed, stall, the reason is the lack of sufficient inertia. Therefore, it is advisable to install a lightweight flywheel only on sports cars or, as noted above, on ordinary ones, but with modifications to other systems.
- The need for precise balancing of the tuned product along with the generator belt pulley and the crankshaft.
- The strength characteristics of a lightweight device are significantly lower than those specified at the factory, so it is impossible to guarantee its stable and long-term operation.
- The difficulty of making it yourself, since the product must be perfectly balanced. To guarantee quality, the flywheel is lightened on a digital coordinate machine;
- High cost if bought at the car market.
Flywheel repair
Flywheel malfunctions are obvious. This part experiences constant dynamic loads and friction, which leads to physical abrasion of the contact surfaces. As a result, vibrations or beatings appear, and the clutch may “slip.” Simple flywheels must be replaced, damper ones are restored in special workshops.
Another typical malfunction is damage or wear of the ring teeth. If the flywheel is still in good working order, the crown is changed; if not, the entire assembly is replaced.
Repairing damper flywheels is more difficult. They are repaired and restored in specialized workshops. Defect detection, precise measurements, balancing machines, and the services of a professional welder will be required. The essence of the process is that worn surfaces are ground, springs and plain bearings are changed. The flywheel is balanced and tested under load. After repair, the flywheel planes should fall within the tolerances for backlash and runout.
Flywheel as an energy accumulator
Heavy flywheels are installed on ordinary, custom cars with serial engines for one more reason - they act as an energy battery.
The fact is that at the lower end, power transfer in such cars from the piston to the crankshaft occurs in a very narrow range - 50 0.
In this case, four strokes in the engine occur in 720 0 (2 revolutions), of which the theoretical power stroke is only 180 0.
Due to the fact that the standard engine has low speeds and power transmission occurs in a very narrow range, even idling it is difficult.
This situation is corrected by a heavy flywheel, which, after 50° rotation of the shaft cranks, absorbs enough energy to then spin up further by inertia and help the engine.
The same is true for the operation of the unit at lower levels. Those. a heavy device on engines with operating speeds in the range of 2.5 - 4 thousand, and idle speeds from 0.8 to 1 thousand plays a positive role and it is not worth making it lighter if you do not simultaneously make design changes to other elements of the engine.