Typically, the fuel pump is changed extremely rarely, since this module is quite reliable and requires a minimum of attention. The main reasons why you generally have to remove or change the fuel pump on a Priora:
- Reduced pressure in the fuel rail
- Replacing the FLS
- Replacing the mesh (mesh filter)
In order to remove the fuel pump from the Priora tank, you will need the following tool:
- Phillips screwdriver
- Head 10 (preferably deep)
- Ratchet handle or crank
- Extension
Replacing the fuel pump mesh on a Priora
The fuel pump in a car is designed to supply gasoline from the fuel tank to the engine.
For carburetor cars, mechanical pumps are used. Due to the short distance between the carburetor and the fuel pump, fuel is supplied at low pressure. Cars with an injection-type fuel system are equipped with electric fuel pumps that supply gasoline under high pressure. The operation of such a pump is controlled by an electronic system that takes into account the throttle position, as well as the air-fuel ratio.
Price
Below are the prices and part numbers for the fuel pump, depending on the manufacturer.
| Manufacturer | vendor code | Price, (rubles) |
| Bosch | 2112-1139009 | 2000 |
| SOATE | 60.1139-01 | 1100 |
| RES | 0588455055 | 900 |
The table below shows the elements of the fuel cup and their prices, taking into account the manufacturer.
| Detail | vendor code | Price, (rubles) |
| RTD | 11180-1160010-00 | 480 |
| Hose | 21083-113902200 | 30 |
| Mesh | 21101-113920000 | 30 |
| The cost of a complete fuel pump glass starts from 2,400 rubles. Article: 21101-1139009 |
Basic fuel pump malfunctions
The fuel pump in the Prior may operate intermittently due to low-quality fuel. This is due to the fact that a fine fuel filter is installed here after the fuel pump.
At the inlet there is only a filter mesh that performs rough cleaning. The gasoline at some of our gas stations is so dirty that the mesh gets clogged quite quickly. The engine does not start well or stalls during operation.
The car jerks along the way and slowly picks up speed. If the filter mesh is partially clogged with debris, the optimal supply of gasoline to the engine is disrupted in different operating modes. When the pump is unable to maintain the required pressure in the fuel system 3.7-4.0 atmospheres , improper mixing of air and fuel occurs. As a result, the car loses speed.
In addition, even a well-warmed-up engine after a short stop can then start only after prolonged operation of the starter.
Unstable operation of the power unit is most often a consequence of a faulty fuel pump. First of all, you need to check the pressure level in it.
If after stopping the engine the pressure in the pump drops too quickly, then there is obviously damage to the diaphragm, as well as the sealing gasket. In this case, the gasket should be replaced, and the diaphragm should be reinforced with a special film.
There may also be foreign bodies in the fuel system, in which case the fuel pump must be disassembled and thoroughly washed. To do this, use the following tool:
- flat screwdriver;
- pliers;
- set of open-end wrenches;
- Phillips screwdriver;
- set of heads.
You can do this type of repair yourself in your own garage. Before you start, you should once again make sure that the fuel pump is not working as it should. To do this, you need to start the car and pay attention to the idle speed.
If it floats, then this is already one of the arguments in favor of carrying out repair work. In addition, you can go out onto the highway and sharply press the gas at about 3000 rpm. If the car starts to twitch while accelerating, then there is a second argument for making repairs.
Useful information and nuances of installing filters
It’s interesting, but original filters for Ford Focus are practically never found on sale. Thus, the manufacturer forces you to change the entire pump assembly. The Ford Focus car uses two types of filters: FGO (for coarse cleaning), which is a mesh, and FTO in the form of a flask.
The purpose of the filters does not need to be described in detail. Let's just say that they efficiently clean fuel in two stages. This practice has long been found in the automotive industry: one filter removes all large particles of debris (mesh), the other qualitatively cleans the fuel before it is directly supplied to the engine.
The coarse mesh on the Ford Focus is located inside the pump
Fuel filters on a Ford Focus can have different designs and be located in different places, depending on the modification and system of the car. For example, on injection internal combustion engines, the FTO remote filter is located near the tank, and the FGO mesh is located inside the fuel pump.
Signs of a car fuel pump malfunction
On a Ford Focus, the FGO mesh is considered a disposable, non-removable element, and according to factory instructions, it can only be replaced when assembled with a pump. The replacement schedule for FTO (external) is every 60,000 km, for FGO (submersible) – every 120,000 km.
Replacing the remote filter is quite easy. You need to crawl under the car, which you have previously placed on a lift or pit. Before doing this, you should put on protective gloves and open the sash or window in the garage to allow benzene vapors to escape. To ensure fire safety, it is recommended to turn off all heating devices.
Next you need to act in the following sequence:
- Pour some fuel into the tank, start the engine and wait until it turns off (the system runs out of fuel - the pressure is released).
- The filter is attached to the body with a bolt, and you need to unscrew it.
- Disconnect the fuel hoses going to the filter (prepare an empty container in advance into which the fuel remaining in the pipes will be poured).
- The filter can then be removed by disconnecting it from the clamp.
- Tighten the new FTO into the clamp.
It is extremely important not to forget to mark the tubes, hoses and fittings that we remove
The Ford Focus remote filter is located separately from the pump
When installing a new filter, you should pay attention to the arrow marked on the housing. It indicates which side of the filter element should face the engine (i.e.
The filter must be placed so that it is directed with the arrow towards the car engine)
e. the filter must be placed so that it is directed with the arrow towards the car engine).
The arrow on the filter should point towards the engine during installation.
Replacement of the mesh is carried out together with replacement of the pump. However, there are motorists who know how to clean the mesh without changing it. There is another option: install a mesh from another car model at the inlet of the original fuel pump, thereby creating additional filtration. This is something like an upgrade designed to improve the stability of the engine for some time. In fact, only a full replacement of the element will make it possible to improve the dynamic and technical performance of the engine if the submersible filter no longer copes with its duties.
Almost all Ford Focus have a hole cut on top of the fuel tank, which is provided for removing the pump and filter without dismantling the entire tank.
The replacement algorithm looks like this:
- The rear sofa reclines.
- The wires going to the pump determine its location.
Wires to the fuel pump will help determine its location - If the hatch is not provided by the manufacturer, then you should use metal scissors to cut and bend the iron just enough so that it is enough to remove the pump.
A hatch cut out with scissors will provide easy access to the pump. - The pump is held on by a nut that must be unscrewed.
After the pump is dismantled, you need to remove the bottom plastic cover protecting the mesh.
The submersible filter is located inside the pump, it is hidden by the bottom plastic cover
All that remains is to remove the submersible filter and replace it. If the pump is being replaced, then you need to install a new unit in place of the old one. After assembly, be sure to pump some fuel into the system with the starter, but do not start the engine. Then you should check the connection for leaks. The car must also be tested in motion. If there are no leaks anywhere, all hoses and tubes are properly secured, then you need to drive the car at speed along the highway, then downhill. This is how the fuel supply is checked in different driving modes.
Removing and disassembling the fuel pump
The fuel supply mechanism in the Priora is located in the gas tank, so to get it you need to:
- Remove the rear passenger seat. The latches holding it in place are on the sides.
- There is a hatch in the bottom of the car, secured with two self-tapping screws. Having removed it, we gain access to the fuel pump, which is fixed in the fuel tank with a flat metal ring.
- Remove the ring, which is held in place by nuts screwed onto eight threaded pins spaced evenly around the hole in the gas tank.
- We remove the two fuel hoses and remove the retaining ring.
- We disconnect the electrical connector through which power is supplied to the pump located in the plastic casing.
- We take out the housing; this must be done carefully so as not to damage the float, thanks to which the filling level of the gasoline tank is shown on the instrument panel.
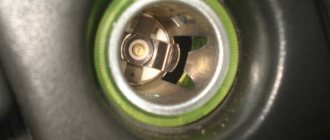
- The next step is to pull out the pump itself, bend the four latches located on the body, and take out the fuel pump, at the bottom of which there is a coarse mesh.
As a rule, the entire mesh looks quite dirty, and its central part is literally clogged with various debris. To remove the old mesh, you just need to grab it on all sides with your fingers and pull it towards you, or pry it with a flat-head screwdriver.
It comes out of its seat relatively easily. After this we install a new mesh. A mesh for the Lada Priora fuel pump can be bought in a specialized store or on the market. It costs about 50 rubles .
There is usually also a lot of debris at the bottom of the plastic cup in which the pump was located. It needs to be rinsed well and wiped with a dry cloth.
Then everything is put together in reverse order. After replacing the mesh, the engine picks up speed smoothly and runs stably. While driving on the highway, the car no longer jerks and accelerates normally.
Product selection
AvtoVAZ offers an original fuel pump for 4,000 rubles. The original catalog number is 2112-1139009. But many car enthusiasts buy and install cheaper analogues instead of the original.
Analogs
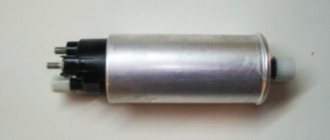
Bosch fuel pump.
A non-original part is often no different in quality from the original. So, if the vehicle owner wants to save money, then you can install a non-original part. Let's consider the main offers of analogue companies:
- Fenox EFM33006O7 - the cost of such a part will be about 3,000 rubles.
- Bosch 0 560 454 035 - as they say, I took BOSCH, and ... (go ahead).
- Ween 192-0262 – the price on the spare parts market will be approximately 3,000 rubles.
- Pekar 2112-1139009 - will cost a little more than the previous two, the average price is 3,500 rubles.
- ATS 53453 - praised, but the price tag is good. We know they put one like this as a replacement for expensive originals on Peugeot.
ATS fuel pump.
Replacing the fuel pump and fuel pump mesh for Lada Priora
The content of the article:
Replacing the mesh in the fuel pump of Lada Priora
Today I decided to change the strainer on the fuel pump. First, I removed the back seat and unscrewed two bolts on the cover that leads to the fuel pump.
We disconnect the wires going to the fuel pump and get behind the wheel. We start the car and let it idle until it stalls, thereby releasing the pressure inside the pipelines. Be sure to bleed.
Disconnect the wiring harness.
We disconnect the two pipelines that are attached to the fuel pump. Removed by pressing on the iron bracket and, pushing away from you, disconnect the pipeline from the fuel pump
Disconnect two pipelines
Unscrew the eight nuts by 10.
Next, remove the fuel pump holder ring and put it away so that it does not interfere with us.
Then, carefully removing the pipeline hoses, holding them with your hand, we pull the fuel pump itself out of its seat, most importantly, without excessive effort, and carefully so as not to damage the float on the fuel pump.
After removing the fuel pump, disconnect the plastic pipe. Without removing it we will not be able to disassemble the fuel pump
Remove the two small retaining rings on either side of these guides.
Then we disconnect the plastic fasteners (there are three of them) by detaching them, we can get to the mesh itself.
We got to the mesh, as we can see, there are some shavings on it, which means the filter is working well. Next we will remove it to exchange it for a new one.
Diagnosis and Troubleshooting
It is relatively simple to verify that the electrical network is faulty - this can be done without removing the fuel pump. When the sound of its operation is not heard when the ignition is turned on, you must immediately check the fuse responsible for this circuit. It is installed in a block mounted at the bottom in front of the front passenger seat. You need to remove the block cover, find the fuse marked F3, rated for 15 A, and replace it. This kind of work can be done on the road.
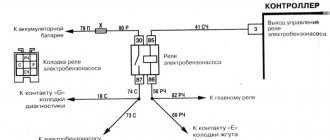
If the operation of the fuel pump has not resumed, you should switch your attention to relay K2, located in the same block. It closes the power circuit of the pumping device based on a signal from the controller. You can also check the serviceability of the relay in road conditions, for which you will need a piece of copper wire. Diagnostics are carried out in the following order:
- Remove relay K2 from the connector.
- Turn on the ignition.
- Using a wire, connect the contacts marked “30” and “87”; the numbers are marked on the relay. Another option is to apply power to pin “11” located in the diagnostic connector. The +12 V voltage can be taken nearby, from the cigarette lighter.
- If you hear the pump humming, then you need to change relay K2.
If after the above manipulations the unit is still “silent”, it is necessary to check the integrity of the wiring and the reliability of the contact at the place of its connection. This will require a device, so it will not be possible to carry out such work in the middle of a field. Unless you can check the serviceability of the fuel pump itself by disconnecting the connectors from it and supplying 12 V directly from any convenient source. If the pump still does not hum, it should be replaced.
Be careful when connecting wires directly and make sure that there are no drops of gasoline nearby, as a spark may cause it to ignite.
It will not be possible to diagnose insufficient fuel supply to the injectors under road conditions, unless you carry a pressure gauge with a corresponding hose for connection to the fuel rail. The amount of gasoline supplied is characterized by the pressure in the network, to measure which you will need a pressure gauge. The check is performed as follows:
- Twist off the plastic cap covering the diagnostic fitting. It is located at the end of the fuel rail and is a regular spool.
- Press the spool rod to release the pressure in the line. In case of gasoline leakage, place a small container under the spool. Perhaps the malfunction will make itself felt already at this stage if there is no pressure in the network and no fuel flows from the fitting.
- Unscrew the spool and put the hose from the pressure gauge onto the fitting. With the ignition off, apply 12 V directly to the pump. To clearly record the readings, it must work for at least 10 seconds.
Replacing the fuel pump Priora/Granta
You will need : relieve pressure in the fuel system (see “replacing the fuel filter”), disconnect the negative terminal of the battery and prepare a Phillips, flat-head screwdriver, a hammer, a 10-point socket with an extension and a cloth.
Removing the fuel pump:
- Inside, use a Phillips screwdriver to unscrew the fuel pump hatch, which is located under the rear seat of the car.
- Disconnect the block from the fuel module cover by lifting the clamp.
- Disconnect the tip (No. 1) from the pump cover fitting by squeezing the clamps (in the direction of the arrows) of the tip (No. 2) of the fuel supply tube.
- Unscrew the 8 nuts securing the pressure plate of the fuel pump using a 10mm socket with an extension.
- Remove the washers and ground wire from the studs. Remove the pump pressure plate.
- Remove the Priora fuel module, being careful not to damage the fuel gauge sensor float.
Installation of the fuel pump is carried out in reverse order. The cut of the spacer should coincide with the protrusion on the fuel module cover. Replace the O-ring with a new one, otherwise you may smell gasoline in the cabin.
For reference:
By the way, if you had to remove the fuel module, then immediately clean or replace the pump mesh.
Manufacturers and prices of analogues
What car owners expect from analogues is maintaining normal pressure in the fuel supply system. If the electrical system is quite weak, there is no point in installing it. There is a list of proven devices for supplying fuel to the engine, which have been well rated by other owners and are suitable in their parameters for replacing the standard device:
- Soate 21101-1139-01, price – 1,600 rubles.
- Bosch 0580-453-453, cost – 4,500 rubles.
- Pekar 2110-11139009-00, price 3,100 rubles.
- Stellox 10-01202-SX, cost – 1,000 rubles.
- Stellox 10-01680-SX, cost – 3,000 rubles.
- STARNER 2112-11390-09, cost – 1000 rubles.
- Masuma MPU-103, cost – 2,800 rubles.
- Denso DFP-0105, priced at RUB 3,200.
Replacing the fuel pump, also known as the fuel pump on a Priora
Welcome! Fuel pump - this unit, as you already understood, has a second name, but it sounds very simple: “Fuel pump”, over time this unit becomes unusable, and since it is the main part that supplies fuel from the tank to the car engine, then after the failure of this pump, the car begins to stall, but if it becomes unusable at all, or if it is simply not in the system, then the car most likely will not even start, and if it does start, it will work for 3 seconds and after that for now If you don’t install a working fuel pump, the car simply won’t start, so when you start to feel that gasoline is starting to flow poorly into the engine, there is a possibility that the car’s fuel pump is to blame!
Note! In order to replace the fuel pump on a car, you will need to take with you some tools, namely: A screwdriver, an extension cord with a socket head, as well as a set of regular wrenches, and you will also need to stock up on a pressure gauge, which is needed to check the pressure in the system engine power! (The pressure in the power system is checked only to make 100% sure that it is the fuel pump that has become unusable, but if you already know that it is the fuel pump that has become unusable, then accordingly you do not need any pressure gauge)
How to measure the pressure in the fuel system?
The easiest way to measure pressure is with a special device - a pressure gauge. The kit also includes an adapter and drain. Pressure can be determined using an air pressure gauge. This device is present in almost every motorist, as it is used to measure tire pressure. A normally functioning pump in a VAZ 2110 should have a reading of 2.8-3.2 atm. You need to connect the pressure gauge and check what the indicator is with the engine not running, but with the fuel pump on. It must be no lower than 2.8 atm.
How to replace the fuel pump, also known as the fuel pump, on a VAZ 2170-VAZ 2172?
Note! As mentioned earlier, you will need to stock up on a pressure gauge in order to check the pressure in the engine power supply system, but the thing is that not every person has this device, and in a car shop it costs not a very small amount, so if you If you don’t dare to buy this unit, then try to get to the nearest service station, which most likely has this unit and you can use it for the duration of the check (20-30 minutes) for not very much money! (You can learn how to check the engine power system and find out more accurately whether the fuel pump has really failed by going to another article entitled: “Checking the pressure in the fuel rail on a VAZ”)
Removal: 1) At the very beginning of the operation, you will need to relieve the pressure in the engine power system; for information on how to relieve pressure, see the article: “Reducing pressure in the engine power system.”
2) Then, when the pressure in the system is reduced, remove the rear seat cushion on which the rear passengers always sit when they get into your car. (For information on how to remove the cushion, see the article: “Interesting information about seats” in paragraph 2)
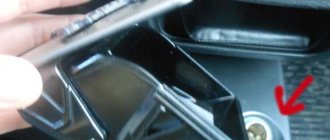
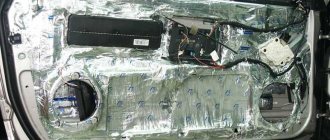
3) Next, when the airbag is removed, you will see the same hatch under which the pump itself is located, so take a screwdriver in your hands and use it to unscrew the two screws that hold this hatch (Indicated by arrows) and then completely remove it from the car.
4) After you remove the hatch, you will see a picture like this, which is shown in the photo below, from this picture you can understand what is generally connected to the fuel pump, and connected to it: A block of wires, which is indicated by a blue arrow, and two fuel pipes which are already indicated by red arrows, so the block and these tubes will need to be disconnected, but start with the block first, to disconnect it, look for the latch that secures it and after finding it, simply press on it and thereby remove the block from the hole in the fuel pump.
Note! When the block is disconnected, you will also need to disconnect the two fuel pipes, to do this, simply press the latch (Indicated by an arrow in the photo below) which is located on this tube and which secures it, and when the latch is pressed, remove the fuel pipe from the fitting on where it is located! (In some cases, the fastenings may be slightly different for these tubes, namely, they will not consist of a wire as shown in the figure above, but of two plastic clamps, so in order to remove such a tube, you will also need to press both of these clamps with your fingers and only after pick up the phone)
What else, when you pull the tubes when removing them, be careful, because their ends are made of plastic and if you press them sideways with a little force, they can simply break!
Fuel pump fuse functions
The Priora fuel pump fuse almost completely determines the performance of the fuel supply system.
He is responsible for the fuel injection system using the injection type of gasoline supply. Fuel is supplied using a 12V fuel pump. If the Priora fuse for the fuel pump fails, the car cannot be started. The function of the Priora fuel pump is to suck gasoline from the tank and supply it through the system to the injector intake manifold. If the fuel supply does not work, then, obviously, there is simply no way to start the engine. If you have problems with the engine, the first thing you need to do is check the fuse for the Priora fuel pump.
If the key is not turned to the start position, the fuel pump turns off after 2 seconds. Obviously, on a Priora, the fuse for the fuel pump is a buffer that takes on the full power of an unauthorized electrical discharge during abnormal operation.
Let's look at the principle of operation of the fuel pump fuse. The design of this element consists of two aluminum contacts and a fire-resistant plastic cover. If it fails at high voltage, the shell melts, which is considered a definite marker for fuse replacement.
Between the aluminum contacts there is a contact thread, which can only conduct a normalized current. For example, when marked “15A”, the current with constant amplitude cannot be higher than 15A. When large currents pass, the filament breaks and the body melts.
If we are talking about the failure of some element of the electrical equipment of the system, the inspection and repair of the car begins with diagnosing the relay and fuse box. This block in Priora is divided into three functional parts, which can be found in the following places of the car:
- The main mounting block is located on the left side near the driver's foot. The drawer opens by turning three locks 90 degrees;
- another fuse box is located near the expansion tank under the hood;
- the additional unit is located on the passenger side near his left foot.
The Priora fuel pump fuse is located in the additional mounting block on the passenger side; on the diagrams of the fuse and relay box it can be found under the designation F3 (15 A). K2 marks the location where the fuel pump relay is located. So, we figured out where the Priora fuel pump fuse is located. Now let's look at its functions.
- on-board computer;
- the relay is designed to adapt high currents at the moment of starting the fuel pump, protecting against combustion, thus, a malfunction of the relay leads to a malfunction of the fuel supply;
- fuse located next to the relay.
So, on the Priora we found out where the fuel pump fuse is located - in the additional compartment near the fuel pump relay. The main function of a fuse is to protect an electrical circuit. When high currents occur, the fuse trips and the circuit opens.
Thus, the functionality of all other elements of the system is maintained. Protection can work at any time. The reason is usually current surges or overheating. In general, if the fuel pump fuse fails on a Priora, it protects the on-board computer from power surges.
They are a small connector that can be installed without additional fastening. Replacing it, if you have experience, takes no more than 5 minutes with the opening of the edema of the additional power supply unit.
If problems arise with the ignition, it is better to immediately inspect the relay and fuse box; with prolonged exposure to high currents, you may encounter the problem of “socket melting,” which may require more complex repairs.