The design of any car requires a cooling system. It helps to avoid overheating of the vehicle engine. One of its main components is coolant, which must be changed periodically. Timely replacement of antifreeze with Lacetti will ensure efficient engine operation. We will explain how the procedure is carried out in this article.
In what cases can the lid be opened at any time?
In addition to closed systems, there are open cooling systems in which the expansion tank is equipped with a special valve connected to the atmosphere. When the antifreeze reaches a temperature of 90-95°C and a maximum pressure of 120 kPa, a valve in the lid is activated, which opens and releases excess air. With such a system, a pressure close to atmospheric (101 kPa) is maintained inside the tank, so it can be opened without any special consequences.
So, it is dangerous to open the expansion tank cap when operating closed cooling systems. The pressure difference will cause the antifreeze to boil, which will splash out, damaging the inside of the hood and scalding the driver. This does not happen in open systems, since normal pressure is established inside the tank.
Source
Stages of replacing coolant in a Chevrolet Lacetti
In this model, antifreeze is drained from the radiator, but there is no drain hole on the block. The remaining liquid is removed by displacement or rinsing with distilled water. Without flushing, the replacement will be partial, because about 2 liters of old fluid will remain in the system.
The Lacetti model is very popular in the world, so it can be found under other names under which it is sold in different countries. Therefore, the instructions for replacing antifreeze apply to the following brands:
- Chevrolet Lacetti;
- Chevrolet Estate;
- Chevrolet Nubira;
- Chevrolet Optra;
- Daewoo Gentra;
- Daewoo Lacetti;
- Ravon Gentra;
- Buick Excelle;
- Holden Viva;
- Suzuki Forenza;
- Suzuki Renault.
The most popular engines are 1.6 and 1.4 petrol, although the 1.8 liter capacity is also quite common. They do not have any fundamental differences in the process of replacing the coolant; there is only a slight difference in the volume of the cooling system.
Coolant drain
Replacing antifreeze on a Chevrolet Lacetti can be done on any flat surface; an overpass is not necessary. Therefore, we find a convenient site, let the engine cool and move on to further actions:
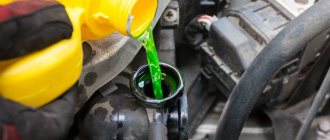
- Open the hood and unscrew the cap of the expansion tank (Fig. 1).
- We bend down and find the drain hole on the left side under the bumper (Fig. 2). We put a hose on it, and lower the other end into a pre-prepared container for draining.
- Under the hood, on the radiator, closer to the left side, under the fan, we find the drain plug (Fig. 3). We unscrew several turns using a large Phillips screwdriver, after which the liquid will begin to drain.
- Following the instructions, for a more complete drainage, you need to remove the hose going to the throttle assembly to heat it (Fig. 4).
That's it, now all you have to do is wait until the old antifreeze drains completely. Using this method, it is possible to drain about 5 liters. But since there is no drain hole on the engine block, about 2 liters of liquid remain undrained in the cooling system.
Flushing the cooling system
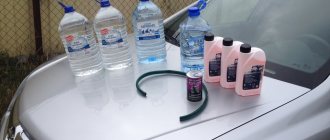
It is usually recommended to flush the system with distilled water when replacing. This will completely get rid of the old antifreeze, replacing it with water. And it is advisable to use a concentrate as the liquid to be poured after this procedure.
To flush, close the drain hole, put the throttle heating hose in place and begin to pour water into the expansion tank. Fill to the MAX mark and put the tank cap in place. Now you need to start the engine and let it run until it warms up completely, so that the water passes through the entire system. After this, turn off the engine, wait for it to cool and drain it.
We perform this operation several times until the drained water comes out almost transparent.
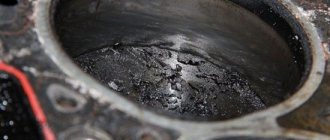
Often when replacing the fluid, sediment is found on the walls and bottom of the expansion tank, so it must be removed for cleaning. To do this, you need to disconnect the pipes suitable for it and unscrew the 2 bolts.
Filling without air pockets
After flushing the Chevrolet Lacetti system, you can proceed to filling in new antifreeze. To prevent air pockets from forming, you don’t have to install the hose on the throttle assembly for now. We install only the expansion tank and check the drain hole to make sure it is closed.
We begin to fill the system, while squeezing the upper radiator hose to release air. We fill in new antifreeze until it comes out of the hose going to the throttle, then put the hose in place.
Next, fill the expansion tank to the maximum mark and screw the cap on it. We start the car, warm it up with gas changes for faster warming up, as well as faster fluid circulation.
After the completed steps, the replacement is complete, you only need to check the antifreeze level after the engine has cooled, and top up if necessary. It is also recommended to do a control check after 100 kilometers.
What kind of coolant is used
The cooling system of a Lacetti hatchback is operated together with high-quality antifreeze made from ethylene glycol. It is better to pour it into the expansion tank. Silicate is the main element in antifreeze, which is designed to serve as protection against rust.
Antifreeze is sold in concentrated form. If the old one is still flooded, then it should be removed from the tank. For this reason, before using the concentrate, add purified water in a 1:1 ratio. At low temperatures of −40 degrees and below, the liquid must be poured in a ratio of 3:2.
Consequences of boiling
What happens if the car engine boils? The consequences of engine overheating can be the most tragic for a car.
There are several degrees of engine overheating that occur as a result of boiling liquid:
- slight overheating of the motor;
- average engine overheating;
- severe overheating of the motor.
Slight overheating. If the overheating of the engine as a result of antifreeze boiling does not exceed 10 minutes, then the car owner can be said to be very lucky. This may occur if the fan or thermostat fails. If you notice the engine overheating in time (according to the temperature sensor on the instrument panel), then you should turn off the car as quickly as possible. In this situation, the worst thing would be if the engine pistons start to melt.
But this is not scary, especially for owners of new cars. As a rule, in new cars the consequences of such overheating will not be noticeable. You need to start panicking and take your car for repairs if you clearly see smoke starting to appear from under the hood.
Refrigerant boiling in the expansion tank
Medium overheating occurs if the boiling time of the liquid exceeds 20 minutes. In this case, the driver may face the following consequences:
- cylinder heads may become bent;
- cracks may appear on the cylinder head;
- cylinder block gaskets will melt or burn out;
- destruction of the inter-ring partitions on the engine pistons;
- Engine oil will begin to flow through the seals.
The two stages of overheating described above often occur as a result of poor or inattentive vehicle maintenance. But severe engine overheating from boiling antifreeze can be a real “heart attack” for your car.
If “Tosol” boils and the engine is very overheated, then the consequences, as a rule, cover all parts of the engine. But this is not the saddest outcome of events. The worst thing that can happen is if the motor explodes as a result of overheating. But this rarely happens, since often the car system allows the driver to avoid such a decoupling - the engine components are destroyed at different rates, as a result of which it simply stalls. The so-called “wave of destruction” extends to the entire motor and other components surrounding it:
- the pistons begin to melt and burn;
- molten metal from the pistons drips onto the cylinder walls, as a result of which the movement of the piston becomes difficult. Accordingly, the piston quickly fails and becomes unusable;
- if the car does not stall due to broken pistons, problems with the engine fluid may begin;
- overheated motor fluid immediately loses its lubricating properties, as a result of which all rubbing parts gradually begin to fail;
- after this, melted elements begin to stick to the crankshaft, which also complicates its operation;
- when the valve seats fly out, the crankshaft simply breaks into several parts under the influence of the piston;
- after this, the piston can pierce one of the walls of the cylinder block, and this, in turn, leads to complete engine failure.
Correct driver actions
In situations where the engine overheats but the radiator remains cold, it is important to take the right measures to prevent the situation from getting worse and also try to prevent any serious malfunctions and costly breakdowns. Sometimes it happens that the driver panics ahead of time
This usually happens to motorists who have only recently gotten behind the wheel, or who have changed cars without having yet had time to get used to the peculiarities of its behavior and the operating modes of the engine itself.
Sometimes it happens that the driver panics ahead of time. This usually happens to motorists who have only recently gotten behind the wheel, or who have changed cars without having yet had time to get used to the peculiarities of its behavior and the operating modes of the engine itself.
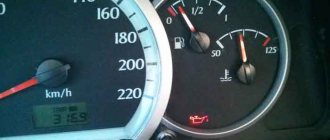
Here we are talking about short-term overheating, which can to a certain extent be considered the norm for many engines. Short-term overheating usually occurs when sitting in a traffic jam for a long time. Then the temperature sensor arrow displayed on the dashboard rises to the critical red zone. But as soon as the car starts moving, when airflow appears due to oncoming air flows, and the cooling fan is activated, the temperature returns to normal. That is, first, try to observe and see whether the temperature will drop after a jump upward, to the red zone.
But you shouldn’t wait and watch when the car was in motion, that is, there was oncoming air blowing, or the fan was running. In such situations, experts give several useful recommendations:
- If the car was moving under completely normal conditions that do not provoke short-term overheating, but the temperature still begins to increase and reaches a critical level, do not immediately turn off the engine;
- Also, do not try to cool the power unit by pouring cold water on it from the outside, or by adding cold water to the expansion tank with cooling liquid;
- If you ignore these recommendations, fill the engine with water or add it to the tank, you will probably have to repair the engine. Moreover, such repairs are often accompanied by a mandatory replacement of the cylinder block and cylinder head;
- If you want to cool the engine, lower the engine temperature with a cold radiator to normal levels, it is better to drive off the road, stop and turn on the heater in the car. It doesn’t matter if it’s spring or summer, the cabin is warm enough without the heating working;
- Turning on the heater will remove excess heat from the engine, transferring it to the interior of your car;
- At the same time, you cannot turn off the engine itself. Just move the gearbox to neutral and leave the engine idling;
- Wait a few minutes after completing all the steps described;
- At the same time, check for any signs of coolant leakage. To do this, you will have to get out of the car, look under the car and into the engine compartment;
- If there are no leaks, then the manipulations carried out with the stove and the idle speed of the power unit did not allow the temperature to drop below the critical level, turn off the engine.
Next, you will need to call a tow truck or ask someone to tow you to get to the garage or the nearest service center. There you will find out the reasons, look for the culprit and carry out the appropriate repair and restoration work.
But there are situations when the engine needs to be turned off as soon as the engine temperature has reached its peak value. These are cases when, while driving, you suddenly saw steam billowing from under the engine compartment, and at the same time there were traces of a coolant leak. If you encounter such circumstances, stop and turn off the engine. There is no need to wait until the temperature starts to drop after turning on the stove. Otherwise, you risk completely ruining the engine.
The engine needs proper operation. This is the basis for its safety, effective, safe and long-term operation. Also, at the same time, always try to monitor the condition of the cooling system. Any traces of a coolant leak, a low level of coolant in the expansion tank, or an excessive increase in temperature under normal operating conditions should be a reason to check the condition of the entire system.
When faced with a situation where the power unit in your car is noticeably overheating, take appropriate measures, find the cause of the increase in temperature and eliminate it. If difficulties arise with self-diagnosis, it is better to immediately seek help from qualified specialists.
Source
Principles of designing cooling systems
A decrease in the efficiency of the cooling system leads to an increase in the temperature of the pistons and a decrease in the gaps between the piston and the cylinder. Thermal gaps are reduced to zero. The piston touches the cylinder walls, scoring occurs, overheated oil loses its lubricating properties and the oil film breaks. This mode of operation can lead to engine seizure. Overheating is accompanied by uneven expansion of the cylinder head, mounting bolts, engine block, etc. Subsequent destruction of the engine is inevitable: cracks in the cylinder head, deformation of the joint planes of the head and the cylinder block itself, cracks in the valve seats, etc. — it’s unpleasant to even list all this, so it’s better not to let it come to that!
The engine and oil cooling system is designed to prevent such developments, but in order for the system to cope with its tasks, it is necessary to use high-quality coolant (coolant). Low-freezing coolants are called antifreeze - from the English word “antifreeze”. Previously, coolants were prepared based on aqueous solutions of monohydric alcohols, glycols, glycerin and inorganic salts.
Currently, preference is given to monoethylene glycol, a colorless syrupy liquid with a density of approximately 1.112 gcm2 and a boiling point of 198 g. The task of coolant is not only to cool the engine, but also not to boil over the entire operating temperature range of the engine and its components, to have high heat capacity and thermal conductivity, not to foam, not to have a harmful effect on pipes and seals, and to have lubricating and anti-corrosion properties.
In the 70s, antifreeze was produced based on an aqueous solution of monoethylene glycol with a crystallization temperature of 40 degrees. It did not require dilution with water when added to the cooling system. This drug was called TOSOL - after the name of the laboratory “Technology of Organic Synthesis”. Because the name is not patented, then TOSOL is a ready-to-use product, and “antifreeze” is a concentrated solution (although TOSOL is also antifreeze).
Ready-made antifreezes are colored for safety and catchy colors are chosen: blue, green, red. During operation, antifreeze loses its beneficial properties - its anti-corrosion properties decrease, and the tendency to foam increases. The service life of domestic coolants is from 2 to 5 years, imported 5-7 years.
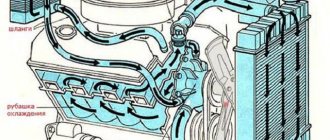
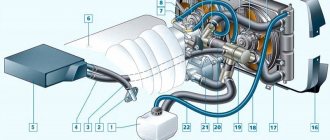
The figure below shows a diagram of the car's cooling system. There is nothing special or complicated in the cooling system and yet...
When the engine starts, the water pump begins to rotate. The pump drive may have its own pulley driven by an accessory belt or driven by the rotation of a timing belt. The cooling system contains an impeller, which rotates and drives the coolant. To quickly warm up the engine, the system is “shorted”, i.e. The thermostat is closed and does not allow fluid to enter the radiator. As the temperature of the coolant rises, the thermostat opens, transferring the system to another state when the coolant passes along a long path - through the radiator of the cooling system (the short path is blocked by the thermostat). Thermostats have different opening characteristics. Typically the opening temperature is marked on the edge. It’s probably not worth explaining the design of the radiator. A fan switch sensor is installed at the bottom of the radiator. If the coolant temperature reaches a certain value, the sensor will close, and because If it is electrically connected to the break in the power supply circuit of the electric fan, then when it is shorted, the cooling system fan should turn on. As the coolant cools, the fan turns off and the thermostat closes the long path to a short one. It's simple, but not very...
This scheme is the basis, but life does not stand still and various manufacturers are improving cooling systems. On some cars you will not find a sensor for turning on the cooling fan, because... The fan is turned on by the engine ECU depending on the readings of the coolant temperature sensor
It is worth paying attention to the situation in which when the ignition is jammed, the cooling system fan immediately turns on. Either the temperature sensor is faulty, or its circuits are damaged, or the engine ECU itself is faulty - it “does not see” the engine temperature and, just in case, immediately turns on the fan
On some cars, special electric valves are installed on the way to the heater, allowing or blocking the path of coolant (BMW, MERCEDES). Such valves sometimes “help” the cooling system fail.
Replacing the Chevrolet Lacetti cooling radiator
Specialization: body repair. We provide repair and maintenance services for Chevrolet. Engine repair services, including diesel engines. Automatic transmission repair services. Tire service. Painting and body repair services and slipway work. Commercial vehicle repair. Steering rack repair. Electrical equipment repair. Installation of additional equipment.
- Replacement of the cooling radiator 1600 RUR.
Specialization: diesel engine repair, engine repair. Chevrolet mechanic repair and maintenance. Transmission and automatic transmission repair. Painting and body repair services and slipway work. Steering rack repair. Tire service. Engine repair services, including diesel engines. Electrical equipment repair.
- Replacement of the cooling radiator 1600 RUR.
Profile car service, maintenance and plumbing repair services for Chevrolet. Engine repair shop, including diesel engines. Electrical equipment repair. Repair of automatic transmissions. Steering rack repair. Tire service.
- Replacement of the cooling radiator 2000 RUR.
The main focus is transmission diagnostics and chassis diagnostics. Chevrolet repair and maintenance. Steering rack repair. Automatic transmission repair. Engine repair shop, including diesel engines. Body work and slipway work. Painting. Additional workshop equipment. Electrical equipment repair. Tire service.
- Replacement of the cooling radiator 5900 rub.
Multi-brand auto service provides repair and maintenance services for Chevrolet. There is a body repair and painting shop, as well as slipway work. Automatic transmission repair services. Steering rack repair. Installation center. Electrical equipment repair.
- Replacement of the cooling radiator 1600 RUR.
How often should antifreeze be changed?
There are a number of recommendations regarding the issue of changing the refrigerant. The coolant should be changed every two years or after 30-40 thousand kilometers that the car has driven.
The antifreeze replacement time is determined based on the following characteristics:
- condition and mileage of the car;
- manufacturer;
- brand and quality of the cooling agent used;
- refrigerant that was previously used.
Liquids with silicate additives are changed every 2-3 years. The technical qualities of hybrid type antifreeze disappear within five years, and carboxylate type antifreeze remains for a period of 5 years or more, and replacement is not required.
At the moment, the market can also offer drivers carboxylate-based refrigerants that “work” for a mileage of 100 thousand kilometers or more. But such products are still few in number.
Signs that replacement is needed
The mixture may lose its qualities before the specified period. Then it needs to be changed.
For this reason, do not forget to regularly monitor the condition of the fluid. There is a set of signs by which you can easily determine whether the antifreeze needs to be replaced:
- Check strip for testing. The least labor-intensive and most convenient way. The strip is sold in the same stores where the refrigerant is sold. When the indicator is dipped into the mixture, it changes color. A special scale is attached to it. Using it you can determine whether the antifreeze needs to be changed.
- Consistency of cooling liquid. The density of a normal solution is 1.078 gcm3, taking into account a temperature not higher than 20 degrees Celsius. The refrigerant that was in use has a completely different density.
- The appearance of neoplasms in non-liquid form. Indicators of antifreeze performance are the presence of all kinds of solid sediments, foam, and scale fragments. Sometimes a mass of mushy consistency appears on the inner walls of the expansion tank. If the above symptoms are detected, be sure to replace the refrigerant.
- Color. The bright color of the antifreeze begins to fade during operation, becoming faded, heterogeneous and cloudy. You should stop using the liquid if it has acquired a reddish or reddish tint, since dissolved corrosion is present in the solution.
Replacement frequency, what antifreeze to fill
The frequency of replacing antifreeze in a new car is regulated in the maintenance card. As for used cars, replacement should be carried out based on the recommendations of the coolant manufacturer.
For example, if you use original GM Dex-Cool Longlife coolant in a Chevrolet Lacetti, then replacement should be done every five years. This is exactly the period stated by the manufacturer, and also guarantees the preservation of all properties.
The original product is available in the form of a concentrate; its complete analogue is Havoline XLC. You can also use an analogue in the form of a finished product Coolstream Premium, produced at the Russian enterprise TECHNOFORM.
You can also pay attention to other manufacturers, for example, FELIX Carbox antifreeze has won good trust among car enthusiasts. The main thing to remember is that the color is just a dye, and the liquid must be selected according to tolerances. If the fluid has GM approval, then it can be used in the cooling system of this vehicle.
How much antifreeze is in the cooling system, volume table
| Model | Engine capacity | How many liters of antifreeze are in the system | Original liquid / analogues |
| Chevrolet Lacetti | gasoline 1.4 | 7.2 | Genuine General Motors Dex-Cool Longlife |
| gasoline 1.6 | Havoline XLC | ||
| gasoline 1.8 | 7.4 | Coolstream Premium | |
| gasoline 2.0 | FELIX Carbox |
Replacing a failed unit
The cooling system cap can last longer than the car engine, or you can buy a new one, which will be defective. It's hard to guess here. But in any case, you should not try to repair it. It costs a penny for most models and is non-repairable. In case of malfunction, it is simply replaced with a new one.
At the same time, it is strongly recommended not to shorten the springs by changing the moment of operation of the cover. After all, many motorists do this, which in most cases does not lead to anything good. Of course, if you have tuned the cooling system and engine, then it is quite possible that you need to achieve more pressure in the system or, conversely, less. In other cases, it is worth buying only the original or a worthy analogue with the same parameters. Remember that high pressure in the engine cooling system can lead to local overheating of the internal combustion engine and failure of certain components.
Replacing the cooling radiator on the Lacetti
We talk about the stages of independent work.
The dense installation of units and the virtual absence of free space in the engine compartment in Chevrolet Lacetti cars complicate the work of replacing its components. However, it is not difficult to independently replace the Lacetti cooling radiator if you accurately understand the sequence of work and arm yourself with the necessary set of tools.
It is quite natural that you need to install a known working car radiator. Ideally, new, proven and high quality. Such car radiators and other reliable car components can be purchased inexpensively in the online store at: https://azon.ua. With delivery and payment in any convenient way.
Why do car radiators fail?
The reasons for the breakdown are traditional:
- mechanical damage to the heat exchanger from stones and pieces of road surface;
- loosening the pipe inlet clamps;
- failure of radiator system sensors;
- loss of tightness of the radiator pipes due to freezing of the coolant;
- mechanical impacts on radiator mounting points during an accident.
Before removing the faulty Lacetti cooling radiator and installing a new one, you need to carry out a number of preparatory actions: drain the remaining coolant into a prepared container and prepare the tool for work. Be sure to disconnect the “-” terminal from the car battery. In addition, you need to stock up on:
- pliers and work gloves;
- screwdrivers (phillips and flat);
- a set of car gas keys;
- a compressor to check the tightness and purging of the new radiator;
- container into which fasteners can be stored.
Sequence of actions when replacing the Lacetti cooling radiator
Removing the radiator is made difficult by the protective shield of the engine compartment (left side) and the radiator grille, therefore:
- carefully remove the mudguard;
- unscrew the radiator grille fastenings - only six screws;
- a “10” wrench will help with fastening the cross member of the engine compartment; it needs to be moved to the side to provide access to the radiator;
- the wiring harness of the sensors that monitor the oxygen concentration must be disconnected;
- Use pliers to loosen the fastenings of the clamps and carefully disconnect the upper supply hose, the steam removal tube and the lower (discharge) hose;
- The right and left bolts securing the air conditioning system to the radiator also need to be unscrewed if this system is included in the car’s equipment. The bolts are paired, located at the top and bottom;
- We fix the air conditioner radiator with temporary fasteners;
- moving the radiator towards the interior of the car, carefully remove it in the upward direction;
- It is advisable to immediately replace the radiator support “pillows”. They are made of rubber, which tends to harden over time, crack and lose its elasticity.
Installation of a new Lacetti cooling radiator is performed in the reverse order; at the completion stage, the system must be filled with coolant. Good luck with your replacement!
Source: https://www.1obl.ru/freetime/zamena-radiatora-okhlazhdeniya-na-lachetti/
Causes of Air Bubbles
The main possible causes of bubbling in the expansion tank of a car, experts include problems such as:
- Insufficient level of antifreeze. If its volume is insufficient, significant overheating occurs. It leads to boiling of the liquid, which in turn is characterized by the appearance of air bubbles in the cooling system. The reason for an insufficient level of antifreeze may be either prolonged use without replacement, or underfilling.
- Thermostat malfunction. It is this device that is responsible for regulating the temperature indicators of antifreeze. If the coolant heats up excessively, a valve opens, releasing liquid from the small circle of the cooling system into the large one. Here it passes through the radiator, which significantly reduces its temperature. If the thermostat is stuck in the closed position, then the entire volume of antifreeze moves around a small circle of the cooling system, heating up greatly. As a result, air appears with bubbles in the expansion tank.
- Breakthrough of exhaust gases into the cooling system. This happens mainly due to two main reasons. These include a burnt-out cylinder head gasket or a crack in the head. Such problems arise due to mechanical or chemical damage. In addition, excessive thermal influence on these parts can play a certain role in this regard.
- Poor quality antifreeze. As a rule, this applies to fairly cheap materials. Their price is often determined by the presence of substances that can pollute the cooling system and water pump. As a result, the antifreeze boils, as the water pump loses its performance. In addition, the latter quickly rusts in such conditions.
- Fan failure. They are started after the temperature of the antifreeze in the cooling system reaches 90 degrees Celsius. If the device does not work, overheating may occur, causing the liquid to boil.
- Airlock. They arise either as a result of replacing antifreeze, or when leaking.
Fault diagnosis
In order to eliminate the boiling of antifreeze or antifreeze in the expansion tank of a vehicle, it is first necessary to diagnose the problem that has arisen.
To do this, you need to perform the following list of actions:
- First you should check the level of antifreeze or antifreeze in the cooling system.
- Next, you need to make sure the thermostat is working correctly. To do this, you need to turn off the engine, open the hood, and check the temperature of the pipes together. If it is significantly different, then the problem is a broken thermostat.
- It is necessary to inspect the integrity of the gasket and cylinder heads.
- If a solution to the problem is not found, it is worth checking the serviceability of the water pump and fan. If they are faulty, the vehicle's internal combustion engine runs relatively quietly.
- It is also necessary to diagnose the tightness of all elements of the cooling system. They may be damaged in some way.
In the end, if there is no obvious reason for the increase in antifreeze temperature, you need to drain it, clean the system and fill it with new high-quality coolant
In this case, it is necessary to perform the work as carefully as possible to avoid air pockets.
Remedies
The solution to the problem with the appearance of gases in the expansion tank of a car directly depends on what caused it:
- If there is insufficient antifreeze in the vehicle cooling system, it must be topped up. To do this, you need to use exactly the material that is already present in the machine. If it is not there, the old liquid must be drained, filling the entire volume of the system with a new cooler.
- If the thermostat breaks down, regardless of what it is related to, it is necessary to completely replace this device. It is impossible to repair any of its parts.
- If a blockage occurs in the cooling system pipeline, it is imperative to flush it or completely replace it. This work can be carried out at a service station.
- If air jams constantly occur in the cooling system, it is necessary to drive the car onto a hill so that its front part is higher than the rear. After this, you should unscrew the plugs from the radiator and expansion tank and start the internal combustion engine. Let the car run for 10-20 minutes with gas release and coolant topping up. When the bubbles disappear, the system has been cleared of air.
- If the cylinder head gasket or head is damaged, you need to replace these elements with new ones that do not have any defects.
The nuances of buying a radiator
After the radiator has been ordered and the buyer has come to receive it, the following should be done:
- Unpack it in front of the seller and thoroughly inspect the radiator (at the same time, keep the packaging intact, otherwise it will be impossible to return the part).
- When inspecting, you need to look at the overall integrity, fastenings for cracks, and incoming holes.
- If everything is good, then we take it. If not, we return it and ask for a replacement or refund.
- Remember that you can return the item within 14 days from the date of purchase, provided it has no traces of installation and the packaging is intact.
By observing all the above points, the radiator for the Chevrolet Lacetti will last a long time and will not cause any trouble to the owner.
Serious consequences
We have already discussed that pressure is created in the engine cooling system. It's quite normal. Another thing is that very often there is a malfunction that is extremely difficult to determine. For example, the antifreeze goes away, but there is no visible leak. In this case, it is quite possible for coolant to enter the engine crankcase. It is recommended to check the oil level regularly. If the coolant actually goes into the engine, the level will increase. Most likely, this indicates a broken cylinder head gasket, changing which is tantamount to rebuilding the power unit.
Any part has its own specific resource, upon reaching which there is no guarantee that it will continue to work properly. There are often cases when even a new expansion tank cap turns out to be inoperative. And now we are not talking about Chinese spare parts, but about original ones. Unfortunately, there is no escape from this.
Radiator selection
Choosing a radiator has always been a difficult decision for the owner of a Chevrolet Lacetti. Doubts eat up anyone who finds themselves in such a situation - original or analogue. Let's consider this issue in more detail.
The original is good, but it is not always affordable, and the average owner of a Chevrolet Lacetti does not know which analogue is good and which one should not be taken. Usually, they are guided by the opinion of the seller, who just wants to fill his pocket and sell more and more expensively.
So, which analogues are worth taking and which ones are not. The table below will show similar radiators that have been tested by time and quality. If you don’t come across an analogue that is offered to you, it means that it is either little-known or you shouldn’t take it.
| Name | Original catalog number | Analog part |
| Radiator General Motors | 96553378 | 10000 |
Installation of both the original and the analogue is carried out on the same seats.
Analogs
There are a number of analogues that can be used instead of the original:
| Name | Original catalog number | Analog part |
| Zekkert | MK-1094 | 5000 |
| Luzar | LRc CHLt04178 | 6000 |
| Fenox | RC00046 | 7000 |
| Pmc | PXNDC-004 | 7000 |
| Valeo | 735159 | 8000 |
| Onnuri | GRDD-025 | 10000 |
| Hcc/Hvcc | HC96553378 | 10000 |
How to check the cover and identify problems?
Before checking the expansion tank cap, it must first be inspected to make sure that it is intact and has no mechanical damage in the form of scratches, cracks and severe wear, and is also free of rust, dirt, scale and other defects. Then you should check the functionality of its valves. Several simple diagnostic methods that allow you to only approximately determine their serviceability are given below.
For safety valve. With the engine running and warm, loosen the cap. There should be a hissing sound of compressed air coming out of the tank. This means the valve holds pressure. But not every professional can determine which one exactly.
Unscrewing the tank cap
For vacuum:
- If the SOD pipes look deformed (compressed, flat) before starting the engine for the first time in the morning, the valve is definitely faulty.
- Unscrew and remove the cover. Then we strongly squeeze one of the SOD pipes and, holding it like that, install and screw the plug back. Let go of the pipe. If it begins to take its original shape, the valve is most likely working.
A more reliable way to check the operation of the valves is to use a pump with a pressure gauge. You will also need any empty expansion tank. We connect to one of its fittings, and then fix with a clamp the pump hose, from which the tip for the nipple was previously removed. We plug the remaining outputs from the tank with some kind of plugs. Then close the tank with the lid being tested.
Pump with pressure gauge
You can also check it on the tank installed on your car without draining the coolant. To do this, for example, on a VAZ 2109, we disconnect from the expansion tank the pipe that comes from above and removes steam from the SOD. We install a pump hose instead. In order to plug it, we insert something of a round cross-section and suitable diameter, for example, a drill, into the disconnected pipe. Then we put a clamp on this hose and tighten it.
We turn on the pump and, watching the needle on its pressure gauge, record the moment a click appears, followed by a hissing sound coming out of the tank through the air plug. If this happened at the level of 1.1–1.5 kgf/cm2, and further pumping only leads to increased hissing, but the pressure does not increase, it means that the vacuum valve is not leaking, and the safety valve is working as expected.
Expert opinion Ruslan Konstantinov Expert on automotive topics. Graduated from Izhevsk State Technical University named after M.T. Kalashnikov, specializing in “Operation of transport and technological machines and complexes.” More than 10 years of professional car repair experience.
To avoid problems associated with the expansion tank cap, it is recommended to replace this simple device every few years. It would also be a good idea to periodically check the coolant level in the tank. When the antifreeze level systematically decreases (leakage), overloads of the cooling system occur, which negatively affects the performance of the valve mechanisms of the cover and other elements of the ODS. Every car enthusiast should know that such a small, inconspicuous part performs important functions for the operation of the internal combustion engine. Ignoring the first symptoms of a malfunction can lead to serious consequences; engine overheating is only the beginning of problems that will result in a major overhaul. Therefore, it is better to buy a cap and replace it for preventive purposes than to repair the SOD.
Danger of boiling antifreeze
If antifreeze boils in the expansion tank, some drivers do not worry about this. After all, experts consider such a process to be quite normal, especially if the power unit is heated to a temperature of 90-95 degrees Celsius.
But if the antifreeze is boiling, then there should be no loss of it, as well as leaks and other signs. When the technical fluid circulates in a large circle, some of it is discharged into a container intended for this purpose. Novice motorists in such a situation may consider that the antifreeze has boiled. But in fact, something completely different happened: excess fluid was dumped.
But not every bubbling of antifreeze can be called safe for the “health” of the engine. If this happens when the power unit is in a cold state, and side symptoms appear, then this is a serious reason to check the condition of the system. The main signs that eloquently indicate the presence of a malfunction are:
- 2-5 minutes after stopping the engine, the water in the expansion tank boils. The main cause is a faulty valve built into the radiator cap. After the circulation of antifreeze stops, the liquid accumulated in the cylinder head heats up quite quickly and increases in volume. This happens because the radiator valve is open. Therefore, antifreeze rushes into the tank, moving along the upper discharge pipe. Boiling or detection of smudges on the body of the working container may indicate that the plug valve is simply stuck. In this case, vapor and air can escape through the weakest point in the container (the plastic thread of the valve). This may cause the vessel to burst.
- If the owner observes white smoke in a fairly large volume from the exhaust pipe, while smudges are noticeable on the cylinder block, this indicates that the gasket between the block and the cylinder head has been broken. The gas pressure created by the pistons is transmitted to the cooling system. This is what leads to the antifreeze bubbling and boiling. It is clearly visible in the tank. Even a beginner understands that if the cylinder head gasket is blown, then the problem is critical and must be fixed immediately.
Problems with the reservoir cap and built-in valves are not serious problems. But still, one should not take such problems lightly. Otherwise, antifreeze will begin to quickly leave the system. They can also cause overheating of the power unit. If this happens, the fan will turn on very often while driving.
Block head
The head is centered on the block with two bushings and secured with ten bolts. A sealing gasket is installed between the block and the cylinder head. The intake and exhaust ports are located on opposite sides of the cylinder head. Spark plugs are installed in the center of each combustion chamber.
Cylinder head assembly: 1 — intake camshaft; 2 — exhaust camshaft.
At the top of the cylinder head there are two camshafts made of cast iron. One shaft drives the intake valves of the gas distribution mechanism, and the other drives the exhaust valves. There are eight cams on the shaft - an adjacent pair of cams simultaneously controls two valves (intake or exhaust) of each cylinder. The camshaft supports (bearings) (five supports for each shaft) are detachable. The holes in the supports are processed together with covers.
The camshafts are driven by a toothed belt from the crankshaft pulley. A semi-automatic tensioning device ensures the required belt tension during operation.
The valves in the cylinder head are arranged in two rows, V-shaped, with two intake and two exhaust valves for each cylinder. The valves are steel, the exhaust valves have a plate made of heat-resistant steel and a welded bevel.
The diameter of the intake valve disc is larger than that of the exhaust valve. Valve seats and guides are pressed into the cylinder head. Oil deflector caps made of oil-resistant rubber are placed on top of the valve guides.
Camshaft: 1 - groove and hole for supplying oil inside the shaft; 2 - holes for supplying oil to the bearings.
The valve closes under the action of a single spring. Its lower end rests on the washer, and its upper end rests on a plate held by two crackers. The crackers folded together have the shape of a truncated cone, and on their inner surface there are beads that fit into the grooves on the valve stem. The valves are actuated by the camshaft cams through hydraulic tappets.
To operate the hydraulic pushers, there are channels in the cylinder head that supply engine oil to them. When the engine is running, oil under pressure fills the internal cavity of the hydraulic tappet and moves its plunger pair, compensating for the thermal gap in the valve drive. This ensures constant contact between the tappet and the camshaft cam.
Timing drive: 1 — mark on the rear timing drive cover; 2 — mark on the crankshaft toothed pulley; 3 — coolant pump pulley; 4 — belt tensioner roller; 5 — intake camshaft pulley; 6 — marks on the camshaft pulleys; 7 — exhaust camshaft pulley; 8 — belt support roller; 9 - belt.
Coolant replacement
Note! Replace the vehicle's coolant at an engine temperature of no more than + 40 °C to avoid burns.
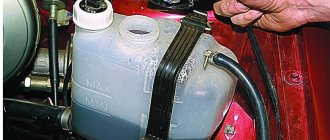
Open the expansion tank cap to relieve pressure in the system and close it again!
We take a container for draining waste fluid, a rubber tube, a screwdriver and head under the car.
Unscrew the five engine protection bolts and remove the protection.
From the lower end of the radiator, a little to the right of the center (if you look in the direction of travel), we find the drain fitting and put a tube on it. You don’t have to put it on, but this way less liquid will spill. We direct the second end of the tube into a container to drain the liquid.
It is more convenient to use transparent silicone hose
Using a slotted screwdriver, unscrew the drain plug of the radiator of the cooling system several turns. Just not by much, otherwise it might fly out under the pressure of the liquid!
Now open the filler cap of the tank again. After this, the waste liquid should begin to flow more quickly from the drain fitting. It will take a long time to leak, so you can vacuum the interior and wash the floor mats for now.
We wait until the liquid begins to flow less intensely.
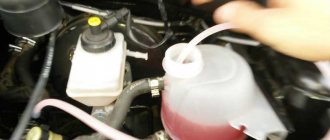
We tighten the cap of the expansion tank and disconnect the hose from the tank that goes to the throttle assembly. Close the fitting on the tank with your finger and blow into the hose with your mouth
This way the liquid will come out faster and in a larger volume (i.e. less will remain in the system)
When only air comes out, then we can say that we have drained the used antifreeze.
We screw the radiator drain fitting back into place and connect the hose back to the expansion tank, which we removed.
If the coolant level on your car was at a minimum, then about 6 liters should drain
If the tank was at the MAX mark, then naturally more fluid would drain out.
The main thing is that the same amount is poured into the system as was drained. If it fits less, then there is a plug somewhere or other problems in the form of blockages.
Fill the tank with distilled water
Start and warm up the engine to operating temperature.
For 1 minute, keep the engine speed at about 3000 rpm.
Turn the interior heater control to the red zone (maximum heating). Turn on the heater fan and check that hot air is flowing. This means that fluid circulates normally through the heater radiator.
Note. Modern cars do not have a valve for the heater radiator. The temperature is regulated exclusively by air flow dampers. And liquid circulates constantly in the radiator. Therefore, it is necessary to turn on maximum heating only to make sure that there are no plugs in the heater radiator and that it is not clogged. And not in order to “put antifreeze into the oven.”
We carry out all the manipulations to drain the liquid again and drain the water.
If the water is very dirty, then it is better to wash it again.
It is also very advisable to wash the expansion tank.