Niva Chevrolet: cooling system
Engine operation at normal temperature conditions is ensured by the functioning of the components included in its composition . This is a closed-type pipeline with forced ventilation.
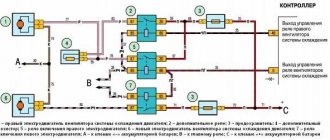
List of elements providing heat exchange:
The pump operates under the influence of centrifugal force . As the blades rotate, coolant is pumped, creating a pressure difference, so the antifreeze moves along the line.
For the efficient functioning of the heat exchanger, which includes a radiator, a thermostat is provided to open and close the movement of coolant in a circle. The latter is necessary to maintain balance in the system and has factory settings - it opens at a temperature range from 75 to 80°C.
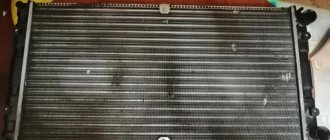
The radiator contains two tanks connected horizontally by aluminum channels:
- one receives coolant;
- from the other - coolant comes out.
Heat exchange is provided over the radiator area.
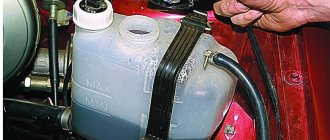
When heated, a liquid tends to expand. To avoid the creation of excess pressure, an expansion tank is designed to receive it . The latter is equipped with a cover with a bypass valve to increase the pressure in the system. By switching to a closed type, it was possible to increase the boiling point and eliminate losses due to leakage from the tank.
Airflow of the heat exchanger is provided by fans operating in two modes:
How much antifreeze is in the cooling system, volume table
According to information about car maintenance, antifreeze should be changed after the car has driven 60 thousand km. Antifreeze becomes unusable after a run of 20 thousand km .
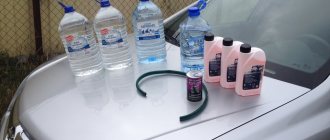
Important. It is better to give the choice of coolant in favor of concentrate. The main advantage is that it can be diluted in the required proportion, since after flushing, distilled water remains in the system.
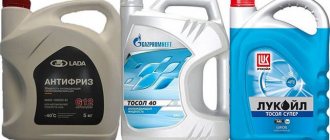
An excellent choice is the product Castrol Radicool SF . If you give preference to a ready-made product, it is recommended to choose AGA Z4, G12 Re or FELIX Carbox G12+.
Table (Niva Chevrolet) antifreeze volume:
- Castrol Radicool SF
- AGA Z40
- FELIX Carbox G12+
- Lukoil G12 Red
What coolant is recommended for Chevrolet Niva
The best option when choosing a coolant would be products containing:
- propylene glycol or ethylene glycol (aggressive substance);
- distilled water;
- additives (silicate, carbosilicate or hybrid).
Products with carbosilite additives have excellent heat transfer, increased cooling temperatures and a long service life ; they also prevent the formation of fatty deposits. Silicate additives help reduce temperature and cause rust.
Important! A high-quality coolant must have increased thermal conductivity and a high boiling point. During operation, foam and scale should not form, and in the cold season the liquid should not freeze.
Antifreeze G12 is ideal for a Niva Chevrolet car . The coolant is replaced every 2 years or after 60 thousand km. If the color of the fluid has changed, this is another reason to replace the coolant. When acquiring a reddish tone, you should pay attention that the chemical properties of the composition have changed.
To accurately determine which antifreeze to fill, you need to know what product was filled at the factory. It all depends on the model and year of manufacture of the car :
- If the cars were produced in 2001, then choosing the G12 class will be a good option.
- If the model was released between 2003 and 2010, then G12 +.
- For more modern models produced after 2010, it is recommended to purchase G12++ antifreeze.
Instead of antifreeze, you can use TS-40 . This is Antifreeze from a domestic manufacturer.
When to change the oil
The oil change period for the Chevrolet Niva gearbox is 30-40 thousand km. This regulation is more suitable for favorable conditions, while driving in mountainous areas or transporting heavy loads can negatively affect the frequency of oil changes. This is due to the rapid loss of its beneficial properties in such conditions. In addition, a colossal load is placed on the transmission components and overheating occurs.
Of course, spoiled oil is not able to effectively lubricate and cool parts, and as a result, additional load is placed on the gearbox, which leads to its failure ahead of time. Therefore, in difficult conditions, you should change the oil on time to prevent unpredictable frequency of repairs.
Replacement frequency - what antifreeze to fill
Coolant gradually loses its properties as it constantly circulates inside the car system. Thermal conductivity is lost, the level of inhibitors decreases and foaming begins.
If the antifreeze is not replaced in a timely manner, this may cause metal corrosion and engine overheating.
Replacement times depend on:
- Product quality.
- Vehicle operating conditions.
The procedure is carried out on average once every 2-3 years . According to the established regulations, antifreeze is replaced every five years or after a mileage of 250,000 km per year.
But in some cases this period is reduced for the following reasons :
- Presence of sediment or cloudiness in the expansion tank.
- A deposit of a jelly-like mass has formed on the inside of the tank, near the neck. Even if this is noticeable at subzero temperatures, there is a need for replacement.
How to replace coolant in a Niva Chevrolet
To prepare for replacement, you need to decide on a location . This could be an inspection hole or a place where the car stands level. Before replacing the coolant, it is necessary to cool the engine. It is obligatory to work in special clothing.
List of required materials:
- Spanners.
- O-rings.
- Wire cutters.
- Capacity 10 l.
- Flushing liquid.
- Distilled water.
- 4 liters of coolant.
There are three stages of replacement in total.
Stage I (waste drainage):
- Remove the crankcase protection shield.
- Relieve pressure by opening the expansion tank cap.
- Attach the hose to the drain faucet and lower the other end into the container.
- Turn the valve.
This is how the liquid is drained.
Stage II (flushing the system):
- Pour distilled water into the expansion tank.
- Pour out the water containing scale and debris from the system.
- Close the tap and fill in the product for rinsing, followed by distilled water until the original volume is reached.
- Start and warm up the engine before the fan starts operating.
- Turn off the car and repeat the process.
- We flush the system with water.
Stage III (step-by-step instructions for pouring):
- Prepare coolant: mix antifreeze with water. The phase transition temperature depends on the proportion. (3 parts antifreeze and 2 liters of water).
- Pour into the expansion tank. Attention. To avoid air bubbles, shake the hose. The resulting amount of mixture is 5 or 6 liters.
- Turn on the engine and bring it up to operating temperature until the fan turns on.
- Check the fluid level in the tank and, if necessary, bring it to the maximum level.
- Reinstall the reservoir cap and protective shield in their original place.
Signs of trouble
On the Internet you can find many different videos and materials that discuss the issue of airing and problems in the power steering on cars of different types, classes and sizes.
Therefore, do not be surprised if you come across questions regarding power steering pumping:
- on KAMAZ;
- on Shakman;
- ZIL 130;
- on the Volga (GAZ 31105);
- in Scania;
- Toyota Corolla;
- Nissan Qashqai;
- Lada Priora;
- Renault Symbol;
- Ford Focus;
- Niva Chevrolet;
- Volkswagen Passat B3;
- Toyota Avensis;
- Skoda Octavia;
- Renault Logan, etc.
The automotive power steering system can become airy for reasons already stated, related to breakdowns, or structural interference in the power steering.
At the same time, every driver is recommended to be aware of the characteristic signs indicating the fact that the system is air-filled. It is when they appear that mandatory pumping is required.
There is nothing difficult in diagnosing and detecting the problem. Look for the appearance of one or several signs indicated in the list:
- there is a strong noise near the power steering itself;
- strong extraneous noise may come from the power steering pump;
- there is a clear increase in pressure on the steering wheel;
- the steering wheel becomes harder to turn during maneuvers;
- leakage of working fluid is observed from the system;
- foam appears on the surface in the expansion tank with hydraulic fluid;
- The steering wheel rotates spontaneously in different directions.
Stages of replacing Chevrolet Niva coolant
When switching from antifreeze to antifreeze, it is necessary to flush the cooling system. This is done so that the new liquid does not lose its properties when mixed. Also, due to the different chemical composition, a precipitate or flakes may form. Therefore, the correct procedure between draining and filling should include a flushing step.
This model is quite popular, so many people know it under other names:
- Chevrolet Niva;
- Chevy Niva;
- Shniva;
- VAZ-21236.
We will consider the instructions for replacing the coolant using the example of a 1.7-liter gasoline engine. But there is one nuance: cars after the 2016 restyling have electronic control of the gas pedal.
Accordingly, there are no pipes for heating the throttle valve. Therefore, we will consider bleeding air on this modification. You can also familiarize yourself with the nuances of replacement on a regular Niva 4x4, the replacement on which we also described.
Coolant drain
To drain the antifreeze, you need to place the car on a flat surface, open the cap of the expansion tank and wait a little until the temperature drops below 60°C. For further convenience, remove the decorative plastic protection on top of the engine.
Further in the instructions we are recommended to turn the temperature regulator to maximum. But it is useless to do this. Since the temperature control in the Chevrolet Niva occurs by moving the air damper. And not by blocking the radiator as in old VAZs.
After the machine has cooled down a little, we begin the draining process itself:
- If you stand in front of the car, at the bottom right, there is a plastic valve on the radiator that closes the drain hole. We unscrew it to drain the antifreeze from the radiator (Fig. 1). When unscrewing, be careful not to lose the rubber O-ring.
In this way, we completely drained the old fluid, but in any case, a small part still remains in the system, distributed among the engine channels. Therefore, in order for the replacement to be high-quality, we proceed to flushing the system.
Flushing the cooling system
If the Chevrolet Niva cooling system is not clogged, but is simply undergoing a scheduled replacement, then we use ordinary distilled water for flushing. To do this, close the drain holes and pour distilled water into the expansion tank.
Then close the tank cap and start the engine. We warm it up until the thermostat opens to flush both circuits. Next, turn it off, wait for it to cool and drain the water. To achieve a good result, it is recommended to do this procedure 2-3 times.
If the car system is heavily contaminated, it is recommended to wash it with special chemical solutions. For these purposes, washes from well-known brands, such as LAVR or Hi Gear, are suitable. Recommendations, as well as instructions, are usually printed on the back of the container with the composition.
Filling without air pockets
To properly fill new antifreeze into a Chevrolet Niva, you need to perform a number of steps. After all, it depends on whether an air lock forms in the system or not. We will close the drain holes in stages, so for now we will leave them open:
- We begin to pour antifreeze into the expansion tank, as soon as it flows through the drain hole in the radiator, we put the wing plug in place.
- We continue the flood until it starts flowing from the hole in the block. After which we close it too. The drain bolt on the block must be clamped with a slight force, approximately 25-30 N•m, if you have a torque wrench.
- Now we need to bleed the air from the top of the radiator. To do this, we find a special plug, the location of which is shown in the photo (Fig. 3). We unscrew it a little, continue to pour antifreeze into the tank, as soon as it flows, screw the cap back into place.
The system is completely filled with new antifreeze, now all that remains is to start the engine, wait until it warms up completely, and check the level. Some people advise starting the car with the reservoir open and closing it after 5 minutes to get rid of air pockets as much as possible. But when replacing according to these instructions, they should not be there.
Signs of trapezoidal problems
Even with careful driving, the trapezoid has its resource, although Chevrolet Niva owners note that it reaches 100,000 km. In fact, the information is not entirely accurate. Every 25 - 30 thousand km, it may be necessary to replace the steering tips, and they are an integral part of the trapezoid.
The first sign of a joint failure is increased play in the steering wheel. The hinge pins wear out and need to be replaced. Recently, drivers prefer to purchase rods or ends assembled with a hinge. Lack of lubrication will accelerate wear of the moving joint. Although the manufacturer adds the required amount of lubricant to the joint, compliance with this obligation should be checked.
Three factors have been identified that lead to trapezoidal faults.
- Poor quality of road surface.
- Driving style.
- Manufacturing defects.
In any case, it is necessary to carry out repair work as quickly as possible. The condition of the steering system determines the safe operation of the vehicle. It should be noted that prolonged absence of repair will lead to complete destruction of the hinge. On the highway, the car will become uncontrollable, which can lead to an accident.
Read news about the new Niva
- Steering tips Niva Chevrolet
- What tire size is available for installation on Niva, available versions and recommendations
- Mud tires for Niva 4x4: radius 15 and 16 - which one is better to install "
- All about the Valet button and how to disable it yourself on alarm systems of different brands
- Niva Lynx buy in Samara - prices for the new Lada “Bronto” (Niva Pickup) | cost and equipment
- Air conditioning Niva Chevrolet - design and repair "
- Niva Chevrolet installation of air conditioning - Auto magazine MyDucato
- Instrument panel Niva Chevrolet designations. Improving the Chevrolet Niva dashboard
Replacement frequency, what antifreeze to fill
In the maintenance information for Niva Chevrolet, it is recommended to change antifreeze every 60,000 kilometers. But many car enthusiasts are not happy with the flooded antifreeze, which becomes unusable by 20 thousand. Dzerzhinsky antifreeze is usually filled from the factory, but there is also information about pouring red antifreeze.
When choosing coolant, it is better to use a concentrate rather than a finished product. Since it can be diluted in the required proportion, because after flushing there is still some distilled water left in the system.
A good choice would be Castrol Radicool SF concentrate; it is what dealers often recommend for use. If you choose ready-made antifreezes, then you should pay attention to the red AGA Z40. FELIX Carbox G12+ or Lukoil G12 Red with good reviews.
Bottom line
You need to change the oil, you need to do it on time and use high-quality consumables. The longevity of the engine largely depends on the issues that are associated with this important component. Don’t skimp on such little things, because a major overhaul of your car’s power unit will cost tens of times more than regularly replacing high-quality engine filler.
There are not so few links in this chain, and this always means that not everything is as simple as you would like. But statistics show, and reviews from car enthusiasts confirm, that counterfeit oil is becoming increasingly rare on store shelves, and it’s not worth chasing after saving money when shopping on spontaneous, semi-legal auto parts markets.
It is also worth paying tribute to the Chevrolet Niva model itself. The car is very unpretentious and can forgive some mistakes when it comes to changing the oil, but you should not look for the ultimate strength in this matter in your car by personal example.
Replacing Chevrolet Niva coolant
Tools:
- Ratchet wrench
- Extension
- 8 mm head
- 10 mm head
- 13 mm head
- Narrow nose pliers
- Torque wrench
- Knife
- Funnel
Parts and consumables:
- Coolant 8 l (10 l with reserve)
- Technical capacity
- Radiator Cap O-ring (if required)
- Plastic bottle
- Rags
Notes:
According to the Chevrolet Niva maintenance regulations, the coolant should be replaced after two years of operation or after 60 thousand kilometers, whichever comes first. In addition, if the coolant changes color to a reddish color, replace it immediately, as such a change indicates that inhibitory additives have developed and the liquid has become aggressive towards the parts of the cooling system.
Replace coolant only when the engine is cold.
1. Place the car on a ditch and open the hood.
2. Remove the oil pan guard and engine splash guard as described here.
Note:
The crankcase protection and mudguard may not be removed, but in this case you will have to use some kind of device to collect the drained liquid, otherwise it will inevitably spill across the area under the car.
3. Relieve excess pressure in the cooling system by unscrewing the expansion tank cap.
4. Place a wide container with a volume of at least 8.5 liters under the drain hole located at the bottom of the left radiator tank. To reduce the intensity of liquid drainage at the initial moment, the cap of the expansion tank should be tightly screwed on.
5. Unscrew the radiator drain plug by hand and drain the coolant from the radiator into a nearby container.
Notes:
Coolant is toxic and lethal to all living things, so be careful when working with it. To avoid polluting the environment, drain the radiator through a funnel (such as one made from a plastic soda bottle).
The drain plug is sealed with a rubber ring. Replace a ring that is torn, cracked or has lost elasticity.
6. Unscrew the cap of the expansion tank.
7. To drain the coolant from the engine cooling jacket, place a container under the drain hole located on the left side of the cylinder block next to the ignition module, and unscrew the drain plug with a 13 mm socket and extension.
8. The connection between the plug and the cylinder block uses a conical thread that does not require additional sealing. Close the radiator and cylinder block drain plugs. Tighten the drain plug of the cylinder block to a torque of 25-30 N∙m.
9. Before filling the cooling system with liquid, remove the engine screen (if any), use narrow-nose pliers to loosen the clamp securing the coolant supply hose to the throttle body and remove the hose from the pipe.
10. Pour coolant into the engine cooling system through the expansion tank until coolant flows out of the coolant supply hose to the throttle body. After this, install the hose in place and secure it with a clamp.
Note:
Use coolants recommended by the manufacturer.
11. Close the cap of the expansion tank.
Note:
Screw the expansion tank cap tightly. The expansion tank is under pressure when the engine is running, and therefore, if the plug is loosely tightened, coolant may leak from under it.
12. Start the engine. When the engine warms up, the outlet (lower) radiator hose should be cold for some time, and then quickly heat up, which will indicate the beginning of fluid circulation in a large circle. After waiting for the cooling fan to turn on, stop the engine.
Note:
When starting the engine, the expansion tank cap must be closed.
With the engine running, monitor the coolant temperature according to the gauge. If the arrow reaches the red zone and the fan does not turn on, turn on the heater and check what kind of air flows through it. If the heater supplies heated air, it means that the fan is most likely faulty, and if it is cold, it means that an air lock has formed in the engine cooling system. But there shouldn’t be a plug, since the cooling system was depressurized before adding liquid (see point 9).
13. After the engine has cooled, check the coolant level in the tank and bring it to normal (it should be between the MIN and MAX marks).
14. After a few days of using the car after replacing the coolant, check its level. If necessary, add coolant.
Note:
If, after a very short time, fresh antifreeze changes color from blue to brown, it means that you filled it with a fake, to which the manufacturers “forgot” to add corrosion inhibitors. In addition, one of the signs of a fake is the sudden complete discoloration of antifreeze. The dye of high-quality antifreeze is very stable and only darkens over time. Antifreeze tinted with linen blue becomes discolored. This “antifreeze” needs to be replaced quickly.
The article is missing:
- Photo of the instrument
- Photos of parts and consumables
Replacement instructions
The procedure for replacing the coolant is not complicated, so even a novice car enthusiast can perform it.
How much to pour?
Antifreeze in a car, according to the manufacturer’s recommendations, should be changed after 40 thousand kilometers or after two years of operation. In this case, it is necessary to constantly monitor the condition of the coolant and check its level. If it has darkened or become cinnamon in color, then it needs to be changed. If the level is below the required level, add water or antifreeze. Replacement may be required if the coolant poured into the car does not meet the density.
The required volume of liquid to be filled is 10 liters. It is advisable to fill with coolant specified in the owner's manual.
Coolant
What will you need?
To carry out the replacement, you will need an inspection hole, a lift or an overpass. The machine must be installed horizontally and secured so that it cannot roll during work. The front of the machine should be installed higher than the rear. The procedure is carried out only on a cold engine. To carry it out you need to prepare the following tools and materials:
- spanner set to “10”;
- pliers;
- screwdriver;
- funnel;
- container for draining waste liquid;
- new antifreeze;
- clean rag.
A watering can can be made from a plastic bottle by cutting it in half. A canister or plastic water bottle is suitable as a container.
Stages
Having installed the car on the inspection hole, they begin to replace the coolant.
- First, open and secure the hood.
- The next step is to unscrew the cap on the expansion tank. It is advisable to perform the procedure on a cold machine.
Expansion tank Niva Chevrolet
If this is not possible, then the coolant temperature should be no higher than 90 degrees. To avoid getting burned by steam or hot liquid, place a rag on the engine and around the neck of the expansion tank. The lid should be unscrewed carefully. First you need to unscrew it a little so that hot air comes out and release the tank from pressure, and then unscrew it completely.
- Now unscrew the plug on the drain hole and drain all the liquid. When the used antifreeze has drained, screw the plug back into place.
- To prevent the formation of air plugs in the cooling system, you need to disconnect the hose from the throttle body fitting. To do this, use a screwdriver or pliers to loosen the fastening on the clamp and move it back. Then disconnect the hose from the throttle assembly fitting.
- Before adding coolant, it should be prepared. There are ready-to-use liquids, mainly antifreeze. There are antifreezes that require dilution with distilled water; usually the proportion is 50/50, unless otherwise indicated in the instructions.
- Next, you can proceed to filling the cooling system.
Fill with antifreeze.
The coolant is poured into the expansion tank. As soon as it begins to flow out of the throttle body nozzle, put the hose on the nozzle and tighten the hose clamp. Next, continue to fill the antifreeze solution to the maximum mark in the expansion tank. - When pouring antifreeze solution, tighten the radiator hoses to prevent air pockets from forming.
- After the cooling system is filled, tighten the cap on the expansion tank.
- Next, you need to start the engine and wait for the electric fan to turn on. If this does not happen, you need to check what kind of air is coming from the heater. If it is warm, then the fan is faulty, if it is cold, the reason is the presence of air pockets formed in the system. To get rid of them, you need to open the cap on the radiator, start the engine, and after 5 minutes of operation, turn off the engine. Now close the radiator cap.
Removing the radiator cap - When the second cooling circle opens, the coolant level will drop significantly.
- You must wait until the engine cools down. Next, check the fluid level again. On a cold engine it should be between maximum and minimum, on a hot engine it should be at maximum. If necessary, add to the required volume.
When several days have passed after the replacement, you need to check the fluid level and get rid of possible air pockets. The process of getting rid of air pockets is the same as when replacing antifreeze: remove the cap on the radiator, let the engine run for a few minutes, close the radiator. You should also pay attention to the color of the antifreeze, if it has changed: it has darkened, become reddish, most likely a fake has been filled in, in which case the coolant needs to be replaced.
Leaks and problems
When replacing the coolant, you should inspect all pipes and connections for possible problems. After all, when the fluid is drained, it is easier to replace them than to tear them during operation. You need to pay special attention to the clamps; for some reason, many people use ordinary worm clamps. Over time, they squeeze the hoses, causing them to break.
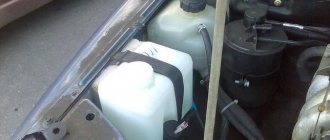
In general, the Chevrolet Niva has several main problems related to the cooling system. It often happens that antifreeze leaves the expansion tank. The plastic on it constantly bursts, which causes leaks. In this case, replacement will be required.
Another problem is antifreeze under the driver's mat, which can cause a sweetish smell in the cabin and also fog up the windows. Most likely the culprit will be a leaking heater radiator. This problem is usually referred to as “a chef’s nightmare.”
There is also a situation where antifreeze is thrown out of the expansion tank. This may indicate a broken cylinder head gasket. This is checked as follows. With the car completely cooled down, remove the expansion tank cap, after which you need to start the engine and rev it up intensively. It is advisable to have a second person so that he can see whether the antifreeze in the tank will bubble at this time.