Stickers on a car windshield allow the driver to identify his personal vehicle. The stickers are durable and weatherproof. They will help hide the cracks, and if desired, you can remove them without effort.
Drawings are used for different purposes:
- Hide the defect. Such stickers do not carry any meaning. The inscriptions “You can’t overtake”, “I have nothing to lose”, “I’m not drunk - I drive around pits” are pasted on for fun or to hide a visible flaw - a scratch, crease, chip, crack.
- Submit information. The drawings warn about the presence of a child in the car, a woman driving, etc. The “Spikes” badge is required and must be installed in the upper left corner of the rear window.
- Replacement of airbrushing. Stickers are inexpensive, while a professionally made drawing will cost the car enthusiast a pretty penny. If necessary, the sticker can be removed or replaced with another image. Airbrushing can only be painted over.
- Advertising. Helps the car owner promote his business. Advertising with a phone number increases the chances of finding new customers. Large companies offer drivers to place information about their company in the form of a sticker on the rear window. In exchange, drivers receive a reward.
Stickers as a way of advertising
One of the ways of marketing has become advertising stickers of various subjects. This could be company logos, contact information, a brief description of the service, or part of an advertising slogan. The more impressive the image on the glass, the greater the chances of attracting new customers and increasing income. Luminous images are becoming increasingly popular. The drawings are visible in the dark, which attracts the attention of passers-by and drivers. This is often used by taxis and delivery services.
Informativeness and originality
Stickers can carry useful information, for example, informing that there is an inexperienced car owner, a child, a car is for sale, or the driver is driving on studded tires - these are examples of the use of informative stickers.
Manufacturing materials
Stickers are made from various materials. Let's list all possible options, starting with the most popular:
- Vinyl film. An acceptable option that is resistant to changes in climatic conditions. Retains ideal shape from 2 to 10 years, which depends on the thickness of the film and its quality. With the help of a vinyl sticker it is easy to remove a visible defect.
- Fluorescent film. It has a special brightness. Valued by drivers who often drive in the dark. The service life is no more than 1 year. Later the film begins to fade.
- PVC film with reflective microspheres included. Able to reflect light from a source, it is visible in the dark, withstands scratches and lasts up to 3 years. In brightness it is inferior to fluorescent film.
- Tinting film. Most drivers prefer film that protects from sunlight. Tinting helps protect the driver from the sun and the interior from fading.
Features of operation
To glue the workpiece for a long period of time and not be afraid that it will fall off, follow a few rules:
- Do not wet the paper backing, otherwise it will be difficult to remove. Particles of paper remaining on the surface will contribute to the workpiece peeling off;
- Do not overheat the vinyl with a hair dryer to a temperature above 70 degrees, or it will begin to deform and lose its properties;
- use a plastic squeegee for the mounting coating so as not to scratch the vinyl itself;
- the temperature indoors or outdoors should be no lower than +10 and no higher than +30 degrees. At other temperature conditions, gluing the sticker will be very problematic;
- There should not be a lot of dust in the room or street where you will glue the film. If it gets under the film, it will prevent it from adhering to the surface.
Car vinyl wrap
Pasting methods
If the car owner does not know how to stick a sticker on the glass, then the following recommendations will help:
- First choose the side of the glass. It is better to fix the darkening film from the inside - it will not last long if it is exposed to precipitation. Stickers are glued on the outside.
- Clean the glass using professional auto chemicals. Wait until the surface is completely dry. The recommendations on the packaging are taken into account, which tell you how to apply the sticker to the car glass.
- If there are no instructions, then arrange the drawing according to your own understanding and fix it with masking tape.
- Peel off the tape, remove part of the protective film from the design, then cut off the edge and glue the sticker from the middle to the edge. The resulting bubbles and creases are removed by hand or with a blunt spatula.
- Remove the remaining tape and add part of the design.
If the technology is followed exactly, the image will last for years. When installing luminous film, it is advisable to seek the help of a specialist.
How to apply a sticker
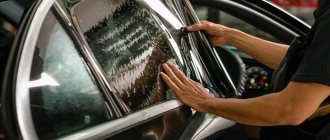
In this example, I will describe 2 main methods of gluing small applique stickers. At the bottom of the page I will post a video showing all the methods for gluing all types of stickers. In 10 minutes you will learn everything you need to know. I recommend watching the video once to be aware. This may be useful to you. So, in the example you see 2 application stickers. One of them is made in a mirror.
We will separate the first sticker from the backing and glue it right away. This method is suitable for small stickers. We pry up the corner of the sticker to grab the mounting film and separate it together with the application from the backing. The surface to be applied should already be dry and clean.
The mounting film has a weak adhesive layer so that it can be easily removed from the surface, leaving the application. In this case, such glue is used to remove the application from the substrate. We film the whole thing.
Then we select a place for gluing and, slightly pulling, apply it to the surface. Tension is necessary so that the sticker lays without waves or bubbles. This is the most important moment of gluing. At this point you can use water. Usually large stickers are glued to the water when the surface is not level. At this size there is no need for water.
Then press the sticker evenly from the center to the edges. To do this, it is convenient to use a squeegee with a felt layer (as in the photo) or a plastic card wrapped in fabric. The fabric helps the squeegee slide, and when gluing a printed sticker, it will not spoil its top layer with ink. Printed stickers can only be applied to fabric; hard objects will damage the surface.
On such glass you can very clearly see where the sticker has already stuck (gray color) and where it has not yet stuck (white color). While the application is covered with the mounting sticker, it is necessary to press it down as firmly as possible. Then you need to take the mounting film by the corner and start removing it. Do not hurry. Make sure the applique stays on the surface. At low temperatures and high humidity, the application adheres less well and may remain on the mounting layer. In this case, you need to press down the sticker even more and, if possible, heat it with a hairdryer to 30 - 40 degrees. Press firmly again and try to remove the mounting layer. It should be easy to remove and not a single edge of the application should follow the mounting layer.
We glue the next sticker using a different method. We separate only part of the mounting layer, and bend the edge of the substrate inward. The free edge of the mounting layer will hold the sticker. You can peel off other corners or use tape to secure and position the sticker.
If the sticker is positioned the way we need it, separate all the other corners (or tape) and begin to pull out the backing. At the same time, roll out the release sticker.
We pull out the entire backing to the end, evenly pressing the sticker to the surface.
Smooth and press well. Remove the mounting layer.
The final look of our stickers. Because one of them is glued from the inside of the glass in a mirror image, it turned out as needed. Why glue the sticker in a mirror? So that it is inside the cabin and not exposed to any influences. In the photo, the sticker pasted on the inside looks whiter, but when used this way in a car, the effect is the opposite. The fact is that car windows have their own transparency and are often slightly tinted. This will cause the sticker to appear grey. It will also stick to the heating lines and may damage them when removed. We do not recommend gluing stickers from the inside.
I also recommend watching a video about all types of stickers. I showed on it all the main methods of gluing. We also have instructions for each sticker. So don’t worry - you’ll definitely glue everything yourself like a pro!)
19336
go to sections
For questions about cooperation or purchasing goods, write to our VKontakte group.
Is a fine possible?
When stickers on a car block the view, the driver will be fined. Violation of technical regulations and the collection of traffic rules is punishable by administrative measures. A traffic police officer can issue a warning if the driver does not immediately get rid of the sticker on the car glass, but the police officer has the right to choose a different preventive measure. The minimum fine for a windshield sticker is 500 rubles, the maximum penalty is confiscation of license plates until the driver removes the stickers on the car.
Adviсe
- Stickers are rectangular and elongated; it is most convenient to glue them on the narrowest side;
- Gluing in rain or cloudy weather, even in a garage or box, is not the best idea;
- Go straight to the highway or just drive through the streets for over 50 km. per hour, at least in the first day it is not recommended - there is a high chance that everything will have to be redone;
- The average lifespan of a sticker is 1.5-2 years
How to remove a sticker
To remove stickers from car glass, it is better to select a special product that will not destroy the surface. Home remedies cannot be used, they will damage the surface, and it will be even more difficult to remove the sticker from the glass. There are special chemical compounds on sale that will remove the sticker and dissolve any remaining adhesive from the surface:
- Solvent 50 Kontakt chemistry This solvent gets rid of any drawings, glue, or double-sided tape. You need to use the product with gloves.
- TESA. The cleaner helps remove glue from patterns on glass. Eliminates thin stickers.
- UHU. Able to cope with traces of drawings, stickers, labels, glue. Dissolves thick stickers.
It doesn’t matter what you decide to use to remove the sticker from the car window - the chemicals are aggressive, so you need to wear rubber gloves when cleaning the glass. At the end of the procedure, wash off the remaining product from the glass with plain water.
Car stickers are beautiful and unusual, but if they interfere with road safety, then think twice before deciding to place the design you like. The main thing is to comply with the rules of the Technical Regulations.
How to remove glue residue from car surfaces and glass
Residues of glue can be removed by first moistening them with alcohol or alcohol-containing mixtures. Be careful when using different solvents. Read their composition first to make sure that they will not damage the paintwork of your car. In particular, in this case you cannot use acetone-based solvents , as well as acetone itself.
You can also remove vinyl stickers on your car using:
Comparison of different sticker and adhesive removers
- gasoline;
- kerosene;
- liquids for removing bitumen stains;
- silicone solution for removing glue from the body;
- degreaser for painting work.
After using the listed liquids, do not forget to use foam (soap solution) to wash off any remaining residue. Also, some car owners in such cases remove glue residues using very fine sandpaper (“zero”). However, after this the problem area will need to be polished using polishing paste. In stores you can find a special rubber roller that fits onto a drill. It can also be used to quite effectively remove pre-softened glue.
Results
Applying film to a car is not particularly difficult. This is especially true for small size stickers. Almost any car owner can handle this. It’s another matter if you want to use vinyl stickers on the car throughout the entire body (for example, “carbon-look”). In this case, it is better to seek help from the experts.
As for the question of how to remove a sticker from a car body or the dried glue left behind, then, as practice shows, it is best to use AI-92 gasoline and a hair dryer to heat up the adhesive. Gasoline is much cheaper than other cleaning products, but has a superior solvent action to most of them. However, the choice is yours alone, and we do not claim to be the ultimate truth. We invite you to share your own experiences using cleaning products in the comments.
Use Cases
Lettering is put on the windshield to satisfy personal interests.
Drawings are used for different purposes:
- Hide the defect. Such stickers do not carry any meaning. The inscriptions “You can’t overtake”, “I have nothing to lose”, “I’m not drunk - I drive around pits” are pasted on for fun or to hide a visible flaw - a scratch, crease, chip, crack.
- Submit information. The drawings warn about the presence of a child in the car, a woman driving, etc. The “Spikes” badge is required and must be installed in the upper left corner of the rear window.
- Replacement of airbrushing. Stickers are inexpensive, while a professionally made drawing will cost the car enthusiast a pretty penny. If necessary, the sticker can be removed or replaced with another image. Airbrushing can only be painted over.
- Advertising. Helps the car owner promote his business. Advertising with a phone number increases the chances of finding new customers. Large companies offer drivers to place information about their company in the form of a sticker on the rear window. In exchange, drivers receive a reward.
Stickers as a way of advertising
One of the ways of marketing has become advertising stickers of various subjects. This could be company logos, contact information, a brief description of the service, or part of an advertising slogan. The more impressive the image on the glass, the greater the chances of attracting new customers and increasing income. Luminous images are becoming increasingly popular. The drawings are visible in the dark, which attracts the attention of passers-by and drivers. This is often used by taxis and delivery services.
Informativeness and originality
Stickers can carry useful information, for example, informing that there is an inexperienced car owner, a child, a car is for sale, or the driver is driving on studded tires - these are examples of the use of informative stickers.
What will you need for pasting?
Before wrapping a car, we study what is necessary and what may be needed in the process. To apply film you will need the following materials and tools:
- The film itself. It is advisable to take it with a reserve or choose one with a larger width. The specialist will tell you the number of meters and which company to buy.
- Sharpened scissors, a sharp knife, preferably a stationery knife.
- Spray bottle with soap solution (prepared from water, liquid soap, detergent, car shampoo in a ratio of 10 to 1).
- Paper tape.
- Two types of squeegee (spatula): plastic, felt.
- To degrease the surface, alcohol or solvent is required.
- Technical (professional) hair dryer.
- Lint-free cloth or napkins.
- A special composition for enhancing the properties of the adhesive side of the material - 3M primer (A transparent liquid with a pungent odor enhances the adhesive effect of the self-adhesive material, has no analogues).
You need to prepare all this in advance so that you can quickly take it if necessary.
To cover a car, a film from 80 to 200 microns thick is used.
Vinyl stickers on cars: which print to choose?
Depending on the type of printing, the surface of the film can be shiny or matte. These properties do not affect the quality of the sticker, since any of the options will stick, stick and wear the same.
types of stickers
However, the identity of the material does not mean that the specimens will look similar, because they have different decorative characteristics:
- Matte car stickers. These sticker options do not glare under sunlight and do not look as rich and bright. They are more discreet, have a deep color and are easy to care for, as there are no fingerprints left on the coating.
- Glossy vinyl stickers. Shiny sticker models can shine under the rays of light and look much brighter, more colorful and richer. They are great for sports cars and those who want to stand out from the crowd, but they are more difficult to maintain as they can leave fingerprints on the mirror surface.
Our recommendations
If the main sticker does not come off the film, carefully peel it off using a knife and attach it to the body. Once you have an evenly taped surface, you will need to go over it again with a squeegee to remove any remaining air bubbles and moisture. If necessary, use a needle or syringe to poke a hole in the vinyl and remove any air.
After the above steps, warm the surface with a hairdryer to ensure a good fit. Fold the film over the joints, if necessary.
After this, leave the car for several hours. The sticker will be completely fixed within 24 hours.
How to glue vinyl to a car: features of operation
The whole process involves working with reagents and chemically active substances. They can evaporate and thereby cause harm to health. To glue vinyl yourself, you should consider the safety rules:
- pasting should be carried out in a clean room with good ventilation;
- if you decide to stick vinyl on a car in the garage, then it should be warm there;
- The pasting procedure should be carried out outdoors in calm weather;
- the air temperature should not be lower than +22 degrees;
- It is undesirable to glue vinyl during precipitation - the film will begin to peel off;
- During operation, make sure that debris does not get under the coating, this can lead to deformation of the material.
To wrap a car yourself, of course, you need to buy vinyl. Before purchasing, compare the prices of films at various points of sale, consult a seller in a specialized store for the cost, and read reviews.
Useful! Most often, they take ready-made stickers with a design already applied.
You will also need the following tools and materials:
- magnets or masking tape;
- scissors or stationery knife;
- rags;
- plastic, felt, combined and felt squeegees;
- degreaser;
- car vinyl film;
- primer;
- industrial dryer;
- edge sealant;
- detergent;
- spray.
Advice! It is advisable to take an assistant who already has the skills and knows how to stick vinyl.
You should also put the car in proper condition: wash and degrease. Only after this can the car wrapping begin.