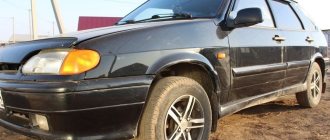
The VAZ 2114 is a restyling of the five-door hatchback VAZ 2109, the model was produced until 2013 by the Volzhsky Automobile Plant and continued the Samara-2 family. Unlike its predecessor, the fourteenth model received an update in the front part of the body: a modified radiator grille, bumper, and moldings. The power unit was supplemented with a new engine from the VAZ 2111 line.
The rear wing of the VAZ 2114 is not a frequent consumable; the part must be replaced after mechanical damage during an accident, if there is a metal rupture. Unlike the front fender and sills, the rear wheel arch and fender as a whole are not so affected by corrosion; the element is more protected from water and dirt. The first repairs using the VAZ 2114 rear wing repair insert begin three years after purchasing a new car.
How to prepare a car and what tools are needed
Before starting a full-fledged repair, it is necessary to prepare the cars, select the necessary tools for dismantling, installation and related work. The rear fenders are installed on the body by spot welding; to replace them, the part must be cut out from the car. The front part is installed with self-tapping screws from the manufacturer's factory.
- The car is installed on an overpass or other flat surface, preferably above floor level. If this is not possible, then you need to jack up the car.
- The battery is removed.
- When replacing, the bumper and trim are removed.
- Before removing the front bumper, the fog lamp terminals are disconnected.
To dismantle the bumper you will need the following tools:
- Phillips screwdriver, flat;
- set of wrenches;
- knife;
- pliers;
If repairs are required, you should prepare an anti-corrosion kit, automotive primer, and auto enamel. To dismantle the rear wing you will need:
- chisel with a sharp edge;
- Sander;
- sandpaper R-80;
- semi-automatic welding;
- anti-corrosion mastic, primer;
- putty, set of spatulas;
- auto enamel.
Rear wings are considered difficult to repair and replace parts for the VAZ 2114. When replacing an element, it is recommended to carefully inspect the part and replace it partially if there is a small defect. Original repair kits offer both a solid element and repair inserts. The price of an original complete replica of the front wing starts from 2,500 rubles, the rear from 7,000. Replacing part of a replica with a complete element is easier and cheaper.
Do-it-yourself wheel arch replacement technology
The wheel arches of a car are risk elements. This is due to the fact that they are constantly exposed to atmospheric factors: rain, snow, moisture, chemically active components that are often present on the highway. And also crushed stones and small stones flying from under the wheels of cars. As a result, pockets of corrosion arise, which lead to the destruction of this part of the car . The rear arches of the car, consisting of an inner part and an outer wing, are especially affected in this regard.
If we are talking about minor defects, you can get by with cosmetic repairs. If we are dealing with very pronounced foci of corrosion, we will need serious repairs or even replacement of the car's wheel arches . To do this, you can seek help from a car service station or do all the work yourself.
Self-repair of the rear arches of a car can be performed using 2 methods:
The first method is used when the wing is not rotten to the point of holes, and we are able to obtain a solid surface by removing all the rust. If the destruction led to the formation of holes, it is obvious that puttying is not enough - you will have to take the welding machine out of the cabinet.
Puttying
So, if we are talking about minor damage, the putty method is used. Step by step it looks like this:
- It is necessary to thoroughly wash and dry the car.
- Remove all bare metal rust from the damaged areas and sand them thoroughly.
- Treat areas with reactive primer and allow the surface to dry.
Car rear arch putty - Place acrylic filler on top of the reactive layer - under no circumstances should putty be applied to acidic primer.
- After the acrylic has dried, apply putty and wait for it to dry.
- Thoroughly sand the dried putty, gradually reducing the grain size of the abrasive. Thus, level the surface, preparing it for painting.
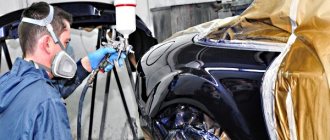
- Paint those areas of the car that have been repaired.
Welding method
If the surface is so corroded that puttying is not possible, you will need welding. Obviously, to carry out work of this kind with your own hands, you must have a welding machine and have the appropriate skills to handle it . So, repair by welding looks like this:
- Carefully wash and dry the car.
- Using a grinder, we cut off all the affected areas of the wheel arches.
- Align and clean the edges (for making patches, it’s good to get arches that have been used and are no longer in use).
- We cut out suitable patches and bring them to the shape we need in order to obtain the correct wing configuration.
Rear arch repair using welding - We prepare such patches for the inner and outer parts of the arch.
- We spot weld the inner patch first, then the outer one. It should be recessed compared to the rest of the surface.
- Carefully sand the weld seams.
- Using putty we derive the geometry.
- We sand the putty on top.
- Apply a layer of acrylic primer.
- We paint the repaired area of the car.
Replacing a car wheel arch with your own hands
If the surface of your car's wheel arches is hopelessly corroded by rust and cannot be repaired, you will need a replacement - this operation will not be difficult to perform on your own.
Let's consider step by step how to replace the wheel arches of a car with your own hands:
- We order the production of a new arch from any turner. The material you can choose is some light alloy like aluminum.
Replacing a car arch with your own hands - We use a jack to lift the car from the side where we plan to work.
- We remove the wheel so that there is no interference.
- We disconnect the arch from the suspension, floor, partition and trunk.
- We clean the surface from the paint layer to bare metal.
- We try on a new product and make a mark along which we will cut off the one that requires replacement.
- After the cut, we install a new product, securing it by welding. We start cooking in the center, then move to the edges. It is important to pay attention to the fastening in the threshold area, where the main loads will occur.
- We grind the welding seams and apply a special primer.
- After priming, use putty to level all surfaces.
- We sand the putty and apply acrylic primer.
- At the end we paint the installed product.
At this point we can consider the work completed if you have the skills to handle a welding machine . It won't cause you any particular difficulties.
Algorithm of actions
Dismantling and subsequent insertion of the front wing takes up to 1 hour, even for inexperienced craftsmen. It is important to perform the entire sequence of actions correctly:
- Unscrew the two nuts in the bumper fasteners and lower the edge of the bumper down.
- Remove the outer part of the sill trim.
- Remove the headlight cover.
- Remove the turn signal from the headlight.
- Remove the side turn signal.
To quickly remove the side turn signal, you need to squeeze the latch, disconnect the block, pull out the block with the socket and the light bulb, and push the socket inside.
- Using a 10mm wrench, unscrew the self-tapping screw that secures the part to the bracket.
- Unscrew the screws under the threshold, two bolts that secure the part to the rack, they are located on the inside.
- Unscrew the 4 bolts that connect the element and the front part of the body.
- Using a knife, cut off the sealant on which the wing is mounted on its top shelf on the body.
Repair kit
If you need to replace the rear left wing of a VAZ 2114, which has significant deformation, it is recommended to purchase a complete repair kit, which includes two sidewall panels, moldings, bolts, and inserts. The number that the AvtoVAZ manufacturer uses for its repair kits for 2114 is 21090-5401065-00. In addition to the main enterprise, parts for the Lada are produced by companies and experimental workshops:
- Nachalo software;
- Kamaz (Naberezhnye Chelny).
All replicas are supplied in original packaging; parts are made from black steel up to 0.8 mm thick. The part must be covered with transport primer.
Repair insert
If there is a need to replace not a whole wing, but a part of it, then it is recommended to use repairs: the wheel arch of the front and rear wing, moldings. Repair inserts are installed in factory locations. The replica parts are made of industrial steel, with a maximum wheel arch thickness of 1 mm.
Original body parts are manufactured by AvtoVAZ and Kamaz, they are treated with shipping primer and are intended for painting. The cost of a repair insert for one wing is from 120 rubles. The price of the rear side panel starts from RUB 3,000.
Linings for wing arches of VAZ 2115
Tuning... and a wide smile... :))
Blog... come on. I moved it from the blog to the logbook, that’s more accurate.
I decided to share my experience of installing linings on the wing arches. When I decided to do it, I couldn’t find almost anything useful for myself on the Internet (I didn’t search well), hence some difficulties.
For the story and for the seemingly technical solutions, don’t blame me, I’m not a pro and not even an amateur :))
My wing arches are quite, that is, in decent condition, except for the driver's front (the edge to which the fender liner is attached has practically fallen off). Immediately after purchase, the machine was very well processed. I bought it in January 2005, in the showroom :))
But, in a circle, although not much, the paint swells (only around the fender liners). My opinion: these protective fender liners are the cause of corrosion, which starts from the attachment points, IMHO.
In general, we clean the farm from dirt and rust. Used: skins, rust converter, applied epoxy primer, Movil
I bought it for my 14, something like in the photo from the Internet,
the pads are something like this
At the car market for 400 rubles, for painting. Retreat.
I will write - as I would do now, having some experience, but with a commentary - as it really was.
- First. Why the main problems are the GEOMETRY and SIZES of the overlays, Therefore, try on and try on so that they fit according to the max, But this is not always possible (for example, the seller will not allow you to choose) I took the first ones I came across, tightly wrapped in tape... Not a single one hit the mark place. Let me note that you can make a mistake and confuse the left with the right, especially considering that the geometry and dimensions turned out to be INCORRECT.
- Second. CUSTOMIZE first and then PAINT. Your humble servant did the opposite. First I painted it. About painting. I used a can of HOLEX - 220 rubles (after painting there was a lot left), instead of primer, gray paint for HI-Gear bumpers (was), KUDO varnish - 150 rubles (easy to apply, hard to put on the snot) There are no plans to polish. I adjusted the already painted ones to the place. The rear ones were sawed out and ground down (they turned out to be somehow much shorter and the bend was steeper) The front ones: the left one is longer, the right one is shorter, the bend is normal (almost)
- Third. Main. We have painted and fitted overlays. Need to glue...
What I found on the Internet is that polyurethane adhesive-sealant is well suited for these purposes; I bought KRASS glue at a hardware store for about 500 rubles.
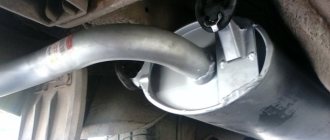
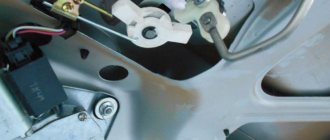
How to remove the rear wing
The rear wing on the VAZ 2114 is attached to the load-bearing parts of the body by spot welding. Dismantling and replacement require skills in welding and the presence of a semi-automatic welding machine to install a new element. If the rear fender has a significant dent from an impact, the metal will need to be pulled out before dismantling and cutting. Dismantling process step by step:
- Prepare the car: remove the battery, bend the carpet.
- Empty the trunk.
- Unscrew the rear bumper and disconnect the headlight unit. If the right rear is to be replaced, then the fuel tank must be removed.
- Remove the seal.
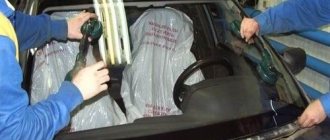
If you are making a cut for a repair insert, then you need to remove the side glass: pull out the rubber seal and press out the glass. During installation, the seat is processed and the old sealant is cut out.
- Using a thin chisel or machine, cut out the old part, retreating 1-1.5 cm from the joint.
- Drill out the welding points with the frame cross member.
- Disconnect the part.
- Cut off the remaining metal, grind it, straighten the edge.
- Attach a new part, secure with spot welding, check the gaps.
- Weld by contact welding, in increments of 4-5 cm.
At the final stage, the part is primed, treated with anti-corrosion agent and painted to match the body color.
Features of the material
One of the main materials from which fender linings for VAZ cars are made is ABS plastic. It is used due to its optimal characteristics:
- Plastic. A product made of ABS plastic can change its shape when heated without changing its performance properties. For example, if the expander does not fit tightly to the wing due to some kind of defect (convexity, concavity), then it is enough to heat it with a hair dryer so that it takes the desired shape.
- Flexibility. A fender made of ABS plastic or polystyrene can be bent without fear of it breaking. The universal trim is easy to install on wheel arches of any diameter.
- Softness. In many cases, when installing the lining, it is necessary to adjust the length, i.e., cut it. This can be easily done with a simple knife or hacksaw. To make the cut area look neat, just wipe it with a piece of waffle towel soaked in acetone.
Metal extensions on VAZs are used quite rarely; they are made to order for a specific model and are not produced as standard.
Source
Repair parts
Replacing the rear wing of a VAZ 2114 in 70% of cases is associated with straightening out a dent from an impact. When there is no metal rupture there is no need for replacement. They straighten, putty and install back. The rear wing can be repaired without dismantling it from the car if there are small dents. Repair methods:
- reverse hammer;
- PDR method;
- vacuum suction cups.
If there are small pockets of corrosion in the area of the wheel arch, then use the method of welding metal patches and sealing through holes with epoxy glue.
Regardless of which repair method is chosen or whether a full replacement of the part is carried out, it is recommended to simultaneously check the condition of the sills and the general geometry of the body along with the fenders.
How to hide rust on the arches of VAZ 2113, 2114, 2115
If installing a completely new body kit seems very expensive, then we can offer to buy arch trims for VAZ 2113, 2114, 2115.
The covers will hide imperfections (for example, damage to the edge of the fender due to rust) and give the car a finished appearance. These linings are made of ABS plastic, and therefore they are not afraid of rust and rotting. Plastic arches of VAZ 2113, 2114, 2115 are sold unpainted; you can paint them yourself in any color.
We would like to note that you must first adjust the linings and then paint them. Since plastic molding is not always accurate, it is necessary to adjust it “on site”.
Another important factor will be the treatment of places where there will be rust at the fastening point. It is best to do this with a rust converter, such as Tsinkar, as it removes rust well. But, if the rust cannot be removed with this liquid, then you can use sandpaper.
Do not leave rust under the trim! Under the trim it will spread across the entire wing. Therefore, it is better to process everything and secure the overlay. This is done very simply using sealant. But there are some subtleties:
- Before applying the sealant, it is better, of course, to apply the trim evenly and trace it along the contour with pencils. Do not press too hard on the pencil, but so that a barely noticeable mark remains, and not a scratch. This will allow you to set the trim level and not move it when the sealant is applied to it;
- Before fixing the cover, thoroughly clean the area from dirt and degrease.
- now, after applying the sealant to the edges of the lining, lean it along the line that you made with a pencil;
- Now you will need mounting tape to secure the trim until the sealant sets;
- It is advisable not to drive a car for at least 12 hours;
- Carry out the same manipulations with the remaining 3 overlays.