In what cases will it be necessary to remove the wing?
The front fenders of any car, including 2114, are one of the most vulnerable elements of the body. It is they, along with the front bumper, that are primarily subject to mechanical damage as a result of the car being involved in various accidents. In addition, due to the extensive treatment of the road surface in winter with salt and chemicals, the parts begin to rust intensively.
In some cases, it is not necessary to replace the element with a new one; it will be enough to restore it.
Typically replacement occurs when:
- Severe mechanical damage as a result of an accident.
- Mechanical wear as a result of long-term use. This refers to numerous small mechanical irregularities that can no longer be completely eliminated by straightening.
- Numerous extensive areas of corrosion. In particularly advanced cases, it “eats” through the metal.
Wing cost
It should also be said about how much the wing costs for Kalina. Currently, the price for this car body element on average ranges from 4,000 to 5,000 rubles. Of course, you can find both more expensive and less expensive options.
Please note that the price will not include coloring of the product. Painted parts cost approximately RUB 1,000. expensive. The cost of products with anti-corrosion treatment, of course, will also be higher, but in this case you should definitely not skimp on quality. If you plan to install a new body part, then it is better to buy it painted, since handicraft anti-corrosion treatment or painting will most likely lead to the rapid appearance of corrosion spots on the new wing. Of course, it is better to avoid this scenario.
How to remove the wing on a VAZ 2114: consider the subtleties of the process
The cars coming off the VAZ assembly line were distinguished by fairly durable body elements. This was explained by the fact that domestic designers, taking into account the operating features of such machines, made every effort to give all components characteristics that ensure uninterrupted operation for a long time.
Over time, the development of technology has made it possible to use new materials that significantly reduce the overall weight of the car. However, this point had some negative impact on the strength of body elements.
So, for example, on a VAZ 2114, the front wings are the parts that are most often damaged during operation.
The causes of such damage may be:
- car accidents;
- consequences of unsuccessful parking maneuvers;
- natural wear and tear, etc.
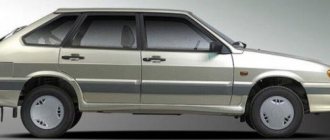
Wing of a VAZ 2114
That is why car owners of such models will not be superfluous to learn how to change the front fender of a VAZ 2114. This information will allow you to easily repair the car with your own hands, as well as competently carry out its maintenance.
Regardless of what was the reason for removing the wing (its straightening or replacement), it is important to properly prepare for the procedure.
Reasons for withdrawal
As mentioned above, replacing the front fender is an event that the average car owner can successfully carry out even in his own garage. Obviously, replacing a wing first of all involves removing it.
Removal of the part will also be necessary if:
- the wing has been dismantled and needs straightening;
- requires dismantling for painting;
- front fender needs to be replaced;
- access to vehicle components is required;
- there was a foreign object caught between the wheelbase spacers;
- rust has occurred.
Preparation for wing replacement and necessary tools
First you need to prepare the car itself. To do this, he should drive the VAZ 2114 into a technical pit or overpass. If this is not possible, then it will be enough to simply lift it with a jack on the side from which the wing will be replaced and securely fix it in this position. Next, you need to remove the wheel and remove all interfering parts. These include:
- front bumper;
- facing linings;
- thresholds;
- wheel arch liners
This is interesting: Cleaning the throttle valve - detailed instructions on how to clean it yourself
Before removing the bumper, you need to disconnect the contacts of the fog lights. To do this, simply remove the terminal with “minus” polarity from the battery. Such a simple procedure will significantly reduce the risk of damage to all vehicle electronics, saving the owner from unnecessary financial costs.
Front bumper
For independent work you will need the following materials and tools:
- socket wrench with 8, 10 head;
- flat-head screwdriver;
- ratchet, extension;
- rags;
- pliers or pliers;
- knife;
- anti-corrosion lubricant WD-40;
- new part.
It should be noted that in the process of replacing a wing, not all of the above tools may be needed. It will be enough for an experienced master to have only a few of them on hand. However, if this is your first time deciding to remove the wing yourself, then it is better to prepare the entire kit so that during the work you will not be distracted by searching for the missing tools.
After completing all the preparatory work, you can begin replacing the old VAZ 2114 wing and installing a new one.
Algorithm for dismantling the wing
Of course, first of all it is necessary to jack up the car body. Removal of individual spare parts is carried out using socket wrenches. The algorithm of actions is as follows:
- Use a screwdriver to loosen the mounting bolts.
- After this, access to the apron opens, which can be removed using a socket wrench size 8.
- Unscrew the car bumper to remove the wing. As soon as the bolts are unscrewed, you need to pull the left edge of the product, after which the right one will begin to come out of its grooves. First, remove the bumper, after which you will have access to the body element.
- Remove the dirt protection cover.
- Disconnect the headlight unit and the hood bumper.
- The area where the metal joins the body is cleaned of mastic using a knife.
- Using a 19mm wrench, unscrew the screws that secure the body element at the front and the bolts that secure it at the top. Then remove the screw that is hidden between the wing and the door. It is important to note that this procedure can only be carried out with the door open. Next, remove the bolt from the lower part of the structure.
How to remove the rear wing
The rear wing on the VAZ 2114 is attached to the load-bearing parts of the body by spot welding. Dismantling and replacement require skills in welding and the presence of a semi-automatic welding machine to install a new element. If the rear fender has a significant dent from an impact, the metal will need to be pulled out before dismantling and cutting. Dismantling process step by step:
- Prepare the car: remove the battery, bend the carpet.
- Empty the trunk.
- Unscrew the rear bumper and disconnect the headlight unit. If the right rear is to be replaced, then the fuel tank must be removed.
- Remove the seal.
If you are making a cut for a repair insert, then you need to remove the side glass: pull out the rubber seal and press out the glass. During installation, the seat is processed and the old sealant is cut out.
- Using a thin chisel or machine, cut out the old part, retreating 1-1.5 cm from the joint.
- Drill out the welding points with the frame cross member.
- Disconnect the part.
- Cut off the remaining metal, grind it, straighten the edge.
- Attach a new part, secure with spot welding, check the gaps.
- Weld by contact welding, in increments of 4-5 cm.
At the final stage, the part is primed, treated with anti-corrosion agent and painted to match the body color.
Algorithm for installing the wing
Above we discussed how to properly remove the wing on a Kalina. Now the conversation will directly focus on installing the part on the car. The algorithm of actions is as follows:
- It is necessary to clean all adjacent areas around the perimeter of the surface, since traces of sealant or technical fluid may remain here. These marks are removed with a knife.
- The surface of the wing is degreased, after which a primer layer is applied and the insulating layer is restored. Professionals strongly recommend using mixtures that include vibroacoustic elements.
- The part is pressed against the opening, and the flange and spring fasteners are screwed into place.
- The wheel arch apron, mudguard and decorative trims are installed.
What to pay attention to when installing a new one
Before installing the new wing in its place, you must immediately install the turn signal and carefully remove the wiring so that you can connect it later.
It is advisable to carry out the installation with a partner, since the part is voluminous and it is possible that it may accidentally fall.
It is very important to start the installation correctly. First you need to install the element in place of the old one and then tighten the bolts around the perimeter without tightening them completely. Then start tightening the bolts crosswise - first, not fully tighten the upper corner of the body, then the lower one on the bumper side. Then it’s the other way around – the top one is on the bumper side and the bottom one is on the body side. After this, the bolts in the middle are tightened. In this case, it is necessary to carefully ensure that the wing is at the level of the body, and does not protrude above it and does not fall through. This procedure will allow you to quickly and efficiently install a new part on the body.
When purchasing new fenders, pay attention to the manufacturer. The best metal front fenders for the VAZ-2114 car are considered to be original products from the AvtoVAZ plant. Their price in Russia varies from 2200 to 3300 rubles. a piece.
Causes of wing corrosion
Among the causes of wing corrosion, the most common are the following:
- 1. There is no factory anti-corrosion treatment at all, or its insufficiency becomes obvious. We have to admit that nothing can be done about this, we can only accept it as a fact.
- 2. Accumulation of dirt in the lower segment of the wing. It is worth understanding that the cleaner the car (not only on the front side, but also in hard-to-see areas), the lower the likelihood of corrosion.
Useful video
You can get additional interesting information from the video below:
Use our recommendations, step by step repeating all the points in the instructions for replacing the wing, and you will be pleasantly surprised that the whole job will take you no more than a few hours.
Didn't find the information you are looking for? on our forum.
If you find an error, please select a piece of text and press Ctrl+Enter.
We recommend reading:
Ignition switch VAZ 2101. Design, diagram and description of possible malfunctions. Replacement video The cooling fan of the VAZ 2114 injector does not turn off, causes of the malfunction Fuel system diagram of the VAZ 21214 injector Lada X-ray gasoline consumption. City, highway, mixed cycle How to ring a VAZ 2110 generator with a multimeter What kind of gasoline to pour into the VAZ 2110, manufacturer's recommendations Replacing a windshield on a VAZ 2114, which one to choose, when to change it, replacement process Gearbox oil for a VAZ 2106 recommended by the manufacturer
Problem areas of the VAZ 2113, 2114, 2115 body
The body of VAZ 2113, 2114, 2115 cars is susceptible to corrosion and destruction, as it does not have special treatment under the paintwork.
In addition, deformed and damaged body parts begin to deteriorate at an increased rate.
Let's consider the most problematic areas of the body of VAZ 2113, 2114, 2115 cars, the condition of which you need to pay special attention to, for example, when buying a car. Moreover, we will not include problems with wings, doors, and hood in the list, since these parts are removable and their condition does not affect performance and safety.
Problem areas of the body of VAZ 2113, 2114, 2115 cars
— Places for attaching the rear beam to the car body
The rating opens with perhaps the most dangerous problem with the body of these cars - the areas with amplifiers and the body around them rot under the rear beam mounting brackets.
The rear beam of VAZ 2113, 2114, 21015 cars is attached with its levers through rubber-metal hinges to triangular brackets on the right and left sides of the body. The brackets, in turn, sit on studs and are secured with nuts (three studs and three nuts per bracket). The studs are welded to a special thicker metal reinforcement located inside the rear of the sill.
Over time, a corrosion center appears around the brackets (possibly due to a violation of the protective layer of the threshold, untimely treatment of its internal cavity with a protective composition, vibration loading of this part of the body, etc.). First, corrosion eats away the metal of the threshold around the bracket, then it is taken over by the amplifier. After some time, the attachment of the beam to the body simply breaks out, and the car becomes uncontrollable as the beam with the rear wheels begins to take on a life of its own. It is very important to repair this connection at an early stage of destruction (before the amplifier inside the rear part of the threshold is destroyed).
In this case, the metal of the threshold under the brackets can be replaced with a thicker one. In severely advanced cases (for example, when a beam has already been torn out), repair is also possible, but more labor-intensive, since it requires the restoration of destroyed elements in compliance with geometric parameters (otherwise the car may be pulled to the side and the tires of the rear wheels can be eaten away by no means).
— Places for attaching the front suspension brace brackets (“crabs”) to the front of the car body
A similar situation occurs when corrosion forms in the area where the “crabs” are attached to the lower part of the radiator frame. In the places where the brackets are attached, the radiator frame also has reinforcements made of thicker metal. Basically, the destruction begins around them. Repair inserts for brackets are available for sale, which need to be welded in place of the damaged ones. Repairs must be carried out in compliance with all geometric dimensions, since otherwise the alignment of the wheel angles is disrupted, which cannot be adjusted in the future.
— Car thresholds
Destruction of thresholds is the most common problem with the bodies of VAZ 2113, 2114, 2115 cars. Operating a car with rotten thresholds is generally possible, but the rigidity of the body decreases sharply in direct proportion to the degree of destruction. Rust especially progresses under plastic decorative door sills. Replacing thresholds in most cases is impossible without restoring the floor elements to which the thresholds are attached. The threshold of VAZ 2113, 2114, 2115 cars consists of four elements (two amplifiers, a lower part and an external lining). Replacement is carried out either as a whole or those elements that are most corroded.
If something went wrong
Difficulties often arise in the process of replacing front and rear pads. The most common problems and ways to solve them are below.
Brake drum won't come off
- It is necessary to loosen the handbrake cable;
- WD-40 is used;
- If both of the above methods did not help, you need to carefully hit the wooden lining with a hammer several times.
The fluid level in the brake reservoir has dropped
- The required amount is added;
- The brakes are being pumped;
- Brake fluid is added again.
The brake drum does not fit
The handbrake cable needs to be loosened.
Timely replacement of worn brake pads is the key to the safety of the driver and passengers. Jamming or other problems associated with these vehicle parts can lead to an accident or even rollover. All replacement work must be carried out in accordance with the regulations.
Body structure in which the roof and side pillar with wing form one element
When constructing the rear wing combined with the roof, a connection using brass or silicon bronze is used at the factory. It is better to clean the C-pillar to determine the location of this seam. You can, of course, detach the rear wing along this seam, and there is a certain procedure for this, but no one usually does this, since it requires additional effort. It is better to make a cut below the factory seam.
Required tools:
- vice;
- new silent blocks VAZ 2109;
- liquid soap (can be replaced with detergent or soapy water)
- source of fire (a gas burner is suitable);
- a piece of pipe whose diameter allows free entry of the silent block;
- standard set of keys;
- chisel and hammer;
- WD-40 penetrating fluid.
To work, place the car on a viewing hole or lift.
To replace the silent blocks of a VAZ 2109, as for other work, disassembly and dismantling are required.
- Unscrew the lower lever. To do this, use a socket with an extension to remove the extension nut, as well as the fixation nut to the body. Then remove the stabilizer link and 2 ball joint bolts. To make it easier to work with stuck and rusted nuts, you need to warm up the connection or use a penetrating liquid. If these methods do not help, try unscrewing the crab, clamp it in a vice, and try again.
- Secure the removed lever in a vice and use a lamp or torch to burn out the old silent block from its seat. If this option is not possible, you will have to press it out with a special puller or vice, but this will take more time.
- After the silent block has burned out slightly, it can be easily removed with a screwdriver or chisel.
- Remove dirt, dust and rust from the place where the new silent block will be installed. Blow it out thoroughly.
After replacement
Once the main body of work is finally completed, you can also install new fender liners on the car. For example, for a Lada Kalina 2 car, Kalina 2 Petroplast fender liners, which are recommended by many professionals, would be a good option.
We recommend reading:
- Brake system: stopping the Lada Kalina
- Kalina Sport car seats
- Firmware for Lada Kalina
- Changing the look of Kalina Turbo
- Diagnostic connector for Lada Kalina
- Beautiful interior of Lada Kalina
Useful video
Use our recommendations, step by step repeating all the points in the instructions for replacing the wing, and you will be pleasantly surprised that the whole job will take you no more than a few hours.
Published January 15, 2018
The front fender is hit just as often as the front bumper. People usually immediately replace a dented wing with a new one. Today we will talk about replacing the wing on cars of the Samara-2 family.
Note! You will need the following tools: a screwdriver, a set of wrenches, a set of spanners, small pliers, anti-corrosion compound (over time, the standard anti-corrosion compound that covers the car from the factory becomes worse or disappears altogether).
