How to remove the instrument panel on a VAZ-2114 yourself
The instrument panel is not only dozens of various measuring instruments and switches, but also the most important decorative element. A damaged shield can seriously ruin the entire appearance of the interior. But sometimes VAZ-2114 owners still have to disassemble it in order to eliminate any problems: replacing light bulbs, wiring, dismantling the heater radiator, etc.
It is important to know that VAZ installs very fragile fasteners on its cars. Therefore, they are very easy to break, which means that when disconnecting the shield from them, you need to be doubly careful. Today we’ll talk about how to remove and disassemble the instrument panel on a VAZ -2114, and what should be taken into account during the work.
Where to begin
Before starting work, we recommend that you carefully study the dashboard structure. If you understand what and how, then it will be much easier for you to remove the torpedo. If you have already become familiar with the structure of the shield, you can begin work. You should start by dismantling the screens. This is done as follows.
- We take a positive screwdriver and carefully remove the three screws that secure the left screen. If you have a tool with a short tip, it is better to use it, it will be more convenient.
- We remove the lower part of the lining from the mounting on the body.
- We do the same with the screen on the right side. The only difference is that it is fixed with 5 screws. While working, carefully hold the pad with your hand.
Now that all the fasteners have been removed, you can remove the screen. But be careful that it doesn't get caught on the wires underneath it. Otherwise, you may simply break the cables.
Removing the instrument panel and replacing the light bulb on a VAZ 2115 (2113, 2114)
Removing the instrument
and replacing a light bulb in it on a
VAZ
2115 (2113,
2114
). I installed the light bulbs without a base...
Replacing light bulbs on the dashboard of a VAZ 2114
Removing the instrument
Our VKontakte group vk.com/ch116 Contact number 89061111189.
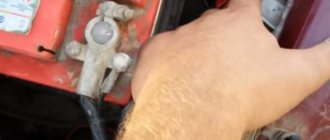
Next, you should disconnect the ground from the battery. This is done by disconnecting the pads. If a radio is installed in the car, it must be disconnected from the wiring. If you do not have any audio devices installed, you can simply remove the wires (they are closed with a plug). Then the cigarette lighter and the socket that illuminates the ashtray are turned off.
So, the first stage of work has been completed. You can proceed to the next steps.
Functions
It is incorrect to assume that the DS serves solely to transmit information regarding the current speed of the vehicle. In fact, this device has several tasks.
- Transferring information to the dashboard, namely the speedometer, about the speed of the car.
- Supports optimal functioning of the idle air control.
- Transferring data to the electronic control unit in order to maintain optimal speed depending on the travel mode.
The DS is connected to the speedometer and controller using a mounting block located in the engine compartment. And inside the car, directly on the heater fan relay, there is a sensor fuse.
If the device starts to work incorrectly or breaks down, you should pay attention to the on-board computer screen. Diagnostics of errors will determine that the DS has stopped functioning properly and measures should be taken to eliminate the breakdown
| Error code | What does it mean |
| P0500 | This error indicates that the computer does not receive a signal from the speed sensor. |
| P0503 | This error code informs about the receipt of an unstable signal from the DS, which is intermittent. |
If these error codes appear on the dashboard, you should definitely inspect the electrical circuit for oxidation or damage to the integrity of the contacts. Often it is because of this that the DS stops transmitting information.
But there are other signs by which you can determine that the DS is out of order:
- On the dashboard, the speedometer shows incorrect speed data or the needle does not move at all;
- With a slight acceleration, the speed floats, the engine switches off on its own;
- Fuel consumption increases;
- Engine power is noticeably reduced.
These signs may be signals of problems with other systems. But if you find one of the characteristic signs of a DS failure, plus one of two error codes appears on the on-board computer, then the problem lies precisely in the speed sensor.
Do not rush to replace the device until you are sure that the faulty sensor is the culprit of the problem.
The check is performed in several ways. Decide for yourself which one you prefer.
Checking the operation of the DS
Before doing this, be sure to check the condition of the wiring and contacts. If they are oxidized or rusted, or there are breaks in the circuit, then the DS itself may well be operational. You just need to return the wiring and contacts to a functional state. If the check shows that everything is intact and there are no problems with the contacts, then diagnose the speed sensor.
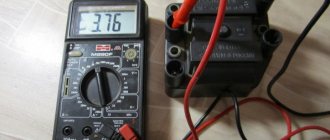
- If you don’t want to remove the DS, then place the car on a level surface, secure it with blocks and lift the left front wheel with a jack. Connect the voltmeter to the contacts of the sensor and begin to rotate the wheel with your hands. At the same time, look at the voltmeter data. If the voltage increases with frequency in proportion to the increase in wheel speed, the DS operates normally.
- Another method also does not require removing the measuring device. But for this you will need a test lamp. Use a jack to lift the left front wheel and connect the test lamp to the DC contacts. After this, manually rotate the wheel. If the lamp lights up, the sensor is working well.
- The third method involves dismantling the sensor and then checking the input and output voltage. The device for measuring the indicators will be a voltmeter.
- The fourth method is actively used by those who prefer to repair their car with their own hands. Here you have to check the sensor drive. To do this, lift the wheel using a jack and remove the sensor. Feel for the DS drive, and then begin to rotate the wheel. You can feel with your fingers that the drive rotates. If there are no jams, everything rotates evenly, then the drive is in good condition.
If a malfunction of the DS is detected, the only correct solution is to remove it and replace it with a new sensor.
Having determined that your DS has already served its purpose, you can begin the replacement procedure.
What's next
After all devices are disconnected from the car, you need to remove the handles from the heater switches. This can be difficult to do, because they are fixed quite firmly. To install the handles, special latches are used, which are installed inside. There is a small protrusion on each handle that will help us remove them. You just need to get into this hole with the tip of a minus screwdriver, then pick up the latch and lift it up.
The further procedure is as follows:
- The handle of the stove motor is removed. It is enough just to slightly pull it towards you;
- The torpedo is fastened to the instrument block using several self-tapping screws. They are removed using a “plus” screwdriver;
- Next, you need to remove the plug. It is fixed with a single self-tapping screw that needs to be removed;
- The cover is held in place by two fasteners. And again the screwdriver comes to our aid;
- Let's move on to the cables that are connected to the switches. They must be carefully removed, having previously marked each of them;
- Next, remove the steering mount bracket bolts;
- remove the fasteners from the bottom of the bracket. The key to 8 will help us here;
- remove the light guide;
- Next in line is the heating system control unit. Unscrew the fasteners and remove the cartridges;
- in front of us is a decorative insert. We also don’t need it, so we temporarily get rid of it;
- remove the hydraulic corrector;
- The last step is to dismantle the upper and lower fasteners.
Withdrawal procedure
- Remove the negative cable from the battery.
- Unscrew the left trim of the instrument panel console.
- Remove the cover. To do this, you need to remove the lower protrusion from the bracket.
- Unscrew the right panel of the instrument panel console.
- Disconnect the wires from the cigarette lighter.
- Disconnect the wires from the cigarette lighter light bulb.
- We push from the inside and take out a niche for small items.
- Unscrew the 2 screws and push the diagnostic connector block inside.
- Remove the heater fan switch handle.
- Using a narrow screwdriver, remove the handle from the lever.
- Unscrew the 2 screws above the instrument panel.
- Unscrew the two screws under the instrument panel.
- Remove the plug and unscrew the screw of the upper fastening of the lining.
- Unscrew the 2 screws of the lower fastening of the lining.
- We move the cover to the side.
- Mark the order in which the blocks are connected to the switches.
- Disconnect the wires from the switches.
- Remove the instrument panel.
- Unscrew the bolts securing the steering column and lower it down.
- Unscrew the 2 screws securing the panel to the bracket.
- Unscrew the 2 screws securing the bracket to the right cross member.
- Unscrew the 2 screws of the lower bracket fastening.
- We move the bracket to the side.
- Unscrew and remove the light guide from the instrument panel.
- We unscrew the 4 screws securing the stove control unit and recess it inside.
- Remove the lamp socket for the heater fan switch handle.
- Press the right lock and remove the air duct from the panel.
- Pull out and remove the headlight hydraulic adjustment handle.
- Remove the instrument lighting control knob
- Remove the decorative insert of the instrument panel.
- Unscrew the light guide.
- Unscrew the nut securing the hydraulic corrector and recess it inside the panel.
- Unscrew the nut securing the instrument lighting control.
- We take out the hydraulic corrector illumination lamp.
- Disconnect the wires from the instrument lighting control.
- Disconnect the wires from the immobilizer sensor.
- Disconnect the wires from the immobilizer unit.
- Disconnect the wires from the glove compartment light bulb.
- Disconnect the wires from the socket of the portable lamp.
- Unscrew the 2 screws of the top panel fastening
- Unscrew the 2 screws on the bottom fastening of the panel.
- Unscrew the self-tapping screw securing the panel to the left cross member.
- Remove the instrument panel.
- Installation of the instrument panel on the VAZ 2114 is carried out in the reverse order.
Let's figure out how to remove the dashboard on a VAZ 2114. Using a Phillips-head screwdriver, carefully unscrew the 3 screws (top, middle and bottom) that secure the left console screen.
Next, remove the trim itself and the protrusion located at the bottom, then remove it from the body bracket.
Using a Phillips screwdriver, unscrew the next five screws, which are located in the right panel of the console, then remove the screen itself.
Then disconnect the negative cable terminal from the battery. If a radio is installed in the car, then remove it, also disconnect the block of its harness with a wire or remove the plug container from the panel. Next, the block of the wiring harness must be disconnected from the cigarette lighter. You also need to remove the ashtray light bulb socket. Then remove the handle from the levers by carefully prying it off with a narrow screwdriver.
The next step is to remove the heater fan switch handle. To do this, you need to pull it towards you or pry it with a screwdriver.
Using a Phillips screwdriver, unscrew the two self-tapping screws located above the instrument cluster, as well as the two self-tapping screws located under it.
Prying off the plug, remove it and unscrew the self-tapping screw located under it.
Next, unscrew the two screws of the lowermost fastening of the lining.
Then remove the dashboard trim.
Now we mark the order in which the wiring harness blocks are connected to the switches, and disconnect them.
We place the already completely removed instrument panel and unscrew the bolts securing the steering column. Using the same screwdriver, unscrew the two screws, as shown in the photo.
Using an 8 mm wrench, we also unscrew the 2 screws of the lowest mounting of the bracket to the dashboard.
Next, unscrew the self-tapping screw securing the light guide using a Phillips screwdriver and remove the light guide.
Then we unscrew the screws that held the heating control unit, and also remove the lamp sockets from its reverse side.
Then we remove the decorative insert, but only after we have removed all its external parts.
We unscrew the nuts numbered one and two with a wrench or pliers (21 cm).
Then you need to remove the lamp responsible for illuminating the hydraulic corrector.
Carefully unscrew the screws for the lower and upper fastenings of the instrument panel, as well as the fastenings to the left cross member, using a Phillips screwdriver.
Now all that remains is to remove the instrument panel. That's it, now you know how to remove the instrument panel on a VAZ 2114 (VAZ 2115).
- First, using a Phillips-head screwdriver, unscrew the 3 screws (bottom, middle and top) that secure the left screen of the center console.
- Next, we remove the trim itself, and then remove the protrusion, which is located in the lower part, from the body bracket.
- Using a Phillips screwdriver, unscrew the next five screws that are located in the right panel of the console and remove the screen itself.
- Then disconnect the negative cable terminal from the car battery. If a radio receiver is installed, then remove it and also disconnect the connector of its harness with a wire or remove the plug container from the shield.
- Then the wiring harness block must be disconnected from the cigarette lighter. The ashtray lamp socket also needs to be removed.
- Remove the handle from the levers by prying it slightly with a narrow screwdriver.
- The next step is to remove the heater fan switch handle. To do this, pull it towards you or carefully pry it off with a screwdriver.
- Using a Phillips screwdriver, unscrew the two self-tapping screws that are located above the instrument cluster and the two self-tapping screws that are located under it.
- Lift the plug a little, remove it and unscrew the screw that is located under it.
- Unscrew the two screws of the lower fastening of the lining.
- Remove the instrument panel trim.
- First, we mark the order in which the wiring harness connectors are connected to the switches, and then we disconnect them.
- We set aside the completely removed instrument panel.
- Unscrew the bolts securing the steering column bracket.
- Unscrew two more screws, as shown in the photo.
- Using an 8 mm wrench, unscrew the 2 screws of the lower bracket mounting to the instrument panel.
- Then unscrew the self-tapping screw securing the light guide using a Phillips screwdriver and remove the light guide.
- Then we unscrew the following screws, with which the heating control unit is attached, and from its reverse side we remove the lamp sockets.
- Next we remove this decorative insert, but only after we have taken out all its external parts.
- We unscrew the nut numbered one and two either with pliers or a wrench (21 cm).
- Next you need to remove the hydraulic corrector illumination lamp.
- We unscrew the screws of the upper and lower fastenings of the instrument panel, as well as the fastenings to the left cross member, with a Phillips screwdriver.
- Lastly, simply remove the dashboard of your car.
What is included in the design?
To make it easier to remove the entire dashboard or its individual elements, you need to know what the structure consists of. In a VAZ 2114 car, the dashboard includes 11 main elements, which are shown below:
Dashboard base. It contains controls for interior systems.
- Overlays. This part is needed to securely fasten the base.
- Bracket.
- The sealing element is a plug.
- Ashtray.
- Crossbar, there are two of them. The number “6” shows the right one.
- Right dashboard screen.
- A shield that blocks access to the wiring.
- Central bracket.
- Left screen of the instrument panel.
- Left cross member.
In VAZ cars, you can improve the appearance of the dashboard. To do this, you need to unload the dashboard from the dials. More stylish and modern information devices are usually installed to replace them. The same applies to the backlight; if you wish, you can update it yourself and install modern original LEDs.
By dismantling these elements one by one, you can completely disassemble the dashboard. Below you will find detailed instructions with which the motorist can completely remove the dashboard elements from the car.
Torpedo device
What is a torpedo? In short, this is the dashboard. The word “torpedo” came to us from the West and has now become firmly established in the everyday life of domestic car enthusiasts.
Dashboard of a VAZ 2115 car
The instrument panels on the VAZ 2113, 2114 and 2115 are almost the same. These are complex collapsible structures made of metal with plastic inserts. In addition, in the panels of this line of VAZ models, engineers actively used polymer film, which covers most of the controls.
Diagram of the main elements of the VAZ 2115 dashboard
Step-by-step instructions for disassembly
- The first step is to remove the left screen. To do this, you need to unscrew 3 screws, as shown in the photo. Once the fasteners are removed, the left dash screen can be removed.
Now the console can be completely removed if replacement is planned. When performing other repair work, it is recommended to navigate by access to the parts of interest. For example, to access the heater stove, it is enough to remove only the lower part of the dashboard.
Lada 2112 Dvin4ik › Logbook › Removing the VAZ 2110 2111 2112 torpedo.
Good day! I couldn’t post the material for a long time for personal reasons) But the time has come, iii) Let’s go, Unfortunately, part of the material was lost forever, so the photo shows a general view, except for the gearbox tannel! for the first time in one mask) I myself relied on the disassembly manuals) Not everything is written there, I want to say. And if it is written, then a lot complicates the work as a whole. Therefore, if possible, rely on my report. The hardest part was removing the torpedo! What we need for this: A 10mm head, preferably with a small ratchet! 24mm socket (socket) or ratchet with extension! Crosshead screwdriver! Flathead screwdriver! Well sharpened! For those who are afraid to disassemble and not reassemble the connectors correctly, Adhesive Band-Aid and Marker! A box is desirable for bolts, screws, etc. Pliers! Scissors!
First, we remove the gearbox panel, otherwise removing the torpedo will turn into a puzzle. Removing the gearbox panel is easy. We unscrew the fastening bolts on the sides (difficulties will arise with the bolts next to the seats, we climb under the saddle or look for a way to get to the bolts) We remove the cover from the handbrake, if it is not clear what I mean, lower the handbrake and the cover will be right under your fist. There we unscrew the bolt. + Remove the gearshift lever cover and unscrew the 3 bolts + Remove the buttons for the beet lifters and other tunnel options. We take hold of the ashtray of the rear passengers (tunnel) and lift the cover of the tunnel to the top and with small jerks we pull it towards the rear sofa. Having gained access to the bottom of the tunnel, unscrew all the bolts securing it to the floor. TUNNEL HAS BEEN REMOVED!
COMPONENTS OF THE INSTRUMENT PANEL VAZ 2114
Before proceeding to the practical part, it is necessary to understand what the instrument panel of the fourteenth is.
The VAZ 2114 belongs to the second generation Samara line of cars, which the Tolyatti Automobile Plant has been producing since 2004. All cars of this family are equipped with a “torpedo” of the Europanel type, for the development of which foreign designers were involved.
Europanel is distinguished by a high level of ergonomics - all its components are located in a freely accessible area, their use does not complicate the driver’s process of driving. Considerable attention is also paid to the comfort of the front passenger.
Dashboard tuning
The main information element of the VAZ 2114 “torpedo” is the dashboard of sensors and indicators, which is located directly behind the steering wheel.
This panel includes the following elements:
- Pointer instruments – tachometer and speedometer. Through the tachometer, the driver receives information about the engine operating mode - the arrow indicates how many revolutions the power unit produces at a given time. The speedometer displays data on the current speed of the fourteenth. The maximum mark on the speedometer is 200 km;
- Electronic screens are located at the bottom of the tachometer and speedometer needles: the screen under the speedometer displays the total mileage of the car and mileage data from the last control point, which can be set by the driver himself. The screen under the tachometer shows the time and ambient temperature;
- There is a rotation sensor between the dial instruments - when the turn signals are turned on, flashing green arrows are displayed on the dashboard;
- In the center of the dashboard there is a “Check Engine” indicator - which lights up when the on-board computer of the fourteenth detects any malfunction in the engine. Next to it is a brake light indicator;
- On the left side of the instrument panel there is a fluid temperature sensor in the cooling system of the power unit, on the right side of the panel there is a fuel level sensor in the gas tank. When the engine temperature exceeds a critical value or the tank is empty, orange lights above the sensors light up;
- There is also a series of indicators on the dashboard that indicate the following information: oil level, doors not closed, seat belts not fastened, amount of water in the window washer reservoir and brake pad wear.
The VAZ 2114 torpedo also includes the car’s on-board computer screen, which is located in its central part. Using the on-board computer, the driver receives detailed information about the operating modes and problems that arise in the systems and communications of the fourteenth. Also, recommendations on the timing of the next technical inspection are displayed on the BC screen.
In addition to information devices, there are also functional elements on the dashboard: turn signal levers, control buttons for headlights and heater, and window heating system.
About the Hall effect
The essence of this effect is the emergence of a potential difference during the interaction of electric and magnetic fields. In this case, the electric field flows through the magnetic field, where the semiconductor wafer is located. It is at this point that the Hall voltage potential difference is formed.
In practice, the effect was applied as follows. When moving, the Hall voltage is converted into a pulse-frequency signal transmitted to the controller. The higher the speed, the higher the frequency of this signal becomes. From calculations it was possible to determine that the sensor produces 6004 pulses per 1 km of road. Due to the intervals between pulses, the sensor calculates the speed of the vehicle.
https://www.youtube.com/watch?v=rrO-5EmSUUo
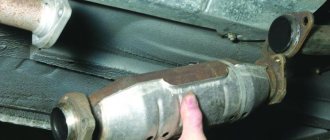
To perform any work with the DS, you first need to determine where it is located. The location of the speed sensor is the upper part of the gearbox housing. You can get to it through the engine compartment or from below if you park the car in a pit.
Replacing backlight bulbs
1. Take the plastic rim of the lamp and turn it to the left. When turning, you will feel that the lamp has become free.
2. Take a new lamp, insert it, and turn it to the right until it locks.
If you don’t understand anything about removing the shield or replacing lamps, watch the video below.
Video lesson
Source
How to remove?
Let's take a step-by-step look at how to remove the steering wheel. This will allow you to understand the principle of operation and avoid any mistakes in the process. So, withdrawal is carried out in the following order:
- To begin, place the wheels straight. You don’t have to do this, but in general it will be easier to work with the steering wheel positioned straight;
- Using a slotted screwdriver, pry up the horn trim and remove it. In order not to break the part, you should pry it as evenly as possible;
- Using a Phillips screwdriver, unscrew the 2 screws that secure the horn cover;
- The cover is removable, in some cases it needs to be pryed off with a screwdriver;
- The horn contacts are secured with self-tapping screws. Unscrew them;
- The wire is disconnected from the contact and removed;
- Use the socket to unscrew the nut. There is no need to unscrew it completely, just loosen it;
- Grasp the steering wheel with both hands and pull it firmly towards you. This will allow you to remove the part from the splines. A nut that is not fully twisted will prevent the steering wheel from suddenly being torn off the column;
- Unscrew the nut completely and remove the steering wheel.
In some cases, the steering wheel will not budge. In this case, you will need help. Your assistant will hold the steering wheel, and you need to apply strong blows with a hammer through a soft drift. This will allow you to remove the part.
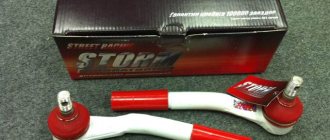
Tuning options
Modifications to the steering wheel on this model usually involve installing a sports version, or installing a part from another model. The optimal option is considered to be a steering wheel from Kalina. But, if desired, you can select other spare parts. Here you need to look at the number and size of splines. If they match, then the steering wheel can be installed on the car. This can significantly improve the appearance of the interior.
conclusions
. As you can see, dismantling this unit is not difficult. But in order to do it without problems, you should clearly know how to remove the steering wheel on a VAZ 2110 and 2112. First of all, it is worth studying the possible complications that often occur. This way you can do this work yourself and in the shortest possible time.
Let's prepare a new dashboard trim for installation
To do this, we cut off the remaining material of the Euro lining. There is no need to cut out any space under the dashboard, otherwise there will be a gap between the control column and the trim. In this place you simply need to make 2 cuts on the sides so that this part of the lining can be slightly bent as needed. Also, there is no need to cut off 10 mm from the sides of the lining in the area of the side air ducts; these places must be adjusted to the location.
We measure the panel overlay and adjust it as necessary. At this step, it is recommended to use anti-creak (soundproofing the panel). This way, you will insure yourself against squeaks in the future.
To install the dashboard in the Euro trim, you can use one of the methods:
- Use fasteners from the Euro lining kit.
- Use fasteners from an old lining (from drilling).
- We connect connectors and Europanel keys according to the instructions:
When the overlay is ready, let's try to install it. Fastening the Europlate in positions 1-7 of the diagram. We fix 35mm screws on top, which are then hidden under a plastic cover.
The advantage of this method is time. If you dismantled the panel, then you will spend no more than 3 hours changing the lining. If this is the first time you are faced with a similar type of work, then about five hours.
Post Views: 6
Operating procedure
This process is quite difficult and can take a lot of time. Before removing the instrument panel of a VAZ 2114 car, you need to carefully study its structure. Once you have an idea of the design of the dashboard, you can begin to disassemble it.
Factory panel
First of all, you need to remove the console screen on the left side of the dashboard. It is fastened with three self-tapping screws with cross-shaped heads. To unscrew them without problems, use a screwdriver with a short blade.
Next, remove the right screen. The mounting diagram for the VAZ 2114 console screens is slightly different. For example, if you unscrew the three screws on the first screen, you won’t be able to remove it so easily, but you need to carefully pry up its lower edge and remove it from the grooves. Only after this will the top edge be able to detach. And in the case of the right screen, you need to unscrew not three, but five screws, and at the same time, support the part with your hand, since it may simply fall off.
When removing the shields, be extremely careful not to snag the wiring harnesses located underneath them. Just in case, disconnect the battery. Next, you need to disassemble the central panel of the dashboard. To do this, disconnect the radio, cigarette lighter, and ashtray light bulb.
After the wires are disconnected, it is necessary to remove the heater levers. This can be done using a flat-head screwdriver. The diagram of the VAZ 2114 stove handles has a special protrusion through which you can reach the latch. This is what you need to pry off with a screwdriver.
Next, you need to remove the fan handle by simply pulling it. Now, to get to the instrument panel, you need to unscrew the screws securing the dashboard. They are located on the left and right of the central panel.
The next step is to remove the instrument panel trim by unscrewing 4 screws: 2 on top and 2 on the bottom. This way you can release the shield. Next, the disassembly scheme involves removing the plug, which is located behind the instrument panel.
At this point, the diagram for disassembling the VAZ 2114 panel is completed. All that remains is to pull out the shield, and when disconnecting the wires, be sure to mark the connectors.