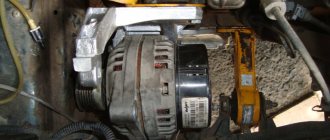
Removing the VAZ 2107 generator
First of all, you should disconnect the battery terminals. To make work easier and improve access to the generator, it is better to remove the battery from the car. The further order of work is as follows:
- disconnect the generator connector;
- remove the insulating cover from the terminal, unscrew the fastening nut using a 10mm wrench;
- disconnect the terminal;
- loosen the generator by unscrewing the nut and remove the belt;
- remove the adjusting bar by unscrewing the fastening nut;
- unscrew the lower fastening nut and remove the bushing with the bolt;
- get the generator.
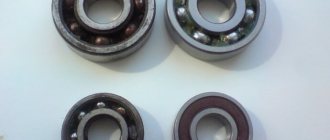
How to change a bearing
During generator repair, the bearing should be checked for play and replaced if necessary. There are two bearings on it: rear 6201 (article - 180201) - 12x32x10, front 6302 (article - 180302) - 15x42x13. For this:
- Remove terminal 30 (nut 6);
- Unscrew two screws and remove the voltage regulator;
- The pulley nut is dismantled;
- The key is removed;
- The bearing lining is dismantled;
- With the help of a device (or without), the old bearing is pressed out and a new one is installed;
- The retaining plate is secured.
Disassembling the VAZ 2107 generator
For a comprehensive repair, you need a puller to remove the bearing from the shaft, a mandrel for pressing and knocking out the bearing in the generator cover.
Sequence of work:
- unscrew the nut securing the pulley and impeller using a socket wrench, holding the rotor with a screwdriver so that it does not turn;
- dismantle the pulley and impeller, remove the key, remove the washers from the shaft;
- unscrew the screws securing the voltage regulator relay and remove it, having first disconnected the wire block;
- remove the regulator relay along with the brush assembly;
- unscrew the nuts and remove the bolts securing the generator cover;
- knock down the front cover by hitting the shaft with a rubber hammer (the cover must be rested against a wooden block);
- remove the spacer sleeve from the shaft;
- check the condition of the bearing in the front cover;
Tip: To check the bearing, you need to rock the inner race of the bearing while holding the cap. If there is play, the bearing must be replaced.
- if necessary, unscrew the bearing mounting nuts;
Attention: if the nuts do not unscrew, you should cut off the ends of the fastening bolts. During assembly, it is necessary to install new bolts and, after tightening the nuts, rivet their ends with a core.
- knock the bearing out of the cover using a drift (mandrel);
- rest the back cover against a pair of wooden blocks and knock out the rotor using a soft metal drift and a hammer;
- check the condition of the rear bearing (similar to the front);
- if necessary, replace the bearing by pulling it from the rotor with a puller;
- unscrew the nuts holding the VAZ 2107 diode bridge and the winding terminals;
- remove the bolts;
- remove the stator winding;
- visually check the condition of the winding;
- if the winding has breaks or has turned black from overheating, replace it;
- remove the generator output nut and insulating washer;
- dismantle the diode bridge;
- remove the capacitor by unscrewing the fastening screw;
- remove the bolt securing the rectifier unit;
- check the rotor and stator windings with a test lamp;
- check the diode bridge of the VAZ 2107 generator for broken diodes.
Connection diagram
The connection diagram for the VAZ 2107 generator is shown in the photo:
Wiring diagram for VAZ 2107 generator circuits
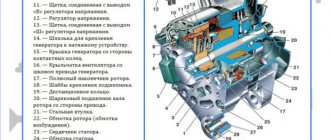
On the generator connection diagram 37.3701: 1 – battery, 2,3,5 – rectifier diodes, 4 – generator assembly, 6 – stator winding, 7 – charge relay, 8 – rotor winding, 9 – capacitor, 10 – fuses, 11 - indicator lamp, 12 - voltage meter, 13 - relay, 14 - lock.
If the output parameters are monitored and they do not correspond to normal values, a decision is made to dismantle and repair the generator
Assembling a VAZ 2107 generator
Before assembling the generator, it is necessary to clean the parts from contamination. It is better to wash metal parts with gasoline, and wash windings and other complex parts with air from a compressor.
The new bearing is pressed onto the rotor using a mandrel. You can use a head or tube with a diameter that matches the size of the inner ring of the bearing.
Before installing the rear and front covers, it is necessary to check the condition of the bearing seats. They must not be damaged or scratched.
If there are cracks in the cover, they must be replaced with new ones. Bolts and nuts of poor quality must also be replaced.
The sequence of assembling the generator corresponds to the procedure for disassembling it.
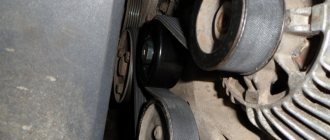
After installing and connecting the generator, it is necessary to tighten the belt with the necessary force. If it is overtightened, the bearings will fail; if it is loose, the generator will slip under load and will not produce the required charging current.
Main malfunctions, symptoms and causes
The most common malfunctions of the VAZ 2107 generator:
- The VAZ 2107 generator does not charge. A malfunction may occur due to a violation of the vehicle's electrical wiring, failure of the voltage regulator, failure of the diode rectifier bridge, short circuit or breakage of the stator windings, wear of the brushes, breakage of the armature winding;
- output parameters (voltage, charge current) do not correspond to the correct values. The reasons for this malfunction are similar to the previous paragraph;
- The generator heats up during operation. This malfunction most often occurs when there is a load in the electrical system circuit or after reversing the polarity of the battery (connecting the battery terminals to it in reverse polarity). In this case, a breakdown of one or more arms of the diode bridge occurs. The stator windings are short-circuited. The flow of large current causes the windings to become very hot;
- extraneous noise when the generator is running. Usually caused when the VAZ 2107 generator bearing is worn out;
- High-frequency noise, or rather a whistle, can be caused by stretching or wear of the belt. It can be eliminated by replacing and tensioning the belt.
Testing for functionality with a multimeter
A generator is an electrical device. You can check whether it works and whether it supplies the required current using a special measuring device - a multimeter.
To do this you will need:
- Check each diode separately. In this case, it is necessary to connect the multimeter probes first in one position, and then with a change in polarity. In the first case, it should produce a resistance equal to infinity. In the second case, the result should be in the range from 500 to 700 Ohms;
- When ringing in both directions, one of the semiconductor components may show very little or infinite resistance. It needs to be replaced or repaired.
The generator of a VAZ 2107 car can be replaced independently. To do this, you need to perform certain steps to remove and then install the unit. To repair the device, it is necessary to completely disassemble and replace the failed components.
It is advisable to have minimal experience working with electrical devices. At the end, it is recommended to check the functionality with a multimeter to ensure that the repair was carried out correctly.
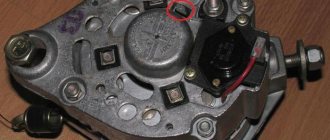
About replacing the diode bridge (rectifier unit)
Since after removing the winding, the diode bridge is practically free, there is almost nothing to say about replacing it. The only thing you need to do is push the bolts from the inside so that they pop out from the outside:
And the diode bridge has been completely removed and you can replace it:
After carrying out the required repairs to your generator, we reassemble it in the reverse order and do not forget to connect all the winding wires correctly.
← Removing the trapezoid and replacing the wiper motor on a VAZ 2107 Self-replacement of the intake manifold on a VAZ 2107 → Sources used:
- https://masteravaza.ru/generator/remont-generatora-generator/remont-generatora-vaz-2107-42
- https://semerkavaz.ru/ehlektrooborudovanie/remont-generatora-vaz-2107/
- https://znatokvaz.ru/elektrooborudovanie/remont-generatora-vaz-2107
- https://zarulemvaz.ru/remont-generatora-na-vaz-2107-svoimi-rukami/
Diagnostics
If the voltage generator does not charge the battery, this is a real problem. It is for this reason that disassembly, replacement or repair of faults, as well as assembly are carried out.
How to properly diagnose:
- Check the voltage generator on the VAZ 2107 by diagnosing the dashboard. If there are problems with the operation of the brushes, bridge or other components, the battery discharge lamp will light up on the device.
- If the VAZ 2107 unit does not charge the battery or an overcharge is detected in the system that needs to be checked, this also indicates a malfunction.
- Another sign of trouble to check is if the headlights are dim because the unit is not giving the battery the required charge. During engine operation, extraneous sounds may appear.
- If there are problems in the operation of the brushes, diode bridge or other components, the system may be overcharged, it is necessary to check. In this case, the brightness of the optics may increase as the speed increases.
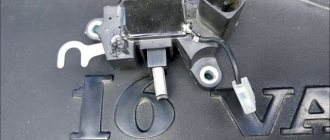
How to change the regulator relay
If necessary, the generator relay 2107 is replaced with a new one if the diode bridge is working properly and the voltage is significantly higher than required or lower than normal.
You can replace the relay-regulator either by removing the generator or carry out repairs without removing it. To do this, of course, you need to know how to attach the relay, since you will have to work almost by touch. The only tool you need is a short screwdriver. The repair is carried out from above, under the hood.
Replacing the brushes of the VAZ 2107 generator is not carried out separately. The brushes are changed together with the voltage regulator, although everything can be done if desired.
Dismantling
To disassemble, remove and repair or replace the generator, you will need to do the following.
- Drive onto an inspection hole or overpass to have access to the bottom and engine compartment.
- Remove the battery, otherwise it will not allow you to get to the nut that holds the generator you are looking for.
- Next, the same nut and adjustment bar are removed. Here you will need a 17 mm wrench. Use an extension cord. This will make the task easier; you will have to apply less force to unscrew the fastener.
- In the engine compartment, remove the shield that performs dirt protection functions.
- Now the drive belt is removed and the wires are disconnected.
- Be sure to remove the protective cap and use a 10mm wrench to unscrew the nut that holds the tip and positive cable of your battery.
- There is another nut on the fixing bracket, which will also have to be unscrewed.
- That's it, you can remove the generator. Just remember to pull out the long bolt first.
- When removing, keep an eye on the buffer sleeve. It won't be good if you lose it.
Dismantling work
This completes the procedure for removing the generator. You can proceed with partial repairs or complete replacement of the unit.
Belt
Often, the solution to a poorly functioning alternator is simply adjusting the belt.
Belt
- For the device to work effectively, it is necessary to ensure normal deflection of the belt;
- The deflection size should be 6-10 millimeters with a force of 98 N or 10 kgf;
- To adjust or replace the belt, you need to move the generator slightly to the side, towards the cylinder block;
- By rotating the adjusting bolt, you can adjust the belt tension.
If this measure does not help, you will have to pay attention to the voltage regulator and brushes.
Brushes and regulator
It is not recommended to repair the generator brushes, as well as the voltage regulator if they are worn out.
Experienced specialists advise purchasing a complete unit that includes both elements. Replacement is completed in a matter of minutes.
Brushes
But we will definitely tell you how you can change the brushes on your car’s generator with your own hands.
- Disconnect the negative terminal from the battery and remove the battery.
- Remove the generator following the instructions above.
- You can replace the brushes without removing the generator, but this causes certain difficulties. It is much easier to remove the unit.
- Remove the cover, which is the protective casing of the generator.
- The wires and the generator itself are disconnected from the brushes. To do this, simply unscrew a couple of bolts.
- On the right side of the dismantled device there is a nut that can be unscrewed by 13 millimeters with a spanner.
- Now lift the voltage regulator lever, which will allow you to get to the brushes.
- Using new brushes, install them in place of the old ones and reassemble the assembly in reverse order.
If there is a problem with the bearings or the belt is dirty
If the device slipping in the VAZ-2107 is caused by the slow rotation of the pulley, which depends on the serviceability of the bearings, it’s time to start repairing the latter. To do this, you will again need to use the instructions on how to remove the generator and how to disassemble it. If you are not confident in your abilities, you should not experiment; it is better to contact a service station.
Another possible breakdown is contamination on the belt. It is difficult to completely clean the part from dirt and dust, so experts recommend replacing the old belt with a new one.
Step-by-step video instructions on how to properly disassemble the VAZ-2107 generator are shown below:
One of the reasons why the battery is not charging is a breakdown of the generator. Before you independently repair the VAZ 2107 generator, you need to find out the causes of the breakdown and become familiar with the technology for removing, restoring and installing it.
- Causes of generator malfunction
- Removing the VAZ 2107 generator
- Disassembling the VAZ 2107 generator
- Assembling a VAZ 2107 generator
000shema_el.jpg
Next, let's get to work:
-Remove the unit from the engine and, using the “ten” key, unscrew the nut from terminal “30”. We remove the capacitor wire.
-Unscrew the fastening screw and remove the capacitor.
-Remove the charging relay and the corresponding insulating washer.
-Unscrew the fastening nut from the pulley.
-We disassemble the pulley and impeller.
-Remove the ring installed behind the key.
-Pull the front cover off the rotor shaft
-Remove the adjusting washer (don’t forget to put it back when installing).
-Using the “8” wrench, unscrew the nuts that hold the bearing
-Remove the outer and inner bearing caps.
- Press in a new bearing. To do this, you need to apply several light blows through a special mandrel.
-Re-lock the nuts.
-Knock out the anchor from the back cover. We remove it together with the rear bearing.
-If it needs to be replaced, remove it from the rotor shaft.
-Unscrew the three nuts that secure the stator terminals to the diode bridge.
-We take out three bolts from the back cover along with special insulating gaskets.
-Remove the diode bridge and winding.
It is better to replace, if necessary, the diode bridge assembly. We clean all generator parts from dirt, dust and oil. We perform assembly in reverse order.