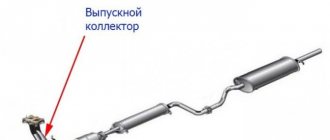
According to Volkswagen rules, routine coolant replacement must be done every five years with average mileage. Engines and radiators of new generations, released in recent years, generally require replacement as needed, that is, theoretically, antifreeze can perform its functions for more than five years. However, in practice, in Russian conditions, replacement has to be done more often, sometimes even reducing the period of five years to three.
In addition, antifreeze will simply need to be removed from the system in the event of a breakdown or dismantling of the radiator, expansion tank, cracks in pipes and pipelines, or repair of the engine or compressor.
If you do not replace the antifreeze in time, you can end up with corrosion of the radiator and end up with quite expensive repairs or a complete replacement of this unit.
How to replace antifreeze on a Polo sedan
What you need
In order to carry out the work conveniently, it is advisable to drive the car onto an overpass or into a garage with an inspection hole. It is much more convenient to carry out some operations from below, but this requires space.
Tools you will need:
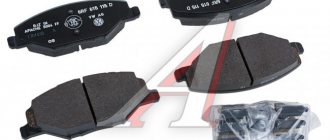
- Torx key T-25;
- pliers, large round nose pliers, clamping pliers;
- container for draining old contents.
What antifreeze to fill in Polo
It should be noted that you cannot fill the car with the first antifreeze you come across - there are certain selection rules:
Original . The manufacturer Volkswagen AG recommends using original coolant marked G13 (exact name G13 G 013 A8J M1). It can be successfully replaced by antifreezes of previous generations - G 12, G 12 plus, G12 plus plus. The differences are that early formulations contain ethylene glycol, which is harmful to the body, in contrast to safe propylene glycol. When purchasing, please note that factory branded antifreeze is produced in the form of a concentrate, and to fill it you need to purchase distilled water.
Read also Advantages and disadvantages of Volkswagen engines
Suitable analogues
You can replace branded antifreeze with high-quality analogues - owners who do this note that there will be no special changes in this case. True, the level of the manufacturer must match. For example, analogues from well-known companies Liqui Moly or Mobil 1 will be no worse than the original, but the price at the bottom will be appropriate. If you select a match from slightly cheaper substances, then Hepu or Coolstream antifreezes are quite suitable.
Algorithm of actions when replacing coolant
If you study modern cars, their design often lacks a drain plug on the engine block. Because of this circumstance, the antifreeze is only partially drained, after which it is necessary to flush it. This will remove any remaining coolant.
In post-Soviet territories, the Polo sedan with a 1.6 engine capacity has gained popular popularity. It is on the example of this car that the procedure for replacing antifreeze will be considered. You can do everything on your own if you follow the sequence of steps.
Step by step plan
Armed with the necessary tools and having purchased new antifreeze, you can get to work.
Drain
By driving the car onto an overpass or into a garage with an inspection hole, they gain access to the bottom. The first step is to remove the plastic engine protection - to do this, unscrew the four bolts with a Torx slot, using a wrench or a bit with a holder and a ratchet.
After this, the lower radiator hose opens. It is fixed with a latch clamp. To open it, use any squeezing tool - pliers, pliers, pliers. Having removed the pipe from the neck, deflect it and place a container under it to drain the old antifreeze.
After the pressure has weakened, remove the cap from the expansion tank. Stopping the trickle or drip indicates that all free coolant has been removed and a flush is now required.
Flushing
To flush the radiator and piping system from antifreeze residues, use distilled water - it will not leave oxides and salts on the internal parts of the cooling system.
In order to flush the system, the pipe is put in place and secured with a clamp. After this, distilled water is poured into the expansion tank slightly above the normal level. Start the engine and wait until it warms up so that the fluid begins to circulate through the system. After this, disconnect the pipe again and drain the contents.
It may take two to three flushes to completely remove old antifreeze from all channels.
Fill
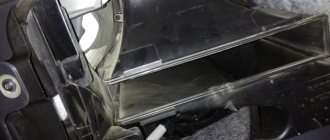
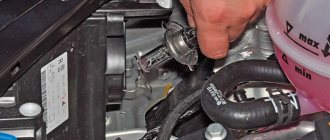
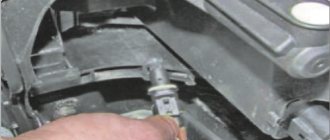
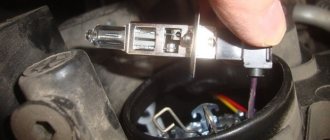
The most common problem when filling in new antifreeze is air pockets that form if coolant is poured through the expansion tank. In order to avoid this, they resort to a trick: they remove the temperature sensor, which can be reached by removing the pipe coming from the air filter. When dismantling the sensor, antifreeze is poured until liquid flows out of the mounting hole. After this, the sensor is put in place.
Read also Repair and replacement of turbines in Volkswagen cars
temperature sensor
If you understand what kind of antifreeze you need to fill in your car, then you can talk about temperature sensors. The purpose of this device is to display the level of refrigerant temperature in the cooling system in digital form. The sensor can be used in Volkswagen vehicles that are equipped with a GAN digital information bus.
Device specifications:
- supply voltage - from 10 to 15 volts;
- 50 mA current consumption.
This device is a microprocessor sensor that connects to the GAN information bus and monitors it. At the moment when information about the temperature level in the motor from the control unit appears on the bus, the device receives and processes it, and then displays it on a small screen. If installed correctly, the sensor will not affect the operation of the tire in any way, since it does not transmit any information through it.
What will you need for installation?
Many motorists need to install the device, since the problem of failure of the stationary sensor on the instrument panel in Volkswagens is quite common. Therefore, we will tell you how to properly install and connect the device. In practice, the sensor is most often mounted instead of a plug in the area of the gearbox lever. You will need:
- T15 star screwdriver;
- pliers;
- flat screwdriver;
- stationery knife;
- clamp terminals;
- new sensor.
The new sensor is a spare part, so Volkswagen Polo cars are not equipped with this device. You can buy the device at any car store that sells parts for Volkswagens. If you are not sure about the quality of the sensor sold in auto stores, order it online on the official website or contact the dealer. Having collected all this, you can begin installation.
Star tip
Pliers for work
Flat head screwdriver
Stationery knife
Clamp terminals for connecting car wires
New engine temperature sensor
Step-by-step instruction
Let's start installing the device:
- First, open the hood and disconnect the battery.
- Now you need to dismantle the instrument panel. To do this, lower the steering wheel all the way down.
- Next, you need to remove the plastic plug under the instrument panel: use a screwdriver if necessary.
- Then use a star screwdriver to unscrew the two screws and disconnect the instrument panel, and also disconnect the connector with the wires.
- Disconnect the plug located next to the gearshift lever.
- Take your new sensor and install it in place of the plug. There are cases when the device socket is slightly smaller than the sensor itself. In this case, take a utility knife and carefully trim the connector until the sensor fits freely into it.
- After this, you need to stretch the wires from the sensor itself to the instrument panel connector.
- Take the pre-prepared clamp terminals and connect the temperature sensor wires to the instrument panel wiring harness - the corresponding diagram is provided below. In particular, there are four wires coming from the sensor. The red wire of the device must be connected to the red-yellow wire of the instrument panel harness. The black wire of the device should be connected to the brown wire of the harness, the yellow wire to the orange-black wire, and the blue wire of the sensor to the orange-brown wire. To make installation of the instrument panel easier, the connection point of the wires should be at least 10 cm from the connector.
- Now the instrument panel can be installed in its place.
- Get under the hood again and connect the battery terminals. At this moment, the device firmware version may appear on the temperature sensor, after which the device should turn off.
- Turn the key in the ignition switch, at this moment the engine temperature will appear on the sensor.
Plastic plug that must be removed first
Unscrew the two screws securing the instrument panel with a star screwdriver
Installation location of the engine temperature detection device near the gear lever
Connection diagram of the temperature check device to the wires
Connecting the device wires to the instrument panel wires
A new device for recording the engine temperature at the installation site.
At this point, the installation of the sensor can be considered complete. If you have any questions or doubts about the correctness of the actions described in the instructions, write about it in the comments. The device will not function if any wires are connected incorrectly or if there is a fault in the electrical circuit. In this case, contact an electrician to correct the problem.
Leaks and other problems
The radiator itself leaks quite rarely. To diagnose, you need to contact a car service center, or by plugging the outlets, immerse the radiator in a container of water to detect air bubbles. They also use the pressure testing method - a special colored liquid is pumped into the radiator under pressure and they see where the leak is.
But leaky rubber tubes with microcracks are a much more common phenomenon; it is better to replace suspicious ones along with antifreeze.
Required Tools
In order for the coolant replacement on a Volkswagen Polo to be successful, the car owner will need a set of tools and materials, which are listed in the table below.
Table - Tools and materials needed to replace antifreeze
The cooling system of Volkswagen Polo with 110 and 90 liter engines includes 4.6 liters of liquid. 1.4 liter and 125 liter engines consume 7 liters of antifreeze.
The proportion in which concentrate and water must be mixed to obtain finished antifreeze is 40:60. It is also permissible to dilute the concentrate 1:1. This liquid will not harm the cooling system, but will only increase the consumption of concentrated antifreeze.
Level control and required volume
When replacing antifreeze, it is necessary to take into account the volume of the cooling system, since pouring excessive amounts of liquid is not recommended. The system of cars produced until November 2022, as well as later versions with a new engine of 110 and 90 horsepower, contains 4.52 liters of fluid. On cars with 1.4 liter 125 l/s engines, the system capacity is larger; 7.03 liters of coolant are poured into it.
To check how much antifreeze is in the system, cool the engine, open the hood and find the spherical reservoir, which is located in the engine compartment on the right wheel arch. On the side surface of the tank there are marks for the minimum and maximum liquid levels. Under normal operating conditions, the amount of refrigerant should be between these marks. If the level drops, it is necessary to restore it and check the tightness of the system. You can only top up the antifreeze that was filled in earlier.
The author of the video, Konstantin Sabirov, will tell you how to add refrigerant to a Volkswagen Polo.
About Volkswagen: Vw polo fuel filter. When to change the fuel filter on a Polo sedan
Timing for coolant replacement
The manufacturer recommends replacing antifreeze on Volkswagen Polo Sedan every 90 thousand kilometers or every three years.
In addition to a planned shift, an emergency shift may be required due to a number of reasons:
- Premature aging of the liquid. For example, due to exhaust gases entering the system through a damaged gasket. Externally, this can be determined by a change in the color of the refrigerant (discoloration or blackening) or the appearance of foam and deposits in the expansion tank.
- Liquid leakage from the system and the impossibility of topping up the exact brand of antifreeze that is already filled.
- Deterioration in cooling properties, especially noticeable in hot weather.
- A breakdown of the gasket between the head and the block, as a result of which the mutual mixing of antifreeze and engine oil begins.
Antifreeze for Volkswagen Polo 5th generation
| Year | Engine | Type | Color | Lifetime | Recommended Manufacturers |
| 2010 | petrol, diesel | G12 | red | 5 years | Havoline, AWM, G-Energy |
| 2011 | petrol, diesel | G12 | red | 5 years | Havoline, MOTUL Ultra, Freecor, AWM |
| 2012 | petrol, diesel | G12 | red | 5 years | Havoline, AWM, G-Energy, Freecor |
| 2013 | petrol, diesel | G12 | red | 5 years | Frostschutzmittel A, VAG, FEBI, Zerex G |
To make the right purchase you only need to know the Type
and
The color
(shade) of antifreeze allowed for a specific year of manufacture of the body.
The same type
of antifreeze can be produced in different colors; the table shows such cases.
When completely changing the fluid, it is enough to know only the Type
suitable antifreeze.
If topping up is necessary, it is also important to find out the color of
the liquid already filled. Select the manufacturer at your discretion. Do not forget - each type of liquid has its own service life.
For example:
For Volkswagen Polo (5th generation) 2010, with a gasoline or diesel engine, suitable - Carboxylate antifreeze class, type G12 with shades of red. The approximate period of the next replacement will be 5 years.
Benefits of antifreeze
Many experts say that antifreeze is more popular than antifreeze, as it has some advantages:
- When the motor is cooled, it has higher efficiency;
- Long service life. Antifreeze can lose its properties after 50 thousand kilometers, and antifreeze can retain its properties up to 260 thousand kilometers;
- Better protection when operating at high temperatures and can protect the engine even at temperatures exceeding 110 degrees;
- When using antifreeze, the radiator does not become clogged;
- Behaves stably at high engine temperatures;
- The life of the water pump is extended.
Volkswagen Polo Sedan Interlagos › Logbook › Topping up G13 antifreeze. Where does antifreeze go?
Greetings to everyone who visited my logbook.
Today we will talk about the next addition of antifreeze. It so happened that the antifreeze level began to drop again. First up to the Min mark, then after winter and even more so below the minimum mark.
— The first time I was topped up with antifreeze was at the OD at TO-1 (7,545 km).
I can’t say that this was a forced measure. The level in the tank was in the middle. The dealer carried out the procedure for adding antifreeze only to extract money. In general, they added antifreeze to me, according to the documents, 300 ml. A blatant lie. At the level I had then, no more than 100 ml would have entered. They charged as much as 300 rubles for refilling. (for comparison, a bottle of VAG concentrate costs 600 rubles). Moreover, the antifreeze was poured above the maximum mark, about a centimeter. I asked why they did this. In response, they waved it off, saying that the level would level out and the excess would spill out. Well, yes, of course, because the client pays for these excesses. Complete nonsense. I forgot about it and moved on. The level actually went down, almost a year later. But it was within the acceptable zone.
— The second time topping up antifreeze was required at a mileage of 25,000 km, just before TO-3, in the spring of 2016.
This time the level dropped a full centimeter below the Min mark. I’ll say right away that at about 20,000 km the antifreeze level was exactly at the Min mark. It dropped below the minimum after the winter. Possibly due to temperature changes. When warming up in winter, when starting a cold engine, I noticed some gurgling and gurgling noises. It was the coolant bubbling in the expansion tank. It actually gurgled, although not very loudly. And you could even see how it was seething. I once wrote about this in the logbook. Adding antifreeze G13. See how the antifreeze bubbles in the tank in the video from the 2nd minute. Then I added 200-250 ml of antifreeze to the Max mark, so that OD Automir VW would not again have the desire to add antifreeze to me at a fabulous price.
— The third time topping up was required just over a year later, at a mileage of 34,000 km.
Again I observed that the level after winter dropped to the Min level. But somehow there was no time to top it up. I only topped it up at the end of May 2017. 200-250 ml came in, as usual.
Watch the video for the filling process itself.
Where does the antifreeze go?
I somehow never asked this question before. Well, the level is going down, and going down. But this year I was at the service center, they checked the steering rack (which, by the way, he soon repaired) and the suspension as a whole, and the master noticed that the pump was leaking
.
Of course, I had heard about the “very good” quality of components, in particular about the quality of the cooling pump on the VW Polo, but I could not believe that it was the pump that was the problem. But as I looked at it myself later, the pump was really snotty. Splashes are noticeable on the right side member. And the spar itself in this place is covered with a film formed from antifreeze and the eroded standard wax coating of the body. The technician recommended replacing the pump immediately, as antifreeze could leak out. Well, of course. They had a pump in stock and were itching to replace something and make money. By the way, on that day replacing the pump would have cost me 1300 + 1100 rubles = 2400 rubles. + naturally antifreeze for topping up. I absolutely did not want to replace the pump with a new one.
. Why didn't you want to? Yes, because the pump did not make any extraneous sounds, it did not crack, and the leak was not that critical. In a year or a year and a half, only 200-250 ml is poured out. I decided to just top it up and watch. If rustling or crackling noises appear, I will immediately replace the pump with a new one.
Which pump to choose?
Of course, it’s up to you to decide, I’ll give you possible options. I’ll say right away that I don’t see the point in the original. Moreover, if this original leaks on such children's runs. The original makes sense if you have to replace your pump under warranty, in which case the dealer will give it a 2-year warranty. But this is for those who have 40-50 thousand miles per year. Not our case for sure. Analogues are in no way inferior in quality, and sometimes even surpass the original. After all, in fact, no one knows who the actual manufacturer of the original pump is. Maybe some Chinese factory? Or maybe not. Although we live in an age of optimization and cheaper production.
For topping up:
1) Concentrate G13 VAG 1.5l -
G013A8JM1
- 488 rubles (price as of July 2022) (Ready diluted mixture G13 VAG -
G013774M2
- 342 rubles) 2) Distilled water Expert 1l - 39 rubles.
And here's what the pump itself looks like.
I haven't bought a pump yet.
But something tells me that it would be good to buy it and put it in the trunk along with a set of replacement keys. You never know...
Since I had previously bought a canister of VAG G13 concentrate and distilled water, this time the cost of refilling was reduced to a minimum.
Price issue
The cost of replacing antifreeze on your Polo Sedan yourself will include the price of only two components - refrigerant costing from 690 to 720 rubles. for a container of 5 liters and distilled water - about 150 rubles. for three canisters with a capacity of 5 liters each. When filling with G13 fluid, the cost will be 1,500 rubles. for the finished liquid and about 1 thousand rubles. for concentrate. To this amount you must also add the price of distilled water. The total cost of replacing the refrigerant with your own hands will not exceed 2 thousand rubles.
Changing the coolant at service centers will cost the car owner 3-4 thousand rubles.