01/25/2022 1,938 Alarms
Author: Victor
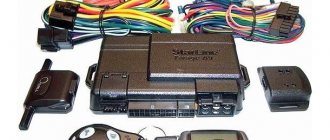
The KGB TFX 5 alarm system is a Russian-made anti-theft system model with two-way communication. This allows the car owner to always monitor the condition of the car when it is within the range of the key fob.
[Hide]
Instructions for use and installation of the system...
Page 3
- Image
- Text
KGB FX-5 “Instructions for use and installation of the system”
ver. 2
© Saturn Marketing Ltd.
3
CONTENT:
SERVICE FUNCTIONS
Remote deactivation and activation of the shock sensor 21 Control of the central locking from the key fob when the ignition is on 21 Automatic control of the central locking from the ignition key 21 Car search mode
21
Driver call
21
Turbo timer operation
22
Monitoring vehicle condition and interior temperature 22 Selecting the duration of confirmation beeps and the type of alarm beeps 22 Valet service mode
22
Monitoring the health of limit switches 23 Control of additional channel No. 1 (remote unlocking of the trunk) 23 Control of additional channel No. 2 (programmable function) 23 Control of additional channel No. 3 (programmable function) 23 Two-step unlocking of door locks 24 Control of additional channel No. 4 24 LED status indication alarm
24
ENGINE STARTING
Rules for the safe use of the engine starting system 25 Preparing to start an engine with a manual transmission 26 Remote engine start 27 Remote engine runtime extension 27 Automatic engine start based on temperature 27 Daily automatic engine start 28 Preparing the vehicle for movement 28 Remote engine stop 28 RPM learning procedure idle speed 28
PROGRAMMING FUNCTIONS AND OPERATING PARAMETERS
Recording key fob codes
29
Programming operating modes using the service button 29 Programming system functions 30 Restoring factory settings of programmable system functions 30 Table of programmable functions 31 INSTALLATION INSTRUCTIONS
Safety regulations
32
Recommendations for placement and installation of components 33 Connecting the power 6-pin connector 35 Connecting the 18-pin connector 36 6-pin connector for connecting electric door locks 39 MAINTENANCE
42
STORAGE, TRANSPORTATION, RESOURCE, DISPOSAL
42
SUPPLIER GUARANTEES
42
MAIN UNIT CONNECTION DIAGRAM
43
Video “Problems with autorun”
User Dmitry Glukhikh in his video showed a malfunction that can occur in the automatic start of an internal combustion engine.
Do you have any questions? Specialists and readers of the AUTODVIG website will help you ask a question
Was this article helpful?
Thank you for your opinion!
The article was useful. Please share the information with your friends.
Yes (50.00%)
No (50.00%)
X
Please write what is wrong and leave recommendations on the article
Cancel reply
Rate this article: ( 2 votes, average: 4.50 out of 5)
Discuss the article:
Instructions for use and installation of the system...
Page 4
- Image
- Text
KGB FX-5 “Instructions for use and installation of the system”
ver. 2
© Saturn Marketing Ltd.
4
SYSTEM FUNCTIONS
Congratulations on purchasing a KGB class security system! This system is designed to last for many years without the need for repair or replacement. only be installed
an authorized dealer with the appropriate certificate.
Protective functions of car alarms
♦ Activation of sound and light alarms when sensors are triggered in security mode ♦ Providing alarm alerts on a key fob with an LCD display ♦ Remote activation of the “Panic” mode ♦ Immobilizer mode ♦ Anti-robbery mode, activated remotely by the key fob ♦ Anti-robbery mode, activated by a special button ♦ Engine blocking and its preservation when dismantling the alarm system
Car alarm service functions
♦ Silent security mode ♦ Security mode with the engine running ♦ Silent activation/deactivation of the security mode ♦ Activation of the security mode without a key fob ♦ Automatic re-arming ♦ Automatic (passive) arming ♦ Delayed activation of the security mode while the interior light goes out ♦ Self-diagnosis when turning on / off the security mode ♦ Remote shutdown / activation of the shock sensor by levels in security mode ♦ Remote control of the central locking ♦ Control of the central locking from the ignition switch ♦ Two-step unlocking of door locks ♦ Double-pulse unlocking of door locks ♦ Possibility of implementing the “Comfort” function ♦ Service mode “ Valet” ♦ Emergency disabling of the security mode with a personal code ♦ 4 additional channels for controlling vehicle devices ♦ Control of vehicle interior lighting ♦ Vehicle search mode ♦ Remote programming mode for new key fobs and erasing lost ones ♦ Possibility of resetting the values of programmable functions to factory settings ♦ Driver call mode ♦ Temperature indication inside the car ♦ Time display, timer, alarm clock ♦ Main key fob battery discharge control via LCD display
Engine starting functions
♦ Remote starting and warming up of the engine ♦ Automatic starting and warming up of the engine by temperature and timer ♦ Remote or automatic stopping of a running engine ♦ Selecting the engine type: gasoline / engine ♦ Selecting the transmission type: automatic / manual ♦ Selecting the starter cranking time when starting ♦ Control of engine operation based on signals from a tachometer or generator ♦ Indication of operating time of a running engine on the key fob display ♦ Remote extension of operating time of a running engine
How to install?
The complex is installed as follows:
- The vehicle's on-board network is turned off. All installation work is carried out with the power supply turned off. Turn off the ignition, open the hood of your car and use the key to loosen the clamp on the battery terminal. After this you can disconnect it.
- Select a location to install the control module. The main thing is that the criminal does not have the opportunity to find the device. When installing the device under the driver's seat or under the center console, keep in mind that these are the places criminals check first. It is better to place the unit behind the dashboard, this will increase the time it takes to find the device and turn it off. To install the module, remove the trim around the steering wheel, unscrew the screws securing the control panel, and then disconnect the connectors connected to the device. Find a free space behind the dash and install the unit there. To prevent vibration, the module can be wrapped in foam rubber. Fix the block to the body or dashboard, depending on the design features of the car. The device is secured using self-tapping screws.
- Install a siren under the hood of your car. Its installation should be done away from the cylinder head. Exposure to high engine temperatures will cause the siren to melt and fail. It is advisable to place the siren in an inaccessible place so that the criminal cannot turn it off. It is advisable to direct the horn of the device in the direction of travel of the car or down, but not towards the cylinder block.
- Choose a place to install the secret Jack key, preferably it should be hidden. If a criminal gains access to the button, he will be able to enter the alarm setup and emergency shutdown mode. As a result, he will be able to turn off the siren and steal the car. The secret button must be installed so that the driver has access to it from the driver's seat. You can disguise the button by installing it in a bundle with standard wiring and hiding it with electrical tape. Please note that you need to use electrical tape of the same color that is wrapped around the electrical circuit elements.
- Set the button to activate the anti-robbery mode. It is advisable to install it in a place inaccessible to an attacker.
- Attach the transceiver to the inner surface of the windshield. It is recommended to install the antenna adapter as high as possible for better signal transmission. When choosing an installation location, it must be taken into account that the presence of metal objects near the device will lead to a deterioration in signal transmission. The transceiver is fixed using double-sided tape or a special sticker that comes with the kit.
- The temperature sensor to activate the autostart function is mounted in one of the cooling system pipes. The controller crashes into the line and is securely fixed in it so that when the engine is running it is not washed away by the flow of refrigerant. The wires for connecting the device's power supply are routed outside.
- Limit switches are installed in the doors, on the hood, and also in the trunk lid. To install devices in body elements, special technological connectors must be present.
- The shock sensor is installed inside the car. After installation and connection, the device must be adjusted so that the device does not operate without reason and is activated when necessary. The sensor must be installed in the central part of the body; for installation, you can use a partition that separates the engine compartment from the passenger compartment. The controller is fixed to the body using self-tapping screws.
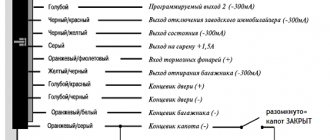
- At the final stage, all elements are connected to the control unit and the car battery. To do this, use the diagram that is included in the package.
1. Power connector connection card
2. Connection diagram for the parking brake control device
The Technomania channel talked about the technical nuances that should be taken into account when installing a car security system.
Instructions for use and installation of the system...
Page 6
- Image
- Text
KGB FX-5 “Instructions for use and installation of the system”
ver. 2
© Saturn Marketing Ltd.
6
RULES FOR THE SAFE USE OF CAR ALARMS
This security system (car alarm) is a complex electronic device. Installation, connection and configuration of the car alarm are described in detail in the “Installation Instructions” and can be carried out by the consumer in full independently. However, the manufacturer strongly recommends that you entrust this set of works to a service center certified according to GOST R 51709-2001 (OKUN 017613), which specializes in installing alarms and/or additional electronic equipment in cars (hereinafter referred to as the certified service center ). The car alarm is designed for stationary installation on a vehicle, powered by its on-board network with a voltage of 12 V DC, the negative pole of the battery is connected to the vehicle ground. Before installing a car alarm on a car, first connect all the wires to it in test mode, make sure that all connections are made correctly, connect power from the battery and make sure that the car alarm is working properly. If installing a car alarm requires drilling holes or any other changes to factory parts of the car, be sure to first consult with your nearest dealer about the correctness of such intervention in the design. Never install the car alarm central unit where it will become very hot, for example from direct sunlight or hot air from the car's heating system. Also avoid places where the central unit of the car alarm and its components will be subject to strong vibration, or where they will be exposed to dust or dirt. Use only the fasteners included with the car alarm installation kit. In this case, the installation will be reliable and safe. The use of parts not included in the car alarm installation kit may lead to disruption of its normal operation. When washing a car, it is unacceptable for water and detergents to get on the surface or inside the central unit of the car alarm, on its components (siren, sensors, antenna module, limit switches), as this can lead to damage to the car alarm. To ensure moisture protection, it is advisable to initially install car alarm components in places inaccessible to the flow of liquids and splashes, and if necessary, take precautions during washing or cover (wrap) the components with available household waterproof material, for example, plastic film, etc. Never insert any objects into the central unit of the car alarm or its components to avoid damage to the electronic units and systems. In the event of a suspected breakdown, do not try to open the car alarm housing (its components) yourself, and please avoid entrusting diagnostics and/or repairs to incompetent persons. If the car alarm is faulty, contact a certified service center. Cleaning. Do not attempt to clean the key fob or other car alarm components with any harsh liquids, solvents or chemicals, as this may deteriorate its appearance. To clean, use a clean, dry cotton cloth (soft brush). Due to the constant work to improve car alarms, increasing its reliability and improving performance characteristics, minor changes may be made to the design that are not reflected in these Instructions.
Specifications
Temperature conditions of normal operation: for the pager - 0... +400°C, siren - -30... 850°C, the system itself - -40... +850°C.
- The alarm works with no more than 4 transceivers.
- Using the system, you can organize 6 security zones.
- Operating currents in active mode are minimal - up to 25 mA.
- Supply voltage - 12 V, from the on-board network.
- 1200 m - radius of operation of the receiver in open areas.
- 600 m - two-way communication range between the key fob and the car.
- The KGB TFX 5 alarm system with auto-start operates at a frequency of 433.5 MHz.
Instructions for use and installation of the system...
Page 9
- Image
- Text
KGB FX-5 “Instructions for use and installation of the system”
ver. 2
© Saturn Marketing Ltd.
9
FUNCTIONS OF SYSTEM TRANSMITTER FOBS
Buttons 3 + 1
♦ Selecting the key fob alert mode (press and release the buttons simultaneously
And
I
)
Buttons 3 + 2
♦ Quickly set the key fob timer (press and release the buttons simultaneously
And
II
)
PURPOSE OF THE BUTTONS OF THE ADDITIONAL (SINGLE-SIDED) KEY FOB
Button 1
♦ Arm/disarm (press and release) ♦ Channel 3 control (press and hold for 3 seconds)
Button 2
♦ Starting and stopping the engine (press and release) ♦ Extending engine run time (press and hold for
3 seconds)
♦ Activating the security mode while the engine is running (press and
hold for 3 seconds)
Button 3
♦ Search mode (press and release) ♦ Trunk release – channel 1 (press and hold for 3
seconds)
Button 4
♦ Silent arming/disarming (press and release) ♦ Channel 2 control (press and hold for 3 seconds)
Buttons 1+2
♦ Panic mode (press and release the buttons simultaneously
And
)
Buttons 1+3
♦ Disabling the sensor (press and release the buttons simultaneously
And
)
Buttons 1+4
♦ Enabling the Valet service mode (press and release the buttons simultaneously
And
)
Buttons 2+3
♦ Enabling the temperature trigger mode (press and release or hold the buttons simultaneously for 3 seconds
And
)
Buttons 3+4
♦ Anti-robbery mode (with
on
, simultaneously press and release or hold down
within 3 seconds of the button
And
)
♦ Recording a key fob in programming mode (press and hold simultaneously for 3 seconds
buttons
And
)
Setting up KGB TFX 5 alarm
The instructions for use describe several programming options.
- Control key fob buttons.
- Protective and energy-saving functions.
Control key fob
Writing a sequence of commands to the system memory is done as follows:
- the key is inserted into the ignition;
- press the service mode button until 4 beeps sound;
- to bind the key fob, you need to hold down the first 2 buttons until the siren sounds;
- After these manipulations, the key can be removed from the ignition.
To program the first button on the key fob, do the following.
- Press the key with the image of the sun several times - this will move the cursor around the screen.
- Place the cursor next to the required command.
- Press the button with the image of the sun for 6 seconds until 2 siren signals sound, and then after a while 3 more.
Other keys are configured in the same way. The system can be given settings using the service mode button; to do this, you need to do the following.
- You need to insert the key into the ignition, after which you need to press the Valet button (service mode) 6 times.
- The machine will beep 6 times.
- With help. Valet keys select function.
- Use the buttons on the key fob to set the desired value.
- After setting, the ignition can be turned off.
The energy saving function is activated as follows:
- by pressing the sun button and holding it until a signal sounds;
- after which the cursor on the screen points to the word Save;
- The mode is started using the first button of the key fob, and turned off - the second;
- In order to exit the setting mode, you must hold down the sun button until a sound signal appears. After which a battery icon will appear on the screen.
To configure protective mode:
- Start the car engine.
- Press and hold the right button on the remote control until the side lights flash (3 times), an exhaust gas icon and an engine operation timer will appear on the key fob.
- After setting, you need to remove the key from the ignition. If everything was done correctly, the motor will not turn off.
To restore factory settings, you need to perform a number of steps.
- Turn on the car ignition.
- Press the service mode button 10 times.
- Turn off the ignition and wait until the siren sounds 10 times. This means the system is ready to reset.
- Press the emergency button once, a beep should sound.
- Click the right button on the key fob, after which the system settings will be reset to factory settings.
- To exit the mode, you must turn on the ignition.
We also recommend reading our specialist’s article on how to turn off the alarm in the event of a malfunction.
Programming the protection function
To enable the protection mode when the engine is running, you need to:
- put the car on the handbrake;
- Press and hold the right button on the key fob until the remote control emits a signal. After which the exhaust gas icon and engine operating time will appear on the display;
- after which the ignition can be turned off, and if everything was done correctly, the power unit will continue to operate;
- within 30 seconds you need to leave the car and lock all the locks. Press the right key fob button and wait for the siren to sound. A lock icon will appear on the remote control screen.
When this mode is activated, the ignition control function will be disabled.
To emergency enable the protective mode (without a key fob) you need:
- Turn on the ignition.
- Press the service mode key seven times.
- The system should beep.
- Remove the key and leave the cabin within 20 seconds, the door locks must be closed.
To emergency turn off the protective mode (without a key fob):
- Open the door with the key, and the alarm will work.
- Start the car engine.
- Press the service mode button 4 times within 20 seconds.
- Turn off the ignition, the siren will stop working and the turn lights will blink twice.
Why doesn't it get attached?
Flashing key fobs for the KGB security system VS 100, 5500, 200, 5900, 300, 5700, 400, 250, 500, BC 150, tfx 7 is not always successful the first time. Why can’t you reprogram the remote control and how to get out of this situation.
- Service mode was accidentally activated. Turn it off by pressing the “Valet” button and repeat the firmware procedure.
- The “Ignition activated” command is not detected by the alarm control unit. Contact a service station.
- Switch failure. Repair it yourself or take it to a specialist.
- Failure of the control unit. Take the car to a service center.
Among experienced car enthusiasts, KGB alarm systems have long been considered one of the best. Models from this brand have good functionality and an affordable price.
Separately, I would like to note the developers’ desire for constant innovation. Each new KGB alarm receives a number of improvements and new functions that allow it to perform its tasks with greater efficiency.
The company's engineers are constantly competing with attackers who come up with ever more sophisticated hacking methods. To provide its customers with reliable protection, the latest signal encryption methods are used, and the frequency range is constantly expanding.
But just buying a KGB alarm system is not enough; it still needs to be installed correctly. This can be done either with your own hands or using the services of a service center. The last option allows you to save a lot of time, but it turns out to be very expensive.
Independent installation of the KGB alarm system is quite possible, but for this you need to have car wiring diagrams, free time and the desire to do everything yourself.
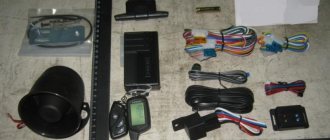
Equipment
Overview of elements and devices included in the KGB alarm system:
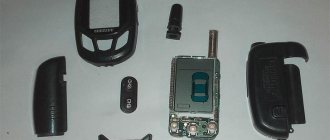
- The main control module equipped with a processor unit. The unit is sold in a black plastic case.
- Main keychain. It is characterized by the presence of three buttons and a screen, thanks to which the possibility of two-way communication is realized.
- Spare communicator. The number of controls may vary depending on the model. The device does not have a display, but it can be used to configure the basic functions of the installed alarm system.
- Transceiver with built-in transceiver. The antenna module is equipped with a temperature controller, which allows you to install and configure engine starting automatically in accordance with the air temperature. The device is also equipped with a button to call the owner from the cabin.
- A shock sensor that allows you to adjust the sensitivity when detecting physical impacts on the car body. The device belongs to the class of two-level controllers and is equipped with a cable for connection.
- Siren with wire and connector for connection. Depending on the model, the package may include a bracket for fixing the device under the hood.
- LED light designed to determine the status of the anti-theft system. It is equipped with a wire with which it can be connected to the car's electrical network.
- Button to enter the service mode for servicing the anti-theft system. Equipped with a cable and connector.
- The alarm package may include a separate button to activate the “Anti-robbery” mode.
- Trigger for installation on the hood. Can be used for mounting on the tailgate, but the first option is preferable.
- A set of wires for installation and connection.
- A set of cables for installing and connecting the engine autostart module.
- Batteries for use in the main and spare key fobs.
- Double-sided stickers for attaching the transceiver module, as well as the LED light bulb.
- Service user manual for installation and connection. The manual includes an electrical diagram, as well as a full description of the actions that must be performed to set up a car alarm.
- Warranty card.
- Packing box.
The delivery package for KGB alarms with auto-start does not include triggers for installation on doors, so these devices must be purchased additionally.
Programming
Options related to autorun are configured programmatically. They are collected in the table that is given in the instructions:
To access the settings, follow these steps:
- The ignition is turned off;
- The Valet button is pressed 6 times, then the ignition is turned on;
- 6 signals follow;
- Press the Valet button to select the option number.
By taking the key fob and pressing the key, you set a new value.
To select number 4, do this: press button 1 long and short.
You don't need reviews to understand the following:
- It is not recommended to change the value of function 11;
- For function 9 the prohibition will be stronger;
- Option 12 is assigned a value of 2 or 3 to eliminate problems that occur when the ignition assist is activated.
In general, the KGB signaling of the model in question is a modified copy of the Starline B9. There are no complaints about these systems, with the exception of the slowness of the key fob. However, the effect only appears during setup. We will leave the choice to the user.
Functions
The main functions that all modern models of car alarms of this brand have:
- turning on the alarm function when one of the machine’s security zones is activated;
- messages from the complex about the triggered zone are sent to a pager with two-way communication, the car owner is warned by triggering a melodic signal, as well as indicator lights;
- the “Panic” function, which allows you to scare away potential intruders from the car, can be implemented remotely;
- support for the function of blocking the power unit when attempting an unauthorized start;
- the ability to remotely enable the anti-robbery option;
- When the protective mode is turned off, the user can activate the machine engine blocking.
Is it possible to improve
Let's see what a car alarm looks like in analysis:
The main element here is the PIC16F77 chip. It contains a processor, memory, and ROM with firmware. You cannot download the firmware on the Internet, and you cannot even read it by installing the chip in the programmer.
The FX-5 ver 2 kit is now available in retail. It differs from the “first version” in the firmware. But the only way to update is by replacing the chip.
The KGB alarm of the model in question is a copy of another security system. It is produced under the Starline brand and designated as Twage A8. It is also equipped with auto start, and the A8 and FX-5 key fobs are interchangeable. The bottom line is that you can buy a Starline controller with A8 firmware if you wish.
There is no support site for KGB security systems yet. And you will have to look for the basic manual, which you can download, on the seller’s website. More often they post a scan of a book available in the new version kits (ver 2). We wish you success.