About the rake
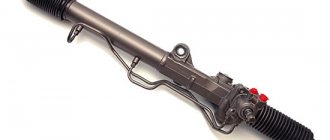
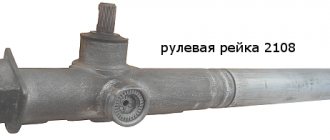
The steering mechanism on Lada cars, starting with model 2108, has a steering rack. It is designed to move steering rods along a horizontal plane, which helps turn the car's wheels.
The design of the slats is quite simple and reliable, with the exception of one small drawback - a plastic bushing.
This bushing is made by the manufacturer from low-quality plastic, which soon leads to play in the rasp in it and the appearance of an unpleasant knock when moving on paving stones.
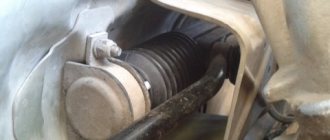
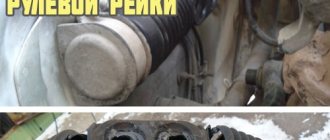
There is a rail between the engine and the passenger compartment, perpendicular to the exhaust manifold and attached with two brackets to the engine shield.
Design
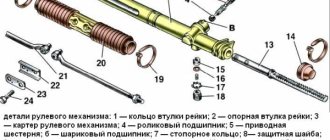
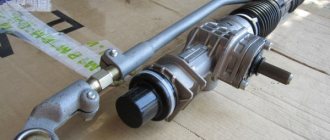
Steering rack design: 1 – shaft boot, 2 – cover mounting bolts, 3 – Belleville washer, 4 – worm shaft oil seal, 5 – worm gear cover, 6 – sealing collar, 7 – thrust bearing, 8 – worm shaft with bearing, 9 – rasp, 10 – left boot, 11 – binoculars, 12 – binocular bracket, 13 – nut plug, 14 – thrust nut, 15 – thrust spring, 16 – locking collar, 17 – thrust piston collar, 18 – thrust rasp piston, 19 – piston liner, 20 – steering rod bolt, 21 – stopper, 22 – plate, 23 – plastic clamp, 24 – steering rack boot, 25 – left side boot, 26 – steering rack pipe.
Signs of play in slats
When driving over small irregularities such as a gravel road, shocks and knocks in the suspension are clearly audible and are transmitted to the steering wheel. These signs will not always refer to play in the rack. Similar impacts to the steering wheel can occur due to broken steering ends or a broken crosspiece of the steering mechanism. Before you begin repairing the rack, you must exclude the tips and steering cross from suspicion.
- Impacts to the steering wheel when driving over bumps
- Creaking sound when turning the steering wheel
- Biting the steering wheel in different positions
- The steering wheel does not return to zero position
Checking for play
Checking for play is done by rocking the swing arms up and down. To do this, we find the steering rods under the hood and pull each of them up and down; there should be no play or knocking. If any, then the rack should be maintained.
Lift
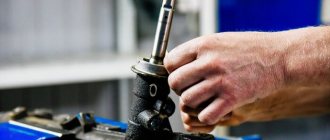
If knocking is detected in the steering wheel, it can be tightened, but tightening will be effective only if there is knocking from the worm gear. If the knocking noise comes from a broken plastic bushing, then tightening is useless.
As is known from practice, the worm mechanism is quite reliable and is very rarely the culprit of knocking. Most often the bushing is to blame.
You can determine the culprit of the knock by pulling the steering rods one by one.
- If there is a knocking sound when applying forces to the right link, then the bushing is to blame.
- If there is a knocking sound when you apply force to the left linkage, then the worm gear is to blame.
In the first case, a lift is not advisable. Since the tightening nut only tightens the worm mechanism. To eliminate the knocking noise, it is necessary to remove the steering rack from the car and have it repaired.
What is needed for work and how to tighten the steering
To perform the tightening you will need the following tools:
- Slotted screwdriver (in simple terms, a “flat” screwdriver);
- Wrench 13;
- A special 17mm wrench designed to adjust the steering rack.
To make the work more comfortable and faster, it is recommended to drive the car into a special inspection hole or overpass, and also use an assistant, whose role even a child can handle.
To get to the rail, you should perform a number of simple steps:
- Disconnect the battery terminals and dismantle it;
- Using a 13mm wrench, unscrew the bolt securing the battery stand, and then remove it;
- Directly under the steering rack, using a slotted screwdriver, you need to pull out the small plug of the adjustment system.
After this, you will have access to the nut responsible for adjusting the thermal gap in the rail.
Next, you need to put your hand under the steering rack and try to put the rack wrench on the nut. It is necessary to tighten the nut clockwise, but since the rack itself is located upside down, from the outside it may seem that the nut must be tightened counterclockwise. Experts recommend tightening the nut no more than 25–30 degrees at a time, after which you should try to rotate the steering wheel, which should turn without jerking or biting.
It is also necessary to listen to the sounds coming from the steering wheel - if there are no knocks when turning the steering wheel, and there are no other noises, then the rack is tightened correctly, and you can put the battery and rubber plug in their place.
The tightening process on video
Repair kit
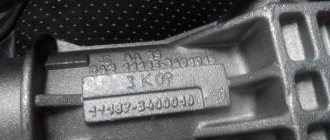
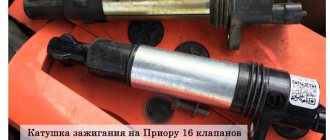
In a Priora with an EUR, a rack from Kalina was installed with catalog number 11183-3400010 20. Therefore, the repair kit must be purchased specifically from Kalina.
Steering rack number
The repair kit includes a large number of parts necessary for repairs.
The price of a new rack starts from 5,000 rubles and higher, depending on the manufacturer, but new does not mean good, and the cost of a repair kit varies from 500 to 1,000 rubles, which is almost 10 times cheaper than a new rack.
Video
This video shows how to repair the steering mechanism on Kalina.
Knock in Kalina steering rack. How to remove.
Installation of Kalina steering rack.
Repair of the steering column gearbox and the RR itself on Priora, Kalina, Grant.
How to install a steering rack from Kalina 2 to Kalina 1.
Steering rack for Lada Kalina Sport with a gear ratio of 3.1 instead of 4.02.
Do-it-yourself repair of the steering rack, but not Kalina, but Daevoo Sens / Daewoo Sens.
Kalina control rack - VAZ 11183 Kalina rack repair
Have you ever had a chance to monitor knocks and noises from the side? Probably it happened. They changed the control tips, changed the ball tips, even changed the springs with support bearings, but does the knocking continue? It's time to tug, make sure there is free play and start sorting out the rack. In this article I will talk about repairing the VAZ 11183 rack, but the development is identical to all other VAZ front-wheel drive racks.
The most interesting thing is that these motherfuckers from AvtoVAZ do not fundamentally change anything except the gearbox housing, I bought a repair kit 2110-2112, the rack is listed in catalogs as 2110, but the splined part is longer than 2110, and the gearbox is slightly different, so just change Unfortunately, 11183 for 2110 will not work, although 2110 costs 2500 in my town, and 11183 5500 costs 6000 rubles. The difference per pocket is very noticeable.
Well, it doesn’t fit and doesn’t fit, so we give the engineers a hard time and start disassembling it. Unfortunately, there won’t be a photo for the article, because I was up to my elbows in mud and didn’t want to wash myself for the sake of pictures, but I’ll try to describe everything carefully.
Removing the steering mechanism.
1. For convenience of work in the future, and so as not to climb into the interior with stains, unscrew the bolt securing the splined connection from inside the cabin (you will see it near the floor of the control shaft).
2. We lift the car on a lift, throw it down, and knock out the control tips from the steering knuckles.
Steering rack removal and repair
Removal work must be carried out with the necessary tools. Such as:
- Ratchet;
- Head at “13”, “15”, “17”;
- Key to "14";
- Hexagon at "6";
- Screwdriver "-";
- Hammer;
- The beard is blunt;
- Wrench for tightening the steering rack;
- Steering wheel end remover;
- Mount;
- WD-40 lubricant;
- Lubricant "Litol - 24";
- Steering rack repair kit;
Steering wheel removal process
- We align the steering wheel exactly in the center.
- Raise the left side of the car with a jack
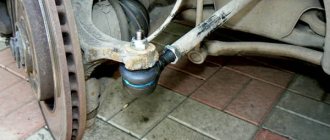
- We unscrew and unscrew the steering end nuts, then use a puller to squeeze them out of the strut bipod.
- We unscrew the steering cardan in the car with a head on “13”, and forget the screwdriver into the slot of the cardan without damaging the splines. This is necessary for its easy removal from the rack splines.
- Remove the steel washer retainer from the tie rod bolts and unscrew the left steering arm from the rack and pull it out into the left window of the tie rods
The process of disassembling the rack
- We unscrew the steering rods with a head at “15”
- We remove the anthers by biting off the plastic clamps with side cutters. We pull out the central steering boot to the right side without damaging it.
- Place a mark as shown in the picture and unscrew the nut securing the rack pipe using a punch and a hammer
- We take out the pipe
- We unscrew the steering tightening nut using a special wrench (don’t be afraid to turn it very tightly), take out the rubber ring and the pressure piston.
- To remove the pressure piston, you need to hit the back of the rack and the piston will fall out.
- We take out the rasp
- We unscrew the two bolts with a hexagon “6” and carefully remove the “worm” cover without damaging the oil seal.
- We clamp the worm shaft into the yew through a block and remove it by hitting the body of the rack
- Next, remove the old plastic sleeve from the pipe using a screwdriver
The rail is disassembled, we proceed to the assembly process using new parts
Assembly
- We install rubber rings on the bushing and insert it into the rack pipe
- We wash the worm shaft from the old grease, lubricate it with new and insert it into place, put a plastic bearing on it.
- Place a disc spring into the worm cover, and then a thrust washer on top. Lubricate well and close the lid.
- We lubricate the rasp and insert it into the worm mechanism, and then insert the pipe into the mechanism body and tighten the nut, aligning the previously placed marks.
Centering the steering rack
When assembling the steering wheel, it is necessary to follow a certain rule, which in the future will not lead to the rearrangement of the steering wheel on the splines.
- When the rasp is placed in the rack body, it is necessary to set it to “zero”, that is, the position in which the steering wheel will stand exactly in the center. To do this, you need to measure 235 mm from the right end of the case and put a mark with a marker. This will be “zero”. Next, you need to align the center of the rasp with this mark. The center of the rasp will be the recess under. We combine this notch with the previously installed mark.
- It should also be noted that when combining these marks, the worm shaft should face the flat to the right side at an angle of 90 degrees to the rack body.
- To combine all these parameters, you need to rotate the worm shaft with a key at “14” until all the parameters are combined.
Attention: the rack pressure piston should not be installed when the marks are aligned.
Do-it-yourself Priora steering repair
It is easier to repair the power steering yourself, since it is structurally clearer. Repairing an electric motor with your own hands is impossible without certain knowledge and skills. The advantage of self-repair is obvious - financial savings. However, by contacting a car service, you can get a guarantee for the work performed and be confident in its quality. It will cost from 500 to 3500 rubles if power steering is installed in the car. Replacing or repairing an electric motor will cost at least 5,000 rubles.
Steering rack repair
For repairs, you will need to remove the rack from the Priora. To do this, the front wheels are dismantled. You will need 13, 15 and 19 mm socket wrenches, a flat-head screwdriver, pliers, sockets, a mounting blade and a hammer.
Inside, you need to remove the lower part of the intermediate shaft from the gear:
- unscrew the fastening bolt with a 13 mm socket and remove it;
- Use a screwdriver to loosen the terminal connection;
- remove the lower part of the intermediate shaft.
To remove the steering rack without dismantling the steering rods, you will have to remove their ends inside the rack:
- Use a screwdriver to dismantle the locking plate of the fastening bolts of the inner tie rod ends;
- Use a 15 mm wrench to unscrew one bolt, just loosen the second;
- turn the plate down;
- dismantle the steering rod, then unscrew the second bolt and remove the second rod.
To remove the rack along with the steering rods, you will have to disconnect the ends from the steering knuckles of the struts:
- Using pliers, straighten and pull out the cotter pin.
- Loosen the ball joint nut with a 19 mm wrench.
- Using a puller, remove the finger. If it is not there, a mounting spatula will help out. It is inserted between the tip and the steering knuckle, after which you need to hit the end of the steering knuckle with a hammer.
- Use a screwdriver to remove the finger completely.
To further dismantle the steering rack, follow these steps:
- Using a 13 mm socket, unscrew the two nuts securing the bracket to the shield;
- remove both brackets;
- Remove the steering rack through the wheel arch by sliding it forward.
Removing the slats will take at least two hours, but if you have experience, you can do it in less time.
Before installing the mechanism in place, you need to put it in the middle position. To do this, using pliers, the shaft rotates in any direction until the end, after which two full turns are made in the opposite direction. In this case, the haze should be in a vertical position on the right in the direction of travel of the car. The steps for installing the rack are carried out in the reverse order of dismantling. When contacting a car service center, you will have to spend money not only on a new part (about 3,500 rubles for a standard copy), but also on the work of craftsmen.
Power steering repair
Repair of the Priora power steering is most often associated with replacing or eliminating a pump malfunction. You can change it or repair it yourself; for this you need to buy the appropriate repair kit. Before dismantling the pump, you need to make sure that there is liquid in the tank, that there are no leaks and there is no air lock in the system. The correct brand of oil must be used.
If the cause of the malfunction is the pump, you will need the following tools for work:
- 12 mm socket wrench and 14 and 24 mm sockets;
- puller for retaining rings;
- copper washers, rear casing gasket and oil seal;
- new bearing;
- syringe and suitable container;
- fine-grain sandpaper and clean rags.
The process of removing the pump and repairing it is as follows:
- Using the hole in the pulley, loosen the axial fastening bolt; it secures the pump.
- Unscrew the tensioner nut and remove the drive belt.
- Using a syringe, pump out as much liquid as possible from the tank, while rotating the steering wheel in different directions to clean the hoses of oil.
- Loosen the reservoir hose clamp and remove it.
- Unscrew the bolt of the high pressure hose (coming from the pump to the system).
- Remove the bolt that secures the pump to the bracket. Instead, insert a metal rod of a suitable diameter to prevent the pulley from turning when unscrewing the fastening bolt.
- Remove the pump by pulling upwards and clean the assembly from dirt.
- Using a puller, remove the retaining ring holding the bearing.
- Unscrew the screws of the back cover and carefully remove it so that the blades do not fall out.
- Pull out the blades and lay them out on numbered pieces of paper so as not to mix them up when assembling (their rounded part should turn outward).
- Remove the plate with the parts underneath it.
- Tapping with a screwdriver, knock out the shaft and press out the bearing.
- Replace the bearing.
- Inspect all pump parts for wear and damage, clean their surfaces from dirt.
- Replace worn parts and reassemble in reverse order.
If repairing the power steering seems too complicated a procedure, it is better to contact a car service center or replace the pump assembly. This can significantly reduce time, but not money.
Electric amplifier repair
Self-repair of EUR on Priora is not carried out. All you can do with your own hands is to replace the electric motor, and to do this you need to completely dismantle the assembly. For work you will need a chisel, a hammer, a set of wrenches and socket heads, a wrench, and an extension cord.
There is nothing complicated in removing the EUR - the problems are created by the parts that have to be dismantled to get to the assembly. You will have to remove the steering wheel from the Lada Priora along with the airbag, ignition switch, casing and partly the panel. Only after this can the EUR be dismantled:
- Using an 8 mm socket, the fasteners are unscrewed and the contact group is completely removed.
- Behind the contact group there is a gray EUR control unit - all wires need to be disconnected from it. There is a lock on each terminal; it is pressed out with a screwdriver and the terminal is removed.
- The bolt connecting the cardan and steering rack is unscrewed.
- Using a chisel and hammer, loosen the cardan tie.
- Now you can unscrew the 4 bolts securing the electric drive from the top and bottom.
- Holding the assembly after unscrewing all the bolts, the EUR should be pulled off the shaft and completely removed.
After removal, carefully inspect the contacts. Failed elements (control unit, electric motor) must be replaced. Installation of the EUR is carried out in the reverse order described.
EUR and power steering Priora: list of possible faults and repair methods
Hydraulic and electric power steering are designed to ease the effort the driver makes when turning the steering wheel. The EUR is a more advanced mechanism compared to the power steering, since it uses an electric drive. The system does not contain oil or other hydraulic components, which increases its reliability. Typically, AvtoVAZ engineers install electric steering systems on passenger cars, and less often - power steering. Both types of power steering are found on the Lada Priora.
Steering diagram
The design and principle of operation of the Priora steering mechanism
On front-wheel drive vehicles, due to their design features, it is impossible to install a classic steering mechanism. The first thing engineers encounter is lack of space. A standard mechanism cannot be installed, even if a transverse engine is used instead of an in-line engine. For this reason, the classics, which are not distinguished by modest dimensions, have been replaced by a compact steering rack, which transmits the force when turning the steering wheel to the front wheels.
To save as much space as possible, on Priora and many other cars the rack is rigidly fixed to the front panel of the engine compartment - between the engine and the passenger compartment. It connects to the steering column, which extends into the cabin and ends with the steering wheel. The steering rack is a toothed metal rod. Its teeth engage with the steering wheel drive in the form of a shaft. They are located relative to each other at right angles. This is an improved worm drive.
The driver rotates the steering wheel along with a shaft, the teeth of which move the steering rack inside the casing, engaging with a toothed rod. There are holes in the rack casing through which the steering ends (rods) are connected. In the center of the rack itself there are holes for attaching these tips, which are attached to the steering knuckles of the front wheel strut using rods and special levers.
Disassembly and assembly of the steering mechanism
We disassemble the steering mechanism when repairing it. Remove the steering mechanism (see “Removing the steering mechanism”). Remove the steering gear boot (see “Replacing the steering gear boot”).
Remove the steering rod support. We insert the bit into the groove of the crankcase pipe mounting nut.
We unscrew the nut, striking the beard (right-hand thread).
...and remove the crankcase pipe.
Use a screwdriver to press out the two clamps of the bushing located inside the pipe...
...and remove the bushing.
Remove the two rubber rings from the bushing (arrows indicate the bushing clamps).
If it is necessary to replace the nut, use pliers to remove the locking rings. . and remove the retaining ring... Remove the nut securing the pipe.
Remove the rubber plug from the rack stop adjusting nut. Using a scraper, remove the jammed metal in the locking areas of the stop adjusting nut.
Using a special 24mm wrench with an external octagonal head, unscrew the stop nut.
We take out the stop spring. Using a screwdriver...
...remove the O-ring.
By hitting the crankcase against a wooden block, we knock out the rack stop. Using a screwdriver...
...remove the liner from the stop. A rubber ring is installed in the groove of the stop.
Remove the rubber ring from the crankcase that seals the hole for the steering mechanism on the front panel.
Remove the boot from the gear shaft. Use a 6mm hexagon to unscrew the two screws (shown by arrows)…
...and remove the crankcase cover.
Remove the separator with the thrust bearing rollers.
Remove the sealing ring of the cover.
We remove the rack from the crankcase.
We press out the gear shaft by holding the shaft in a vice with soft metal jaw linings and pressing the crankcase upward with the mounting blade.
We remove the gear shaft with bearing from the crankcase. We pry it off with a screwdriver...
...and remove the bushing retaining ring.
We take out the gear shaft bushing assembled with the support plate.
If it is necessary to replace the needle bearing, use a drill with a diameter of 4 mm to drill two diametrically located holes in the crankcase so that they extend to the end of the outer ring of the needle bearing. Through the drilled holes, using a rod of the appropriate diameter, we knock out the outer ring of the bearing from the crankcase.
Using a puller, we press the ball bearing of the gear shaft with the inner ring of the roller thrust bearing.
Use a puller to press the inner ring of the needle bearing off the shaft.
Use a screwdriver to pry and remove the gear shaft seal from the crankcase cover. If the outer race of the roller thrust bearing needs to be replaced...
... use a scraper to remove the extruded metal in four places and take out the ring. We generously lubricate the bearings, rack and gear teeth, and the plastic rack bushing with Fiol-1 grease. We assemble the steering mechanism in the reverse order. We press the outer ring of the needle bearing into the crankcase using a mandrel of suitable diameter. To seal holes in the crankcase, you can use “fast steel” or “cold welding”. We press the gear shaft with the ball bearing into the crankcase using a piece of pipe of a suitable diameter or a high head, applying force to the outer ring of the bearing. You can press the gear shaft into the crankcase, resting the outer ring of the bearing on the jaws of a vice. Then we put the crankcase on the bearing...
...and press the crankcase with light blows of a hammer through a wooden block.
We press the gear shaft oil seal into the cover through a mandrel or head flush with the end of the cover. We insert the rack into the steering gear housing. We install the pipe.
After tightening the pipe fastening nut, tighten the nut. We rotate the gear shaft so that the flat on it is located on the right side. We move the rack so that the steering rod support mounted on the rack is located in the middle of the pipe groove. We insert the rack stop, the stop spring and tighten the stop nut. It is recommended to replace the stop nut with a new one.
Scheme for monitoring the gap in the engagement of the rack and pinion shaft
: 1 — dial indicator; 2 — indicator mounting bracket; 3 - nut; 4 - sealing ring; 5 — steering gear housing; 6 — needle bearing; 7 — gear shaft; 8 — bushing; 9 — crankcase cover; 10 - rack; 11 — liner; 12 — rack stop; 13 — indicator leg; 14 - spring
We adjust the gap in the engagement of the gear with the rack. To do this, set the rail in the middle position and block it from moving. Insert the leg of the dial indicator into the hole of the adjusting nut of the stop until the tip of the leg touches the stop of the rack. The diameter of the tip of the indicator leg must be at least 3.5 mm...
...so that the leg rests against the end surface 1 of the stop, and does not fall into its hole 2 (for clarity, shown on the dismantled stop). We apply a torque of 15 N m (1.5 kgf m) to the gear shaft, while the gear pushes the rack and stop. Based on the indicator readings, we determine the amount of movement of the stop, which corresponds to the actual value of the gap in the engagement. If it exceeds 0.05 mm, tighten the adjusting nut, achieving the specified amount of movement of the stop. After this, having unlocked the rack, we check the ease of rotation of the drive gear throughout the entire range of travel of the rack.
Design and operating features of power steering and power steering
To make steering easier to turn and increase comfort, either hydraulic or electric power steering can be used. Both amplifiers have both pros and cons.
Power steering device
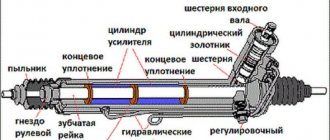
Structurally, power steering is a system of high and low pressure hoses containing oil driven by a pump. Power steering fluid must be poured into the reservoir near the pump. It only works when the engine is running. The driver turns the steering wheel, and at this time the fluid flows through the distributor under pressure created by the pump to the steering mechanism. It enters the working cylinder, puts pressure on the piston, which begins to move, and facilitates the rotation of the steering wheel. When moving in a straight line, the liquid flows back into the system reservoir.
Advantages and disadvantages of power steering
In the case of a hydraulic booster, the main disadvantage is the bulkiness of the entire system. But it is cheaper to produce and maintain, and this affects the price of the car. At the moment, power steering is found mainly on budget class cars, which include Priora. An amplifier of this type is also installed on expensive, powerful SUVs. This is explained by the fact that the power steering is capable of transmitting greater torque transmission power to the steering. In this regard, it outperforms an electric booster, but there are still more disadvantages:
- In a car equipped with a hydraulic booster, it is not recommended to hold the steering wheel in the extreme right or left position for more than 5 seconds. Otherwise, the oil in the power steering on the Priora begins to heat up, which can lead to system failure.
- The mechanism requires constant monitoring of the oil level, inspection and replacement of drives, hoses, and pump.
- The pump depends on the operation of the engine, which means it takes a certain percentage of power from the power plant. If the power steering does not work when driving in a straight line, this percentage of power is wasted.
- Such a system does not imply setting operating modes depending on the speed of movement or the angle of rotation of the steering wheel.
- At low speeds, the steering mechanism provides good sensitivity, but at high speeds it becomes less pronounced.
Engineers compensate for the last drawback by using a steering rack with a variable gear ratio. Power steering has already become an outdated system; designers are no longer involved in improving it.
Electric amplifier design
The design of the EUR is simpler than that of the power steering. It consists of an ECU, a torque sensor, a steering angle sensor and an electric motor. There are no hoses or fluids here. The electric motor is mounted directly on the steering rack itself, and torque is transmitted to it via a torsion shaft built into the steering mechanism system.
In the case of power steering, the force is facilitated by liquid, and in the electric booster the current is responsible for this. When the driver turns the steering wheel, force is transmitted to the steering rack. At this time, the torque sensor transmits data to the electronic control unit. The controller calculates how much current needs to be sent to the electric motor to optimally facilitate steering rotation. Since the force must be uniform, the speed of movement and the angle of rotation of the steering wheel are taken into account.
If the steering wheel rotates without the vehicle moving or at low speed, as when parking, the electric motor receives maximum current and the steering wheel turns easily. When driving at medium and high speeds, such force is no longer required, and the controller supplies a lower current.
Pros and cons of EUR
The electric booster is a more modern system with high potential for modernization. It is not without its shortcomings, but there are fewer of them than the power steering:
- high price,
- The electric motor cannot provide high power, so it is installed only on passenger cars.
The disadvantages are leveled out, since the design of the electric amplifier is constantly being improved.
The EUR for the Priora has many advantages. The system is easy to maintain due to its simple design. The only part that requires inspection is the rolling bearing. The ESD mechanism has more compact dimensions and can be installed on the steering shaft in the cabin, freeing up space in the engine compartment. Due to this, the durability of the structure increases, since there is no exposure to temperature changes and high humidity.
The electric booster does not take power away from the engine, which saves fuel. The drive only operates when the steering wheel is turned. The ECU is responsible for the operation of the amplifier, with the help of which you can adjust the operating mode of the EUR, taking into account the operating conditions of the vehicle. The electric booster is not afraid of extreme steering positions. Driving at high speed makes the steering wheel with ESD more sensitive.
How to replace the steering rack on a VAZ 2170-VAZ 2172?
Note! The Lada Priora car was equipped with several types of racks, namely: On the first cars, a steering rack with hydro power steering was used, and on the second, with an electric power steering (On new Priors, with a modified appearance, with a different interior, etc.), but the power steering was not I also bypassed the Priora in the old body, it was used on it too, only not on all trim levels, all amplifiers are removed according to the same type, you just need to pump out the fluid from the power steering reservoir in the power steering, and remove the minus terminal from the battery in the power steering before starting work ( After removing the terminal, the rail is removed from the EUR in the same way as a regular rail; how to remove a regular rail is written in another article, which is linked in paragraph 3 below), quite a few words will be said about the first amplifier in this article!
Priora steering rack malfunctions
Problems with the functioning of the steering rack can be different. To identify them, it is not necessary to have a wealth of special knowledge; it is enough to periodically inspect the mechanism.
Large steering play
If you turn off the engine and actively turn the steering wheel, there should be no extraneous sounds. When not only suspicious noises appear, but also play is observed, the cause of the problem may be a weakened spool stop or insufficient elasticity of the torsion bar. The steering wheel may play due to severe wear of the silent blocks on which the steering rack is fixed. The same problem occurs when the angle of contact between the teeth and the screw is incorrect, or the curvature of the crankcase or shaft is caused by damage or the stroke of a screw-type bearing. To determine the malfunction, you will need to diagnose the rack bushing, steering rod joints and teeth.
The appearance of knocking and heaviness when turning the steering wheel
The steering wheel becomes heavy due to a soured cardan, but most often it is the knocking that occurs. There are a number of characteristic reasons for this phenomenon:
- noise occurs during the movement of the vertical bearing shaft;
- excessive wear of joints and crankcase;
- exhaustion of the life of a screw bearing, bushing or teeth;
- crooked shaft or crankcase, as a result the screw contacts the teeth with an offset angle;
- wear of silent blocks;
- loose rack fastening;
- steering wheel play.
In any case, you will need to carry out diagnostics, and if malfunctions are identified, you will need to dismantle and repair the Priora steering rack with replacement of worn elements.
Worn steering shaft center tooth
Wear of the mechanism with teeth occurs quite often. The main purpose of the steering shaft is to convert rotational motion into translational motion. Most cars are characterized by the exhaustion of the resource of the central teeth. The reason is simple: movement in city traffic is determined by driving in a straight line with slight deviations of the trajectory to the left or right.
To determine the malfunction, you need to swing the steering wheel to the sides from the middle position. If knocking noises are heard, it is better to carry out further diagnostics at a service station. If the central tooth is worn excessively, the entire shaft must be replaced.
What is the steering rack for front wheel drive cars?
In cars with front-wheel drive, there is no way to install the classic, long-proven front wheel steering control system. The transverse installation of the motor and power drives to the wheels will not allow this to be done. Therefore, the cumbersome system of levers was replaced by a steering rack. Its main task is to transfer force from the steering wheel to the steering arms.
Important! Most Priors are equipped with electric power steering (EPS) and not power steering. This is a feature of this model.
Location and design of the Priora steering rack with EUR
To save space, this element of the Priora control system is located on the wall of the engine compartment. On the bulkhead between the engine and the interior of the Priora. The rack is connected to the steering column located in the cabin.
Steering rack device
This important Priora control unit is assembled from the following components.
- The rack is mobile.
- Frame.
- Splined shaft with bearing.
- Metal case (casing).
- Seals and seals.
- Fasteners and accessories (bolts, nuts).
- Springs.
- Rubber cover for the mechanism.
The basis of this mechanism is a metal pin (rail), so to speak. There are teeth on one part of it. They are mated to the steering wheel drive shaft, located at right angles to the supporting pin. This is, in fact, the well-known worm gear. The rotating shaft moves, engaging the teeth, the rack inside the casing. The protective casing has a special slot for attaching tie rod ends. In the center of the pin (rack) there are special holes for tips, which are connected through special levers to turning wheels.
Malfunctions and their symptoms in the Priora steering rack with ESD
Most often, the rubbing parts of this unit fail. It is quite easy to determine whether the steering mechanism is broken or simply worn out. This will be marked by the following signs:
- The steering wheel is difficult to turn.
- When entering a turn, tapping and grinding noises are heard from the mechanism.
- While driving, when using the steering wheel, sensitive shocks are transmitted from it to the hands.
Problems in the operation of the hydraulic booster
All breakdowns of the Priora power steering, as well as the causes and methods of eliminating them, are listed in the table:
Malfunction
Remedy
| When turning the steering wheel, you feel a kickback (shocks in the opposite direction) | Worn or loose pump drive belt | Replacing or adjusting belt tension |
| It takes a lot of effort to turn the steering wheel. | The pump belt is worn or loose. Low fluid level in the reservoir. The fluid reservoir filter is clogged. Low pump pressure or air lock in the system. Insufficient engine idle speed. | Adjust or replace the drive belt. Add liquid to the reservoir. Replace or clean the filter. Replace the pump. Remove the air lock. Adjust idle speed. |
| More effort is required to rotate the steering wheel in the middle position | Pump or steering mechanism faulty | Check, repair or replace the pump. Find and fix the steering mechanism problem |
| More effort is required to turn the steering wheel to one side | The pump has failed | Pump repair or replacement |
| Steering is unclear | There is not enough fluid in the reservoir or it is leaking. Air in the power steering system. Resource development. | Add fluid and fix leaks if any. Remove the air lock. Check steering components and replace if necessary. Replace tires. |
| It takes a lot of physical effort to quickly turn the steering wheel | The belt tension has weakened. Air in the system. The pump is faulty. Failure of parts of the steering mechanism. Floating idle speed. | Pull the belt. Remove the air lock. Replace the pump if it cannot be repaired. Check and eliminate faulty parts of the steering mechanism. Adjust idle speed. |
| Noise during power steering operation | There is not enough liquid in the tank. The liquid is discharged through the safety valve (a whistle is heard when the steering wheel is turned to the extreme position). | Add fluid and fix the leak. Remove the air lock. Check the pump pressure, repair or replace the part. |
| Steering wheel vibration | Airlock. The wheels are out of balance or the tires are damaged. | Remove air. Balance wheels or replace tires |