Hello, dear readers of the Kak-Kupit-Auto.ru . Today I bring to your attention a detailed photo report on such an event as replacing the Kalina steering rack (steering rack 2110, 2112 of the new model). It is now June 2014 and the odometer of my car has almost 170 thousand km, and a year ago, at 144 thousand km, I repaired the steering rack and now drumming is heard from the steering mechanism again. I must say that repairing a steering rack is not a pleasant task, and I would like to get rid of the problem for a long time, which is why I decided to replace the entire steering rack of Kalina .
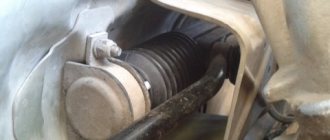
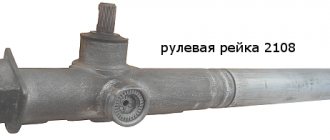
Strictly speaking, to replace the entire mechanism. It was necessary to replace only the rack (the so-called “rasp” ) and the plastic bushing in which the right end of this “rasp” moves, but I was unable to buy it separately, so I decided to replace the entire steering mechanism assembly. This is what the rack (“rasp”) looks like when fully extended to the right from the steering mechanism. As you can see, the right end of my Kalina's old steering rack was completely covered in rust.
The cause of knocking noises in the steering rack is the plastic bushing that secures the right end of the rack. When the bushing stops tightly fitting the rack, the latter begins to dangle, making a drum roll on uneven surfaces. I think that after last year’s repair, the bushing on my Kalina became loose due to rust that covered the right end of the steering rack. Last year, while repairing the steering mechanism, I replaced the bushing, cleaned the rack and lubricated it thoroughly, but after a couple of thousand kilometers the knocking in the rack began to return, and after another 5 thousand, the rack was already knocking no less than before the repair.
Diagnostics of the Kalina steering rack
So, dear readers, it is worth repairing the Kalina steering rack only if the right end of the rack is in perfect condition. If there is rust on it (as it was for me), then it will act as an abrasive and will “eat” the nylon bushing quite quickly. The right edge of the “rasp” should shine like a mirror, only then it will not break the sleeve.
Checking the condition of the right edge of the rail is quite simple. To do this, you need to carefully cut off the plastic clamp that secures the long right boot, then remove this boot and, turning the steering wheel to the left, visually inspect the right end of the rack that has emerged from the body.
I advise you to carry out such diagnostics before removing the rack from the car. And in general, if you are going to solve the problem with the rack yourself, then I sincerely wish you to remove and install it only once, because the process of installing the rack is quite complicated and can cause discomfort, especially if it needs to be repeated.
In the article about steering rack repair, I already mentioned how to determine that the knocking is coming from the Kalina steering rack . To do this, open the hood and give the steering rod a good tug with your hand . A serviceable steering rack bushing will not allow the rods to move even a millimeter, but with a “broken” bushing, the rods will shake.
At the beginning of this video you can clearly see the play of the steering rack after a run of 164 t.km, and at the end - a new steering rack after a run of 3 t.km.
As you can see, there is no play on the new rack. If on your Kalina do not dangle , it means that it is NOT the rack that is knocking .
Diagnostic methods
We drive onto an inspection hole or overpass. Applying force, we pull the ends and tie rods with our hands. The presence of play will indicate the need for repairs, otherwise you can proceed further, but this rarely happens.
Tool for work:
- Set of capes or heads;
- Screwdriver with flat and Phillips bits;
- Small hammer;
- Pliers;
- Roulette;
If you have a puller, otherwise be sure to purchase one (you can’t go anywhere without it). Available for sale at any auto store or car market. It is advisable to take a high-quality one, and not a cheap fake. There are two types: universal and corner. Most practical is a universal one, tested on more than one driver.
The repair kit should consist of:
pairs of ends, tie rods and tie rods, nuts, cotter pins, tie rod bend, one plastic bushing. For more information, read the article “What is included in the steering rack repair kit.”
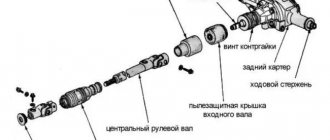
Replacing the Kalina steering mechanism assembly
So, dear readers, I will describe how I changed the Kalina steering rack assembly. The day before, after calling a couple of stores, I found out that a regular original 4-turn rack would cost me 4 thousand rubles, and a version of a factory 3.1-turn rack would cost no less than 4,700 rubles. Heading to the store, I intended to buy a 3.1-turn rack, but on the sales floor I suddenly realized that the sporty ambience of the 3.1-turn rack was of no use to me, and the standard factory 4-turn rack suited me completely. In addition, I was also pleased with the opportunity to save money; in general, an original factory 4-turn rack was purchased, identical to that installed from the factory.
If anyone doesn’t know, then 4 revolutions is the number of revolutions of the steering wheel from the extreme right position to the extreme left and vice versa. My car is not equipped with an electric power steering, so with a 3.1-turn rack, turning the steering wheel would be somewhat more difficult than with a 4-turn rack. But with a 3.1-turn rack, the steering wheel becomes more sensitive, for example, less steering movement is required to avoid obstacles. We can say that the 3.1-turn rack is more suitable for drivers with a sporty driving style .
The original steering mechanism without tie rods is not for sale, so I had to buy all this stuff as a set, although I still need to replace the steering ends The steering tips on the new rack, by the way, differ from the “native” Kalinov ones, with which there are difficulties when adjusting the camber. The rail I bought was equipped with 10's lugs, which made me personally very happy. But this time I still won’t change the steering rods and ends; we’ll talk about this some other time.
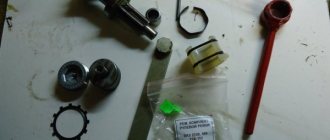
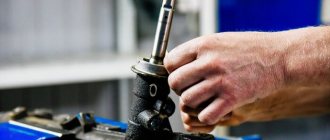
When buying a new rack assembly, I prepared in advance to completely disassemble it and lubricate it thoroughly , because for some reason they save lubricant at AvtoVAZ . If you are not interested in additional lubrication of the rack, then you can skip this moment, otherwise I recommend that you disassemble the new rack and lubricate it in advance , before removing the old rack from the car. For example, no matter how hard I tried, I couldn’t unscrew the stop nut on the new rack - the key failed, and I couldn’t go get another key, since by that time the car was already without a steering mechanism.
The tool that I used when replacing Kalina's steering rack is described in more detail in the article about repairing the steering mechanism, you can look there, I will only give a photo here.
If you disassemble and lubricate the new steering mechanism , you will need nylon ties to secure the rubber boots of the rack. The length of plastic ties should be at least 28-30 cm .
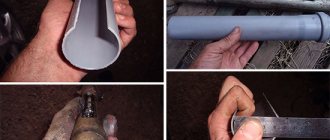
Since steering rods for now, I’ll put the new ones aside for now. To remove them from the new rail, I use a powerful wrench with a 15mm head and reinforced with a half-meter piece of steel pipe.
Next, carefully cut off the plastic ties, remove the anthers and look at the contents of the new steering mechanism . As expected, there was not much lubricant inside the rack .
As you can see, the bushing in the new factory rack works almost “dry”.
On the side of the worm shaft the situation is somewhat better, but it wouldn’t hurt to add lubricant here too, especially from below, where stop the rack to the worm .
No matter how hard I tried, I could not the rack stop nut The key that helped me out during last year's repairs, this time lost its position and began to bend at the junction with the octagon. Either the key had softened since last summer, or AvtoVAZ had tightened the nut too tightly, but I only managed to unscrew it half a turn. At the same time, the old steering rack had already been removed from the car and options such as going for a new key or postponing repairs did not suit me. In general, I tightened the nut to the maximum, loosened it 2 notches (as required by the instructions) and decided to lubricate the rack without completely disassembling it .
Turning the worm shaft first in one direction and then in the other, I filled the rack with half a tube of lithol inside, so much so that it began to climb out of there. This is what happened.
the anthers in their places and tighten them with clamps . Before doing this, do not forget to put this plate in place .
Great! The new steering rack for Kalina is ready for use and can be installed on the car. The removal and installation process is described in detail in the article on steering rack repair; we will repeat it briefly. First of all, we remove the battery and the pad under it, disconnect the pad from the wires screwed to it, which are secured with a tricky clamp (pictured on the right).
It is advisable to clean the nuts securing the rack to the engine shield from dirt and spill it with “Vedashka” or kerosene in advance. This is a very important point! These nuts must be unscrewed with great care , without applying force, otherwise you can easily twist the pin welded to the body and then replacing the rack can become a big problem. You will have to look for a suitable bolt, drill a hole in the body and insert the bolt from the inside. In general, be careful when unscrewing and tightening the four nuts that secure the steering gear to the body !
Next, we remove the air duct between the air filter and the engine and, in order to protect the engine from possible dust, we plug the vacated holes with rags, just in case.
Next, for ease of operation, unscrew the nut securing the thermal protection .
We remove the locking plate and use a powerful wrench with a 15mm head to unscrew the steering rods from the rack.
It’s good if by this point the penetrating lubricant has already done its job, because now is the time to unscrew the steering rack from the engine shield . I remind you: you need to do this literally with two fingers , without any extra effort. If it doesn’t work, then it’s better to clean the threads again, spray with WD-40 and wait a couple of minutes.
Having unscrewed the steering mechanism from the engine shield, we go into the interior and completely unscrew the bolt that tightens the flange of the elastic coupling of the steering shaft.
to loosen the flange with something , then it will easily detach from the steering gear shaft. You can loosen it, for example, with a powerful screwdriver or a small pry bar.
Now, from the engine compartment, carefully move the steering mechanism away from the engine shield, trying to disconnect it from the steering shaft. If the flange tightening bolt is unscrewed and the flange is loosened, then this will happen easily and naturally.
Having disconnected the rack housing and slightly raised the left front wheel with a jack (it is not necessary to lift it off the ground), we remove the steering mechanism through the opening in the wheel arch. Attention! If you do this in the garage, then leave at least a meter of free space to the left of the left front wheel in advance.
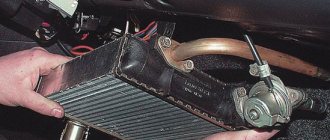
Here it is - the original steering mechanism , installed on the car at the factory in Tolyatti. We remove the fastening parts and move all this stuff to the new steering rack .
The new steering rack is ready to be installed on the car.
Through the same opening in the left front wheel arch, we place the new steering mechanism into the engine compartment and install it in place. And here, dear readers, is where the fun begins. If you work together, then it will be easy for you to connect the rack with the steering shaft, but doing it alone is quite difficult, but I will now explain to you how to proceed in order to do everything quickly and keep your nerves in order.
Leaning the steering mechanism against the engine shield, lightly tighten the lower nuts securing the steering rack to the body. Do not tighten the upper part of the fasteners; let the body hang freely on the lower nuts.
To make the splined part of the worm shaft easier to connect with the steering shaft flange, I recommend that you lightly lubricate the connection point with some thick lubricant (for example, lithol), this way the parts will connect much more readily.
the steering rack removed, Kalina's steering column has free longitudinal movement. To make it easier to connect the elastic coupling flange with the rack shaft, I pulled the steering wheel towards me and it moved a couple of centimeters into the cabin.
Now, using a screwdriver, we combine the rack shaft and the flange of the elastic coupling of the steering shaft. Attention! The flange slot should be approximately in the middle of the ground part of the rack shaft. This is the only way you will be able to fix the flange with a coupling bolt and not damage the thread of this bolt.
Don’t worry about the position of the steering wheel; it’s easier to move it to the desired position later than to try to guess the right position of the flange on the shaft now. When the shaft engages with the flange of the elastic coupling, turn them so that the groove on the shaft is vertical .
As you can see, the rack shaft and coupling flange are at an angle to each other, which is why it is difficult to align them. We solve the problem this way: use a screwdriver or a small pry bar to tilt the flange, trying to align its axis with the axis of the rack shaft . It all looks something like this:
When the coupling flange is on the same axis with the rack shaft, you can lightly hit the center of the steering wheel and the elastic coupling flange will slide onto the steering rack shaft .
Check. The shaft should fit into the flexible coupling flange clamp like this.
As soon as the Shaft is in place, return to the engine compartment and tighten the upper nuts securing the rack to the body. Attention! Be careful when tightening these nuts! Don’t forget, it’s better to under-tighten them than to over-tighten them!
If it was not possible to align the shaft with the flange the first time, then you need to try again and then everything will definitely work out. And here's another little tip: when you tighten these nuts, lubricate the protruding part of the threads of the studs with grease. Then the studs will not sour even after several years, and you can always unscrew the rail without tearing off the studs.
And now the important moment ! If you now try to tighten the flange coupling bolt with a wrench, you can easily damage the threads on it, and this will certainly happen if the bolt does not fit into the recess on the shaft. This is exactly what happened to me, so I had to tighten the flange with a thinner bolt and nut and then go to the spare parts store. The ball joint mounting bolt from the classics turned out to be suitable; it cost 5 rubles, so I bought several in stock at once.
So, if you want to avoid this annoying nuisance, then make sure that there are no obstacles in the way of the coupling bolt. First , when the flange is connected to the shaft, the notch of the steering shaft must be in the right place - where the pinch bolt will be located. And secondly , push the steering wheel away from you so that it presses against the plastic trim of the steering column, it should look like this:
In this case, the flange will fit onto the steering gear shaft as much as possible:
Now you need to tighten the coupling bolt, but only by hand. There is NO NEED to tighten it with a wrench!
To avoid damaging the threads of the flange coupling bolt, it must be tightened by hand, without using a wrench.
If everything is done correctly, the bolt will tighten without problems. If something interferes, then you need to eliminate the cause, otherwise you will only damage the thread, and you still won’t be able to tighten the bolt.
Now that the bolt is tightened, but not yet tightening the flange, you need to push the steering wheel back towards you so that a gap will form under it again, otherwise the steering wheel will rub against the steering column cover with a squeak. So, with both hands, pull the steering wheel towards you, you can even pull it slightly.
Everything worked out? Great! Now you can tighten the coupling bolt with a spanner.
At the next stage, using a meter wrench with a 15mm head, we fasten the steering rods to the rack and do not forget to install a locking plate over the bolt heads.
Finally, the new steering rack is installed on the car, which means that now is the time to check its condition by pulling its “whiskers” with your hand. The steering rods must remain motionless, no matter how you try to move them.
Then you can collect everything and put it in its place. We install the platform under the battery and screw the wires to it from below. We screw the thermal protection to the body, put the air duct in its place and tighten it with clamps. We install the battery, connect all the connectors, if for ease of operation you disconnected them.
Rail repair
Repairing the rack must begin with its adjustment. Most likely, after adjustment, all knocking will disappear. If it doesn't help, you'll have to disassemble it and change parts.
Adjustment
You can adjust the VAZ 2114 rack as follows: directly on the car or by removing it. The second method is needed after repairs. The car must be parked on a viewing hole; alternatively, a lift can be used. The adjustment is carried out as follows:
- The VAZ 2114 must be put on the parking brake, locking the rear wheels;
- Next, you should disconnect the negative terminal from the battery and lock the steering wheel;
- The manufacturer has provided a special adjusting nut with which you can quickly adjust the unit. This element is located on the mounting side of the part facing the car body;
- If adjustments are performed rarely, there will be a large layer of dirt on the adjusting nut - this must be removed with a cleaning agent. Adjustment is carried out using a special key.
If repairs were made, the adjustment should be made in a vice. If the adjustment is done correctly, then there should be no play when turning the rods. In the VAZ 2114 steering wheel itself, the play should be about 15 degrees. The steering wheel should rotate without snagging or additional effort. If the steering wheel returns to its original position on its own, then the adjustment has been completed correctly. The above work must be repeated after 500-800 kilometers.
Disassembly and replacement of parts
When all problematic fasteners are lubricated, you can begin work:
- The front part of the VAZ 2114 must be lifted and the wheels removed. After this, you will have access to the steering tips, which also need to be removed;
- Next, you need to move into the cabin and disconnect the steering shaft there. Now you need to unscrew the nuts securing it to the car body. After removing all fastening elements, the part should be moved to the side and pulled towards you; Unscrew the nut near the brake pedal.
- The VAZ 2114 unit is dismantled quite easily, now you need to disassemble it - at this stage you will need special keys, which will also be useful when adjusting the steering rack;
- First you need to dismantle the rods (it is recommended to mark the required side so as not to get confused during assembly). Next, remove the rubber tip and boot. Now the motorist has access to the shafts - it can be reached after removing the thrust and adjusting sleeve. From inside the steering rack housing you can reach a plastic bushing, which should also be removed. All parts must be thoroughly cleaned of dirt and grease;
- The repair begins with troubleshooting the VAZ 2114 steering rack elements. After this operation, you can determine which parts need to be replaced. The housing and shafts should be inspected for scratches and cracks. The bearings are the first to collapse, so it is recommended to replace them regardless of the condition of the old ones; In the engine compartment, use the same “13” key to unscrew the nuts securing the steering mechanism.
- When all the defective parts have been found, assembly can begin: the bearings and a new plastic tube are pressed in. Next, the shafts are installed, which should be thoroughly lubricated;
- The next step should be preliminary adjustment. The bushing is clamped until it stops and then loosened. The bushing must be in such a position that the shaft can be turned by hand. After this, you should put on new rods without tightening them. It is also recommended to wear a new boot.
The most interestingPublished October 13, 2016
The result of replacing the Kalina steering rack
Great! Now you just need to do a test drive. Take a marker with you to mark the highest point on the steering wheel when driving in a straight line. Returning to the repair site, we will move the steering wheel so that it faces straight.
So, sea trials. Having closed the garage, I pulled out onto the road and noticed that, out of habit, I was avoiding small bumps and politely slowing down in front of them. Having made a heroic effort on myself, I literally forced myself, without slowing down, to direct the car onto the side of the road covered with coarse gravel, and here was the long-awaited feeling of satisfaction: the roar had disappeared, the car went smoothly, methodically handling the unevenness with the suspension, but in the cabin it was practically inaudible .
I really hope that the well-lubricated and hermetically sealed new steering rack on my Kalina will last at least 3 years (for me it’s 75 thousand km), and after that I’ll definitely take it apart, wash it, lubricate it and replace the rubber covers, but only if The “rasp” will not rust.
Malfunctions of RM Kalina and ways to eliminate them
Even the most reliable mechanisms wear out, especially if they are not protected from dust, dirt, water and aggressive environments. Although the steering rack of the Lada Kalina is located under the hood of the car and is protected from below by a pallet, during operation, especially in off-road conditions, it is exposed to all of the listed factors. The main malfunctions of the PM can be grouped into three groups:
- large free play of the steering wheel;
- knocking, noise and creaking in the mechanism;
- tight steering wheel.
How to put the steering wheel straight on Kalina?
After repairing or replacing the steering rack, it is not always possible to position the steering wheel so that it faces straight, so many car enthusiasts have a question: how can Kalina place the steering wheel straight? Indeed, when the steering wheel is straight when driving in a straight line, it is not only pleasant, but also convenient. It's just easier to hold on to.
To then set the steering wheel straight , first, while driving in a straight line, make a mark at the top point of the steering wheel, and when you arrive at the repair site, place the steering wheel so that this point is at the very top. Next, pull the central part of the steering wheel towards you, it will detach and end up in your hands.
The horn terminals must be disconnected, the central part of the steering wheel can be put aside.
Using a 24mm wrench, unscrew the nut securing the steering wheel to the steering shaft.
Don't forget to mark the position of the steering wheel relative to the shaft with a marker.
Now we take the steering wheel with both hands (at 9 and 3 o’clock) and, alternately shaking each hand towards and away from us, carefully remove the steering wheel from the splines of the steering shaft. As soon as the steering wheel is removed from the splines, turn it to the position you need (that is, put it straight) and put it back on the splines. Now, when driving straight, your steering wheel will also point straight.
My steering wheel was slightly skewed to the right, so I moved it one slot to the left, like this:
Removing the Kalina electric power steering column
- Medium Phillips screwdriver
- Large flat screwdriver
- Marker
- Open-end wrench 10 mm
- Open-end wrench 13 mm
- Driver for socket attachment
- High nozzle on the wrench 13 mm
- Knob attachment 13 mm
- Knob attachment 24 mm
1. Set the wheels to the straight-line position of the car.
2. Disconnect the wire terminal from the negative terminal of the battery.
3. Remove the steering wheel as described here. We remove the steering column switches as described here. Disconnect the ignition switch wire connectors from the instrument panel wiring harness connectors. If necessary, remove the ignition switch from the steering column.
4. Using a Phillips screwdriver, unscrew the three screws.
5. Then remove the lower cross member of the instrument panel.
6. Pressing the latches, disconnect the two wiring harness blocks from the power steering control unit. Disconnect the wiring harness connector from the steering column switch connector as described here.
7. Using a high “13” head, unscrew the four nuts securing the bracket (the fourth nut is not visible in the photo).
8. Lower the steering column to the floor.
9. If necessary, remove the connector for the steering column switches, as described here. Using a 13mm socket, unscrew the nut of the bolt securing the lower cardan joint to the steering gear shaft. If the bolt turns, hold it with a 13mm wrench.
10. Remove the bolt.
11. Using a powerful slotted screwdriver, release the terminal connection of the hinge.
12. Remove the intermediate propeller shaft from the steering gear shaft.
13. Before disconnecting the intermediate propeller shaft from the steering shaft, use a marker to mark the relative position of the upper joint of the propeller shaft relative to the steering shaft. Using a 13mm wrench, unscrew the nut of the hinge coupling bolt. If the bolt turns, hold it with a 13mm wrench. We take out the bolt.
14. Using a screwdriver, open the terminal connection of the hinge.
15. Remove the intermediate driveshaft from the steering shaft.
Intermediate cardan shaft
16. Install the intermediate driveshaft in the reverse order. When connecting the upper joint of the intermediate propeller shaft to the steering shaft, it is necessary to align the previously made marks. Install the steering column in the reverse order. Installation this way is best done with an assistant.
However, it is more convenient to install the column when the lower hinge of the intermediate propeller shaft is installed on the steering gear shaft in advance. To do this, after connecting the intermediate propeller shaft to the steering shaft, use a 13mm wrench to unscrew the nut of the intermediate shaft coupling bolt.
Is it necessary to do a wheel alignment when replacing the steering rack?
In conclusion, I would like to discuss with you this question, which is probably asked by everyone who is going to replace or repair the steering rack: is it necessary to adjust the wheel alignment after repairing or replacing the steering rack? There is an opinion that this must be done; personally, I believe that the wheel alignment angles are NOT violated during such repairs , and therefore it is not necessary to adjust them . When replacing a steering rack, as well as when repairing it, the suspension geometry does not change in any way; the steering rods are unscrewed from the rack and then screwed back, while all dimensions remain the same.
It’s another matter if, when replacing the steering rack, you also change the steering rod assemblies or at least the steering ends . In this case, it is unlikely that you will be able to accurately adjust the length of the new steering rods, and therefore adjusting the wheel alignment angles is simply necessary .
In this article, we looked at the option of replacing the rack without tie rods and ends, and therefore the procedure for replacing Kalina’s tie rod ends will be discussed in a separate article.
Electrical faults of the electric booster
When troubleshooting electrical problems, be sure to remove the terminal from the battery. This procedure must be performed during any electrical work in the car.
Operation failure
It happens that when you turn the key in the ignition switch, the icon indicating a malfunction in the EUR turns on again. A possible malfunction is a breakdown of the amplifier drive motor. It is possible to fix such a malfunction yourself if you have electrical knowledge. If you are unable to repair the electric motor, it is recommended to replace it with another one.
Operation failure may also occur in the following cases:
- The fuse has blown. However, it is recommended to replace the fuse only after eliminating the cause of its blown. The fuse is designed to protect the electrical circuit from short circuits. When the wires are shorted, they heat up and the fuse link melts, breaking the electrical circuit. There is probably an overlap of wires in the circuit and their further short circuit. Eliminate the cause and only then change the fuse.
- Poor contact at the connections, resulting in a lack of power in the amplifier circuit. Correct the contacts or clean the wire connections.
Speed sensor
One of the most vulnerable elements of the system is the speed sensor. This is an electrical device that is designed to control the electric drive of the amplifier at various speeds.
The fact is that using ESD at high speed can cause an accident, since the slightest rotation of the steering wheel will lead to the car being driven off the road. This sensor reads the speedometer and, as speed increases, weakens the power steering effect. Thus, it turns out that at high speed the power steering operates in the same way as when using a mechanical amplifier.
The main malfunction of the sensor is its failure. If the sensor fails, the amplifier circuit does not receive speedometer readings and the amplifier is turned off. After this, a special icon on the instrument panel lights up (steering wheel with an exclamation mark). In this mode, the amplifier operates without an electric drive and does not interfere with the steering. In this case, you just need to remove fuse F31 in the block to the left of the steering wheel to completely disconnect the circuit before replacing the speed sensor.
Ultimately, to fix this problem, you just need to change the speed sensor.
Mechanical problems
Mechanical failures of the power steering include various damage to the amplifier structure, jamming, deformation and fracture. In cases with mechanical faults, the electric amplifier must only be replaced.
Replacing the Kalina steering rack. Results
So is it worth repairing the steering rack on a Kalina (ten, twelve, etc.) or is it better to replace it right away? Let's summarize which option is better to choose and in which case.
- If the right end of the rack is covered with rust , then it is useless to change only the bushing; the rasp itself must also be changed. If you come across a rack that is sold separately, then replace this rack and bushing. If you can’t buy a “rasp” separately from the body, then replace the entire steering mechanism assembly, it’s easier.
- If the rack is clean, without traces of rust , then feel free to change the bushing, stop and central protective cover (corrugation), and at the same time thoroughly lubricate the insides of the steering rack. With this kind of prevention you can save several thousand rubles, and how to perform this repair, read the article repairing the Kalina steering rack
That, my friends, is probably all! At the moment, I am satisfied with the repair of Kalina's steering rack (I've been driving with the new rack for a week), the results are exactly what I expected. I only hope that the effect will last for a long time, because I don’t plan to remove the rail again in the near future - this is a very dreary task.
Dear readers! I hope this material will help save your time and effort and I wish that the steering rack on your car will run for a very long time and never knock at all! See you soon in the next articles!
PS Today is January 29, 2015. Mileage 200 t.km. The steering rack is in order, there are no extraneous sounds.
Replacement algorithm
- We place the car on a flat surface, it can be like a garage or a forest belt along the highway;
- We clean the nuts and boots from obvious coarse dirt;
- Using pliers,
remove the cotter pins that secure the tips; - Use a cape to unscrew the nuts on the steering rods;
- Using a puller, press out the tips. It is strictly forbidden to confuse the left and right sides, as they are different;
- Take measurements between the centering holes
. The indicators will be useful to you when installing new ones; - After the rods are twisted, do not clamp the clamps;
- Unscrew the 4 bolts using capes and remove the steering rack assembly from the car body;
- Unscrewing the two bolts, we take out the worm to facilitate access to the rack;
- Pressing out the old bushing. We carry out diagnostics of the rack. If there are defects and eaten splines, we replace them. If not, press in a new bushing and put the worm in place;
- Screw the steering column into place
; - We install the rods and set them according to size. Don’t forget about the right and left sides, and the transverse one should be placed with its convex side towards the engine crankcase;
- Having tightened it moderately and pinned the pins of the tips, we check the entire system as a whole.
- Having checked everything, we test the car.
- Electric, used in city cars, because... Under heavy loads, the electric motor often fails.
- Mechanical ones are used less and less in cars.
- Hydraulic, a hydraulic pump is installed on these racks, which makes it easier to turn the steering wheel.
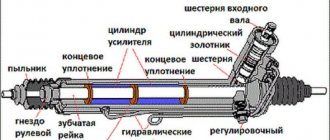
The steering rack (steering gearbox) transmits force from the steering wheel to the wheels through rods. The tie rod is one of the main parts of the steering system. There are three types of steering racks:
Faults associated with the steering rack may be indicated by knocking noises when turning, and the force required to turn the steering wheel also increases.
It is quite difficult to check the condition of the steering rack due to its inaccessibility. To check the steering rack, you have to disassemble the entire steering mechanism.
conclusions
Experience shows that it is possible to repair the Lada Kalina steering rack with electric power steering with your own hands. Of course, this procedure will take a day, maybe two. The main thing is not to rush and choose all the parts of high quality and correct. It is recommended to install new bearings, since even if there is no play, it is not known how long it may appear.
Tools:
- Driver for socket attachment
- Knob attachment 10 mm
- Knob attachment 13 mm
- Tubular socket wrench 17 mm
- Octagon key 24 mm
- Hex key 6 mm
- Jack
- Side cutters
- Chisel
- Large hammer
- Medium flat screwdriver
- Circlip pliers
- Scraper
- Vise
- Mounting blade
- Electric drill
- Bearing puller
- Mandrel
- Beard
Parts and consumables:
- Wood block
- Pipe fastening nut
- Stop nut
- Drill 4 mm
- Gear shaft needle bearing
- Fiol-1 grease
- Roller Thrust Bearing Outer Race
- "Fast steel" or "Cold welding"
- Pipe section
Video
This video shows how to repair the steering mechanism on Kalina.
Knock in Kalina steering rack. How to remove.
Installation of Kalina steering rack.
Repair of the steering column gearbox and the RR itself on Priora, Kalina, Grant.
How to install a steering rack from Kalina 2 to Kalina 1.
Steering rack for Lada Kalina Sport with a gear ratio of 3.1 instead of 4.02.
Do-it-yourself repair of the steering rack, but not Kalina, but Daevoo Sens / Daewoo Sens.
How to disassemble and repair a rack when jammed
The repair procedure, like replacing the steering rack, begins with disassembling the unit. To perform a set of actions, we purchase a repair kit.
- To disassemble the rack, unscrew the adjusting nut and then remove the thrust bushing. If at the moment we are experiencing difficulties, then we use a mallet, with which we apply gentle blows to the rack body.
- We dismantle the side plugs along with the boot. First cut off the plastic fasteners.
- We must replace the boot with a new product.
- We also use a mallet to remove the shaft from the rack body.
- Inside the freed crankcase we find a plastic sleeve, which we remove using a screwdriver. We also replace this component with a new analogue (present in the repair kit).
- We clean the internal cavity of the rack housing from old grease. Wash and dry.
- Apply new grease. We lubricate the gear pair with special care.
- We inspect all other components of the rack and pinion mechanism and if wear is suspected, we replace them. Removing the steering wheel in a Lada Kalina works like this.
1. Disconnect the battery.
2. Turn off the airbags. Loosen the clamps and move them to the side.
3. Disconnect the two-wire horn connector.
4. We move on to the steering shaft and in the area where the arrow is present, we outline the location (until removal).
5. Loosen the steering wheel nut, but do not completely unscrew it.
6. We take the steering wheel and, using rocking movements to the sides, move it close to the indicated nut.
7. Now we align the wheels and place the steering wheel in a strictly straight position.
8. We take out the pin, and then insert it into the switch block located directly under the steering wheel. At this moment, the steering wheel rim should be clearly fixed.
9. After removing the wires, we proceed to removing the steering wheel itself.
10. We check the integrity of all elements.
11. Assembly is carried out using the reverse algorithm.