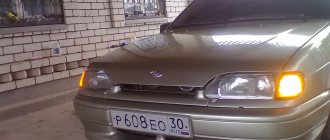
On VAZ-2112 model vehicles, left and right headlights are mounted on the front. This design combines both low and high beam. Manufacturers can be Bosch or Avtosvet, respectively, and the products have minor differences. However, the mounts are always located in the same places, which allows you to easily install headlights made in different factories. The light bulbs used are also absolutely identical. Their characteristic feature is the presence of only one filament coil.
General information
Modern models of the Volzhsky Automobile Plant are equipped with many devices, including many lighting ones. All of them are connected to a single electrical circuit of the car, but they perform different functions.
So external lights and signals serve for:
- road lighting at night;
- determining dimensions;
- demonstrating to other road users the car enthusiast’s intentions.
In addition, there are also light bulbs in:
- salon;
- trunk;
- engine compartment.
External devices include:
- side and signal lights;
- block headlights;
- rear lights;
- fog lights;
- number plate illumination.
The headlights have a special adjustment device - a corrector. With its help, the driver, without leaving the cabin, can direct the light up or down depending on the need.
Content
The easiest way, without a doubt, is to entrust everything to the reliable hands of a trusted auto electrician, but it is not too difficult to cope with some problems on your own - if you have the smallest amount of free time and a primitive acquaintance with the basics of electrical circuits.
The low beam of the headlights does not light up, but the high beam is on - this phenomenon can be due to several reasons. And most of them are quite easy to fix. Moreover, this can happen to your car at a completely inopportune moment: on the highway, for example, when you need to switch to low beam so as not to blind oncoming drivers with headlights. Let's try to deal with all the flaws one by one, and consider: what might be the most common options for repairing and troubleshooting such an important segment as low-beam lighting.
The most common lighting problems in the VAZ-2112
All faults that arise are divided into two categories:
- mechanical;
- electric.
During vehicle operation, external lighting devices are exposed to various negative influences. They are often rendered unusable:
- stones flying out from under the wheels of cars driving in front;
- sand;
- branches of bushes, etc.
Thus, the first thing to do if you were unable to turn on the headlights is to check their integrity. The simplest option in this case is to replace the entire unit that has become unusable. Removing it is not difficult. In addition, the headlight can be repaired. It is important to pay attention to restoring its tightness - ignoring this requirement leads to rapid failure of the entire unit, since moisture that gets inside contributes to:
- constant fogging of lenses;
- oxidation of contacts;
- rapid wear of fasteners.
The most common electrical failure is a light bulb burnout - this is usually indicated by the failure of only one of the headlights. There are no special options here - you will have to change it to a working one.
If the lamps are good, then you should suspect the following faults:
- the fuse link has burned out;
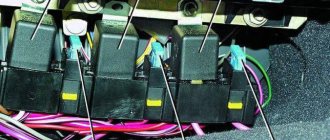
- the electromagnetic switching relay has deteriorated;
- one of the circuit contacts has come off (or oxidized);
- there is a break in the wires;
- there is no mass.
How to turn on headlights without MUS
You can turn on the headlights when the light control module has failed by dismantling and removing the chip from it. On the chip you need to find contacts numbered 10 and 12 and insert a copper wire jumper between them. After installing the jumper, the headlights turn on when you turn the ignition key.
This method will help you get to the nearest service station in the evening. It is not recommended to use the jumper for an extended period of time as it does not provide proper contact and can cause heat to build up, putting you and your vehicle at risk.
How to replace a broken lamp
For an experienced car owner, installing a new lamp will not be difficult, but a beginner will have to suffer a lot.
The order of work is as follows:
- first of all, you should remove the wire from the negative terminal of the battery - this will de-energize the on-board electrical network;
- to get to the lamp, you need to remove the rubber gasket from the hood side;
- after this, disconnect the terminals from the headlight;
- then pull out the latch by pressing the springs holding it;
- remove the burnt out light bulb and install a working one;
- reassemble.
The lamps could burn out
Halogen lamps are designed in such a way that different filaments are responsible for the low and high beam. That is why drivers are often faced with a situation where there is high beam, but no low beam. The reason may be precisely the lamps that simply burned out.
How to fix the problem? Nothing complicated, no electrical knowledge required. It is enough to open the hood, pull out the contact group, release the clamps, unscrew the old lamp and install a new one in its place.
Both headlights do not work
In the case when two headlights fail at once (and both the high and low beams do not work), the switch responsible for the external lighting is first inspected. It is easy to test the circuit using a test light or a regular tester. One wire is applied to ground, and the other to the 30th terminal. If this is not the problem, then there will be 12 volts on it (even with the ignition off). After turning the key, voltage will also flow to terminal 10. Such diagnostic results allow us to say with complete confidence that the light does not come on precisely because of the switch.
If there is no voltage at the terminals mentioned above, then most likely the wires have broken or the contact has been lost.
Main types of main headlights
Based on their design principle, headlights are divided into two types: European and American. The key difference between head light is as follows:
- Low beam focusing . In European headlights, the beam of light is directed at the road surface and the right shoulder; in American headlights, the focus is uniform, the luminous flux illuminates the road, both sides and signs placed above the road.
- Shape of the light beam . The European standard aims to more clearly define road signs and improve their readability in the dark. The American type involves illuminating the roadway, focusing on general illumination.
- Clarity of the boundaries of the light flux . Unlike the American type, the European standard has clearer illumination boundaries. This makes it possible to use powerful lamps and minimize the risk of blinding an oncoming driver.
- Difficult to adjust . The European headlight system allows adjustment by eye thanks to the presence of several spheres. In the American standard, performing a similar procedure is a more complex undertaking. Only a true specialist can complete the task of adjusting American standard headlights with high-quality results.
Almost every motorist is faced with the problem of adjusting headlights, or repairing certain optics. Violation of their functionality creates a real threat to traffic safety. A decrease in lighting efficiency can lead to a lot of unforeseen situations, which significantly increases the likelihood of emergency situations. Adjustments or repairs can be made in two ways: using special equipment or manually. The first option is usually implemented in car services. After all, not every motorist can afford to purchase professional equipment that requires special knowledge to operate. The second option, self-adjustment, is a fairly common procedure among motorists. However, there are many supporters of this method who claim that only car service specialists can provide high-quality results. This procedure requires knowledge and high precision in performing all actions, which not every car owner can do. How to adjust headlights yourself, what should you pay attention to? Before answering this question, let's consider the reasons for poor lighting quality.
High or low beam does not turn on
The inability to turn on two high beam headlights requires a mandatory check of relay K5. It is located in the mounting block located in the cabin (to the left of the steering wheel).
How to find out if this relay is working. Pull it out and place a jumper between the 87 and 30 connectors of the block. After this, try to turn on the light. The activation of the headlights indicates a breakdown of the above-mentioned unit. It cannot be repaired in principle, so it will have to be replaced.
The reason for the failure of both low beam lamps is diagnosed in the same way, only you will have to close contacts 87 and 30 on the K4 relay block - it is the relay that is responsible for this electrical circuit.
Other reasons
Lamps are one of the simple and common reasons for the lack of low beam, but they are far from the only one. I strongly recommend that you also check:
- Headlight fuse - blown or not
- Relay - functioning normally or broken
- Button - works properly, or is stuck
- Wiring - are they oxidized, do they allow current to pass through?
Carefully inspect the entire wire, as well as the terminals for connection to the fuse and relay. If necessary, tighten the nuts and clean the contacts. Also, don’t forget about the button, the wire going to it could have fallen off, or simply come off. In domestic cars, it is the button that needs to be checked first - this is one of the weakest points!
When the headlights on any car simply do not work, this is an ordinary case. The cause could be the light switch, fuses, or other common things. The “ten” has a feature, without knowing which you can check everything you can to the point of stupor, but still not find the fault.
Usually everything looks like this: the headlights or side lights of the “ten” do not work, and randomly, for example, the left side headlight does not work, the side lights on the right front and left rear do not work. The fuses are intact and many owners of the “ten” are very surprised. It's no wonder if you don't know one secret.
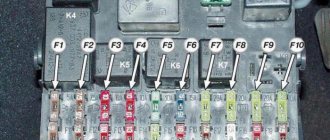
This secret is located in the fuse box, which on the VAZ-2110 even looks like a black box. Once you open it, you will see fuses and relays, with one relay being larger than all the others. It is called a lamp monitoring relay and ensures that the lamps in the headlights and side lights are intact. When a light bulb burns out in the indicated places, the relay sends a signal to the display unit of the on-board control system, the pictogram lights up in it and a typical decimal “ding-ding” is heard.
Only one headlight is off
So, you saw that one of the high beam (or low beam) headlights did not turn on, and you found out that the bulbs are working, and the voltage is supplied by the battery or generator. In this situation, checking the circuit begins with the fuse. So, if the problem occurs in:
- right headlight (low beam), then inspect F12;
- left – F2.
Both of these fuses have the same rating - 7.5 amperes. At the same time, for the right high beam, voltage is supplied through F3, and the left one feeds F13.
All the fuses mentioned above are located in the same block where relays K5 and K4 are located. If you don’t have any new ones in stock, install a temporary jumper. For this, a copper wire with a thickness of at least 0.3 millimeters is suitable - this cross-section will withstand a current of 10 amperes. As an alternative, aluminum foil rolled into a flagellum will also work. In any case, remember that this is a temporary measure, and replace the fuse with a new one as soon as possible.
Circuit breakers
[custom_ads_shortcode1]
Now let's see which fuses are responsible for what in the same mounting block. I will also give the main reasons for troubleshooting.
F1 (5 A) - license plate lighting lamps, dashboard lighting, side lights on the panel, trunk lamp, left side lights . If any of the listed lamps do not work, check this fuse, as well as the lamps themselves and their contacts. If everything is in order, check the headlight switch button.
F2 (7.5 A) - low beam in the left headlight . If both low beam headlights do not work, also check relay K4 and the lamps themselves. It could also be the light switch and its contacts.
F3 (10 A) - high beam in the left headlight . If both high beam headlights do not work, check the K5 relay, the lamps themselves and the high beam switch knob.
F4 (10 A) - front fog lamp on the right side . If both fog lights do not work, check relay 9 and the headlight bulbs themselves, as well as the switch and its contacts.
F5 (30 A) - window lift motors . If the power windows do not work, check this fuse and relay 5. In winter, check if the windows are frozen, warm them up and clear them of ice if necessary. It could also be the window lift motor, its mechanism and gears; in order to get to it, you need to remove the trim of the desired door.
F6 (15 A) - portable lamp fuse.
There may also be problems with the cigarette lighter. To check, unplug the cigarette lighter from the connector. If this fuse stops burning, then the problem is in the cigarette lighter.
F7 (20 A) - engine cooling fan, sound signal . If the cooling fan does not turn on and the engine overheats, check this fuse. Also check the operation of the fan motor by connecting it directly to the battery. It could also be the coolant temperature sensor or thermostat.
F8 (20 A) - heated rear window (element) . If the heating does not work and the rear window fogs up, check this fuse, fuse F9 and relay K7. Also check the contacts on the terminals of the heating elements, check the wiring, sometimes the wire frays. It could also be the heating switch and its contacts.
F9 (20 A) - recirculation valve, windshield wipers and washer, headlight washer, rear window heating relay coil . If the heating does not work, similar to the previous one.
If the windshield wipers or washer do not work, also check relay K2, the fluid level in the washer reservoir, the washer pump, and the wiper motor. Another issue may be their switching handle, its wiring and contacts. The wires may be squashed or frayed and shorted to the housing.
F10 (20 A) - backup fuse. F11 (5 A) - right side dimensions. If the left side does not work, check fuse F1.
If none of the side lights work, check the light switch and its contacts. Also check the dimensions of the lamps themselves.
F12 (7.5 A) - low beam in the right headlight . Similar to fuse F2 for the left headlight.
F13 (10 A) - high beam in the right headlight, high beam lamp on the dashboard . Similar to fuse F3 for the right headlight.
If the blue lamp on the panel does not light up when you turn on the high beams, check this fuse, as well as the lamp itself and the wiring to it. F14 (10 A) - front fog lamp on the left side.
Similar to fuse F4 for the right fog light. F15 (20 A) - seat heating, trunk locking. If the heated seats do not work, check this fuse and the power button on the dashboard, its contacts and wiring.
F16 (10 A) - direction indicators and hazard warning lights, hazard warning lamp . If the turn signals or hazard lights do not work, also check relay K3 and the lamps in the turn signals themselves, as well as the hazard light switch button.
F17 (7.5 A) - interior lighting, lighting, ignition switch lighting, brake lights, clock, on-board computer . If the brake lights do not work, check this fuse, the lamps themselves, and also the switch installed in the pedal unit.
F18 (25 A) - glove box lighting, heater controller, cigarette lighter . If the cigarette lighter does not work, check this fuse, disassemble the cigarette lighter and check for a short circuit in it, especially on the washer and contacts. Bend them if necessary or replace the entire cigarette lighter. Do not insert non-standard size connectors into it.
F19 (10 A) - door locks, control relay for brake lights and parking lights, turn signals and lamps for turning them on on the panel, reverse lamp, generator winding, control indication of the on-board system, dashboard, clock, on-board computer.
F20 (7.5 A) - rear fog lights.
If the rear fog lights do not work, check this fuse and relay 9. Also check the lamps themselves, wiring, connectors and the switch on the panel.
Never replace blown fuses with fuses of a higher rating (current), this can cause burnout of tracks on the mounting block, failure of devices, etc. In this case, repairs will cost more, so it is better to deal with the problem immediately and fix the problem. If you cannot find what’s wrong on your own, contact a car service; usually such problems are dealt with by electricians, who will not have any difficulty identifying the problem and fixing it.
Fuses and relays in Lada Kalina
Fuses and relays Niva Chevrolet.
[custom_ads_shortcode1]
Both fog lights stopped working
Sometimes it's better to live.
The fog lights stopped lighting along with the tidy. Moreover, the mileage display works. The tidy backlight (brighter - dimmer) also does not work((((Sadness((
I have already burned out 10-15 fuses (((The one under the steering wheel is on. I put it on the more powerful one, it burns out under the hood due to the dimensions.
I turned off the fog lights and the dash lights are still on.
Did you get into the wiring? Additional gavnetol sensors?
No, they didn’t do anything like that. Yesterday during the rain I think it went out, or after it.
Nothing has been installed on the car for “a hundred years.” The fuse for the fog lights is on. Accordingly, the following happens: I start it, turn on the dimensions - everything is ok, well, almost)) the tidy does not work (tidy lights), I turn on the fogs and the fuse blows. Near and far are working!
The fogs seem to be original.
The fuse blows when I turn on the headlights. but the dimensions are on fire. Those. It's not even a matter of fogs. and in the tidy.
Correctly, the fog lights are made through the dimensions precisely through the snout, the fog lamps have their own fuse, and the dimensions have their own relays, and at the moment the dimensions are turned on, when the fuse burns out, are the fog lamps turned on or off? those. — turned on the lights, everything is fine, the fuse for the fog lights works, then you turn on the fog lights, does the fuse burn out? or so - you just turn on the headlights, the fog lights are turned off, and the fog light fuse still burns out?
what about the fuse? which I voiced - which is used to illuminate the tidy and often some other lighting in the cabin.
Many opinions and topics have been voiced on many forums regarding short circuits in the instrument panel (a lot of lyrics.
Performance diagnostics
After you have found out where the VAZ 2114 reverse sensor is located, you can begin diagnostics. To do this, you may need light bulbs with wires or a tester. However, there are ways to do without their participation.
The verification procedure itself should proceed as follows:
- The hood must be opened and the cover removed from the fuse console.
- Then check 15A, who is directly responsible for its operation. If the white light does not come on after replacing the fuse, the diagnosis continues.
- The ignition must be turned on to record electrical voltage on the console. If it is not there (and its indicator should be 12 V), then it is likely that the contacts have oxidized. If there is, the check is carried out further.
- And then you need to crawl under the car. The protection is removed from the electric motor, the ignition and the corresponding gear are turned on. Now you can see whether voltage has appeared at the sensor connector or not.
- As mentioned above, if there is no tester with an arrow, you can use a test light. Its glow should make it clear about the existing voltage.
- Then comes the key point: it is necessary to short-circuit the conductors of the sensor in question. When the light appears, all that remains is to state the fact that the VAZ 2114 reverse sensor needs to be replaced.
After completing the diagnostics, you can begin the replacement procedure.
Lamp burned out
Naturally, if any light source does not turn on, the first thing that comes to mind is that the light bulb has burned out. The design of car lamps is such that the low beam may indeed be absent, but the high beam remains available. Halogen lamps have two filaments. It is quite possible for one of them to rupture - in this case, the light for which it is responsible will be absent.
To replace the bulb, the services of an auto electrician are not required. It is enough to open the hood with the ignition off, remove the protective box on both sides of the headlight, pull out the contact group, disconnect the spring clips, remove the burnt out bulb and install a new one. A little subtlety:
The flask should be wiped with alcohol before installation, otherwise it will burn instantly. It is also not recommended to handle the bulb with unprotected hands: there is always some greasy and damp secretions on them, which can damage the light bulb. The best way to do this (replace the lighting) is with a dry cloth or rag.
Unexpected reasons for non-working PTFs on the VAZ-2110
First of all, we check the bulbs themselves; you can get to the left one through the hood.
On some versions of the VAZ-2110, a PTF from the Avtosvet plant (Kirzhach) was installed with a socket for the H1 lamp. Stock lamps are not the best quality and they do not like sudden changes in temperature. It is quite difficult to get to the right fog lamp through the hood; it is easier to remove the headlight itself by unscrewing the screws.
During sudden cooling, when leaving the garage in winter, for example, or after turning off the headlights, the contact leg of the lamp bulb simply fell off the conductor. At the same time, visually the halogen lamp looked absolutely intact. It was enough to apply a plus directly to the leg itself, and the lamp would light up. The fault was due to poor-quality resistance welding, and it is almost impossible to detect the cause without a detailed examination of the lamp itself and its dismantling.
Of course, it is impossible to provide for all failure options, but we will consider the most common ones.
Instructions for dismantling and replacing the fog lamp
Replacing a fog light may be necessary if the entire unit does not work or the quality of the light beam has significantly deteriorated. When replacing, it is most often necessary to remove the bumper. It is on this that the fog lamp plug is located.
After the mounts of the optics to the bracket are opened, you need to unscrew the fasteners from the bracket with the appropriate tool. Next you need to disconnect the plug and you can remove the fog light. If the entire assembly needs to be replaced, a new part is installed.
Photo gallery “Replacing foglights”
If the fog lamp frame, reflector or glass is changed, then it is necessary to disassemble the fog lamp. To do this, you need to warm it up well, for example, with a hairdryer, so that the sealant melts, and then you can disassemble the PTF.
Installation of replaced or repaired optics is performed in the reverse order: attach the plug, install the fog light in its original place, tighten the bolts securing it to the bracket. At the last stage, either the fender liners or the bumper are returned to their place.
The principle of operation of the fog lamp
Before grabbing the tools and adjusting the position of the PTF on the car with your own hands, every car owner must understand the features of their operation.
And for this you need to remember that fog:
- These are the smallest particles of moisture that are in the air;
- The emanating heat from the ground (road surface) does not allow them to sink, causing them to literally hang, which leads to the formation of a milky veil;
- The stream of light, reflected from them like a mirror, returns back and blinds the driver.
Narrow work space
All drivers know that turning on regular headlights in fog leads to poor visibility. This happens because droplets of moisture are located exactly at the level of the headlight of a modern car. After all, their location was determined for better illumination of the road situation - as close as possible to the driver’s organs of vision.
But PTF has another task - to make movement in fog possible. That’s why they are installed on cars as low as possible to the road surface, so that they, as they say, “shine under the fog.”
The fact is that moist air close to the ground is drier and, accordingly, does not have glare properties.
Warning! Under no circumstances should fog lights be installed lower than 25 cm from the road surface. This is prohibited by current GOST 8769-75. But what is not prohibited is making stickers for headlights that will protect them from stones. Since the price of PTFs does not allow their safety to be neglected.
Technical feature of the luminous flux
The second point that should be emphasized is that:
- The beam of the fog lights along the top edge has a clear boundary:
- This is done so that when it hits drops of moisture, it does not refract upward and blind drivers.
For reference: due to the special shape of the lens or marks applied to the glass of a classic headlight, the luminous flux of fog lights has a clear horizontal cut.
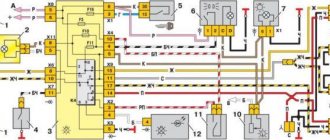
Headlight wires VAZ 2108, 2109, 21099
The headlights of VAZ 2108, 21081, 21083, 2109, 21091, 21093, 21099 cars are equipped with low/high beam headlight lamps, a marker lamp, and a turn indicator lamp.
Headlight wires VAZ 2108, 2109, 21099
Each of the headlight units is connected to two blocks (chips) of wires for these lamps. One main one is for the headlight itself, the other is additional for the turn signal section.
Pinout of headlight wires for VAZ 2108, 2109, 21099 cars and their modifications
Main wiring block
The shaped block (attached to the headlight in only one position) combines four wires. The pinout of the wires is as follows.
Right headlight
1 - Gray wire (+ for low beam). It comes from terminal “6” of block Ш5 (Х5) of the mounting block. Inside the headlight, a white wire continues in the lamp block.
2 - Green wire (+ for high beam). It comes from terminal “1” of block Ш5 (Х5) of the mounting block. Inside the headlight, the yellow wire continues in the lamp block.
3 - Black wire (common negative to the headlight). Mounts to the body next to the headlight. On cars up to 1998. The black wire to ground of the engine cooling system radiator fan switch sensor is connected to them. Inside the headlight, a black wire continues to the lamp socket.
4 - Yellow wire (+ to the side light bulb). Goes to pin “8” of block Ш6 (Х6). Inside the headlight, the blue wire continues to the side light lamp.
Left headlight
1 - Black-gray wire (+ for low beam). It comes from terminal “3” of block Ш5 (Х5) of the mounting block. Inside the headlight, a white wire continues in the lamp block.
2 - Black-green wire (+ for high beam). It comes from terminal “2” of block Ш5 (Х5) of the mounting block. Inside the headlight, the yellow wire continues in the lamp block.
3 - Black wire (common negative to the headlight). It is connected to the negative wire of the turn signal and mounted on the body next to the headlight.
4 - Yellow-black wire (+ to the parking light lamp). It comes from terminal “10” of block Ш6 (Х6). Inside the headlight, the blue wire continues to the side light lamp.
Additional wiring block
Square chip with a protrusion (inserted in one position only).
Right block headlight
Blue wire (+ to direction indicator). It comes from terminal “11” of the Ш6 (Х6) block of the mounting block.
Black wire (- to turn signal). It comes from the attachment point to the car body next to the headlight.
Left headlight
Black-blue wire (+ to turn signal). It comes from terminal “3” of the Ш6 (Х6) block of the mounting block.
Black wire (- to turn signal). It comes from the main headlight wiring block (then to the attachment point to the body next to the headlight).
Complete wiring diagrams for low/high beam headlights, side lights and turn signals
What glass color to choose for the fog light
Experienced drivers remember the time when PTF glass was painted yellow. Since then, there has been a very strange, but erroneous stereotype that yellow headlights are the most effective and optimal color. However, this opinion is completely erroneous, since today the largest car and component manufacturers equip fog lights with transparent glass. And this is not an accident, because transparent glasses are more preferable.
For the VAZ 2110 model, modern models of fog lights are available in only two variations: transparent and corrugated.
It’s paradoxical, but the lion’s share of buyers choose transparent ones, although for a number of objective reasons the corrugated ones are better suited for installation
They not only make the appearance of the car more modern, but also ensure clarity and directionality of the beam itself, and ultimately better visibility in adverse weather conditions, and ultimately safety, as well as checking the VAZ 2110 speed sensor, timely replacement of tires and others precautionary measures