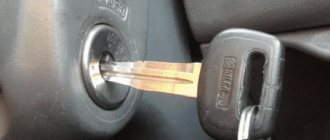
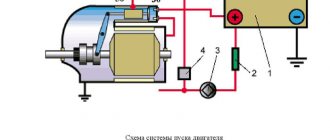
To start driving a car, you must first start the engine - every car owner knows this, and even people who are very far from automotive topics. On most cars, the electric charge from the battery is supplied to the starter through the ignition switch contact group. You need to insert the key into the lock, turn it to the first position to turn on the ignition, then to the extreme position. Only then will the starter work. But there are situations when the key does not turn in the ignition. Don't panic. This problem can be solved.
There are several reasons why this annoying malfunction occurs. Let's look at these reasons and repair methods.
Lockout triggered
Any modern car is equipped at the factory with a special steering wheel locking mechanism. This is one of the protective measures that are designed to prevent attackers from stealing a car. If this blocking system has worked, then naturally the key in the lock will not turn, so that it will not be possible to turn on the ignition and start the engine.
When contacts freeze
Russian winters are so severe that in severe frosts the castle also freezes solid. A huge number of situations when the key does not turn in the ignition occur in winter, when temperatures drop below -20 degrees. The thing is that the lock mechanism can accumulate condensation in winter. And then, when the car sits in the cold for a while, these droplets of liquid crystallize, thereby blocking moving parts. As a result, the engine will not be able to start.
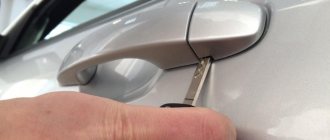
The most effective and efficient option is to heat the key with a lighter or a match. The hot element is inserted into the lock and then carefully tried to turn it. If the key does not turn in the ignition the first time (and most often this is what happens), then you need to repeat this operation two or more times.
To prevent the locks from freezing with the onset of cold weather, experts recommend injecting brake fluid into the lock with a syringe and a needle. In the spring, this “well” is thoroughly cleaned with carburetor cleaning fluid. If this is not done, the lock's lubricant will accumulate dust and eventually cause a blockage. This can also cause blocking.
Recommendations from the magazine “Behind the Wheel”
Let’s turn again to the “Behind the Wheel” review, which discusses how to remove door locks in a VAZ-1118 Kalina. If the casing has been dismantled, this is not bad. Next, according to the recommendations, unscrew the screw securing the inner handle:
The lock mechanism is connected to two rods made in the form of rods. Both of them are dismantled by disconnecting the plastic clips:
To disengage the latch, press on the plastic tab with a screwdriver.
At the last step, as you might guess, all that remains is to unscrew the screws holding the mechanism motionless.
But first, you need to dismantle the external handle. To do this, unscrew two bolts equipped with an “8” hex head.
By the way, if the central locking connector is attached to the mechanism module, it is also disconnected.
Let the wiring harness for the central locking drive remain in the door.
Of course, all door locks must be unlocked with one key, which is supposed to be used in the future.
The work indicated here is carried out on each of the four doors. In addition, it is very desirable that the ignition key also unlocks the doors. However, replacing the cylinder on the steering column will not be so easy. Can you handle the total amount of work that needs to be done? Decide for yourself.
Blockage in the lock
The driver goes outside, opens his car, inserts the key and feels that the key does not turn in the ignition, and it is no longer winter outside. It happens that wells become clogged. During operation, a large amount of various debris easily gets into them. Dirt actively collects (especially if the mechanism has been lubricated with thick lubricants or oils to improve operation).
Ideally, you need to disassemble and thoroughly clean the lock. But this is not always possible. Experienced drivers, in order to continue operating the car without visiting a service station, solve the problem with the universal remedy WD-40.
Clogging and freezing of the larva
Due to dirt accumulated inside the lock, the key jams and jams in various positions. If the jam occurs in the intermediate position indicated by the letters ON and ACC, it cannot be removed. What to do:
- purchase WD-40 lubricant in an aerosol can from your local auto parts store and blow it into the mechanism through the keyhole slots;
- make attempts to turn the key by rotating it in different directions and swinging it in the lock;
- periodically add lubricants to dissolve the dirt inside the larva;
- Gently tap the key head and lock with a light hammer or similar object.
Recommendation. During the manipulations, keep the car on the hand brake. By focusing on the stuck mechanism, you may not notice the car rolling away.
Usually the blockage can be cleared using these methods and the key is turned at least once. This is enough to get to the nearest car service center or garage. If attempts are unsuccessful, it is necessary to dismantle the lock or get to the contact group in another way. Without disconnecting the wires, turn the shaft with a screwdriver and start the motor. Do not touch the key - you may accidentally engage the mechanical lock.
A frozen mechanism is “treated” by warming it up . Pouring hot water is not allowed: just heat the key with a lighter, insert it into the well and try to turn it. The second option is to fill the mechanism with warm WD-40 lubricant from a heated can.
Wear of contact group surfaces
During the operation of the car, the place where the metal elements come into contact with each other is wiped off. Due to this, the gaps grow. The key itself and the elements of the lock mechanism may become worn out.
In the first case, if the key in the VAZ ignition switch does not turn, visually check the condition of the key. If its teeth are rounded, and its width or length has noticeably decreased, then it should be replaced. For comparison, take a second spare key. But it’s better not to use it on a daily basis. Experienced motorists recommend making a duplicate. If you continue to use the second key, then someday the situation will repeat. And then you will have to change the lock.
It must be said that you can find out about a worn key or lock much earlier than jamming occurs - if the key in the ignition switch does not turn well, then this is the first call. If the key is stuck due to abrasion, you can usually try to find a position where the key can engage the secret part of the lock. To do this, carefully turn and press the key into the lock hole many times.
Key programming instructions for Lada Kalina, Priora, Granta, etc.
- Close all doors. Turn on the ignition with the training key and wait in the on state for at least 6 seconds.
- Turn off the ignition. The indicator light in the warning lamp unit should flash quickly (at a frequency of 5 times per second) while the learning procedure is being carried out correctly. If the lamp stops flashing quickly, it indicates an incorrect operation, an out-of-time interval, or a malfunction. Remove the training key from the ignition switch.
- While the warning lamp is flashing (about 6 seconds), insert the remote control and turn on the ignition. The immobilizer buzzer should emit three sound signals. If the buzzer does not sound and the flashing indicator stops, this means: - the time interval of 6 seconds has been exceeded and it is necessary to repeat the learning procedure, starting from step 1; - the immobilizer is faulty
- Wait 6 seconds for the buzzer to emit two more beeps and turn off the ignition.
- If it is necessary to train the second remote control, then you should perform steps 3...4 again, using the second learning remote control to turn on the ignition. If not, continue from step 6.
- After turning off the ignition for no more than 6 seconds, while the indicator is flashing, remove the remote control, insert the learning key and turn on the ignition. The buzzer should beep three times. Wait 6 seconds until the buzzer beeps two more times.
- Turn off the ignition without removing the training key, wait 6 seconds until the buzzer sounds a single sound signal. The indicator should flash twice as fast. If the sound signal does not sound and the flashing of the indicator stops, you should return to step 1 and repeat the learning procedure. If a repeated failure occurs when performing step 7, this means that the ECM was previously trained with a different key, in which case the controller should be replaced.
- After the buzzer gives a single sound signal, no later than 3 seconds, turn on the ignition for 2...3 seconds and then turn it off (after turning on the ignition, the buzzer will sound three times and the indicator will stop flashing). The hazard warning lights should flash and the car signal will “beep”.
- Remove the learning key. Wait with the ignition off for at least 10 seconds. Insert the working key and turn on the ignition. Wait 6 seconds, if the indicator does not flash, test start the engine, the engine should start. If the indicator flashes, turn off the ignition and wait at least 10 seconds. Turn on the ignition. The warning light should not blink, and the engine should start. If after turning on the ignition, after 6 seconds the warning light comes on with a constant light, then the learning procedure must be repeated, starting from step 1.
Replacing the ignition switch for a VAZ 2115 injector
Deformations
Often the main cause of problems with the operation of the lock is the key. It is subject to deformation. Damage occurs in various cases (for example, when a car owner opens beer bottles with this key).
Deformations of the lock's secrets occur even more often. This leads to the ignition switch breaking. In this case, only dismantling the lock and removing crumpled springs and slats will help. Often in modern cars, only complete removal of all the lock's secrets helps. After this operation, the car starts even with an ordinary screwdriver. Naturally, if the ignition switch is torn out and the key does not turn, the Mercedes can be easily started even with a Swiss Army knife. This is the only option to get to the service and replace the element.
When the problem is spark plugs
The ignition switch is not always the reason why the engine will not start. At such an unpleasant moment, it is worth starting to solve the problem by checking the spark plugs. What spark plugs should be used with the Lada Kalina engine? The manufacturer recommends A17DVRM elements. As an analogue, you can install “A15DVRM”. You can also resort to installing products from foreign manufacturers. The cost of the set is small (does not exceed 500 rubles), so there is no point in saving, but it is recommended to purchase quality products.
In this case, the design of the candles may differ slightly. This concerns the number of electrodes. For LADA Kalina, it is recommended to use products with two electrodes: central and side. The service life directly depends on operating conditions and fuel quality. It is advisable to opt for replacing spark plugs after 30,000 miles. To complete the replacement procedure, you will need to stock up on a special spark plug wrench. How to remove and replace spark plugs? The process itself is quite simple and looks like this (the engine has cooled down):
- We clean the surrounding areas around the spark plug wells with a rag so that no debris gets into the combustion chambers.
- Remove the high-voltage cable ends from each spark plug.
- We unscrew each of the spark plugs in turn and inspect the electrodes (photo No. 4).
- We screw in new products with the appropriate tightening torque.
Other reasons
Sometimes it is much easier to solve a problem, since the reason is very trivial. For example, if on models with automatic transmission the key in the ignition does not turn (“Opel Vectra C”, for example), then you should not exclude a problem with the position of the box. Some car models are designed in such a way that the key cannot be turned until the selector is in neutral or park.
ZZ malfunctions
Most often, damage to the Kalina ignition switch is associated with its mechanical part. In this case, it is impossible to turn the key to the desired position. A malfunction does not arise, as they say, out of the blue. As a rule, frequent jamming of the key is observed over the course of several months, which is eliminated by rocking it in the cylinder.
Rarely, there are cases of failure of the electrical component of the Lada-Kalina ignition switch. Basically they come down to a lack of contact when turned on. This is typical only for locks with a long service life. True, there is another common reason for burnt contacts - the car owner himself.
Renovated or new?
It would seem that what could be simpler than replacement if the key does not turn in the ignition? Whether it’s a Toyota or a domestic VAZ, it doesn’t matter. But it's not that simple. Buying a lock at a salvage site is not suitable for many people, since a used element will be in the same condition and is unlikely to last long.
To start the vehicle moving, you need to start the power unit - both experienced motorists, novice drivers, and those who never drive at all know this. In most cars, the electric charge from the battery is supplied to the starter via a contact group. An appropriate key is required, set it to the first position to start the ignition, and then turn it to the extreme position. Only after these actions does the starter operate. But sometimes the key does not turn in the ignition, and manipulations with it do not bring the desired result . No need to panic. This problem can be solved quite easily .
Castle design
Before answering the question why the key gets stuck in the ignition switch, you need to look at how the locking mechanism works . The basis of all locks is the cylinder. This is an element that determines the privacy category of the device.
The key does not turn in the ignition
In the simplest mechanism, the larva has the shape of a cylinder, which has a different number of diametrical recesses (4-10). Each of them is equipped with its own spring-loaded plate, which, when the original key is fully inserted, sinks to the same level as the cylinder. And this element has the opportunity to rotate freely inside the locking mechanism as long as the activator key is present in it. In turn, the larva is combined with other nodes:
- contact group;
- steering lock device.
Causes of failures and their elimination
There are a number of reasons that provoke this unfortunate misunderstanding. Let's talk in more detail about the reasons and possible options for correcting the situation. Among the most common reasons why the key does not turn in the ignition switch is this:
- activation of the steering lock system;
- freezing of the unit due to negative temperatures;
- lock blockage;
- elementary wear and tear of the device;
- deformation of the lock itself or the activating key.
Next, we’ll talk in more detail about each of the reasons.
Steering wheel lock
Recently, all cars already on the assembly line receive a special element that blocks the steering wheel in the event of an unauthorized attempt to start the engine. When the system is blocked, the key will not turn, so that the power unit will not start when the ignition is turned on.
Ignition key
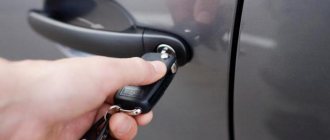
What should I do if the ignition key does not turn as a result of the lock being activated? In such conditions, professionals advise finding a location for the steering wheel where both the steering unit itself and the locking mechanism are unlocked. This is accomplished by certain actions:
- Place the key in the lock mechanism.
- At the same time, turn the steering wheel in different directions.
This will help set the key to the engine start position. But the main thing is that in one of these positions the lock will be unlocked.
Freezing contacts
In winter we have such severe frosts that the locking mechanism freezes tightly. Most often, situations with difficulty turning the key in the locking mechanism occur precisely in winter , when the temperature drops below -20ºС. This happens because the lock assembly collects condensation. And then, after standing in the cold for a while, the drops freeze, blocking the moving parts. As a result, the engine will not be able to start.
Ignition switch frozen
In such a situation, experts recommend simply warming up the locking mechanism. This can be done with any device that supplies hot air, for example, a hair dryer. It needs to be sent into the well. You should not warm the castle with boiling water or other liquids that crystallize in the cold.
But a more productive option would be to heat the key with an ordinary lighter or matches. The heated key is placed in the hole of the lock and then carefully turned. If you can’t turn it right away (and this often happens), you need to repeat heating several more times.
To prevent the lock from freezing in the cold, professionals advise injecting a little brake fluid into it with a syringe and a needle. With the end of frost, the keyhole is cleaned with a composition for cleaning carburetors, since an “unwashed” mechanism will collect dust, which will ultimately lead to its clogging. Which also provokes blocking of the mechanism.
Lock clogged
Imagine the situation: you get behind the wheel, insert the key and realize that it does not turn, although it is no longer winter outside. Often, the well becomes clogged. A variety of debris accumulates in it . Dirt accumulates intensively, especially if the lock has been treated with a special lubricant or oil for efficient operation.
The ideal option in such circumstances is to disassemble and thoroughly clean the lock. Unfortunately, such actions cannot always be performed. In order to further use the car without visiting a car service center, specialists can solve this problem using the universal tool WD40. The tube from the can is directed into the hole and the composition is poured in until a clear liquid flows out.
Cleaning the ignition switch
Note that this product copes with the most serious stains. But if you fail, you will need to disassemble the lock.
Natural wear and tear
With constant use of the vehicle, the places where metal parts come into contact with each other, they wear out . Therefore, existing gaps increase. The key is worn out, as well as the locking mechanism.
If we talk about VAZ models, then you should conduct a visual check of the key. If its teeth are rounded and its size (width/length) has decreased, then it must be replaced. The 2nd copy is used as a sample. But it is advisable not to use it daily. Masters advise ordering a duplicate. If you constantly use a spare key, the problem will certainly recur. And the lock block will need to be replaced.
Note that it is possible to determine the wear of elements much earlier than a rotation failure occurs. When the key turns with difficulty, this is the 1st signal.
If the key jams due to wear and tear, you can find a position in which the key will be able to catch on the “secrets” of the lock. To do this, you need to carefully turn and press the key into the keyhole several times.
Deformation of elements
Very often, the key itself becomes the cause of difficulties with the lock's operation . It is prone to deformations that occur in various situations. For example, when a driver uses it to open a beer bottle. If the key is bent, you can straighten it using a wooden/rubber hammer. After completing these steps, you need to test the key in operation again.
Deformation of the secrets in the locking mechanism occurs much more often. This leads to the switch being damaged. In such a situation, only removing the lock and removing the deformed elements will save you. Although, more often it only helps to completely dismantle all the secrets of the locking mechanism. After such actions, the vehicle will start even with an ordinary screwdriver. But the best option would be to visit a car service center and replace the element. But not every lock can be removed without completely removing the unit. Often it is even necessary to remove the switch from the steering unit.
During these actions, some difficulties may arise with unscrewing fasteners that have special heads. Therefore, to begin with, the caps are exposed to a hammer and chisel, and then used with pliers.
Other reasons
Often the solution to such a problem is much simpler due to the banality of the cause. For example, in cars with an automatic transmission, you cannot turn the key in the locking mechanism, try looking for the reason in the position of the box. On some models, the key will not turn until the switch is in neutral or park.
Another simple option that can be used in such situations is to lightly tap the key. This will help if the key has difficulty getting into the recesses.
Repair or install a new one
Many people believe that a change is the best option, but this is not entirely true. Buying a disassembled lock is not an option for everyone, since a used device is in a similar technical condition and is unlikely to work for a long time.
Repair or new installation?
In addition, the new keys will not fit the trunk/glove compartment. It will need to be registered in the car (does not apply to our cars). Undoubtedly, you can carefully disassemble the element from the old lock and remove the chip from it, and then put it on the purchased copy.
But the best option is to restore the larvae. This way you can keep the old copy of the keys in use. If it is necessary to cut a new body onto an element, it will be made according to the original characteristics.
The price of solving the problem
If it is impossible to repair a broken mechanism , you must buy and install a new one. By contacting the official service, you will receive high-quality installation of the original locking mechanism very quickly. Replacing the lock mechanism in the service costs approximately a thousand rubles.
If you want to do this yourself, you first need to buy a lock that matches the model of your car. This affects its cost. Typically, imported components cost from two thousand rubles, Russian ones up to one thousand (for example, for VAZ cars the cost of the mechanism is within 700 rubles).
To prevent breakdowns of the locking device in the future and extend its service life, it is important to regularly lubricate the moving parts. To do this, inject a little oil into the hole with a syringe, and there will be no difficulties with turning the key in the ignition for a long time.
We have analyzed the main reasons for the key “wedges” in the ignition. And they explained how to resolve such difficulties independently.
Every motorist knows perfectly well that it is impossible to start driving a car until the engine is started. And to do this, first insert the key into the ignition switch. When this happens, on most cars the electrical charge from the battery goes to the starter. The ignition switch contact group plays a key role here. The driver inserts the key, turns it in the desired direction, activates the ignition, and then turns it to the extreme position. It is at this moment that the starter should operate. But sometimes it happens that the key does not want to turn. This is a fairly common problem that you can fix yourself. If you do not want to take risks, then it is better to invite a specialist or deliver the car by tow or tow truck to a car repair shop.
How to remove the ignition system lock? Recommendations from experts
In Lada Kalina, it is sometimes necessary to remove the blockage (Figure No. 1) of the ignition system due to various reasons. Next, we will tell you how to remove and how to replace the lock in case of malfunction. So, replacing the ignition switch has the following aspects:
- mechanism failure;
- the need to replace the APS coil;
- the need to replace the lock contact group.
To perform dismantling actions, you will need to use a simple set of tools, namely:
- well sharpened chisel;
- small hammer;
- flat blade screwdriver;
- pliers.
Manipulations are performed according to the following algorithm.
- Disconnect the negative terminal from the corresponding battery terminal.
- Remove the switch block located under the steering wheel.
- Using a chisel, we disassemble the bolts securing the gear mechanism. You also need pliers here.
- Remove the bracket from the steering column. Now the block itself becomes available for removal.
- Using a screwdriver, pry up the APS coil cable connector and remove it completely.
- The contact group block must also be disconnected from the common wire connector.
If you want to install the block in its original place, the entire list of actions is performed using the reverse algorithm. Special work should be carried out taking into account the recommendations that Lada Kalina owners kindly share with experienced craftsmen.
- The cover around the steering column can be removed by unscrewing 7 screws. To do this, use a Phillips screwdriver and start the procedure. Note that two screws are located on both the left and right sides, and three fasteners are located directly below it.
- Now lower the joystick and lower the column. In this case, both halves of the casing can be disassembled quite easily.
- To remove the steering column switch block, you will need to press out the fixing elements and remove them from their seats.
- The bolts that hold the ignition switch in place are usually sheared off when the head is screwed on. To disassemble them, you will need to use a chisel. It is applied tangentially, after which light blows are applied with a hammer. After the bolt head begins to move, additional unscrewing is done using pliers. When installing the lock, it is recommended to use profile bolts with a hexagon head. The length of these fasteners is 20 mm, the thread is M6.
- To remove the lock, you need to tighten the wiring and release the connectors under the cover.
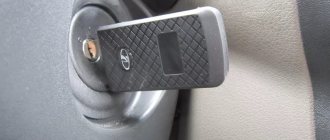
- Before installing the lock, insert the key into the special cylinder and move it to position 1. In this position, the sliding latch moves inside the lock. Next you need to check the operation of the locking mechanism. If used correctly, we continue installing the lock and connecting all the necessary wires. If blocking does not occur, then they resort to adjusting the installation position of the lock, ensuring that the latch is able to move inside the corresponding groove, which is located on the steering shaft.
- Sometimes situations arise when difficulties are observed with inserting the key into the keyhole. Here you need to apply a dab of WD-40, which we inject into the lock cylinder. If there is no such penetrating agent, use a drop of synthetic oil. This completes the replacement of the ignition switch.
Causes
There are several main reasons why the key in the ignition switch does not turn on a car. Depending on the source of the problem, the driver will have to perform certain actions. Practice clearly shows that quite often the problem is not serious, and therefore it takes little time, effort and money to eliminate it. Most often, the key does not want to turn in the ignition switch because:
- The steering column lock is activated;
- nodes freeze due to exposure to low temperatures;
- elements become dirty;
- natural wear and tear is observed;
- the key or other components of the locks are deformed, etc.
Each potential cause must be addressed separately. This will allow the motorist to recognize the malfunction and understand how best to fix it.
Blocking
Car owners often panic and try to figure out what to do if the steering wheel and ignition switch are locked. Such situations are explained by the presence of factory steering lock systems on many cars. This is a fairly common and effective protective measure designed to prevent possible vehicle theft. When this same locking system on the steering column is activated, then it will be impossible to turn the key in the ignition switch. Therefore, the driver is deprived of the opportunity to start the engine and drive. Don’t rush to call for help, call a tow truck and look for a suitable car service. You can try to solve the problem yourself if the car’s steering wheel and the ignition switch itself are locked at the same time. Experienced motorists recommend searching for a suitable steering wheel position. There is a point at which the steering column and lock must unlock. To achieve the desired result, try inserting the key into the lock and simultaneously turning the steering wheel in different directions. Do not do this very quickly so as not to miss the desired position. In most cases, using this method, you can fully insert the key into the ignition, turn it and start the engine. If this is factory protection from the car manufacturer, then if the position is correct, unlocking will occur. You just need to find it.
Exposure to low temperature
In some regions, winter is accompanied by severe frosts, which can easily cause the key to stubbornly refuse to turn in the ignition. Most often, this can be observed in situations where the air temperature drops below -20 degrees Celsius. Gradually, as it is used, a certain amount of moisture in the form of condensation may accumulate inside the ignition switch. When the car sits in the cold for some time, the process of crystallization of water droplets begins. As a result, frozen water blocks the moving elements of the ignition switch. Because of this, the motorist cannot start the engine and drive. The simplest and most effective solution in such circumstances would be to heat the castle. You can use any suitable available means for these purposes. The most convenient way is to use a household hair dryer, directing a stream of hot air to the center of the ignition switch of your car. But it is better to avoid using any hot liquids that freeze at subzero temperatures. This is especially true for hot water. This can only make the problem worse, because the next time you stop for a long time in the cold, there will be even more ice inside the castle.
If you don’t have a hairdryer at hand, which is quite logical when you’re not near the house, then take matches or a lighter. Carefully light them and bring the fire to the key. Gradually heat it up and insert it into the lock. The heat emanating from a match or lighter should be transferred to the metal of the key and melt the formed water crystals, thereby opening access to starting the engine. Be prepared for the fact that during the first heating the key will not be able to be fully inserted and turned the first time. The procedure should be repeated several times. But even if you are in a hurry, never bring an open flame to the lock itself. You can melt the plastic parts and create additional problems for yourself. But it’s definitely not an option to come to the car every day with a hairdryer or keep a supply of lighters in your pocket throughout the winter. Therefore, an effective solution to the problem of freezing of the ignition switch at low temperatures is proposed. When cold weather sets in, you can protect the castle from possible freezing for the entire winter period. This requires a regular medical syringe with a needle. Using a simple tool, you need to inject a small amount of brake fluid into the lock. It will prevent condensation from freezing, even if it appears there.
But remember that after the temperature rises in the spring, the lock must be cleaned. To do this, use carburetor flushing. If you forget to carry out this procedure, the lubricant will become a source of dust and dirt accumulation. As a result, you will encounter another reason for the ignition switch being stuck, which is related to blockages.
Clogging
Even if it’s warm outside, there is no frozen condensation in the lock and everything is fine with the locking, when you try to insert and turn the key to start the engine, nothing happens. Something is blocking the ignition from working properly. This is often caused by accumulated dirt. When the machine is operated for a long time, dust, dirt and other small debris accumulate in the well through the key itself and in other ways. At first it does not interfere at all, but as it increases in volume it can cause a similar problem when the key does not want to turn. This situation can be observed especially often in those cars where thick materials were used to lubricate the mechanisms. They are sticky and therefore easily attract debris.
How to replace the ignition switch on a VAZ 1117-VAZ 1119?
Note! Before you start replacing the lock, discard the negative terminal of the battery and still work on the electronics! (For information on how to remove the terminal, read the article: “Replacing the battery in a VAZ”, paragraph 1)
Withdraw: 1) At the beginning of the operation you will need to remove the cover from the steering column, to do this, use a screwdriver and use it to unscrew the seven screws that secure the cover (see Photo 1), after all the screws are unscrewed, completely pull out the handle , thanks to which the steering wheel is adjusted (see photo 2, indicated by an arrow), then remove the lower casing, then, lifting the upper one, also remove it from the steering column.
Note! When removing the lower and upper casings, look at their side or look under the pedals for the rubber o-ring that is needed to seal the ignition switch from dust and dirt!
2) Then you will have to look at the lock itself and pay special attention to the wires coming out of it; Kalina also has an immobilizer, so there will be a lot of wires from the lock itself, but there will only be two wire connectors (one of the connectors goes to the starter, then it is responsible for starts the car, and the second connector goes to the immobilizer and is responsible for ensuring that the car is not stolen), then disconnect each connector from the contact pads (each connector will be connected to two other contact pads), to do this, grab the connector and simply disconnect it from block, applying a little force (do the same with the other connector).
Note! The photo above shows an example with an arrow, where the connector of the wire coming from the ignition switch is connected to another block (this connector goes to the starter, to the immobilizer, which goes a little smaller)!
3) Next, as shown in the photo below, using a hammer and chisel, unscrew the four bolts (they have no edges and are indicated by arrows) that secure the lock to the steering column, how do you unscrew them? explaining! Take a chisel and hammer in your hands and place the chisel on the edge of the bolt, then hit it, and then try to move the bolt from its place and so on until the bolts are completely removed.
Note! If you don't like this method, you can still drill through these bolts, just be careful not to damage anything!
4) When all four bolts are unscrewed, remove the bracket indicated by the arrow on one side of the steering column, and on the other, remove the ignition switch itself and set it aside if it is no longer needed and you go to install a new one in its place.
Note! If the old padlock is still useful to you (for example, not all new padlocks are sold with a group of contacts, so you need to remove it from the old lock and install it on the new one), in order to remove the group contact from the lock, you must first convince yourself, that everything is inside it, that is, in the lock, and it needs to be replaced, for example, if you have problems with the electronics in the cabin, let’s say you turn the key and the devices do not turn on, so most likely it’s all in the group of contacts and not be sure to change the block itself (But it’s not a fact that there may be a problem with the immobilizer, to do this, disassemble the contact group and check which contacts are there, whether they are oxidized or not), so here’s how to remove the group of contacts from the lock, for this:
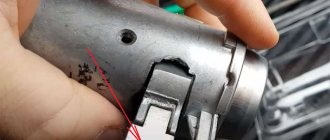
1. Using a screwdriver or by hand, bend the clamp that is on the wire connector, and then remove all the terminals from this connector along with the wires (see Photo 1, but be sure to remember the position of each wire in the connector, even if we described how just below you can install the wires into the connector without remembering their location in advance, but it’s still better to remember so that there are no problems in the future), then tighten the latches of the contact group cover (see photo 2), remove it from the lock body itself (see photo 3), and then fold two plastic latches (see photo 4), separate the contact group cover and the contact group itself (see photo 5), and then the contact group itself is in your hands, remove the moving part from it and inspect all its contacts as shown in the sixth photo, if the contacts are found oxidized or burnt, then try to clean them with fine sandpaper on the end and if the contacts are severely damaged and start stacking them will not lead to anything, so in this case, replace the group of contacts itself.
Note! When reassembling the moving part of the contact assembly, install it so that the wider part that is present on it makes contact with the tab on the cover, as shown in the photo below:
Installation: The new block is installed in the reverse order of removal and is also assembled, but only during assembly there are some nuances, namely when installing the wire terminals from the contact group to the wire connector, pay attention to the fact that each terminal must have its own position, so find the block wires to which this connector will be connected, and while looking at it, connect all the wires to the connector in exactly the same places as on the block, for example, on the Wire Block you see that the red wire goes to the far left position, therefore, therefore, on the wire connector, make sure that the same red wire can be connected to this wire, so that you at least understand the situation a little below, we posted a photo showing two terminals, otherwise there will be exactly the same terminals on the blocks and on the wire connector ( there will be males on the connector, and females on the block) so there is an rca there to match them so that each thread color is removed from the Sono.
Note! When installing the lock, be sure to insert the key and turn it from the “0” position!
Replacing the lock return spring:
Note! The same spring is easy to replace, but there is one thing! It is not sold in stores, so you will have to remove it from any ancient castle or make it yourself, it looks like this:
1. At the beginning of the operation, to remove the spring, you will need to take the lock itself and unscrew the three bolts that secure the bracket to it, approximately where these bolts are located, see the photo below, in which one of the screws is clearly visible.
2. When all the bolts are taken out, carefully remove the bracket and make sure that the ball that is inside has not fallen off (this is shown in the photo below), and if it does fall off, put it back in place, now let's talk about the return spring as you already seen in the photo, it is located in the cylinder of the lock itself and its antennae rest against the grooves that are in the cylinder, and then using a screwdriver, remove the old one from there and install the new one in place and assemble the entire mechanism in the reverse order of removal.
Additional video clip: For more information on how to replace the power switch, see the video posted just below:
Repair vs replacement
Many even experienced motorists are sure that when the key in the ignition switch does not want to turn normally, they should simply replace it. In theory, this can be done on any vehicle. But the question is whether it is worth going this way. In big cities there are a large number of car wreckers. This way you can easily find the ignition switch that suits your car. Although it is worth considering whether the investment is worth it. There are no guarantees that a used item will not be in a similar faulty condition or that its lifespan will be sufficient for at least several years of operation. Since the ignition switch is replaced along with the key, then it will probably not be suitable for your car to open the same glove compartment or luggage compartment. On modern cars, the key consists of more than just a metal blade. The case contains a special electronic chip that is tied to the ignition switch. If this chip is missing or it is not programmed, then you still will not be able to start the engine. Sometimes you can disassemble the old key, remove the chip from it and insert it into the new case. Such a trick is not successful in all situations.
The best way out of this situation would be to repair the larva itself. This will allow you to continue using your old keys. And if you have to make a new turnkey case, it will still be created according to factory parameters. But each motorist decides for himself what is easier and more profitable for him to do. The problem when the key does not want to turn in the ignition switch is quite common. And there are also many reasons for this behavior. You need to find the source of the problem and eliminate it in the most optimal and effective way. Sometimes it is better to turn to qualified craftsmen for this, rather than risk trying to do something yourself.
The best prices and conditions for the purchase of new cars