01/26/2022 6,179 GAZ Gazelle
Author: Ivan Baranov
Modern cars, both foreign and domestic, are equipped with many different systems and devices that ensure normal engine operation. If one of the components or assemblies begins to work incorrectly, the car owner can always check the condition of these elements, and today this process takes much less time. How diagnostics are carried out in Gazelle cars and in what cases it is carried out - read below.
[Hide]
Gazelle diagnostic connector pinout
You can also familiarize yourself with the pinout of diagnostic connectors
Renault diagnostic connector
Opel diagnostic connector
KIA diagnostic connector
Currently, the overwhelming number of foreign cars, as well as domestic cars, have an OBD2 diagnostic connector. Through this connector you can connect diagnostic equipment to diagnose your car, as well as connect on-board computers and other devices that work through the diagnostic connector. Sometimes users have questions about the pinout of diagnostic blocks for certain car brands. For your convenience, we offer ready-made adapters for working with various diagnostic plugs on cars. However, if you forgot to purchase an adapter for your car, or you needed to make it in an emergency, or connect the adapter directly, then in this article you will find information about the pinout of OBD 2 standard blocks, as well as Russian and foreign-made cars.
Pinout of the OBD 2 block (the most common option in foreign cars since 2002, and is also installed in all VAZ cars after 2002):
4/5 - GND protruding contacts
16 — adapter power supply +12V
Pinout of the VAZ block before 2004:
M - k-line diagnostics
H or G - adapter power supply +12V
When connecting an adapter without a block directly to the wires, it is better to take power from the cigarette lighter, since the contact shown in Figure H, depending on the model, may not be routed, and when using the G contact, the fuel pump gives very large impulses that can damage the adapter.
(In 99% of cases, you can use the indicated contacts since damage to the adapters from the fuel pump practically does not occur.)
Connector GAZ (Gazelle) UAZ
2 - Power adapter +12V
10 - L-diagnostic line (may not be routed, as a rule not used)
11 — K-line diagnostics
Pinout for Daewoo Nexia n100, Matiz, Chevrolet Lanos, ZAZ Chans:
Connector M - K - line for diagnostics
Connector A - ground
Connector H - +12V (voltage in this connector may not be available on some car models)
Connector G - +12V from the ignition switch (there may be no voltage when the ignition is on and the engine is not running on some car models
If you are interested in the location of the diagnostic block in your car, as well as the pinout of diagnostic blocks for cars of other brands. Then you can familiarize yourself with them through a systematic catalog of diagnostic adapters. Download pinout of car brake pads.
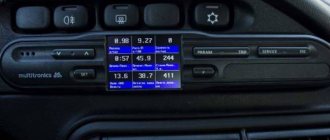
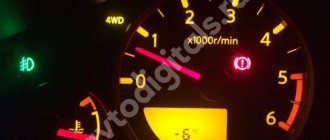
Many people are wondering about diagnostics when their “turn off the engine” light comes on. BC owners know about a simple error, those with a better BC can find out more information. But only normal diagnostics (adapter + PC + software) can give the most comprehensive picture of the operation of sensors and actuators.
Chapter I. How to choose an adapter?
The question is this. Volga Is your only car? Are there any more cars? Are there any plans to diagnose other cars? How seriously do you want to approach diagnosing the car (flashing the ECU, checking sensors, as well as mechanisms and testing them separately from the car)? A correct and honest answer will save your money and nerves. There are a lot of different devices on the market. From a simple piece of PCB where you need to plug the wires into the diagnostic connector, to suitcases with a bunch of wires (or rather, connectors for direct connection to sensors and a lot of adapters for exotic connectors). We will not consider suitcases and a full set of cables. Those who want to buy them already know everything perfectly well without me. There are two good complexes on our market from Motor-Master LLC and Skanmatika. The first one is still better in hardware, the second one is better in terms of software. For those who simply need diagnostics, this option is not suitable; it is a bit expensive for something that is not always needed. I decided to describe a budget option. Let's focus on KKL 409.1, also known as VAG-COM 409, also known as KKL-USB. Why? The adapter is common, a lot of software works with it, and the price of about 500 rubles on various Internet resources is very good. In stores, of course, they sell it for 1,500, but you can find resellers in an advertisement in your city who buy and resell them, even if they make 100-200 rubles, but you can check it on the spot. This is what it looks like:
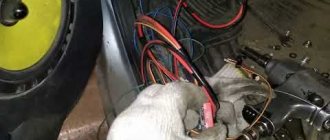
Chapter II. We make a 12 pin GAZ connector.
Of course, you can directly plug in 4 wires where you need them and everything will work great. But time and experience show that sooner or later you will mix up some wire. And it’s very inconvenient to control these pins from falling out. Therefore, we will do it carefully and beautifully. We buy in stores that sell BC, or the adapters themselves - OBD2 connector (female). And the GAZ connector is 12 pin. As you can see, all the contacts on the adapter plug are numbered. Its pinout is as follows:
This is where the “iron” part ends. In the second part, I will already describe the software and its work with the adapter using the example of the Mikas 7.1 ECU, ZMZ 406. It makes no sense to simply throw everything into one entry, because the volume of the material turned out to be too large.
If you already have an adapter and you are interested in connecting it and working with the software, then please go to the second part - DIY diagnostics. Part II - diagnostic software and working with it.
Modern cars, both foreign and domestic, are equipped with many different systems and devices that ensure normal engine operation. If one of the components or assemblies begins to work incorrectly, the car owner can always check the condition of these elements, and today this process takes much less time. How diagnostics are carried out in Gazelle cars and in what cases it is carried out - read below.
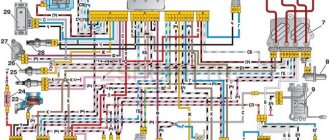
Pinout Mikas 7.1 injector and carburetor
This block is designed to control internal combustion engines:
- ZMZ-4062.10—with gasoline injection and electronic control;
- ZMZ-409.10—with gasoline injection and electronic control;
- ZMZ-405.10—with gasoline injection and electronic control;
- ZMZ-4063.10—carburetor, with electronic ignition system;
- ZMZ-4061.10—carburetor, with electronic ignition system.
- UMZ-4213.10—with gasoline injection and electronic control;
- UMZ-420.10—with gasoline injection and electronic control.
The block is a multi-mode cyclic machine with an extensive program that provides registration and processing of information from the system sensors to control the actuating electric mechanisms of the engine. The block is implemented on the basis of an 8-bit microcontroller and on an imported element base, has a monoblock single-board design with a 55-pin electrical connector from AMP.
Error code: elm327 abs on AliExpress - buy online at a good price
| 1 | white | Ignition coils 1 and 4 (KZ/1-4) Ignition control circuit. Creates excitation in ignition coils 1 and 4. |
| 2 | black White | Grounding the control unit. (General GNI) The contact is connected to the vehicle ground. The voltage at the contact relative to ground should be close to zero. |
| 3 | white/green | Fuel pump relay (FPR) Control of the fuel supply system relay. Turning on the ignition is a signal for the control unit to connect power (12 V) to the fuel supply system relay. If there are no crankshaft position reference signals, the control unit turns off the relay. When the reference signals of the position of the k.v. are resumed. the unit turns on the fuel pump relay again. |
| 4 | blue/cyan | Additional air regulator* (РДВ/1) |
| 5 | Not used | |
| 6 | White black | Input signal from the mass air flow sensor “-” (MAF) |
| 7 | black/yellow | Input signal from the mass air flow sensor "" (MAF) |
| 8 | pink | Input signal from the camshaft position sensor "" (DPRV) |
| 9 | Not used | |
| 10 | Not used | |
| 11 | green/white | Input signal from the knock sensor " " (DD) The signal is the voltage supplied to the control unit from the knock sensor to detect knock. The block adjusts the ignition timing depending on the level of detonation to extinguish it |
| 12 | White yellow | Power output of the throttle position sensor (TPS (power) |
| 13 | brown | L - diagnostic line (L - Line) |
| 14 | black | Control unit grounding (Common GNP) The contact is connected to the vehicle ground. The voltage at the contact relative to ground should be close to zero. |
| 15 | Not used | |
| 16 | pink/green | Nozzle 2(F/2) |
| 17 | orange | Injector 1 (F/1) Injector control. The voltage at these contacts is supplied through injectors connected to 12 V. When the ignition is on and the engine is not running, the voltage at the contacts is equal to the battery voltage. At idle, the charging system increases this voltage slightly. At higher engine speeds or greater engine load, the increased frequency and duration of the injector injection pulse causes a slight decrease in voltage compared to the idle voltage. |
| 18 | blue | Terminal 30 of the 12 V battery ( 30 ) Provides constant 12 V power to the electronic unit, including when the ignition is turned off. The voltage comes through the fuse. |
| 19 | blue red | Common (Common GNO) The contact is connected to the vehicle ground. The voltage at the contact should be zero. |
| 20 | brown/white | Ignition coils 2 and 3 (KZ/2-3) Ignition control circuit. Creates excitation in ignition coils 2 and 3. |
| 21 | Not used | |
| 22 | pink/blue | Diagnostic lamp (LD) Control of the diagnostic lamp. The electronic unit provides ground for turning on the diagnostic lamp. With the ignition on and the engine not running, the lamp should light up for 0.6 s and go out, and the voltage at the contact relative to ground should be close to zero. When the lamp is turned on, this voltage matches the battery voltage. |
| 23 | Not used | |
| 24 | red/pink | Control unit grounding (General GNI) The contact is connected to the vehicle ground. The voltage at the contact relative to ground should be close to zero. |
| 25 | Not used | |
| 26 | yellow/black | Additional air regulator (RDV/2) |
| 27 | orange/white | Ignition switch, terminal 15 (15) “On” signal to the control unit from the ignition switch circuit. The signal does not power the unit, it signals to it that the ignition is on. The voltage is equal to the battery voltage when the ignition switch is in the ignition or starter position. |
| 28 | Not used | |
| 29 | Not used | |
| 30 | Red Green | Common sensors (General GNA) The contact is connected to the vehicle ground. The voltage at the contact relative to ground should be close to zero. |
| 31 | yellow/white | Control channel for the burn-in of the mass air flow sensor (burn-in of the mass air flow sensor) |
| 32 | Not used | |
| 33 | Not used | |
| 34 | orange/red | Nozzle 4(F/4) |
| 35 | yellow green | Injector 3 (F/3) see pins 16 and 17. |
| 36 | measles h/blue and | Input signal from CO adjustment potentiometer (PTSO) |
| 37 | orange/green | Input 12V(12) |
| 38 | Not used | |
| 39 | Not used | |
| 40 | Not used | |
| 41 | Not used | |
| 42 | Not used | |
| 43 | blue/black | Output signal (logic level) to tachometer |
| 44 | white/pink | Input signal from intake air temperature (IAT) sensor |
| 45 | White blue | Input signal from the coolant temperature sensor (DTOHL) The electronic control unit sends a 5 V signal to the coolant temperature sensor, which is a thermistor. The sensor, also connected to ground, changes the voltage depending on the temperature of the coolant. |
| 46 | white/brown | Main relay (RGL) |
| 47 | Not used | |
| 48 | yellow/blue | Input signal from the crankshaft position sensor “-” (DPKV -) |
| 49 | white/blue | Input signal from the crankshaft position sensor (Dpkv) The contacts provide the electronic unit with data on the speed and position of the crankshaft. With the ignition on but the engine not running, the voltage should be below 1V. As the crankshaft rotates, the voltage increases with increasing speed. |
| 50 | Not used | |
| 51 | Not used | |
| 52 | Not used | |
| 53 | green | Input signal from the throttle position sensor (TPS) The input signal voltage of the throttle position sensor, which corresponds to actual changes in throttle position, varies in the range from 0 to 5 V. Typically, at idle the voltage is below 1 V, and when fully open throttle is 4.4...4.7 V. |
| 54 | Not used | |
| 55 | Red Blue | K - diagnostic line (K-Line) This line communicates with diagnostic equipment (tester, stand, etc.) |
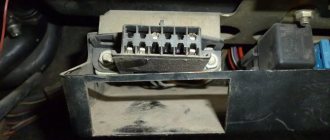
Description and location of the diagnostic connector
If earlier, in order to find a fault, you often had to focus only on the symptoms of the breakdown, and also act at random, but today everything is much simpler. To determine the incorrect operation of a particular unit, it is enough to diagnose the vehicle using additional devices. These can be a computer, laptop, tablet and even a mobile phone. To check, you only need to connect the device to the diagnostic connector and run the appropriate software.
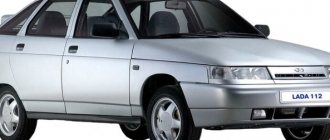
Location of the diagnostic connector in the engine compartment
As for the location of this connector, it may vary depending on the year of manufacture of the car. For example, in older versions of Gazelles, this connector is located in the engine compartment, near the windshield. Newer vehicles use an OBD II connector located under the steering wheel.
Today the situation has changed. Almost all cars have an OBD-II/EOBD diagnostic connector. This connector can be used to connect not only professional diagnostic devices, but also simple devices for reading fault codes (DTC).
There are quite a lot of such devices on sale. In terms of price and ease of use, they are quite affordable for the average motorist. To feel confident on a long trip, it is better to carry one of these devices with you.
The main fault codes are defined by the SAE standard and are almost the same for cars of all brands. However, the diagnostic connectors of the American standard OBD-II and the European EOBD, although identical in shape, differ in the purpose of some pins.
Most commercially available diagnostic tools allow you to read codes from any connector. However, when purchasing a device, you must clarify that it is compatible with the Cummins ISF2.8 diesel engine on the GAZelle NEXT car (OBD-II standard).
Diagnostic adapter Cummins INLINE 5 or Cummins INLINE 6 for diagnosing the Cummins ISF2.8 diesel engine on GAZelle NEXT.
To diagnose the Cummins ISF2.8 electronic engine management system on a GAZelle NEXT vehicle, it is recommended to use the INLINE 5 or INLINE 6 diagnostic adapter from Cummins. It comes with a set of connecting wires. As well as a personal computer with INLINE version 7.3 and higher installed.
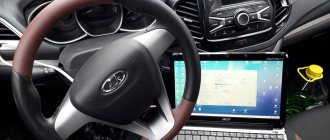
Checking the car's performance using a laptop
The diagnostic procedure at home is as follows:
- First of all, the adapter needs to be connected to a laptop or computer. The adapter should come with drivers; you need to install them. Go to Device Manager (Right-click on the “My Computer” icon - “Properties” - “Device Manager”) and make sure that the adapter is recognized by the computer. If the driver installation is successful, it will be registered in the system as a virtual COM port.
- Please note that most modern computers work with COM port number 1. Therefore, just in case, go to the “Properties” tab and select “Port Settings”, and then click the “Advanced” button and select the first port.
- Then you need to find the diagnostic connector - it can be located in the engine compartment near the windshield, behind the washer expansion tank, or under the steering wheel, as we wrote about above. Connect the adapter to the connector; the indicator on it should light up. At this point, the verification procedure can be considered complete; let’s proceed directly to testing.
- Now you will need to launch the software. Even if you have downloaded several programs, only one utility runs, otherwise the diagnostics will not give results. If you are not confident in one program, then you can check the car with several utilities, but one by one, and not simultaneously. The program should see the port to which the diagnostic adapter is connected; if this does not happen, try reconnecting it.
- Run the scan and wait for the results. During diagnostics, the corresponding indicator on the device may flash, there is nothing to worry about. The software should provide information regarding the basic technical parameters of the vehicle, as well as error codes if there are malfunctions in the operation of the car. The engine operating parameters must be checked with those indicated in the service book for the car; this will be the main step. When the diagnostics are completed, it will be necessary to decipher the error codes, if any, and repair the corresponding components.
obd2 adapter for gazelle
Many people are wondering about diagnostics when their “turn off the engine” light comes on. BC owners know about a simple error, those with a better BC can find out more information. But only normal diagnostics (adapter + PC + software) can give the most comprehensive picture of the operation of sensors and actuators.
Chapter I. How to choose an adapter?
The question is this. Volga Is your only car? Are there any more cars? Are there any plans to diagnose other cars? How seriously do you want to approach diagnosing the car (flashing the ECU, checking sensors, as well as mechanisms and testing them separately from the car)? A correct and honest answer will save your money and nerves. There are a lot of different devices on the market. From a simple piece of PCB where you need to plug the wires into the diagnostic connector, to suitcases with a bunch of wires (or rather, connectors for direct connection to sensors and a lot of adapters for exotic connectors). We will not consider suitcases and a full set of cables. Those who want to buy them already know everything perfectly well without me. There are two good complexes on our market from Motor-Master LLC and Skanmatika. The first one is still better in hardware, the second one is better in terms of software. For those who simply need diagnostics, this option is not suitable; it is a bit expensive for something that is not always needed. I decided to describe a budget option. Let's focus on KKL 409.1, also known as VAG-COM 409, also known as KKL-USB. Why? The adapter is common, a lot of software works with it, and the price of about 500 rubles on various Internet resources is very good. In stores, of course, they sell it for 1,500, but you can find resellers in an advertisement in your city who buy and resell them, even if they make 100-200 rubles, but you can check it on the spot. This is what it looks like:
Chapter II. We make a 12 pin GAZ connector.
Of course, you can directly plug in 4 wires where you need them and everything will work great. But time and experience show that sooner or later you will mix up some wire. And it’s very inconvenient to control these pins from falling out. Therefore, we will do it carefully and beautifully. We buy in stores that sell BC, or the adapters themselves - OBD2 connector (female). And the GAZ connector is 12 pin. As you can see, all the contacts on the adapter plug are numbered. Its pinout is as follows:
This is where the “iron” part ends. In the second part, I will already describe the software and its work with the adapter using the example of the Mikas 7.1 ECU, ZMZ 406. It makes no sense to simply throw everything into one entry, because the volume of the material turned out to be too large.
If you already have an adapter and you are interested in connecting it and working with the software, then please go to the second part - DIY diagnostics. Part II - diagnostic software and working with it.
You can also familiarize yourself with the pinout of diagnostic connectors
Renault diagnostic connector
Opel diagnostic connector
KIA diagnostic connector
Currently, the overwhelming number of foreign cars, as well as domestic cars, have an OBD2 diagnostic connector. Through this connector you can connect diagnostic equipment to diagnose your car, as well as connect on-board computers and other devices that work through the diagnostic connector. Sometimes users have questions about the pinout of diagnostic blocks for certain car brands. For your convenience, we offer ready-made adapters for working with various diagnostic plugs on cars. However, if you forgot to purchase an adapter for your car, or you needed to make it in an emergency, or connect the adapter directly, then in this article you will find information about the pinout of OBD 2 standard blocks, as well as Russian and foreign-made cars.
Pinout of the OBD 2 block (the most common option in foreign cars since 2002, and is also installed in all VAZ cars after 2002):
4/5 - GND protruding contacts
16 — adapter power supply +12V
Pinout of the VAZ block before 2004:
M - k-line diagnostics
H or G - adapter power supply +12V
When connecting an adapter without a block directly to the wires, it is better to take power from the cigarette lighter, since the contact shown in Figure H, depending on the model, may not be routed, and when using the G contact, the fuel pump gives very large impulses that can damage the adapter.
(In 99% of cases, you can use the indicated contacts since damage to the adapters from the fuel pump practically does not occur.)
Connector GAZ (Gazelle) UAZ
2 - Power adapter +12V
10 - L-diagnostic line (may not be routed, as a rule not used)
11 — K-line diagnostics
Pinout for Daewoo Nexia n100, Matiz, Chevrolet Lanos, ZAZ Chans:
Connector M - K - line for diagnostics
Table of pin number and what it is connected to
| № | Mikas 7.1/ 7.2 | Mikas 7.6 |
| 1 | Ignition coils 1, 4 | Ignition coil "A" |
| 2 | Control unit grounding | not used |
| 3 | Fuel pump relay. | Fuel pump relay |
| 4 | Auxiliary air regulator, circuit 1 | Additional air regulator (ADV), circuit A |
| 5 | Canister purge valve. | not used |
| 6 | Input signal from mass air flow sensor “-“ | Radiator Fan Relay |
| 7 | Input signal from mass air flow sensor " " | Absolute Pressure Sensor (APTS) ( ) |
| 8 | Entrance. Phase sensor " " | not used |
| 9 | Speed sensor " " | Speed sensor |
| 10 | Oxygen sensor 1 "-" | Oxygen sensor weight |
| 11 | Input signal from knock sensor " " | Knock sensor (DS) |
| 12 | Throttle position sensor power supply | Absolute Pressure Sensor (APTS) (-) |
| 13 | L - diagnostic line | L - diagnostic line (L-Line) |
| 14 | Control unit grounding | General power |
| 15 | Shaper FVN1 | Oxygen Sensor Heater |
| 16 | Injector 2 | Injector 2 |
| 17 | Injector 1 | not used |
| 18 | Terminal 30 of 12 V battery | Terminal 30 of 12 V battery |
| 19 | General power | General power |
| 20 | Ignition coils 2, 3 | Ignition coil "B" |
| 21 | Shaper FVN3 | Additional air regulator (ADV), circuit C |
| 22 | Diagnostic lamp | Diagnostic lamp |
| 23 | Recirculation valve | Injector 1 |
| 24 | Common ignition wire | Common ignition wire |
| 25 | Air conditioner relay | not used |
| 26 | Additional air regulator, circuit 2 | Additional air regulator, circuit B |
| 27 | Ignition switch, terminal 15 | Ignition switch, terminal 15 |
| 28 | Oxygen sensor 1 " " | Input Oxygen Sensor |
| 29 | Shaper FVN2 | Additional air regulator (ADV), circuit D |
| 30 | General sensors | Common sensor wire |
| 31 | Burning control channel for mass air flow sensor | not used |
| 32 | Fuel consumption sensor | not used |
| 33 | Secondary air relay | Oxygen Sensor Heater |
| 34 | Injector 4 | Injector 4 |
| 35 | Injector 3 | Injector 3 |
| 36 | Entrance. CO adjustment potentiometer | not used |
| 37 | 12V input after main relay | 12V after main relay |
| 38 | PBS signal | not used |
| 39 | Oxygen sensor 2 "-" | not used |
| 40 | Air conditioner request | not used |
| 41 | Knock sensor 2 " " | not used |
| 42 | Block programming permission | not used |
| 43 | Output, logical. Signal to tachometer | not used |
| 44 | Entrance. Intake air temperature sensor " " | Intake Air Temperature Sensor (IAT) |
| 45 | Entrance. Coolant temperature sensor " " | Coolant temperature sensor (DTOZH) |
| 46 | Main relay | Main relay |
| 47 | Pressure sensor power supply | Block programming permission |
| 48 | Frequency sensor "-" | Frequency sensor (DPKV) “-“ |
| 49 | Frequency sensor " " | Frequency sensor (DPKV) " " |
| 50 | Pressure meter " " | not used |
| 51 | Diagnosis of FVN | not used |
| 52 | Shaper FVN4 | CO adjustment potentiometer (RCO) |
| 53 | Throttle position sensor. Entrance " " | Throttle Position Sensor (TPS) |
| 54 | Recirculation valve position sensor | not used |
| 55 | K - diagnostic line | K - diagnostic line (K-Line) |
Useful: Cooler pinout: connecting 3 pin and 4 pin fans
Necessary tools, materials and programs for diagnostics
So, what you will need to prepare for a proper vehicle check:
- Diagnostic adapter with cord. When purchasing a device, you need to be sure to select the adapter that will fit your connector, so find out exactly what connector your car uses.
- Diagnostic device. We will describe an example of testing with a laptop. If you don’t have one, you can use a desktop computer, but this is extremely inconvenient, especially since you will need a household outlet to connect it. The best option is a netbook. It can work autonomously, while its dimensions are very convenient for diagnostics.
- Software for checking. In this case, you have a huge choice - you can easily find the necessary diagnostic software on the Internet, there are many options. At the same time, programs have their own characteristics and characteristics. You can give preference to free software - most of these programs are just as effective at finding errors as their paid counterparts.
Photo gallery “Getting ready for diagnostics”
Renault diagnostic connector
Renault diagnostic connector
The diagnostic connectors used in Renault family cars are not very diverse, unlike Japanese car manufacturers, and currently there are two types of diagnostic connectors for Renault cars.
On Renault cars until approximately 1998, a 12-pin rectangular diagnostic connector was used.
As a rule, a diagnostic connector of this type on Renault cars is located under the hood of the car on the partition between the engine compartment and the interior of the car itself.
The presented 12-pin diagnostic connector for a Renault car has the following pinout:
1 K-line for vehicle automatic transmission diagnostics (AD4)
7 K-line for vehicle automatic transmission diagnostics (M)
8 L-line for vehicle engine diagnostics (Siemens/Bendix/Renix SPI/MPI systems)
9 K-line for vehicle engine diagnostics (Siemens/Bendix/Renix SPI/MPI systems)
10 L-line for vehicle engine diagnostics (Fenix 5, Magneti Marelli 06R, Motronic M4.4.2 systems)
11 K-line for vehicle engine diagnostics (Fenix 5, Magneti Marelli 06R, Motronic M4.4.2 systems), ABS, AirBag
On modern Renault car models, most models after 1997 and all modern models, have a 16-pin OBD-II connector made in the shape of a trapezoid.
This diagnostic connector on Renault cars is usually located under the dashboard (under the steering column)
at the feet of the front passenger (Renault Avantime)
or on the back wall of the glove compartment of a car (for example, on a Renault Logan) behind a plastic cover
Pinout of OBD 2 standard diagnostic connector
4 Grounding the car body
5 Vehicle signal ground
6 Line CAN-High, J-2284
7 K-line vehicle diagnostics (ISO 9141-2 and ISO/DIS 14230-4)
14 Line CAN-Low, J-2284
15 L-line vehicle diagnostics(ISO 9141-2 and ISO/DIS 14230-4)
16 Power supply +12V from car battery
Diagnostic connector Opel
Currently, in the Opel family there are only two types of diagnostic connectors.
On Opel cars from 1988 to 1996, a 10-pin diagnostic connector was used.
As a rule, a diagnostic connector of this type on Opel Vectra A and Omega A cars is located under the hood of the car, and on an Astra F car in the interior fuse box of the car itself.
The presented 10-pin diagnostic connector for an Opel car has the following pinout:
A) Ground contact
B) Contact designed to read slow vehicle self-diagnosis codes. K - car engine diagnostic line.
C) Contact designed for reading slow self-diagnosis codes of a vehicle’s automatic transmission. L-line for automatic transmission diagnostics of a car.
D) Contact designed for reading slow self-diagnosis codes of the on-board LCD display and the vehicle’s on-board computer.
E) Contact designed to read slow vehicle self-diagnosis codes.
F) +12V power contact
G) K-line diagnostics of the engine, automatic transmission, ABS of the car.
H) Contact designed to read slow self-diagnosis codes of the cruise control unit and anti-theft device (ATWS) of the vehicle.
J) Contact designed for reading slow self-diagnosis codes of the vehicle's four-wheel drive control system.
K) Contact designed to read slow ABS self-diagnosis codes. L-line for vehicle ABS diagnostics.
On modern Opel car models, most models after 1996 and all modern models, have a 16-pin OBD-II connector made in the shape of a trapezoid.
This diagnostic connector on Opel cars is usually located under the dashboard (under the steering column), using the example of the Opel Corsa car
near the parking brake handle on the tunnel between the front seats (Opel Vectra B)
Pinout of OBD 2 standard diagnostic connector
4 Grounding the car body
5 Vehicle signal ground
6 Line CAN-High, J-2284
7 K-line vehicle diagnostics (ISO 9141-2 and ISO/DIS 14230-4)
14 Line CAN-Low, J-2284
15 L-line vehicle diagnostics(ISO 9141-2 and ISO/DIS 14230-4)
16 Power supply +12V from car battery
All modern diagnostic adapters have an OBD 2 standard connector and do not require adapters
KIA diagnostic connector
If you are the owner of a Kia car, then in this article we will tell you what pinout the diagnostic connector of your car has, after which you can connect the on-board computer or diagnostic adapter to your car without resorting to the use of adapters.
This connector can be found on certain models of Kia Spectra, Sportage, Cee'd and many others. The connector is located under the hood and can be installed either separately or as a duplicate of the OBD2 standard connector installed in the car interior.
If your car has a 20 pin diagnostic connector (kia 20 pin), then it has the following connector pinout:
1) +12V power supply after the fuel pump relay 2) Signal to turn on the cooling system fan 3) Engine speed signal / primary ignition circuit control signal 4) GND - Ground 5) +B - +12V power supply 7) Primary ignition circuit control circuit (coil 2 ) L-line for ABS diagnostics 9) K-line for engine diagnostics 10) Automatic transmission fault signal 11) Check Engine lamp circuit - output for reading slow engine self-diagnosis codes 12) GND - Ground 14) K-line for airbag diagnostics (AirBag) 15) K-line for ABS diagnostics 16) Primary ignition circuit control circuit (coil 1) 17) K-line for cruise control diagnostics 18) L-line for automatic transmission diagnostics 19) L-line for engine diagnostics 20) Engine monitor output
If your car has a standard 16-pin OBD2 diagnostic connector (kia Obd-2 16-pin), then this connector has the following pinout:
Firmware for diagnostics of VAZ, GAZ, UAZ, IZH, ZAZ, KAMAZ, MAZ, PAZ, Ural
| Firmware module name | ECU type | Diagnosed systems | Car models, engine model | Key Features | ||||
| Fault codes | Parameter control | MI tests | Adaptations/specials functions | |||||
| "ECU AUTO-DETECTION" | To determine the ECU of gasoline engines of VAZ/GAZ/UAZ/IZH/ZAZ passenger cars | |||||||
| "VAZ M154/Y7/Y5/Y4" | BOSCH M1.5.4 (P-83), BOSCH M1.5.4N (Euro-2), January 7.2 (Euro-2), Itelma 7.2 (Euro-2), January 5.1 (Euro-2), January 5.1.1 ( R-83), January 5.1.2 (R-83), January 5.1.3 (Euro-2), VS 5.1 (R-83/Euro-2), January 4, January 4.1 | Engine | VAZ 2104, 2105, 2106, 2107, 2108, 2109, 2110, 2111, 2112, 2114, 2115, 2121, 2123, Chevy Niva | |||||
| "VAZ MP70/GM" | BOSCH MP7.0H (Euro-2/Euro-3), GM ISFI-2S, GM EFI-4 | Engine | VAZ 2108, 2109, 2110, 2111, 2112, 2121, 2123, Chevy Niva | |||||
| "VAZ M7.9.7/M73" | BOSCH M7.9.7 (Euro-2/Euro-3), BOSCH M7.9.7 (Euro-3) A/C, M73 (Euro-3), M74K (Classic) | Engine | VAZ Classic, 2114, 2115, Chevy Niva, 1118 (Kalina), 2170 (Priora) | |||||
| "VAZ M74/ME17.9.7" | M74 (Euro-3/Euro-4), BOSCH ME17.9.7 (Euro-3/Euro-4), M75 (Euro-4) | Engine | VAZ 2114, 2115, Niva 4×4, 1118 (Kalina), 2170 (Priora) | |||||
| "VAZ M74 CAN"* | M74 CAN (Euro 4), NEW! M74.5 CAN (Euro 4) | Engine | VAZ LADA Granta, Kalina II, Priora, Dutsun on-DO, mi-DO | |||||
| NEW! "VAZ XRAY EMS3125"* | Siemens EMS3125 | Engine | VAZ LADA XRAY | |||||
| "VAZ ADDITIONAL EQUIPMENT." | EMUR, SAUO, SAUKU, SNPB1118, SNPB2170 | Electro-mechanical power steering Kalina, Priora; APS6; automatic heater control system, automatic control system for climate control 2110 and Priora; airbags Kalina, Priora | VAZ 2110, 2111, 2112, 2114, 2115, 2123, Chevy Niva, 1118 (Kalina), 2170 (Priora) | — | ||||
| "VAZ ADDITIONAL EQUIPMENT.1" | Electrical package 2170-3763040, Electrical package 1118-6512021, Electrical package 11180-3763040, APS-6.1. | Electrical package Kalina, Electrical package Kalina-Lux, Electrical package Priora-Norma, Immobilizer APS-6.1 (Kalina-Lux). | Chevy-Niva, 1118 (Kalina), 2170 (Priora) | — | ||||
| "VAZ ADDITIONAL EQUIPMENT.2"* | SNPB Takata, ABS/ESP BOSCH 9.0 (CAN), automatic transmission Jatco | Takata airbags (Granta, Priora), ABS/ESP BOSCH 9.0 (Granta, Kalina, Priora, Niva), Jatco automatic transmission (Granta) | VAZ LADA Granta, Kalina, Kalina II, Priora, Niva from 2022, Dutsun on-DO, mi-DO | |||||
| NEW! "VAZ ADDITIONAL EQUIPMENT.3"* | Instrument panel (CAN) | Dashboard | VAZ LADA Granta, Kalina II, Dutsun on-DO, mi-DO | — | — | |||
| "VAZ ADDITIONAL EQUIPMENT.4"* | Electrical package (CAN) | Body Electronics | VAZ LADA Granta, Kalina II, Priora New, Dutsun on-DO, mi-DO | |||||
| NEW! "VAZ ADDITIONAL EQUIPMENT.5"* | Visteon (CAN) | Air conditioning system | VAZ LADA Granta, Kalina II, Dutsun on-DO, mi-DO | |||||
| NEW! "VAZ ADDITIONAL EQUIPMENT.6"* | ZF AMT | Automatic transmission | VAZ LADA Priora, Vesta, XRAY, Dutsun on-DO, mi-DO | |||||
| "VAZ LARGUS" | Siemens EMS 3132, electrical package | Engine, electrical package | VAZ Largus | |||||
| "VAZ LARGUS ADDITIONAL EQUIPMENT" | ABS BOSCH, SRS | ABS, SRS | VAZ Largus | |||||
| "GAZ MIK/SOATE/AVT" | MIKAS 5.4, MIKAS 5.4 KZ, MIKAS 7.1, MIKAS 7.1 KZ, MIKAS 7.2, AUTRON M1.5.4, SOATE 31, SOATE 302 | Engine | GAZ (Volga, Gazelle, Sobol, Valdai, Barguzin) with engine. ZMZ-4052, ZMZ-4062, ZMZ-4063, ZMZ-409, UMZ-4216, UMZ-249; UAZ engine ZMZ-405, ZMZ-409, UMZ-4213, UMZ-4216, UMZ-249, UMZ-420 | |||||
| "GAZ VS5.6 ITELMA" | VS5.6 ITELMA | Engine | GAZ (Volga, Gazelle, Sobol, Valdai, Barguzin) ZMZ-4062 | |||||
| "GAZ/UAZ MIKAS 11/VS8" | MIKAS 11 (Euro-2/Euro-3) serial number 822.3763 001, VS8 ITELMA | Engine | GAZ (Gazelle, Sobol, Valdai, Barguzin) with engine. ZMZ-4052; UAZ (Patriot) engine. ZMZ-409 | |||||
| "GAZ/UAZ MIKAS 11E3" | MIKAS 11ET (Euro-3) serial number 371.3763 000, MIKAS 11 (Euro-3) serial number 825.3763 001, MIKAS 11CR (Euro-3) serial number 581.3763 000 | Engine | GAZ (Volga, Gazelle, Sobol), UAZ with engine. ZMZ-40524 (electronic throttle), ZMZ-4052, ZMZ-4091, Chrysler 2.4l. (since 2008) | |||||
| "GAS MIKAS 10.3" | MIKAS 10.3, serial number 4216.3763000 | Engine | GAZ Gazelle with engine. UMZ-4216 | |||||
| "GAS MIKAS 12.3" | MIKAS 12.3 | Engine | GAZ Gazelle with engine. UMZ-42164 Euro-4 | |||||
| NEW! "GAS MIKAS 12 G/B" | MIKAS 12 | Engine | GAZ Gazelle with engine. ZMZ-405 Euro-4 (gas/gasoline) and UMZ-421647 Euro-4 (gas/gasoline) | |||||
| "GAZ Chrysler" | Motorola | Engine | GAZ Volga with Chrysler 2.4l engine. (until 2008), GAZ Siber 2.4l. | |||||
| "GAS VDO Steyr" | VDO Steyr | Engine (diesel) | GAZ-560 (Steyr) | — | ||||
| "GAZ/UAZ/VAZ ABS" | BOSCH 5.3 (ABS), BOSCH 8.0 (ABS), BOSCH 8.1 (ABS) | ABS | GAZ (Volga, Gazelle, Sobol); UAZ (Patriot); VAZ (Kalina, Priora) | — | ||||
| "UAZ ME17.9.7" | BOSCH ME17.9.7, BOSCH ME17.9.7 Euro-4, NEW! BOSCH M(E) 17.9.71 Euro-4 | Engine | UAZ with engine ZMZ-409 | |||||
| "UAZ EDC16C39"* | BOSCH EDC16C39 | Engine | UAZ Patriot with engine. Iveco F1A (diesel) | IMA codes for injectors | ||||
| "UAZ VS9.2" | VS9.2 | Engine (diesel) | UAZ with diesel engine ZMZ-5143 | — | ||||
| "UAZ EDC16 ZMZ-5143" | BOSCH EDC16C39-6.H1 | Engine (diesel) | UAZ with diesel engine ZMZ-51432.10 Euro-4 | Recording injector codes | ||||
| "UAZ ADDITIONAL EQUIPMENT" | Air conditioning remote control, central locking | Air conditioning remote control (Patriot), central locking (Patriot) | UAZ Patriot from 2022 | |||||
| "ZAZ/IZH MIK7.6/10.3" | MIKAS 7.6, MIKAS 10.3, MIKAS 10.3/M11 | Engine | ZAZ Sens, Lanos, Slavuta, Tavria, IZH | |||||
Error code: UCANDAS VDM2 Wi-Fi - diagnostic auto scanner
* — Only for “AVTOAS-F16 CAN”, “AVTOAS-F16 CAN 24”