Many car enthusiasts remember the immemorial times of the Soviet Union, when many vehicle owners made wheel alignment on their Zhiguli using a thread. If this technology was already available then, then purely theoretically, this operation could be done with your own hands on any car.
The video will tell you how to independently adjust the wheel alignment angle, what tools and knowledge you will need, and also talks about the subtleties and nuances of the procedure.
Which racks are better to put on a VAZ 2114
Owners of domestic cars, as a rule, are well versed in the structure of the car and are able to carry out repairs of any complexity with their own hands. Due to the large number of varieties of spare parts of this type, it can be difficult to figure out which racks are best to install.
Choosing a shock absorber type
The racks installed on the VAZ 2114 can differ significantly in technical characteristics, which, first of all, depend on the substance filling the internal chamber of the product. According to this principle, shock absorbers are divided into gas, oil, and gas-oil.
Oily
Oil shock absorbers are very soft, making them ideal for normal driving. In addition, such products are inexpensive and have a significant service life. Among the shortcomings of the products, one can note only a decrease in oil viscosity at low temperatures, which negatively affects the efficiency of vibration damping.
Gas-oil
It is worth installing gas-oil shock absorbers when the car owner wants to save money, but at the same time significantly improve the comfort of driving the car. This type of VAZ 2114 rear struts is only slightly more expensive than oil-based models, but after installing gas-oil products, the car will become more controllable when cornering and at high speeds.
Gas
Gas shock absorbers are the most expensive, but you cannot do without them if the car is planned to be used in racing or at low air temperatures. In addition, installing racks of this type will significantly increase the vehicle's controllability on a wet road.
Manufacturer's choice
The choice of rear strut manufacturer should be taken very seriously. Often, the service life of almost identical products from different companies can differ tens of times, so even a relatively small cost of the product will not be able to compensate for further costs of replacing shock absorbers.
Kayaba
If there is a need to change the rear struts of a VAZ 2114, then you can hardly find a better product than Kayaba shock absorbers. Despite the higher cost, spare parts from the world-famous Japanese brand are in great demand among Russian motorists. Such products fully comply with the technical requirements of this car model, and can also be used with virtually no restrictions in the winter.
SS-20
SS 20 shock absorbers are domestically produced, but in terms of build quality such products are not inferior to the best foreign models. Products should be changed taking into account the intensity of use. For these purposes, the model line includes the following categories: “Standard”, “Comfort Optima”, “Highway”, “Sport”.
Plaza
Rear shock absorbers for the VAZ 2114 from Plaza are excellent for a sporty driving style. It is also recommended to install such products if the car is frequently used on roads with broken surfaces. According to the main technical characteristics, the Plaza rear struts are more than 2 times higher than the requirements of the vehicle manufacturer; therefore, even under very harsh conditions of use, they will last longer than the original shock absorbers.
Other good options
In addition to the listed companies and models, rear shock absorbers can be replaced with products from other manufacturers. Good reviews can be found for the Belarusian concern Fenox, which produces spare parts for Russian cars. The products of the British company Delphi Corporation have also proven themselves well. Products from this company are ideal for installation on cars operated primarily in a sporty style.
Selection of parts and necessary tools
Before you start directly replacing silent blocks, it is important to properly prepare for it. There are few specific recommendations for choosing new parts. The auto parts market is simply filled with silent blocks from different manufacturers, basically they are all quite good
The only thing you can do to make a better choice of new parts is to consult with auto mechanics in your area. The main thing is that the new vibration isolators fit completely.
The auto parts market is simply filled with silent blocks from different manufacturers, mostly they are all quite good. The only thing you can do to make a better choice of new parts is to consult with auto mechanics in your area. The main thing is that the new vibration isolators fit completely.
For repair work you will need the following things:
- new silent blocks;
- a set of spanners and socket wrenches (required sizes 17, 19, 24);
- a hammer, a vice or a special puller (also known as a “press presser”) for vibration isolators;
- any lubricant, WD-40 is most convenient;
- inspection hole (lift);
- jack.
Important! Despite the complexity of replacing silent blocks, it is necessary to have at least basic repair skills. Therefore, objectively weigh your strengths before replacing and decide whether you can do it.
Replacing suspension silent blocks with your own hands
The suspension silent blocks on the VAZ-2112 are located in the arms of both the rear beam and the front one. It is advisable to replace them comprehensively. The replacement process is approximately the same on both the rear and front parts of the suspension. Below are instructions for both cases.
Front control arms
Replacing front control arm silent blocks on a VAZ-2112 is the following process:
- First of all, the car must be placed above the inspection hole or use a lift. Then remove the engine compartment protection represented by the casing.
- After this, the nuts securing the front arms are unscrewed, then the stabilizers, all this is done with a 17 wrench.
- After loosening the nuts securing the required wheel, you need to jack up the car and remove it completely.
- Use a 24mm wrench to unscrew the nut on the extension. Then unscrew the fastening bolts of the ball joint and dismantle it.
- Next, the suspension arm is completely released.
- It is necessary to remove the old silent blocks from the removed lever with a hammer or puller. After this, clean the seat from rust and dirt, lubricating the surface with a thin layer of lubricant. You can make your own puller. It will be especially useful when you want to replace the silent block without removing the lever.
- Having pressed the new silent blocks into the mounting groove with a vice or a puller, you need to assemble everything in the reverse order.
- Ready.
Important! Many car enthusiasts do not press out silent blocks, but burn them out, which is extremely wrong. During heat treatment, the quality of the metal from which the lever is made seriously changes for the worse.
Replacing silent blocks in the rear beam
Replacing the rear silent blocks is done as follows:
- Again, the car must be driven into a viewing hole or raised on a lift.
- Then, taking a 19mm wrench, you need to disconnect the rear beam from the bracket by unscrewing the nuts securing it.
- After this, the bolt freed from the nut should be removed, and a wooden beam the size of a brick should be inserted between the beam and the body.
- Then the silent block is knocked out with a hammer or puller, and the freed groove is cleaned and lubricated.
- Next, a new silent block is pressed into the mounting groove.
- The last step is to assemble the entire structure back.
Important! After carrying out measures to replace silent blocks (both front and rear), it is very important to do a wheel alignment.
Chassis problems and setting wheel parameters
Be sure to perform a wheel alignment if the vehicle's chassis has been repaired. It is especially important to do this when replacing the following parts:
- silent blocks;
- tie rod ends;
- suspension arms.
Theoretically, when replacing upper and lower ball joints, springs and shock absorbers, there is no need to resort to the procedure, but some experts recommend performing it when working with absolutely any chassis component. Just in case.
[custom_ads_shortcode3]
What happens if you don't change the racks?
If you continue driving without replacing the struts, you will have to repair the entire suspension
Below we will describe to you several reasons that directly indicate what will happen to the car if the front struts are not repaired in time:
- During the first 2-3 thousand kilometers with faulty shock absorbers, the support bearings on the front struts can be broken.
- When the struts are faulty, wheel balancing is also disrupted over time and tires begin to wear unevenly, and hub bearings break.
Braking
Braking demonstration on new and old struts
- Since the braking distance becomes longer and increases, this directly affects the safety of the vehicle. Since even one extra meter of braking distance can lead to a traffic accident.
- Braking on faulty struts leads to a decrease in the service life of the brake pads, as well as their uneven wear. As you might guess, this directly depends on traffic safety.
All these malfunctions can significantly damage the condition of the entire front suspension system as a whole, and this can already hit the overall budget. However, there are ways in which you can reliably determine the working condition of your shock absorbers.
How and what to measure
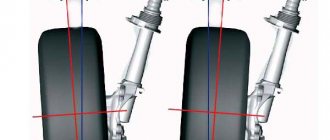
Caster angle cannot be measured. Decreasing it leads to the inability to take a turn at speed, and increasing it leads to a “heavier” steering wheel. Usually 2-3 degrees is considered a “sporty” option. This is what we need to build on.
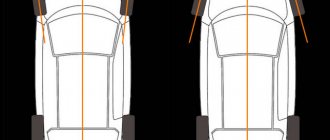
To measure toe and camber angles, it is enough to place a thread and a weight. Zero camber corresponds to the fact that the values of A and B are equal (Fig. 52).
Measuring with a thread
“Zero toe” is also easy to check: measure distance B (Fig. 51), knowing that the track of the front and rear wheels differs by 30 mm. The rear wheel is “recessed” inward compared to the front.
To accurately measure the toe angle, you will need equipment: a sliding ruler or a chain with a dynamometer. Only one thing is used.
Measuring the toe angle
The “measuring device” itself is brought in front and behind, then the obtained values are compared. For zero degrees, the two digits should not be different.
The car must be placed on a surface whose inclination angle is zero! In practice, to take measurements, plates are placed under the wheels. The steering wheel must be turned to the “0 degrees” position - this is also important.
When to do it
It is recommended to check and adjust angles in the following cases:
- The car has traveled about 10-15 thousand km (for domestic models) or 20-45 thousand (for imported brands).
- The vehicle became difficult to drive, and the tires began to wear out quickly and unevenly.
- The steering wheel does not return to the neutral position on its own after the vehicle is pulled out of a turn.
- After repair work related to the suspension, steering elements and load-bearing parts of the body, namely: replacing the CV joint (constant velocity joint), installing new steering tips and ball joints, replacing the front side members.
- If the vehicle has been in an accident, it is also recommended to check the camber and toe angles.
It should be noted that before starting work on measuring and setting angles, it is necessary to find out:
- Are the steering components in good working order?
- Should the wheel bearings be replaced?
- Are there any problems with the front suspension elements?
You should also definitely balance the discs (if there is any runout).
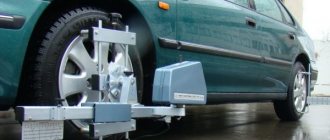
Computer wheel alignment allows you to most accurately set wheel angles
Front strut replacement tool
In order for the work to be completed successfully and quickly, you need to prepare some tools:
- A set of keys or socket heads with a diameter from “10” to “27”.
- Collar.
- Jack.
- Wheel chocks.
- WD-40 lubricant.
When the tool is ready, you can start working.
Preparatory work
Before you begin directly to work, you need to prepare your workplace and car.
- First of all, place the car on a flat surface.
- For maximum reliability, we place wheel chocks under the rear wheels.
- We tear off all the bolts securing the front wheels.
Broken nuts are easier to unscrew later.
We recommend: How to change the alternator belt on Kalina with your own hands
Step-by-step process for replacing front struts
If you only have one rack out of order, you will still have to change a couple anyway, so the order in which the work is performed does not matter.
- First of all, we lift the hood and, using a special device for fixing the rod and key at “19”, engage the nut securing the support to the rack and turn it. When the fastening becomes loose, do not unscrew it completely.
When removing the nut, you must use a special wrench.
A similar key is easy to find in stores.
- Using a key set to “13”, unscrew the 3 bolts that are located on the upper glass.
The bolts are marked with arrows. - Next, we use a jack to hang the wheel and fix it in this position.
The process has begun! We remember about safety. The rear wheels are locked with a handbrake, or better yet, with bars - We remove the brake hose, which is attached to the strut knuckle itself, from the place of fixation and remove it in any direction.
- We inspect all connections, including the steering tip, steering knuckle and the rack itself for signs of corrosion; it is best to treat these places with lubricant. This is done so that all soured parts can be easily torn off.
- After a short amount of time until the lubricant penetrates into all deep places, you can continue working.
- Having disconnected the cotter pin and unscrewed the nut from the steering end using a pry bar and a hammer, we remove it from the place of fixation.
When the rods are loosened, leave the nuts in place. - Using the heads at “17” and “19” we begin to unscrew the two bolts that secure the strut to the steering knuckle.
The bolts are marked with arrows. - When the nuts are unscrewed, problems may arise with further dismantling of the main bolts. Since they stick strongly, they may need to be exposed to excessive amounts of lubricant or liquid wrench. In order to knock them out of their seats, you can use a bolt with a smaller diameter.
- If all fastening elements are unscrewed, all that remains is to completely unscrew all three bolts located on the upper cup.
- Until the strut is disconnected from the steering knuckle, do not completely unscrew one of the three bolts on the cup.
And we turn it completely only when the stand is in the hands and completely under control. The stand has been removed. We carry out a visual inspection of the steering tip and ball joint - The racks should be disassembled first, starting with the ties.
The springs should be tightened carefully, eliminating the possibility of their breaking. It is necessary to tighten the springs until they release the upper cup. - If the stand no longer rests against the support, this will mean that it is already under sufficient tension.
- Now you can dismantle the support fastening nut and, accordingly, the support itself.
- When the support is dismantled, remove the spring itself.
- Now all that remains is to remove the boot and bump stop from the strut rod.
(Although you don’t have to do this if all the spare parts are new). The order of work in the illustration.
At this stage, work on dismantling the front pillar of the VAZ-2112 can be considered complete.
Assembly procedure
First of all, we install the boot and bumper on the new rack. Installation is carried out in the reverse order of removal. If you plan to install sound insulators, we will install them. Sound insulators are ready for installation
We put on the spring
Please note that its main part must fit exactly into a special recess located on the rack cartridge. Using a new support and support bearing, you need to fix it on the rod itself using a nut. Make sure that the part of the spring on top is always in place where it is fixed and that there are no distortions or bevels. When everything has been diagnosed, you can remove all the ties and begin installing it on the car. Let's try it on, admire it and install it
Next, we carry out all the work in exactly the reverse order, starting with the cup nuts in the engine compartment. When fixing the strut to the steering knuckle, it is best to use new bolts of the same diameter with completely new nuts.
Front strut replacement tool
In order for the work to be completed successfully and quickly, you need to prepare some tools:
- A set of keys or socket heads with a diameter from “10” to “27”.
- Collar.
- Jack.
- Wheel chocks.
- WD-40 lubricant.
When the tool is ready, you can start working.
Preparatory work
Before you begin directly to work, you need to prepare your workplace and car.
- First of all, place the car on a flat surface.
- For maximum reliability, we place wheel chocks under the rear wheels.
- We tear off all the bolts securing the front wheels.
Broken nuts are easier to unscrew later.
Step-by-step process for replacing front struts
If you only have one rack out of order, you will still have to change a couple anyway, so the order in which the work is performed does not matter.
- First of all, we lift the hood and, using a special device for fixing the rod and key at “19”, engage the nut securing the support to the rack and turn it. When the fastening becomes loose, do not unscrew it completely.
When removing the nut, you must use a special wrench.
A similar key is easy to find in stores.
- Using a key set to “13”, unscrew the 3 bolts that are located on the upper glass.
The bolts are marked with arrows.
- Next, we use a jack to hang the wheel and fix it in this position.
The process has begun! We remember about safety. The rear wheels are locked with a handbrake, or better yet, with bars
- We remove the brake hose, which is attached to the strut knuckle itself, from the place of fixation and remove it in any direction.
- We inspect all connections, including the steering tip, steering knuckle and the rack itself for signs of corrosion; it is best to treat these places with lubricant. This is done so that all soured parts can be easily torn off.
- After a short amount of time until the lubricant penetrates into all deep places, you can continue working.
- Having disconnected the cotter pin and unscrewed the nut from the steering end using a pry bar and a hammer, we remove it from the place of fixation.
When the rods are loosened, leave the nuts in place.
- Using the heads at “17” and “19” we begin to unscrew the two bolts that secure the strut to the steering knuckle.
The bolts are marked with arrows.
- When the nuts are unscrewed, problems may arise with further dismantling of the main bolts. Since they stick strongly, they may need to be exposed to excessive amounts of lubricant or liquid wrench. In order to knock them out of their seats, you can use a bolt with a smaller diameter.
- If all fastening elements are unscrewed, all that remains is to completely unscrew all three bolts located on the upper cup.
- Until the strut is disconnected from the steering knuckle, do not completely unscrew one of the three bolts on the cup. And we turn it completely only when the stand is in the hands and completely under control.
The stand has been removed. We carry out a visual inspection of the steering tip and ball joint
- The racks should be disassembled first, starting with the ties. The springs should be tightened carefully, eliminating the possibility of their breaking.
It is necessary to tighten the springs until they release the upper cup.
- If the stand no longer rests against the support, this will mean that it is already under sufficient tension.
- Now you can dismantle the support fastening nut and, accordingly, the support itself.
- When the support is dismantled, remove the spring itself.
- Now all that remains is to remove the boot and bump stop from the strut rod. (Although you don’t have to do this if all the spare parts are new).
The order of work in the illustration.
At this stage, work on dismantling the front pillar of the VAZ-2112 can be considered complete.
Assembly procedure
First of all, we install the boot and bumper on the new rack.
Installation is carried out in the reverse order of removal.
If you plan to install sound insulators, we will install them.
Sound insulators are ready for installation
We put on the spring
Please note that its main part must fit exactly into a special recess located on the rack cartridge. Using a new support and support bearing, you need to fix it on the rod itself using a nut. Make sure that the part of the spring on top is always in place where it is fixed and that there are no distortions or bevels.
When everything has been diagnosed, you can remove all the ties and begin installing it on the car.
Let's try it on, admire it and install it
Next, we carry out all the work in exactly the reverse order, starting with the cup nuts in the engine compartment. When fixing the strut to the steering knuckle, it is best to use new bolts of the same diameter with completely new nuts.
Adjusting the camber angle
Adjusting the camber angles is performed in the following order (we remind you that in our case the actions are described for a VAZ 2109 car):
- Before adjusting the camber, the machine must be on level ground.
- We put two vertical marks along the diameter of the wheel rim with chalk - one on top, the other on bottom.
- We apply the cord with a plumb line to the wing, and along the marks with a ruler or caliper we measure the distance from the rim to the cord at the top mark, and then at the bottom. The difference should be ±3 mm.
- The rim may not be perfect, so it is advisable to roll the car by turning the wheel 90° and making 2 more vertical marks. We take measurements again.
- Do the same on the second wheel and write down the result.
- After this, turn the car 180° and take measurements again, write them down and compare them.
- Then remove the wheel and use two 19mm wrenches to loosen the two bolts securing the shock absorber strut bracket to the steering knuckle.
- Move the steering knuckle with a wrench to 19 due to the eccentricity of the bolt head inward or outward to the required distance, thus achieving the required camber angle.
- Tighten the bolts, put the wheel in place, lower the car and rock the fender several times. Take measurements.
- Move some distance away from the car and look at the position of the front wheels, comparing them with the plane of the rear wheels.
On rear-wheel drive cars, the camber angle should be within +1/+3mm, and on front-wheel drive cars, camber in the range from -1 to +1mm is considered normal.
[custom_ads_shortcode3]
What is “wheel alignment”
The wheels of the car must be positioned relative to the horizontal plane at a certain angle (camber), the same applies to the vertical plane (toe). This is required to achieve better tire traction and acceptable vehicle handling.
Correct setting of camber and toe angles ensures stable handling and stability of the vehicle
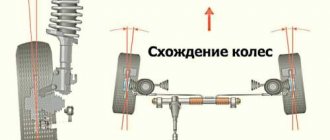
Convergence
This value can be either “plus” (when imaginary lines running parallel to the drive wheels will have an intersection point in front of the “nose” of the vehicle) or “minus” (when the intersection point is located behind). You need to understand that the closer the toe angle is to zero, the less resistance the vehicle has to the rolling effect.
A negative toe angle is bad. In this case, poor handling and poor response when turning the steering wheel will be observed. In addition, this will lead to the car yaw during travel (especially at high speed). The risk of an uncontrolled skid will increase significantly.
With “positive” toe-in of the front wheels, the vehicle is more responsive in handling, and it will be easier for the car enthusiast to take turns. It is also recommended to install the wheels of the rear axle with a positive toe value, then the car will become as stable as possible when driving straight.
If the convergence angles strongly differ from the factory settings, increased tire wear is observed:
- If positive - on its outer part;
- When negative – internal surfaces.
Therefore, it is not recommended to experiment with this angle.
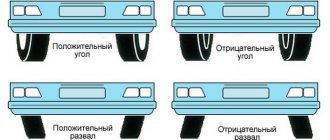
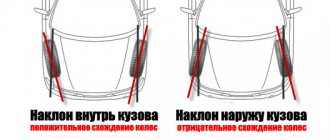
Camber
Camber is the angle between an imaginary vertical plane and the lateral plane of the wheel. If the upper parts of the wheels “look” towards the center of the car, the camber angle is considered negative, and if outward, then positive. A significant discrepancy between the camber angles and the parameters set by the manufacturer will lead to rapid tire wear. Moreover, the car will begin to “drag” towards the wheel that has the maximum camber angle.
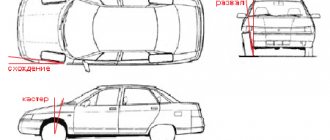
Custer
The behavior of a vehicle while driving is influenced by caster - the angle between an imaginary vertical and the axis of rotation of the wheels while turning the steering wheel.
Its meaning can have both positive and negative meanings. Because of this angle, the drive wheels will invariably return to their original (neutral) position. Its value determines the change in wheel camber when turning the steering wheel and the stabilization of the car while moving along an arc trajectory. The higher this value, the greater the stabilizing effect.
Caster angle - deviation of the angle of the longitudinal axis from an imaginary vertical line
The camber and toe angles should be constantly monitored, but the caster is set by the manufacturer during the development of the vehicle, and in most cases there is no need to change it.
It is important that the angles are the same on both sides of the vehicle. Otherwise, the car may behave unpredictably on the road - the car will “steer” to one side
Factory settings are 1 degree 30 minutes (plus/minus 30 minutes).
Adjusting the wheel toe angle
To adjust the angle of convergence, it is most convenient to take measurements using a special telescopic ruler with a scale. Ruler for adjusting toe It is more convenient to work in the pit. The steering wheel should be in a straight-ahead position.
- Before adjusting the toe, make one mark on the inside of the wheels with chalk on the left and right tires as close as possible to the rims.
- Having created a preload in the ruler, install it, resting its ends against the intended points so that its body does not touch the body parts and suspension.
- Shake the ruler slightly and align the “zero” on the moving scale with the fixed pointer. Lock the scale.
- Carefully roll the car forward so that the ruler along with the wheels moves back, but does not touch the suspension and body parts.
- Check the readings.
If on a VAZ 2109 the distance between the wheels at the rear is less than at the front, then the steering rods must be shortened, and if it is greater, then lengthened.
- Using a 27mm wrench, loosen the locknuts on the steering rods. Nuts with marks on the edges have a left-hand thread.
- Using a 24mm wrench, rotate the clutch to change the length of the rod.
- Do not forget to monitor the horizontal position of the steering wheel spokes.
- Place the moving scale on the ruler to adjust the toe to “zero” and roll the car back.
- With readings from -1 to +1mm, you can finish adjusting the toe angle. For additional control, roll the car forward.
Look in turn from each front wheel to the alignment of each rear wheel. With the steering wheel spoke horizontal, you can easily see whether or not both wheels are moving to the left or right. If the displacement is clearly noticeable, then by unscrewing one rod and tightening the other by the same number of turns, correct the displacement.
After adjusting the wheel alignment yourself, it’s worth thinking about which wheels to choose: stamped or cast? It is believed that alloy wheels significantly reduce the load on the suspension, while stamped wheels are more practical.
[custom_ads_shortcode2]
Choosing which ones to buy
It is impossible to say unequivocally which front struts are best to choose for the VAZ 2110. Some choose factory ones because they are not rigid enough for them, others prefer analogues for their softer and more comfortable behavior.
Some people even want to install a sports version of the struts on their “top ten”, since they are the stiffest and the springs are the thickest.
Sports
Focus on what you want to get out of driving. But from the point of view of manufacturers, Samara CC20 devices have proven themselves to be excellent. If necessary, you can figure out how to pump up such racks.
The choice is between oil and gas (gas-oil, actually). The former are more affordable from a financial point of view, but they do not have such a wide temperature range, which is why the shock absorbers become stiffer in winter.
Gas analogues have a more complex design, a high price, but an excellent “tenacity” indicator.
Among the manufacturers, in addition to CC20, the following manufacturing companies can be distinguished:
- KONI
- Sachs
- Kayaba
- Monroe
- Brillstein.
All of them have approximately the same devices, so there should be no problems with selecting suitable parts.
Corner installation options
Most often, the car owner does not need to change the factory settings, but he should be aware of how the position of the wheels affects the handling of a front-wheel drive car.
First option
With negative caster, the wheels move as far back as possible; in this situation, the car will become more sensitive to manipulations with the steering wheel. This means it is more demanding of the owner’s driving level. At speeds exceeding 70 km/h, the vehicle’s tendency to “yaw” will manifest itself, and it will be more difficult to maintain the trajectory on sharp turns.
Second option
The castor is “positive”, and the camber and toe angles are “zero”. It will become physically more difficult to turn the steering wheel, but at the same time the vehicle will “hold” the road perfectly when driving in a straight line.
Third option
These settings can be called sports settings. If you set the camber and toe to minus when the caster is “positive”, the steering wheel will be harder to turn, but the handling will improve. It will become easier to steer the vehicle into turns even at above-average speeds.
Signs of a wheel alignment disorder
During operation, the control units change due to wear or replacement of suspension and steering elements. When parameters go beyond the permissible values, the following is observed:
• uneven wear of one or two tires of the steered wheels, as shown in Fig. 5;
• rapid uniform wear of tires on both steering wheels; • increased vibration, steering wheel shock on uneven roads; • pulling the car to the side when driving in a straight line on a road surface without a slope, in the absence of a side wind; • unstable behavior of the car at speeds above 80 km/h; • Frequent skidding of the rear end on a slippery road can cause improper alignment of the non-steering wheels.
Table 1 shows typical values for toe and camber angles. Table 1.