MAIN! Normal pressure in a VAZ engine 2114
1.0 MPa as standard and 1.4 MPa on eight-valve engines.
After the procedure is repeated for all cylinders, it is necessary to analyze the records. How to remove a vase from an engine 2108-2115! Thus, in a proper engine, compression should not fall below 1 MPa and should not have dispersion between cylinders exceeding 0.2 MPa. just installing the injectors on the injectors of the VAZ 2114 Volga, how to clean the injectors. Otherwise you will have to repair the engine .
Useful video
You can get more information about the engine removal process by watching the video below:
Finally
The procedures for removing the engine and checking compression are quite simple if you have minimal mechanic skills. If you are not confident in your abilities, it is better to go to an auto repair shop, which will be much cheaper than painting and straightening the body or disabling it.
How to remove a VAZ 2114 engine: we analyze the process in detail
Many car enthusiasts, taking into account the price of a VAZ car and the possible cost of repairs in a car repair shop, are thinking about how to remove the VAZ 2114 engine with their own hands.
This article is intended specifically for thrifty and independent car owners, in which we will figure out how to remove the engine, install it back, what options for this procedure exist and how to check the compression after the repair. In addition, we will look at how to do this yourself without involving other people.
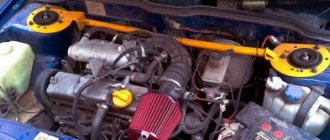
VAZ 2114 engine
Comprehensive modernization of the VAZ-2114 instrument panel: first steps
Most often, a set of works to improve the dashboard of a VAZ 2114 is important and necessary, but at the same time, an interesting and serious task. The main task is to choose the right details and decorate them beautifully. It is always better to think through all actions related to various updates in advance, in advance.
Subsequently, this will avoid unnecessary mistakes and disturbing fuss. The right decision would be to draw up a work plan that you will follow and thanks to which you will not make mistakes, and the whole process will be a complete pleasure for you.
What kind of oil should I use?
Properly selected motor lubricant is the key to long-term operation of the VAZ 2114
But how to choose the right oil for the engine of a given vehicle? When choosing a lubricant for the VAZ 2114, it is recommended to pay attention to the following characteristics:
- Viscosity of technical fluid (depending on the time of year);
- Quality of motor lubrication. When purchasing oil for a VAZ engine from a reputable manufacturer, you should beware of counterfeits;
- Suitability of a certain brand of technical substance for use as a lubricant for the VAZ 2114 engine.
Viscosity scale of motor oils depending on the time of year.
The following brands of lubricants are recommended as motor oil for the engine of the vehicle in question:
- Mobil 1, Super S and Synt S;
- Lukoil;
- Nordis Premier Ultra;
- TNK Magnum and TNK Super;
- Mannol Elite Extreme Classic;
- Shell Helix, Super. Plus. Ultra, Extra.
Experienced VAZ 2114 owners recommend using the following types of oils:
- Shell Helix;
- Mobil 10W40;
- ZIC 5W30.
It is important to consider that unsuitable technical fluid will not only not provide the vehicle engine parts with the necessary lubrication, but may also contribute to their damage. Therefore, the choice of lubricant for a personal car should be approached responsibly
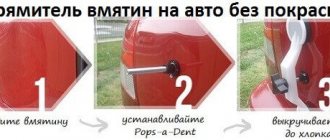
Tools
Tools you will need:
- Drill or screwdriver
- Metal drill 4 - 5 mm
- Flat file
- Technical hair dryer
- Mandrels. Plumbing fittings can be used as mandrels
- Powerful flat head screwdriver
- Open-end or socket wrench 14
- Clamp
- Hammer or mallet
- Oil can or syringe
- Sealant
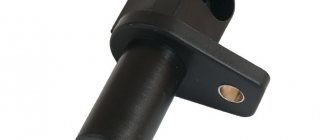
Should high-voltage wires be replaced and when?
No matter how well the armored wires are made, they also have a limited service life. According to current regulations, they must be replaced after every 30,000 km traveled. In practice, many motorists ignore this rule, continuing to travel with wires that have already outlived their useful life.
Such inattention can cause a whole host of problems, including:
- poor ignition;
- overclocking problems;
- engine tripping;
- inability to start the car.
All these troubles are caused by one single factor - an increase in the electrical resistance of the core of high-voltage wires, as a result of which it becomes “more difficult” for the impulse from the coil to reach its destination.
You can check whether you can still drive with the old wires or not - at home.
To do this you need:
- Turn off the ignition.
- Remove one of the armored wires.
- Measure its resistance using a megohmmeter or multimeter in the appropriate mode.
- If the resistance turns out to be equal to or close to the figure indicated on the wire insulation, then it is in good condition, but if it turns out to be greater, then the wire should be replaced.
- Repeat this operation on the remaining three wires.
It should be remembered that if only one of the wires is faulty, then all four should still be replaced.
Also, do not forget about the cleanliness of the contacts of high-voltage wires - they can also cause ignition problems. If oxides are noticeable on the metal tip, they should be cleaned with fine sandpaper or a cloth moistened with kerosene. By following these simple rules for caring for armored wires and replacing them, you can almost completely avoid troubles associated with the ignition system.
Europanel: standard equipment
With a total weight of 17 kg, the panel has overall dimensions (in cm) – 170x90x100.
see also
The package includes all the elements necessary for quick installation and further operation:
- Instrument panel (qty. - 1 pc.).
- Set of devices (qty. - 1 pc.).
- Under-panel wiring harness (qty. - 1 pc.).
- Central console (qty. - 1 pc.).
- Floor tunnel (qty. - 1 pc.).
- Control unit for the heater (qty. - 1 pc.).
- Top cover for the glove compartment (qty. - 1 pc.).
- External lighting switch (qty. - 1 pc.).
- Rear fog light switch (qty. - 1 pc.).
- Heating switch for rear window (qty. - 1 pc.).
- Set of plugs for switches (qty. - 4 pcs.).
- Heater air duct deflector (qty. - 5 pcs.).
- Cigarette lighter (qty. - 1 pc.).
- Metal frame (quantity - 1 piece).
DISASSEMBLY OF THE POWER UNIT
Upon completion of diagnostics and other preparatory actions with the engine that is planned to be installed on a VAZ 2107 model car, you can proceed to the next stage. It is necessary to dismantle the standard motor in the following order:
The machine is installed in a garage box on an inspection pit or on a lift. The room must be equipped with a hoist or other lifting mechanism. We disconnect the battery and remove it from the car, disconnect and dismantle all attachments. We undock the power unit from the transmission and unscrew the mounting bolts of the pillows. After making sure that nothing interferes with the process, using a hoist, you can carefully lift the power unit and remove it from the engine compartment. If any of the elements interfere with this process, it should be removed. It is advisable to place the dismantled engine on a special stand; the engine can later be sold
This will help offset part of the cost of re-equipping the machine.
It is advisable to place the dismantled engine on a special stand; the engine can later be sold. This will help offset some of the costs of re-equipping the machine.
Cast
Today, the best wheels on the VAZ 2107 are considered to be cast products. They recently came into fashion and quickly gained great popularity. Light alloys are used for their production, so they weigh 30% less than stamped counterparts.
Alloy wheels are highly durable and almost never rust. In addition, their appearance has many differences. Designers take care of the aesthetics of the product, giving it an original look.
If we consider die-cast models from the point of view of functionality, certain advantages immediately become noticeable:
- Fast acceleration.
- Soft movement
- Reduced fuel consumption.
For all their advantages, alloy wheels are not without negative qualities. After a strong blow, for example, when flying into a deep hole, it will not crumple, but simply burst. Such parts cannot be repaired.
The cost of cast structures is always higher than ordinary stamping, and the service life is much shorter.
Any impact is transmitted to the suspension, since alloy wheels cannot absorb external influences by their own deformation. Each driver decides which wheels to install on a VAZ 2107 individually, taking into account future operating conditions.
When choosing, it is very important to consider the car model. For example, wheels for low-profile tires are not suitable for summer residents; heavy structures will increase fuel consumption.
How to increase engine power
There are various ways to modify a VAZ 2114 8 valve engine at home. They can be used either separately or in combination, depending on the desired result.
Increasing the volume of engine chambers
There is a direct proportional relationship between engine size and power. The most popular option for the VAZ-2114 is to increase the volume from 1.5 to 1.6 liters. (or from 1.6 liters to 1.8 liters depending on the specific engine model). To increase volume, you need:
- install a lightweight crankshaft;
- replace the pistons with forged ones and replace the piston rings with lightweight ones;
- change the connecting rods that connect the pistons to the crankshaft;
- increase the diameter of the cylinders and grind the surface (this is done to increase the number of crankshaft revolutions).
Crankshaft VAZ 2114
As a result, the engine power increases by about one and a half times. But this also increases fuel consumption.
Installing a new air filter
To increase engine power, an intake filter with reduced aerodynamic drag is used. As a result, air enters the mixer with less effort. This can add an additional 5-8 horsepower to the engine. At the same time, fuel consumption is reduced.
To tune the intake system, you need:
- polish the internal intake channels (done in car repair shops);
- install receivers;
- install a throttle valve with a larger diameter.
Throttle assembly with increased diameter
The exhaust system is also modernized by installing a direct-flow muffler.
Turbocharging installation
This is one of the most effective, but at the same time costly, methods for tuning the 2114 engine. The increase in engine power depends on the type of turbine used:
- low pressure turbocharger – increases engine power by 15%. This is the least labor-intensive option for installing a turbine;
- high-pressure turbines - increase engine power by 25-30%.
One of the compressor options
Tuning the gas distribution mechanism
This method does not lead to early exhaustion of the engine's life and allows to reduce fuel consumption. To increase engine power, it is necessary to reduce the timing resistance and optimize its phases. Necessary:
- bore the valve seats;
- replace the intake and exhaust valves with lightweight ones;
- you can change the guide bushings to lighter ones;
- install the split gear and adjust it properly.
The most important element in timing belt tuning is the split gear. It is this that optimizes the valve timing.
Split gear for VAZ 2114
For lower and middle speeds, you need to reduce the angle of gas-dynamic boost and increase the opening angle of the exhaust valve. To adjust the gear, you need to turn the camshaft as the crankshaft rotates.
For high speeds, the camshaft should be turned in the opposite direction relative to the crankshaft stroke. Thus, the angle of gas-dynamic pressurization increases.
Alloy wheels
Casting is fashionable, cool, modern. In addition, such disks can be 20-30% lighter than stamped ones, because they are made from a light metal alloy, they are less susceptible to corrosion and are more durable. The low-pressure casting technology itself increases the strength of products.
Externally, alloy wheels have an individual look; there are design bureaus that produce new shapes and follow fashion.
Functionally, the ride on alloy wheels is smoother, acceleration is improved, and fuel consumption is lower.
But there is also a “other side of the coin”. The disadvantage of alloy wheels is the continuation of their advantages. That is, when it gets into a hole, a cast disk does not crumple like a stamped one. But under supercritical load it simply bursts, splits - and its place is in an alloy processing workshop, or in the trash.
This is all due to the fragility of the disk. In addition, the cost of casting is higher and the service life is shorter. An important disadvantage is the transmission of all shocks to the suspension, since the disc cannot absorb them using its own deformation. Therefore, before deciding which wheels to install, decide where and why you will drive the car.
What does the price depend on?
Motorists who need engine overhaul of a VAZ-2114 are faced with different prices for such a service. The cost depends on the influence of factors:
- Engine capacity.
- The prestige of the service company, its pricing policy.
- Urgency.
- Scope of work.
- Difficulty of repair.
- The need for a specialist to visit.
- Cost of spare parts.
- Equipment used.
- Automotive technician qualification level.
The more work is required to restore the engine of a VAZ-2114 car, the more expensive the service of a specialist will cost. You will have to pay extra for urgency and a specialist visit.
How to remove a VAZ 2114 engine without a box
Mileage 140 thousand. It turned out that I overheated the engine. How this happened is a completely different story. The engine stopped starting, compression was lost in cylinders 2 and 3, and the cylinder head gasket was burned out. Now the time has come to repair the engine, and according to the mileage, according to the standards, it is supposed to be carried out at 150 thousand + -
I had no experience in repairing engines; I found all the information on the Internet, and somewhere I intuitively found solutions.
First of all, I removed the air filter with the throttle valve and the receiver, and then, logically, the valve cover, the camshaft and the cylinder head. I did not remove the valves, I only removed the glasses with washers. And I put them aside so as not to confuse each other during installation.
What I saw did not please me, the head moved very strongly, even a step was formed above the 3rd cylinder, moreover, the piston broke on this bulge, and deep scuffs formed in the cylinder. Initially, I expected that I would only sharpen the head and not even remove the block. But the breakdown was much more serious than I expected.
I set about removing the cylinder block. I unscrewed it from the box as it should be, unscrewed the engine mount and one box mount, the one under the Akum practically. Using a jack under the box, I threw the engine to the ground and took it out from under the car by first unscrewing the right crab and moving the saber to the side.
There was only one mistake I made: I didn’t drain the oil while the engine was standing normally; after removing the block, I filled the garage floors with oil. Drain the oil before removing the block!
I disassembled the block, visually everything was fine with the crankshaft, connecting rods and bearings, having disassembled everything completely, wear on the crankshaft was revealed such that even with your finger you could feel the groove on the main journal of the first from the timing belt (from the front of the engine). Looking ahead, I’ll say that this is exactly why I had trouble The timing belt now, after repair, runs in the middle of the gears; before repair, it ran away and crashed either into the right side of the tension roller or into the left.
I gave the block, head and crankshaft for boring, head - 800 block 2800 crankshaft 1000 (only main journals were sharpened) total 4600 boring. I bought the tenth piston on the recommendation of a turner 82.4 category C since I couldn’t find category A and B in our stores for 1400 along with the pins, and rings for 1000, plus the main and connecting rod bearings 500, the main ones were 0.25 connecting rod standard, total 2900. In addition to everything, during dismantling, wear was revealed on the flywheel crown and clutch disc along with the release bearing, which had been buzzing lately, the price of spare parts was 250 + 650 + 300 = 1200. I also bought a timing belt, oil for the box 4 liters is the simplest and all the gaskets it came out somewhere around 2000.
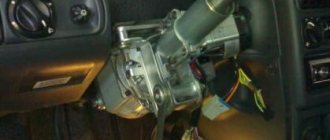
Removing the engine
You will need: keys “10”, “13”, “17”, “19”, extension with cardan joint, socket heads “13”, “17”, “19”, “22” , “24”, wrench, screwdrivers (two), mandrel for centering the driven clutch disc, pliers, hoist or other lifting device, slings (strong rope).
1. Disconnect the wires from the “+” and “–” terminals and remove the battery.
3. Drain the coolant from the engine cooling system (see “Replacing the coolant”).
4. Remove the air filter with the intake pipe hose (see “Removing and installing the air filter” in the “Power system” subsection).
5. Unscrew the mounting bolts and remove the engine crankcase protection.
8. Turn the throttle drive sector all the way and disconnect the throttle drive rod from it.
9. Remove the two bolts securing the throttle linkage bracket. Move the bracket to the side without disconnecting the rods from it, so that it does not interfere with engine removal.
10. Unscrew the fastening nut and remove the tip of the engine “mass” wire from the stud on the clutch housing.
11. Unscrew the two fastening nuts and remove the tips of the “mass” wires from the studs securing the rear cover of the cylinder head.
12. Disconnect the block with wires from the coolant temperature sensor by squeezing the plastic clip.
13. Loosen the clamps and disconnect the radiator inlet pipe, the throttle body inlet hose from the outlet pipe, and disconnect the radiator inlet hose from the thermostat.
14. Disconnect the heater radiator outlet hose and the cooling system filling hose from the water pump inlet pipe (see “Replacing the cylinder head gasket”).
15. Disconnect the wire from the coolant temperature gauge sensor (see “Replacing the cylinder head gasket”).
16. Disconnect block 1 with wires from knock sensor 2 or remove the sensor by unscrewing the nut that secures it and removing the sensor from the stud, leaving it on the wiring harness.
17. Disconnect the block with wires from the low-voltage terminal of the ignition module by pressing the plastic latch.
18. Disconnect the block with wires from terminal “D” of the generator. Sliding the rubber boot, unscrew the nut and disconnect the wires from the contact bolt (terminal “B+”) of the generator.
Types of repairs
Depending on what fuel the VAZ-2114 engine runs on, major overhauls are distinguished:
- A unit operating on gasoline.
- Diesel engine.
From the one who carries out the work, major repairs happen:
- Independent.
- Auto service specialist.
- A private craftsman who works in his garage.
Major repairs are identified according to urgency:
How to install europanel 2114?
All actions are performed in the following sequence (for greater convenience, you can remove the seats and column):
- The old panel is removed.
- The europanel is “attached” to the installation site and screwed (together with the column).
- The central frame is installed.
- The stove control is screwed on.
Please note that even new VAZ 2114 cables may not be suitable for installation. In this case, you can make them yourself.
Installing the panel will not take much time, since it does not require special adjustment to the interior features.
Salon
The model features a comfortable interior. Spaciousness is adequate for this class, but three people in the back will be uncomfortable. On the VAZ-2115 the rear edge of the luggage compartment is lowered - it is convenient to load/unload.
The luxury version of the Lada Samara is equipped with heated driver and passenger seats.
After buying a car, the first thing owners do is improve sound insulation. To perform the operation yourself, be sure to read the repair manual.
Extraction from the top
If you have a good winch or 3-4 reliable assistants, then there is no better solution on how to remove the engine from the VAZ 2114 through the top. This method differs from removal through the bottom in that it eliminates the possibility of damaging the engine itself or the car. The most important factor in the success of this operation will be your accuracy.
Removing the engine from the top
The procedure for removing the engine from the top must be carried out as carefully as possible. It is important to take into account everything that can affect the engine falling off its mounts. Moreover, if you do everything correctly, this method will be the least labor-intensive. At its core, this procedure is no different except for removal from removing an engine without a gearbox.
Without removing the gearbox
If there is no pit, overpass and friends, you will most likely have to figure out how to remove a VAZ 2114 engine without a box. You can perform this procedure yourself, and you will not need any special physical activity. Part of this procedure will not differ in any way from the general algorithm, so we will focus only on the differences.
To prepare a working base you will need bricks and a jack. It is necessary to smoothly lift the car and place brick by brick under the front wheels, having first secured the rear wheels so that the car does not roll.
The key differences between the methods begin when you completely free the motor head from the wires connected to it:
- Remove the pulley and muffler.
- We remove the head itself with the camshaft - here it is important to pay attention to the bolts. If they are hexagonal, you will be able to remove the head together with the camshaft, if not (they come in the shape of an asterisk), then you will inevitably remove them separately.
- Now we unscrew the front pulley, first turning on the fifth speed and placing a brick on the brake.
- We unscrew the generator and go directly to the gearbox, on which there is a nut and three bolts.
- Unscrew the crab and put it aside.
- We fix the engine and lower it onto the prepared cushion.
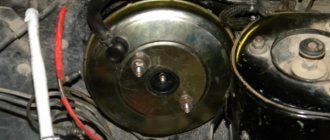
Homemade support for engine removal
BE CAREFUL! Sometimes the engine does not want to fall off the box on its own, in order to fix this you will have to gently push it with a crowbar.
When you put it back together, don't forget to secure not only the engine, but also the box itself with rope. To carry out reassembly without removing the box, you will need an assistant.
Compression test, troubleshooting
One of the main reasons for engine repair is decompression. Actually, the troubleshooting itself must be done every 30 thousand km, combining it with valve adjustment.
Signs of the need for early technical inspection of the engine are:
- power surges;
- increase in fuel consumption;
- engine tripping.
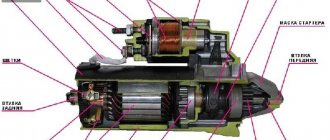
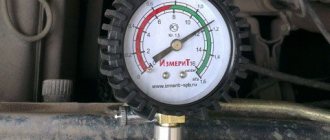
Compression measurement
If you experience similar symptoms, you need to do the following:
- Check the starter and charge the battery.
- Find a compression gauge and warm up the car.
- Remove the spark plugs and fuel supply hose.
- Insert the compression gauge into the spark plug socket of the first cylinder and depress the accelerator.
IMPORTANT! The normal pressure in the VAZ 2114 engine is 1.0 MPa in the standard configuration and 1.4 MPa on an eight-valve engine.
- We turn the key in the ignition and turn the starter for 10 seconds, watching the device, it must be interpreted as follows: a. if the pressure stops at 0.8 mPa and then stops growing or does so slowly, then the cylinder head is broken or there is a leak in the valve; b. if it just grows slowly, it means that the rings have exhausted their service life (by the way, this fact can be checked by adding oil and measuring again, if the pressure returns to normal - the rings are 100% to blame).
After the procedure is repeated for all cylinders, it is necessary to analyze the records. So, in a working engine, compression should not fall below 1 MPa and should not have a spread between the cylinders of more than 0.2 MPa. Otherwise, you will have to repair the engine.
Exhaust
With the exhaust system everything is much simpler than with the others.
There are two options to solve the problem:
- We buy an exhaust system for a 16 valve engine, change it completely and don’t fool ourselves.
- We buy only a spider of the 4-2-1 type, you need to buy it exactly the long one, in which there is a hole for the DC, the wires must be reached, but with a certain effort (it is better to lengthen it or replace it immediately with longer ones). A corrugation and a new pipe are placed behind the spider, while leaving the can as standard, but it will also need to be modified for the new system.
The original exhaust manifold is not useful in both options, and the second option is not much more economical, but requires more labor. Based on this, we can conclude that for nerves it is much easier to resort to the first option with a complete replacement, because the nervous system costs more than a small amount of money.
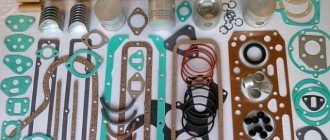
Preparatory stage
Before starting work, it is strongly recommended that you familiarize yourself with the structure of the “heart” of the iron horse. This will help avoid many problems associated with incorrect connection of individual system elements, such as:
Beginners are advised to take photographs of the listed parts in assembled form. In order to successfully dismantle the VAZ engine, it is necessary to use the tools recommended by the manufacturer. A list of these can be found in the vehicle operating instructions. Regardless of the reason that prompted the need to carry out removal and diagnostics, you must adhere to the following scheme:
A carefully removed car ignition module will help you remove the engine correctly. Due to the fragile nature of the device, do not use excessive physical force. After this, the plug located on the block is dismantled. Only after all the liquid has been drained is the next element removed.
All plugs from the drive are disconnected in random order. The same thing happens with the throttle and hose cables. Before starting this stage, it is better to use a camera to record the initial position. The photo will be useful when the installation of the VAZ engine begins.
Literally, pinpoint precision is required when it comes to removing the hose leading to the gas line. To do this, you need a key set to “17”, which will not break the rather fragile system. Here, as in the case described above, it is necessary to carry out recording using a photo.
When returning the VAZ engine to its rightful place, the photograph will help to correctly connect all the elements. There is no room for error here. Only after you have completed removing all the tubes on the “head” can you move on to those parts that are directly attached to it.
VAZ 2107 wheel sizes
Four mounting bolts are used to secure the products. The holes for them are located around a circle with a diameter of 98 millimeters. Holes with a diameter of 12.5 millimeters are drilled for the bolts.
In order for the disc to fit freely on the hub, a central hole with a diameter of 58.5 millimeters is made in it. It is through this hole that its orientation occurs. The bolts only press the flange against it.
When installing an alloy wheel, you may need to use an adapter ring. Sometimes without such an additional part it is impossible to create an accurate alignment of the hub and the surface of the disk. The ring can be freely purchased at any auto store.
The offset, or offset of the disc on a VAZ 2107 is usually 29 millimeters. This term refers to the distance formed between the mating surface of the disk after installation on the hub, with a conditional plane passing through the center of the disk rim.
That is, when the offset is positive, it seems that the element has gone deep into the arch. With a negative value, it seems to come out of the arch, it seems that it is too deeply recessed in the seat.
Experts advise making the flight within normal limits. If the overhang is too large, the wheel may begin to touch the fender liners. A deviation of 5 millimeters in any direction is allowed. In other words, on a VAZ 2107 the offset can be in the range of +24 - +34 millimeters.
Moreover, this parameter is designed only for a specific disk width. To install a wider model, it is necessary to withstand a smaller offset.
View Queue
Queue
- delete everything
- Disable
VAZ 2115 engine: characteristics, malfunctions and tuning
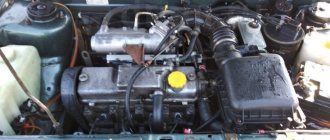
The VAZ 2115 is equipped with a four-cylinder 1.5-liter engine, which has an injector and an improved lubrication system. The VAZ 2115 engine has proven itself to be quite reliable, powerful and easy to operate. This power unit, depending on its modification, was designated 2111 and 2114.
Specifications
Motor characteristics:
Download .xls file
Download picture
Send by email
| PARAMETER | MEANING |
| Years of manufacture | 1994 – present |
| Engine weight, kg | 124 |
| Cylinder block material | cast iron |
| Supply system | injector |
| Type | in-line |
| Engine displacement | 1.5 |
| Power | 78 horsepower at 5400 rpm |
| Number of cylinders | 4 |
| Number of valves per cylinder | 2 |
| Piston stroke, mm | 71 |
| Cylinder diameter, mm | 82 |
| Compression ratio | 9.8 |
| Torque, Nm/rpm | 116 / 3000 |
| Environmental standards | EURO 4 |
| Fuel | AI 93 |
| Fuel consumption | 7.3 l/100 km combined cycle |
| Oil | 5W-30, 15W40 |
| Oil volume | 3.5 |
| When replacing, pour | 3.0 liters |
| Oil change carried out, km | 15 thousand |
| Engine life, thousand km - according to the plant - in practice | 150+ 200+ |
The engine is installed on VAZ: 21083, 2111, 2113, 2114, 2115.
Description
The VAZ 2115 engine was developed on the basis of engine modification 21083. The only differences are the presence of an injector, which replaced the aging carburetor, a modified camshaft and a floating connecting rod pin.
- In total, the new engine turned out to be 6 horsepower more powerful than its predecessor. At the same time, the power unit has become more responsive and provides confident traction at various speeds. Like its predecessor, this engine has a belt drive, which somewhat complicates maintenance work.
- If the belt breaks, the valves do not bend, which eliminates the need for complex repairs. The motor itself turned out to be quite reliable and has a service life of 150 thousand kilometers. When following all service recommendations and careful operation, mileages of 200 and 300 thousand kilometers are not uncommon.
- The four-cylinder engine is cast from a durable cast iron alloy, which improves temperature resistance. It is practically not subject to overheating, which allows you to operate the car in difficult conditions and under maximum loads.
- In general, impressions of the VAZ 2115 engine are positive. It is moderately powerful, reliable and easy to maintain. However, you shouldn't expect miracles from him. From 1.5 liters of volume, VAZ engineers managed to extract only 78 horsepower. Whereas engines of similar volume in modern cars produce at least 100 horsepower.
- The average fuel consumption, which is 7.3 liters in mixed mode, also does not shine. This engine is also not without characteristic breakdowns, which, although not critical, can cause a lot of problems for the car owner.
Maintenance
This power unit is not demanding on service, so the oil in the VAZ 2115 engine is changed every 15 thousand kilometers, and it is possible to use inexpensive semi-synthetic and mineral oil.
We only note the need to replace the timing belt, which is done every 50 thousand kilometers.
One of the serious shortcomings is the lack of hydraulic compensators, which forces the car owner to adjust the valve clearance manually every 10 thousand kilometers.
To perform this service work, the valve cover must be removed and the clearances measured and adjusted. This is quite a complex service job and it is difficult to do it yourself.
Malfunctions
| FAULTS | CAUSES AND REMEDIES |
| The engine does not start or runs with detonation and strong vibrations. | Injection system failure. It is necessary to open the engine, clean the injectors and check their functionality. |
| The engine is shaking, the idle speed is floating. | The throttle sensor or idle speed control has failed. Repairs are made only after a thorough diagnosis and consist of replacing the failed element. |
| The engine takes a long time to warm up or does not reach operating temperature at all. | The thermostat failed, which closed the circulation of liquid along a large circuit. The repair consists of replacing the thermostat. |
| The appearance of an extraneous knocking sound in the engine under load. | Valves are knocking and require adjustment. Repair in this case involves opening the engine and adjusting the valve clearance. |
Tuning
There are several possible ways to increase engine power. Let's talk about these tuning options in more detail:
- Chip tuning of the VAZ 2115 engine will not allow you to obtain any noticeable effect. Even by replacing the engine control unit, the car owner will be able to get 3-5 horsepower, the increase of which will be almost imperceptible.
- Deep engineering tuning of VAZ 2115 engines, which involves replacing the camshaft and other power elements, will increase the engine power to 85 horsepower. Such an increase of 10 horses will already be noticeable, and the car will accelerate faster, especially from low revs.
- Replacing the throttle body and exhaust will increase power to 95 horsepower.
- If the engine power limit of 100 horses is important to you, then you need to install lightweight valves, mill the cylinder head and replace the intake manifold. A car with such a tuned engine will accelerate 1-2 seconds faster than with a basic 78-horsepower engine. A further increase in power by replacing internal power parts will not allow you to obtain the desired horsepower, and the service life of the motor is significantly reduced.
- An alternative way to increase the power of a VAZ 2115 engine is to install a compressor with a pressure of about 0.5 bar. If the compressor is properly configured, the engine power will be about 120 horsepower. At the same time, when resorting to such tuning, the car owner must be prepared to reduce the service life of the engine, which may require appropriate major repairs after only 75-100 thousand kilometers.
dvigatels.ru
( 2 ratings, average 5 out of 5 )
DIFFERENCES between VAZ 2114 and VAZ 2109
Since the fourteenth, in fact, is a modified version of the nine, it is necessary to understand what the main difference between the VAZ 2109 and the VAZ 2114 is.
Let's go through the most significant points.
- Body
In terms of dimensions, the fourteenth differs slightly from the nine - it is 10 centimeters longer and 40 kg heavier. The ground clearance and wheelbase have not undergone any changes.
The differences in the body are quite significant - the presence of a new hood, headlights, radiator, bumpers and moldings create the impression of a completely new car. If we talk about the quality of the metal, then things are much better in the fourteenth model - with proper care, it does not rot even in the most problematic places.
- Engine and suspension
The base model of the VAZ 2114 was equipped with an 8-valve 1500 cm3 engine, similar to the one on the Nine, but in 2007 models with a 1.6-liter engine that complied with the Euro-4 standard with an electronic gas pedal and an electric throttle began to roll off the assembly line.
In 2010, the “Super-Auto” modification went on sale with a 16-valve power unit, which is superior to the Nine engine in all respects.
The chassis of the fourteenth, in comparison with the VAZ 2109, did not undergo any serious design changes.
- Salon
The interior is one of the key advantages of the fourteenth in comparison with the VAZ 2109. The first thing that stands out (thanks to the use of hard plastic), whereas in the nineth, this was one of the main problems.
Specially invited foreign designers worked on creating the interior of the cabin, so it is visually comparable to the interior of middle-class foreign cars of the same year of manufacture.
Unlike the Nine, the interior of the VAZ 2114 is distinguished by softer shapes and the presence of various little things - power windows, new seats, illuminated ashtrays, which significantly improve the comfort of both the driver and front passenger.
The functionality of the interior has also improved significantly - the instrument panel is equipped with an on-board computer, which informs the driver about the status of the main vehicle systems, ambient temperature, current time and has many useful functions.
2114 and 2109