The engine has been repaired, all that remains is to install it on the car in the engine compartment. The engine for installation is assembled in half, the head is not installed, so it is easy to install the engine yourself at home without lifts.
To install the engine in this way, you only need two people, but three are better, so that two lower the engine, and the third directs it onto the gearbox shaft.
I have seen many times how people suffered when the engine got onto the gearbox shaft, and all because the gearbox was not fixed.
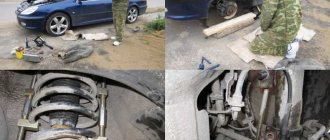
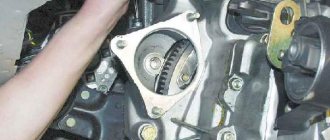
In order to easily get the engine onto the gearbox shaft, the box must be jacked up as shown in the photo, and the box must be supported with a jack against the car body, so that the car begins to rise slightly.
In this position, the box is clearly fixed, and the engine easily fits onto the input shaft of the box.
The principle of installing the engine is this: two people lower the engine into the engine compartment using belts or a rope, and the third directs the engine to the input shaft of the gearbox, and after the shaft enters the basket, the engine is placed completely on the box.
Photo. The arrow shows the jack that jacks the gearbox.
But try to ensure that the engine goes straight to the box without distortions, then the shaft fits neatly into the clutch disc and crankshaft bearing.
Photo. The engine is mounted on the gearbox.
If you do everything correctly, installing the engine takes no more than 2-3 minutes.
All that remains is to gradually lower the jack and place the engine mount on the cushions. Screw the box to the engine, starter, generator, but the generator can be screwed to the engine before installation (at your discretion), the stove pipe to the pump. Now just install and screw the head.
Photo. Engine head bolt tightening sequence.
Before installing the head on the engine, lift the chain by hand and place a mark on the pulley, opposite the long mark on the cover, this will be top dead center. Then put the chain on the shoe, ideally wipe and clean the top of the engine from pieces of stuck gasket, and also clean the cylinder head. Place the head gasket on the block, and immediately put the muffler gasket on the manifold, place the head on the block and immediately put the manifold on the muffler.
Tighten the head.
Be sure to, after tightening the head bolts, go through it two more times, for a more precise fit, and also be sure to lubricate the bolts with oil, lubricated bolts stretch well, but try to feel the tightening, if the bolt rests, then it’s enough, with force you can break everything.
Install the cooling radiator and connect all the pipes.
Photo. Correct installation of the camshaft, the arrow shows where the guide cotter pin should be.
Then place the camshaft on the head, the photo shows how to install it correctly, tighten the camshaft. But do not overdo it, as you may break the thread.
Photo. The arrow shows how to tension the chain with a pry bar and the location of the chain tensioner.
Take a piece of wire and make a hook at the end, with this hook and take out the chain, thread the wire into the chain so that it does not fall into the engine block.
Photo. The arrow shows the camshaft sprocket mark.
Loosen the chain tensioner, and use a pry bar to press the shoe all the way, tighten the tensioner, this will make it easy to install the sprocket and chain on the camshaft.
Section of the chain tensioner VAZ 2101 to 2107: 1 - cap nut; 2 — tensioner body; 3 - rod; 4 - spring ring; 5 — plunger spring; 6 — washer; 7 - plunger; 8 - spring; 9 - cracker; 10 - spring ring
Take the camshaft sprocket and put the chain on it so that the sprocket mark is at the very top. Install the sprocket on the camshaft, and check that the chain marks, when tensioned, coincide with the mark on the crankshaft pulley (top dead center), with the mark on the camshaft. After installing and checking the marks, be sure to tighten the camshaft sprocket well, since if you do not tighten the sprocket and start the engine, the guide cotter pin in the sprocket hole will break.
Diagram of the camshaft drive mechanism and auxiliary parts of VAZ 2101 to 2107: 1 - camshaft sprocket; 2 - chain; 3 — chain damper; 4 - oil pump drive shaft sprocket; 5 — crankshaft sprocket; 6 — limit finger; 7 - tensioner shoe; 8 — chain tensioner
But the marks on the pulley and the camshaft do not always coincide perfectly, it turns out that either set the mark on the camshaft sprockets to go a little forward or backward, it is better to set so that the mark on the camshaft sprockets slightly does not reach the mark on the camshaft. Why is this better, I’m too lazy to explain, but it’s better, but if you want, you can experiment, it’s possible that on your engine, it will be better when the mark goes a little forward. .
After the marks have been set, tighten the chain. To properly tension the chain, loosen the tensioner, take a thin pry bar, insert it under the shoe, and use the pry bar through the shoe to tension the chain and tighten the chain tensioner. The entire chain is perfectly tensioned.
Photo. Adjustment of valves VAZ 2101 to 2107.
What engines was equipped with the VAZ 2107
"Seven" was produced for a very long time - from 1972 to 2012. Of course, during this period, the vehicle’s configurations and equipment changed and were modernized. But initially (in the 1970s) the VAZ 2107 was equipped with only two types of engines:
- From its predecessor 2103 - a 1.5 liter engine.
- From 2106 - 1.6 liter engine.
On some models, more compact 1.2 and 1.3 liters were also installed, but such cars were not widely sold, so we will not talk about them. The most traditional for the VAZ 2107 is a 1.5 liter carburetor engine. Only later models began to be equipped with 1.5 and 1.7 liter injection engines.
YouTube Premium
Report a video?
Subscribe to my channel “My Leisure” where I post various videos about my life and more
Subscribe to my channel “Earning money in the village” where I breed and keep pets, and also try to make money from it.
This video shows the entire process of disassembling a five-speed VAZ 2107. disassembling a gearbox, disassembling a gearbox assembly, repairing a VAZ gearbox, disassembling a VAZ gearbox, five-speed gearbox VAZ 2107, gearbox VAZ 2107, repairing a gearbox 2107, gearbox VAZ 2107, gearbox VAZ 2107 5 mortar, gearbox VAZ 2107 5, gearbox VAZ 2107,
In this video all the disassembly process pyatistupki 2107, dismantling of PPC, disassembly assembly checkpoint repair box vases, disassembly PPC vases, five-speed transmission 2107, gearbox 2107, repair PPC 2107, PPC 2107, gearbox 2107 5 mortar, gearbox 2107 5, gearbox 2107.
Lightweight valves
Installing lighter than standard valves ensures that the valve closes quickly with a spring. For this purpose, expensive light alloy valves are used. This method of modernization provides greater efficiency and normalization of valve timing at high speeds.
When tuning valves, you can install upgraded valves with a special shape of the disc profile.
Sometimes, instead of using light alloy valves, the valve plates are simply lightened. Less weight requires less camshaft effort to operate. Reduced weight rockers can be used in conjunction with lightweight valves. This will give even more advantages when using the machine at high speeds.
A similar effect can be achieved by installing more powerful valve springs. The valves also begin to close more quickly, but this solution has its drawback: stronger springs place additional stress on the camshaft, reducing its durability.
What engine can be installed on a VAZ 2107 instead of the standard one?
Some car enthusiasts who are accustomed to upgrading cars with their own hands decide to replace the installed engine with a more productive one. Like any other car, the “Seven” can be converted and equipped with an engine from another car, but a number of rules must be followed:
- The replacement engine must exactly match the dimensions and weight of the standard device. Otherwise, there may be problems with the operation of the new motor.
- The new engine must be mated to the existing transmission.
- The power of the new power unit cannot be greatly overestimated (no more than 150 hp).
A carburetor power unit is considered the preferred means of equipping a rear-wheel drive “seven”
Motors from other VAZ models
Of course, first of all, the owners of the “Seven” turn their attention to the engines of other VAZ models. The best option (a little more powerful and durable) is a carburetor with a VAZ 2114
It fully corresponds to the dimensions of the VAZ 2107 carburetor, but is a more modern and productive device. In addition, you can install the engine from a VAZ 2114 with virtually no modifications - the only problems may arise with the RPD, but they are easily solved.
A more modern analogue of the “Seven” engine will fit perfectly into the 2107 design
Engines from foreign cars
The VAZ 2107 can also be equipped with an engine from an imported car. Power units from Fiat and Nissan brands are ideal for replacement. The thing is that the progenitor of VAZ engines were Fiat engines, which also served as the basis for the development of Nissan engines.
Therefore, engines from these foreign cars can be installed on the “Seven” without any alterations or modifications.
An engine from a foreign car can be installed on a VAZ 2107 without any unpleasant consequences for the design of the car
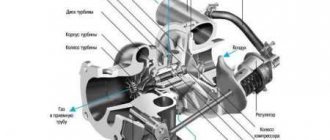
Rotary engine
There was a period in the history of AvtoVAZ when some car models (including the Seven) were equipped with rotary piston engines. Initially, such installations were highly productive, but the VAZ 2107 with such engines had many disadvantages:
- high heat losses, due to which fuel consumption was higher than on conventional carburetor VAZ models;
- problems with engine cooling;
- the need for frequent repairs.
Today, rotary engines are installed only on Mazda models, so if you wish, you can purchase such a power unit at a showroom or in official Mazda stores
Diesel engines
Car enthusiasts, in order to save on fuel, sometimes replace gasoline power units with diesel ones. On a VAZ 2107 you can also carry out this procedure. Again, for replacement it is better to take engines from Fiat and Nissan. Diesel engines are more economical than gasoline engines, but require increased attention from the car enthusiast, as they are very capricious in terms of maintenance.
Today, diesel engines cannot be considered as more economical, since the cost of diesel fuel exceeds the prices of AI-92, AI-95
Thus, the VAZ 2107 carburetor was initially designed for typical loads and a short service life before the need for repair. However, the repair itself is considered a simpler and more accessible procedure than, for example, the overhaul of an injection engine. In addition, the nuances of the “Seven” design give owners a chance to install engines from other car models in order to get the quality of work that is required.
Advantages of VAZ 2107 injection models
- Due to the optimal formation of the fuel mixture, the efficiency of an injection engine is higher than that of a carburetor. Accordingly, the VAZ 2107 injector engine consumes less fuel and is at the same time more powerful than a carburetor engine with the same volume.
- Electronics regulate engine speed, thanks to which it idles more steadily, stalls less often when starting from a standstill, and starts better in cold weather.
- Unlike a carburetor engine, an injection engine does not require frequent adjustment of the fuel supply and ignition systems.
- The optimal composition and quantity of the fuel-air mixture entering the cylinders, as well as the presence of a catalyst, ensure a minimum content of harmful substances in the exhaust. This is an important point from an environmental and health perspective.
- Hydraulic chain tensioner and hydraulic valve clearance compensators eliminate the need for manual adjustment of the mechanism and ensure quieter engine operation.
- The torque curve is smoother - high torque is achieved over a wider rpm range.
Note: gas equipment of both the second and fourth generation can be installed on the injection engine. The latter option is more preferable - the fourth generation of gas equipment is more economical and prevents the possibility of “popping” in the engine.
Technical characteristics of the “Seven” injection engine
In carburetor systems, the creation of a combustible mixture is carried out directly in the chambers of the carburetor itself. However, the essence of the operation of the injection engine on the VAZ 2107 comes down to a different approach to forming the fuel-air mixture. The injector sharply injects the fuel itself into the working cylinders of the engine. Therefore, such a system for creating and supplying fuel is also called a “distributed injection system.”
The injection model VAZ 2107 is equipped from the factory with a separate injection system with four injectors (one injector for each cylinder). The operation of the injectors is controlled by the ECU, which regulates the flow of fuel to the cylinders, obeying the requirements of the microcontroller.
The injection engine on the VAZ 2107 weighs 121 kilograms and has the following dimensions:
- height - 665 mm;
- length - 565 mm;
- width - 541 mm.
The power unit without attachments weighs 121 kilograms
Injector ignition systems are considered more convenient and modern. For example, the VAZ 2107i has a number of important advantages over carburetor models:
- High engine efficiency thanks to precise calculation of the amount of fuel injected.
- Reduced fuel consumption.
- Increased engine power.
- Stability of idling, as all driving modes are controlled via the on-board computer.
- No need for constant adjustment.
- Environmentally friendly emissions.
- Quieter engine operation thanks to the use of hydraulic compensators and hydraulic tensioners.
- You can easily install cost-effective gas equipment on the “Seven” injection models.
However, injection models also have disadvantages:
- Difficult access to a number of mechanisms under the hood.
- High risk of catalytic converter damage on rough roads.
- Capriciousness regarding fuel consumed.
- The need to contact a car repair shop for any engine malfunctions.
Table: all 2107i engine characteristics
| Year of production of engines of this type | 1972 - our time |
| Supply system | Injector/carburetor |
| engine's type | Row |
| Number of pistons | 4 |
| Cylinder block material | cast iron |
| Cylinder head material | aluminum |
| Number of valves per cylinder | 2 |
| Piston stroke | 80 mm |
| Cylinder diameter | 76 mm |
| Engine capacity | 1452 cm 3 |
| Power | 71 l. With. at 5600 rpm. |
| Maximum torque | 104 Nm at 3600 rpm. |
| Compression ratio | 8.5 units |
| Oil volume in crankcase | 3.74 l |
The VAZ 2107i power unit initially used AI-93 fuel. Today it is allowed to fill AI-92 and AI-95. Fuel consumption for injection models is lower than for carburetor models and is:
- 9.4 liters in the city;
- 6.9 liters on the highway;
- up to 9 liters in mixed driving mode.
The car has economical fuel consumption due to the use of an injection system
What oil is used
High-quality maintenance of an injection engine begins with the choice of oil, which is recommended by the manufacturer itself. AvtoVAZ usually indicates in the operating documents of such manufacturers as Schell or Lukoil and oils of the following type:
- 5W-30;
- 5W-40;
- 10W-40;
- 15W-40.
Flushing the VAZ 2107 engine and changing the oil
As mentioned above, completely draining the lubricant from a VAZ 2107 engine is a long process. The problem is that even after 20 minutes of draining, there is still waste left in the engine. This point is especially relevant if the oil is very old and therefore very viscous.
It will not be possible to remove thickened oil with a regular drain - you need to rinse with diesel fuel
Such oil simply does not pour out of the small channels and openings of the engine. To remove this viscous mass, the car owner will have to rinse the VAZ 2107 engine with diesel fuel.
Flushing sequence
An important point: after the liquid oil has completely drained from the VAZ 2107 engine, you must remove the old oil filter from the car and replace it with a new one. You can save on the quality of this filter, since it will be used only once, during washing.
- The drain hole, previously opened, is closed again with a plug. Diesel fuel is poured into the engine through the oil neck. Volume - 4.5 liters. Then a plug is installed on the neck, and the engine is cranked with a starter for 15 seconds. It is impossible to start the engine completely. To increase the efficiency of washing, the rear right wheel of the car can be raised by 15–20 cm using a jack.
- The drain plug on the crankcase cover is unscrewed again with a 12 mm socket wrench, and the diesel fuel along with the dirt is drained.
- After the diesel fuel is completely drained (which may take 10–15 minutes), the plug on the crankcase is screwed on, and 5 liters of fresh oil are poured into the engine through the oil neck, after which the plug on the neck is screwed on.
Some differences when replacing the engine on a VAZ 2114
When replacing the power unit in a front-wheel drive car with index 2114 close to Priora, the task seems even simpler compared to the classic VAZ 2107.
There is no need to modify the engine mount; it is placed in the designated places. When docking with a gearbox, there are also no questions about attachment points. As practice shows, it is only necessary to change a number of gears and the main gear in order to optimally use the capabilities of the VAZ 2107 engine.
In this situation, replacement of the starter will be required when installing a BATE starting mechanism on the vehicle. But if you previously had a KATEK starter, you can get by by replacing the head and coupling.
Unlike the starter, there is no need to replace the alternator. It is excellent for installation on the engine both in terms of mounting and performance characteristics.
To communicate between the gearbox and the engine, additional efforts will be required to bring the clutch mechanism to the required parameters. The optimal solution may be to adjust the clutch from the “eight” to the required size. Another option is to install a Valeo clutch. In this case, additional costs will be required, but this method is still acceptable given the good resource of this node.
Priora engine design
The fuel line will require some adjustment, just like the classic ones. To prevent this process from being labor-intensive, it is advisable to use a ready-made version from the same 12th model. Its ramp is perfectly suited for the VAZ 2114. By the way, the injectors in the engines are not interchangeable.
Some difficulties arise when ensuring the required efficiency of the cooling system. Firstly, as practice shows, the thermostat from model 2114 works best. Therefore, it needs to be replaced on the engine. The radiator can be installed from either of the two machines. Secondly, for a number of reasons, the installation of a cooling fan is required. It is recommended to use a unit from Niva. When installing it, it is necessary to provide additional protection against overload of the fuse box. This is achieved by inserting a separate protective relay.
If the preparatory work is carried out competently and in full, then the engine replacement, both for classics and for models 2114 or Niva, is carried out in a fairly short time. Installation and dismantling of the motor takes one day. You have to tinker a little with the rest of the attachments and transmission elements. But the end result will be a car that is comfortable to drive.
Causes
There are several most common reasons why a car owner has to remove the engine from his car.
| Cause | Peculiarities |
| Major renovation | In the event of a serious accident or as a result of wear of key engine elements, it will not be possible to restore its functionality without a removal procedure. Therefore, they resort to dismantling the engine |
| Replacement | It’s not uncommon for VAZ 2109 owners to think about replacing the standard factory engine with a more efficient, powerful power unit. This is a serious step, where dismantling is one of the initial stages |
| Finalization | If there is no opportunity or desire to change the engine, some simply modify the existing one. Tuning can be quite complex, involving the need to completely remove the engine from the engine compartment |
Regardless of the reasons, you need to remove the engine carefully, following a clear sequence of your actions. Decide in advance whether you will dismantle the engine together with the gearbox or without removing it.
What kind of oil can be poured into the VAZ 2107 engine
A car owner who decides to change the oil on his “Seven” for the first time will inevitably face the question: which lubricant to choose? This is not an idle question, because there is a huge amount of motor oils on the modern market. It doesn’t take long to get confused by such abundance. Therefore, it is worth understanding the types of motor oils and their differences.
Types of oils
Essentially, engine oils are divided into three types:
- synthetic oil;
- semi-synthetic oil;
- mineral oil.
Now let's look at each type of oil in more detail:
- Synthetic motor oils are the most expensive. This should not be surprising: “synthetics” have excellent temperature parameters and viscosity. If the driver has filled in with high-quality synthetic oil, he can be sure that it will not freeze even at -50°C, and this circumstance is very useful given our climate;
- Semi-synthetic motor oils are a mixture of mineral and synthetic oils. “Semi-synthetics” do not have such a wide range of operating temperatures, but they have one undoubted advantage: they are cheaper;
- Mineral motor oils are the cheapest today. The reason is simple: the viscosity of these oils directly depends on the outside temperature. For example, at forty-degree frost, most mineral oils turn into a substance similar to plasticine.
Required spare parts
If you still decide to tune the engine yourself, then here is an approximate list of parts that you need to purchase on your own:
- cylinder head with 21214;
- her gas pedal;
- MZ bracket;
- also a pulley with distributed injection;
- firmware for ECU January 5.1.1.;
- Volga fuel pump (Bosch) with bracket;
- assembled throttle with gasket, idle speed reducer;
- high-voltage ignition wires for an eight-valve engine;
- throttle cable (possible with classics);
- fuel filter for injection engine;
- highway;
- knock and speed sensors;
- receiver with ramp from 21214;
- engine cover with crankshaft position sensor;
- injection wiring harnesses;
- fuel pump and breaker plugs;
- antifreeze temperature sensor;
- air flow sensor;
- Nivovsky ignition module;
- tee with cylinder head;
..... and also all the standard gaskets and seals, which we will replace during installation.
What is needed for repair
First of all, worn out sliding bearings under the crankshaft supports and piston rings (compression and oil scraper) need to be replaced. You need gaskets (for the cylinder head and others) and seals - installing old ones with new working dimensions can lead to the formation of gaps through which oil and antifreeze will leak.
Consumables necessary for major repairs.
You also need to purchase rollers and a belt for the belt drive. If the drive is chain, you need to check the chain.
Temperature and pressure sensors in the lubrication system need to be replaced.
We need filters (air, oil filter and others), new oil and antifreeze.
The list of what is needed to repair an engine on a VAZ 2107 also includes all consumables and fastening elements. For example, sealant or retaining rings. The need for them arises during the repair process and cannot be determined in advance.
Camshaft replacement
The standard camshaft of the VAZ 2107 distributes power approximately equally throughout the entire speed range. To improve power at low speeds, you can install a low-phase shaft, which closes the valves faster. A wide-phase shaft that opens the valves strongly gives an advantage when operating at high speeds.
Therefore, the market offers several camshaft options for tuning the VAZ 2107 engine: top, bottom (lower) and universal shafts.
Installing a low camshaft is convenient for those who often tow or simply do not like to “crank the engine” to high speeds. An overhead camshaft is needed for those who are used to maintaining high engine speeds. It starts working after 3200 rpm, but at low speeds the engine thrust weakens and fuel consumption increases. Therefore, such a camshaft is used only for specialized sports tuning.
How does the VAZ 2107 oil filter work?
When changing the oil on a VAZ 2107, car owners usually also replace the oil filter. Let's try to figure out what kind of device this is and what it comes in. Oil filters are divided into three types:
- filters with modular housing;
- filters with a collapsible housing;
- filters with a non-separable housing.
The most expensive are collapsible filters. But at the same time they also have the longest service life. When a filter of this type becomes clogged, the car owner removes it, opens the housing, removes the filter element and replaces it with a new one.
Filters with non-removable housings do not last long because they are disposable devices. As soon as the filter elements in such a filter become dirty, the car owner simply throws it away.
A filter with a modular housing is a hybrid of a collapsible and non-separable filter. The modular housing is only partially disassembled, so the car owner only has access to the filter element. The remaining filter parts remain inaccessible.
The filter housing can be anything you want, but the “filling” of this device is almost always the same.
The filter housing may be different, but its “filling” is always the same
The body always has the shape of a cylinder. There are two valves inside: forward and reverse. There is also a filter element inside connected to a spring. On the outside of each filter there is a small rubber O-ring. It prevents oil leakage.
The filter element is made of filter paper with special impregnation. This paper is folded many times, so that a kind of “accordion” is formed.
A paper “accordion” allows you to increase the filter surface area by 28 times
This technical solution is necessary to ensure that the filter surface area is as large as possible. The direct valve allows oil to enter the engine when the main filter element is clogged. In fact, the straight valve is an emergency device. It lubricates the rubbing parts of the engine with unrefined oil. And when the car engine stops, the check valve comes into play. It traps oil in the filter and prevents it from flowing back into the crankcase.
Thus, the choice of oil filter for the VAZ 2107 depends entirely on the car owner’s wallet. Anyone who wants to save money chooses a non-separable filter. Those who are not constrained by funds install collapsible or modular devices. A good option here is a filter from MANN.
MANN is perhaps the most popular collapsible oil filter among VAZ 2107 owners
Modular devices from CHAMPION are also in constant high demand among owners of “Sevens”.
The CHAMPION filter is cheaper than MANN, but has a modular design
Well, if money is short, then you can take a closer look at the Nf-1001 disposable filters. As they say, cheap and cheerful.
Disposable filter Nf-1001 will help out the driver who is tight on money
About the frequency of changing oil filters
If you look at the VAZ 2107 operating instructions, it says that oil filters should be changed every 8 thousand kilometers. The problem is that mileage is far from the only criterion by which the wear and tear of a device is determined. You can tell if the filter is worn out by checking the engine oil. If a car owner, checking the oil with a dipstick, sees dirt on the dipstick, it means the filter is not working well and needs to be replaced. The life of the filter is also affected by the driving style of the car. If the car is driven too aggressively, the oil filters become clogged faster. Finally, the operating conditions of the car. If the car owner has to constantly drive in heavy dust, then the oil filters will have to be changed very often.
Registration period
When planning any action, especially one related to government agencies, it always seems that it will take a lot of time. When planning to register an engine change with the traffic police in 2022, the following deadlines must be taken into account.
If a replacement occurs with a similar engine, then registration with the traffic police is reduced to entering the corresponding mark in the vehicle passport. This action will only take a few hours and depends only on the size of the queue.
Registration of modernization associated with the installation of a different type of motor will take much longer. You will have to come to the MREO traffic police department itself twice: to fill out an application and to submit a package of documents collected after making the proposed changes to the vehicle. You will also have to allocate time to conduct a technical inspection and obtain a diagnostic card. After submitting documents to the inspector, the procedure for checking them can take up to several hours, but, as a rule, the owner of the car receives a title with the marks and changes made on the day the documents are submitted.
What engines can be installed on the VAZ “classic”
The VAZ 2107 is certainly considered a classic of the domestic automotive industry. Therefore, the same rules apply for this model as for the entire “classic” AvtoVAZ line.
Two engines can be considered the best options for the “seven”:
- from Lada Priora;
- from VAZ 2112.
These 16-valve engines have virtually identical mountings and require very little modification for installation.
In addition (which is also important), the current gearbox from the VAZ 2107 is quite suitable for these engines, thereby saving the driver time on installing the gearbox
It is advisable to take the power unit from later VAZ models from 2112 or Priora
How to remove a VAZ 2101 to 2107 engine
On these machines, VAZ 2101 to 2107, the principle of engine removal is the same. If you decide to remove the engine yourself at home, without any equipment, and don’t know how to do it correctly, then this article is for you.
The engine has to be removed to overhaul it, or to replace it with another engine.
You look at the engine and the first feeling is that it is difficult to remove the engine from the car, but in fact everything is very simple, two men can easily remove the engine themselves at home and also put it in place. I will give an example of removing an engine from a VAZ 2106, although this principle is suitable for VAZ2101 to 2107.
The engine can be removed entirely, but this is much more difficult, or you can remove it without the head, this is much easier. If you decide to repair the engine yourself, then the second option is preferable, since you have to disassemble the engine anyway and why drag out the extra weight. I will describe the removal of the engine with its partial disassembly, in the engine compartment of the car.
The reason for removing the engine was that the splines on the oil pump drive gears on this six were torn off, and the driver drove on without oil pressure, and the engine jammed.
Installing valve stem seals
When installing new caps, it is advisable to use a special bushing that fits onto the valve stem to avoid damage to the working edge. For the same purpose, the inner surface of the valve stem seal is lubricated with engine oil before installation.
To simplify the work, it is better to put a new cap on the valve guide immediately after removing the old one, while the valve is supported with a tin rod. Immediately you need to put on the spring with the plate and secure them with breadcrumbs.
The procedure for installing the oil seals on the valve guide and springs is as follows:
- Place the auxiliary sleeve onto the valve stem;
- put the cap on until it stops;
- remove the auxiliary bushing;
- press the cap onto the guide bushing using a special mandrel or tube of suitable diameter;
- install the support washer, springs and plate on the valve;
- secure the desiccant so that it can press on the valve plate;
- press on the plate and insert crackers into the groove of the rod;
- release the desiccant.
Next you should assemble and adjust the engine timing belt:
- install valve rocker arms;
- install the camshaft with a cover on the engine head studs;
- tighten the camshaft cover fastening nuts evenly, using a torque wrench to control the tightening torque;
- install the chain tensioner, first compressing its spring as much as possible and securing the position by tightening the nut;
- untie the wire from the sprocket and carefully install it on the camshaft so that the position of the links on the teeth does not change;
- install the lock washer and tighten the camshaft sprocket bolt;
- bend the tabs of the washer to prevent spontaneous unscrewing of the bolt;
- unscrew the tensioner nut and turn the crankshaft so that the chain is tensioned;
- tighten the chain tensioner nut;
- check the correct installation of the chain, focusing on the marks on the engine and the camshaft and crankshaft sprockets;
- adjust the gaps between the camshaft and valve rocker arms;
- Install the engine head cover and tighten it.
Replacing valve stem seals on a VAZ 2107 is quite feasible at home. The most important operation is setting the gap between the camshaft cams and the rocker arms (rockers) of the valves. The operation requires a micrometer or probe. If the gap is too large, the camshaft will knock loudly on the rocker arm while the engine is running, and the valve will not open fully, which will impair engine performance and can lead to burnt out exhaust valves. If there is no clearance, the valve will not close completely. A slightly open valve will worsen engine compression and burn out over time. Therefore, when replacing VAZ 2107 valves or valve stem seals, after removing/installing the camshaft, it is necessary to adjust the clearances. But this is a topic for a separate article.
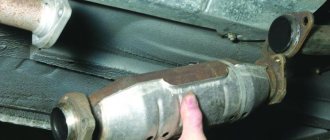
How to properly pour liquid into a radiator
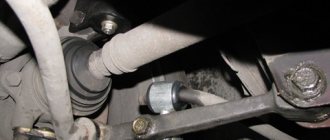
When pouring liquid into the radiator, there is one trick, but many mechanics don’t know about this; they pour liquid, start the engine, and it boils, and if there is gas equipment, the gearbox freezes.
This happens because the thermostat holds an air lock, and the fluid cannot completely fill the engine.
This happens because the thermostat holds an air lock, and the fluid cannot completely fill the engine. Therefore, the photo shows a hose that needs to be disconnected when pouring liquid into the radiator, and as soon as the liquid flows from the hoses and the head, put it in place, the entire engine cooling system is completely filled.
↑ Preparation for engine removal
Remove the hood, disconnect the wires from the battery and from electrical components installed on the engine. Remove the battery and engine compartment lamp.
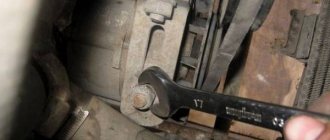
Drain the liquid from the radiator, cylinder block and heater by unscrewing the plugs on the left side of the cylinder block and on the lower radiator tank, move the upper heater control lever to the right (it opens the heater valve) and remove the plugs from the expansion tank and radiator.
WARNING! To avoid damaging the radiator, when unscrewing the drain plug, hold the plug fitting soldered into the radiator with a second wrench. Unscrew the plug with a socket or socket wrench so as not to tear off the edges of the plug.
Re-equipping a car on your own: is it possible?
From the above description it is clear that the VAZ 2107 can be equipped with any engine from 14 VAZ models. This can be done without any special modifications, except that some difficulties may arise with the RPD. However, this power unit is compact and there is enough space in the engine compartment for it. Another thing is that it is quite difficult to find and there are big problems with spare parts.
Tuning enthusiasts are not limited to such simple options and prefer more complex tasks. It is considered especially chic for such car owners to replace the standard engine with a powerful engine from a foreign car. Theoretically, there is nothing technically impossible about this and it can be done subject to certain conditions. In the matter of selecting a suitable power unit, it is advisable to consult with specialists and study successful experience.
Suspension and wheels of VAZ 2107
Front suspension: independent, on double wishbones, with anti-roll bar and hydraulic shock absorbers. Rear suspension: dependent, with a rigid rear axle beam and 5 reaction rods, on hydraulic shock absorbers.
Standard VAZ 2107 wheels: 5Jxl3H2 with an offset of 29 mm, mounted on 4 bolts with a hole diameter of 98 mm, hole diameter for the hub - 58.5 mm) Tires: tubed or tubeless 175/70R13 or 165/70R13
Recommended tire pressure: - front wheels - 1.7 kg/cm2 - rear wheels - 2.0 kg/cm2
For a softer and more comfortable ride, you can reduce it by 0.1 kg/cm2
Re-riveting driven disk linings
To replace worn friction linings of driven disks, you must:
drill or cut off the rivets with a pointed chisel and remove the linings; Drill out the rivets carefully so as not to damage the holes in the disk; place a new lining on the disk, mark the centers of the holes, drill holes and countersink them so that the rivet heads are 0.5 mm from the surface of the lining; select brass or copper rivets according to the diameter of the disk holes and the thickness of the assembled disk with linings so that the length of the protruding part of the rivet is approximately equal to 0.7 of its diameter; rivet the linings to the disk manually or using a bench tool with frequent and strong blows (so that the heads of the rivets on both sides are buried 0.5 mm from the surface of the linings).
After riveting, the surfaces of the linings are cleaned with a file or emery stone and the disc is checked for runout in the centers on the mandrel. The runout from the short end of the disk hub at a radius of 120-150 mm should not exceed 0.5 mm. If the runout is greater than the specified value, the disc is straightened on the plate with hammer blows.
The linings of the driven clutch disc (for GAZ-51 and M-20 Pobeda cars) are riveted to leaf springs located around the circumference of the disc. In this case, each overlay is riveted separately.
Sequence of work
We drain the antifreeze below the height of the cylinder head. We remove the carburetor. Remove the intake and exhaust manifolds. We remove the breaker - distributor with coil. We remove the pulley from the crankshaft, replace the front engine cover with a new one, with space for the crankshaft sensor. We install a new pulley, with teeth for the sensor, not forgetting the marks. We install a new block head 2124. You can use a new prefabricated one, or you can use an empty one, but then you’ll have to rearrange everything with yours, or you can leave your classic one, but bore it for the new profile of the intake windows and for additional studs with your own hands; We install the coolant sensor on the tee of the VAZ 2107 block head, drilling a hole and cutting a thread for the sensor. Then we install it. After installation, we attach the intake pipes and exhaust manifold to the block head, install a ramp with injectors on the intake, and screw it on
Then you need to put on the receiver, with the throttle assembly and screw it on. We attach a plug to the seats of the fuel pump and breaker. We place the knock sensor closer to the cylinders, preferably on the breaker plug screw. Install the ignition module; To do this, use a grinder to level the area with your own hands (be careful, sparks and gasoline vapors can cause a fire and explosion!) next to the brake fluid reservoir and attach the “Nivov device.” It's away from the heat, which is better for electronics.
We install a fine filter between the supply tube and the main line; it is easier to install it from the Volga on clamps; We install the return line in the same way, in the form of a second line along the bottom of the car to the tank;
There, under the bottom, near the fastening of the speedometer and gearbox cables, we install a speed sensor;
We put the return line into the gas tank, the main thing is to make it hermetically sealed, by drilling a hole in the intake cover and inserting the tube;
Installing a fuel pump
It is better to place it further away, as it makes noise. For example, on the wheel arch in the trunk:
We connect the fuel pump hoses according to the diagram: intake - pump - supply line - return - pipe to the gas tank. The clamps need to be strong, otherwise there will be a stink of gasoline from the trunk into the cabin. Place the gas pedal, attach the gas cable to it, attach the cable to the throttle and to the receiver bracket. The cable does not need to be pulled too tight. We check the tension with our hands. Electrical: all new wiring, on-board computer, all fuel injection system sensors need to be installed. To discourage beginners, let’s just say that you need to not only cut out the lengths of all the circuits to the sensors, but also professionally solder them, making do with a minimum of connections to prevent “terminal souring.” In this case, you will have to conduct separate electrical circuits by hand: black - white, black - red, red, gray, white with a stripe, blue with a stripe, brown with a stripe of wire. They need to be carried out on the battery, fuel pump, ignition, choke light, tachometer, fan, fan relay and all sensors. Finally, the ignition system is installed - coil, high voltage wires.
Now the pleasant sound of an injection engine can please the owner. You have done a great job!
Step-by-step instructions for disassembling the internal combustion engine of a car + Video
- Prepare all the necessary tools and drain the oil from the crankcase.
- Firstly, this will be necessary to lighten the weight of the motor, and secondly, it will help to avoid excess dirt on the workbench. Next, unscrew the oil filter. Also unscrew all the bolts that secure the oil pan. The old gasket can be thrown away as it is no longer suitable for further use.
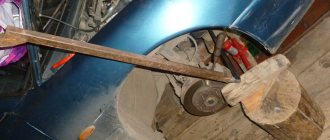
- Now you need to remove the crankshaft pulley. This is not as easy to do as it seems at first glance, since in this case you will need good physical strength. However, no one has canceled the use of a pipe as a wrench extension. Secure the crankshaft from turning by blocking the flywheel. For this, a special device is used, which can be purchased in the store. Next, use a wrench to unscrew the ratchet and remove the pulley.
- Unscrew the nuts securing the valve covers and timing chain, remove it and pull out the gasket. Unscrew the bolts securing the camshaft gears, as well as the shaft that drives the engine oil pump. Next in line is the timing chain tensioner. First, loosen the special cap nut, and then unscrew the other two nuts that secure it to the cylinder head. Do not forget to unscrew the bolt securing the shoe, and then remove the tensioner itself, along with the shoe. Then the pin that restricts the chain is unscrewed, the camshaft and oil pump gears are removed, and the chain is removed.
- Now you need to remove the camshaft. To do this, unscrew two nuts located on its studs in the bearing housing. The housing must be removed and the camshaft carefully pulled out. Before pulling it out, do not forget to also remove the special thrust flange.
- Next, the bolts intended to secure the cylinder head to the block itself are unscrewed. The cylinder head is dismantled immediately along with the manifolds, which are not required to be removed (depending on the type of repair being carried out). After removing the head, it is also recommended to replace the gasket. This procedure will help you, in the future, get rid of repeated removal of this element.
- After this, you need to dismantle the oil pump. To pull it out you need to remove the special thrust flange. After this, remove the roller from the cylinder block, which is responsible for driving the oil pump.
- Using a special removable device, remove the gear that fits onto the engine crankshaft. Then remove the nuts located on the connecting rod bolts. Now remove the connecting rod caps and, using the cylindrical opening, pull out the connecting rods along with the pistons.
Attention! Before removing the connecting rods and pistons, as well as the main bearings and liners, you must first mark them all to prevent errors when assembling the element.
- We return to the flywheel retainer again and install it. Unscrew the bolts that are intended for fastening and remove the washer, then pull out the flywheel mounted on the crankshaft, and then remove the protective cover of the clutch housing.
- Using a puller, remove the gearbox input shaft bearing, which is located in a special socket at the rear of the power unit. Next you need to pull out the special crankshaft oil seal holder. Now unscrew the bolts that secure the caps covering the main bearings and pull them out along with the liners. After this, you need to remove the crankshaft and the uppermost shaft bearings. Also remove the special thrust half-rings that are located on the support.
That's all you need to do to disassemble the engine. The next step is to bore various elements to repair sizes and replace damaged and worn elements. It is recommended to pay special attention to the liners, which are most often subject to rotation, which is why the motor simply jams. After repair, the engine is assembled and installed on the car.
Sources:
https://7vaz.ru/remont/kak-snyat-dvigatel.html https://carmanuals.ru/vaz/vaz-2107/dvigatel/snyatie-i-ustanovka-dvigatelya https://vazclub.com/vaz/ 2104-2105-2107/remont/dvigatel/razborka-i-sborka/ustanovka-i-snyatie-dvigatelya.html https://bezsto.ru/remont-avtomobilnogo-dvigatelya/remont-dvigatelya-vaz-2107/ https:/ /vipwash.ru/dvigatel/razborka-i-sborka-dvigatelya-svoimi-rukami
Removing the power unit
Upon completion of diagnostics and other preparatory actions with the engine that is planned to be installed on a VAZ 2107 model car, you can proceed to the next stage. It is necessary to dismantle the standard motor in the following order:
The machine is installed in a garage box on an inspection pit or on a lift
The room must be equipped with a hoist or other lifting mechanism. We disconnect the battery and remove it from the car, disconnect and dismantle all attachments. We undock the power unit from the transmission and unscrew the mounting bolts of the pillows. After making sure that nothing interferes with the process, using a hoist, you can carefully lift the power unit and remove it from the engine compartment. If any of the elements interfere with this process, it should be removed.
It is advisable to place the dismantled engine on a special stand; the engine can later be sold. This will help offset some of the costs of re-equipping the machine.
Major repairs yourself
Before proceeding with a major overhaul of the VAZ 2107 engine, it is strongly recommended that you familiarize yourself with special literature in order to better understand the procedures being performed.
Upon completion of the repair, the vehicle must be run in to break in all parts. Typically, break-in occurs within the first 5,000 kilometers.
Engine prepared for major overhaul.
Before disassembling, the engine oil must be drained. To do this, warm up the engine to approximately operating temperature and turn it off. If there is a ditch, then the car is driven into it.
If it is not possible to drive into a ditch, you must park the car on a flat surface.
Place a 10-liter container made of heat-resistant material under the oil drain hole. Unscrew the plug and drain the oil.
After this, drain the antifreeze from the cooling system through the drain hole at the bottom of the engine cooling radiator.
IMPORTANT!
The oil can reach temperatures of about 100 degrees. If you try to start the car with the oil and antifreeze drained, the engine will completely fail.
When all the working fluids have been drained, unscrew all the supports and disconnect the bolted connections of the flywheel to the gearbox. Using a winch, remove the engine from the hood space and install it on a stand for repair.
Disassembling the engine does not require a special approach: simply unscrewing the threaded connections.
Photo of the removed cylinder head.
Everything is removed: the cylinder head, electrical components, including the starter and generator, connecting rods, crankshaft, oil pump, and so on. The result should be a separately disassembled cylinder block and crankshaft. Removing the head and all elements is a simple procedure.
It will be difficult when assembling gas distribution and other engine mechanisms that require precise alignment of the position of the working parts. Installing the head will require compliance with the timing marks and other mechanisms.
The removed cylinder head and crankshaft, along with the purchased pistons, are taken to a grinding specialist. The specialist takes all measurements, including all crankshaft dimensions, for subsequent engine boring. Boring is necessary to compensate for wear of non-replaceable parts. The specialist bores the pistons already purchased to size.