Exhaust system design of VAZ 2107
Like most passenger cars, the VAZ 2107 has an exhaust system consisting of three main parts:
- a receiving pipe into which gases enter from the exhaust manifolds;
- VAZ 2107 resonator (additional muffler), where gases are directed from the exhaust pipe and where the exhaust sound is partially reduced;
- muffler, which absorbs most of the engine exhaust noise.
In addition to the above parts, the exhaust system includes:
- muffler mounting pad;
- pillow bolt;
- muffler suspension belt;
- clamp bolt and clamp securing the muffler to the resonator;
- clamp bolt and clamp securing the resonator to the exhaust pipe;
- clamp bolt and clamp securing the exhaust pipe to the body;
- nuts securing the exhaust pipe to the manifold;
- pad;
- locking plate;
How are knocking and muffler position related?
If the muffler suddenly starts knocking on some parts of the car, find the source of the extraneous sounds. Usually the reason lies in stretched rubber fasteners. After replacing them, the knocking will stop.
Sometimes a knock appears after work related to removing the muffler. In this case, extraneous sounds are a consequence of installation errors. Round pipes at the joints with clamps can be slightly rotated relative to the correct position: more or less than required, pushed into each other.
DETAILS: Replacing the VAZ 2114 manifold Photo instructions on how to replace the manifold on a VAZ 2114
To eliminate knocking, restore the optimal position of the exhaust system elements.
Sagging mufflers can be “treated” using similar methods—by replacing rubber bands and correcting the position of joints.
Differences between the exhaust systems of carburetor and injection VAZ models
Installation of an injection system on a VAZ 2107 required modernization of the exhaust system. Two additional details were added to it:
- an oxygen sensor that determines the composition of the mixture, which is embedded in the exhaust manifold;
- an exhaust gas catalyst (“catalyst”), which is installed in front of the resonator, in the central tunnel under the bottom.
In connection with the installation of the catalyst, the VAZ 2107 resonator (injector) was moved a little back.
The new exhaust system has become a little more complicated, but it allows for a reduction in the toxicity of the VAZ 2107 exhaust and ensures that the car complies with EURO-2 standards.
Advantages and disadvantages of the injection modification of the VAZ 2107
The “Seven” in injection version and with a modernized exhaust system has a number of advantages over the old “carburetor” model. They are as follows:
- thanks to the injector, the engine operates more stable in all modes;
- the specific power and torque of the injection engine are higher;
- the exhaust of a VAZ 2107 with an injection system is cleaner than smoke from a carburetor engine;
- Driving a car with an injection engine is easier, it is not so demanding on the driver’s qualifications and “forgiven” mistakes when operating the gas and clutch pedals.
But installing the injector at the same time worsened some performance characteristics:
- the clearance of the injection “seven” decreased to 7 cm, which worsened its cross-country ability;
- due to the installation of the catalyst, the “survivability” of the exhaust system has decreased;
- the high temperature of the catalyst sometimes causes grass and dry leaves to ignite when the car is stopped.
Exhaust system functions and parts replacement intervals
Despite its apparent simplicity, the exhaust system performs several important functions:
- removal of fuel combustion products;
- reduction of noise level from the exhaust;
- maintaining air balance in intake and exhaust systems;
- ensuring ventilation and cleaning of cylinders;
- reduction of CO content (in the presence of a catalyst).
Exposure to high temperatures, moisture, fuel and oil combustion products leads to through corrosion of exhaust system parts. This is aggravated by the external influence of gravel, sand and salt solutions that are used to treat roads in winter. Therefore, parts of the system have to be changed. The frequency of replacement depends on the following factors:
- car use activity;
- frequency of machine operation in bad weather (rain, snow);
- fuel quality;
- quality of exhaust system parts.
Replacing the muffler VAZ 2107
The VAZ 2107 muffler (injector and carburetor) is connected to the resonator with a clamp, which is located in front of the rear axle. Before removing the clamp, it should be tapped with a hammer to make it easier to unscrew the threaded connection and uncouple the pipes. To change the muffler, you need to do the following:
- loosen the clamp bolt and remove (move) the clamp;
- pull the flared muffler pipe off the resonator (if that doesn’t work, knock it down with a hammer and chisel);
- remove the muffler from the cushion and mounting straps;
- install a new muffler on the VAZ 2107;
- tighten the clamp.
Removal process
In the process of removing an element of the exhaust system from a VAZ 2107 (injector) for its subsequent replacement. The following tools will be useful to you:
- wrench 13 (open-end type);
- ratchet or crank;
- deep heads on 13 and 10;
- Bulgarian;
- flat screwdriver (can be replaced with a chisel);
- pliers;
- hammer.
https://youtube.com/watch?v=bOzlK_Cr5qE
To figure out how to remove the muffler from your VAZ correctly and replace it. Please read the following instructions carefully:
- install the car over an inspection hole or on an overpass;
- unscrew (cut with a grinder) the crimp coupling;
- using a screwdriver or thin chisel, bend the flared ends of the pipe;
- using a hammer, which you will use to knock on the pipe, separate the muffler from the resonator;
- Unfasten the hanging pillows.
After this, the product can be freely removed to be replaced with a new one, which is installed in the reverse order.
For this reason, moisten corroded parts with an anti-corrosive agent in advance (motor oil or brake fluid will also work). If you are planning to install a new muffler, it would be a good idea to purchase new suspension rubber bands (1 for the rear and 2 for the center location).
If you want more interesting articles on auto topics, subscribe to our channel at.
Replacing the VAZ 2107 resonator
The VAZ 2107 resonator does not have fastening parts to the car body, so it is necessary to hold it when replacing it. Otherwise the exhaust pipe will be bent.
The replacement work consists of the following steps:
- tap clamps and pipe connections with a hammer;
- loosen the bolts of the clamps and move the clamps fastening to the “pants” and the muffler;
- disconnect the resonator from the muffler by undocking the pipes;
- disconnect the resonator from the receiving pipe (“pants”);
- install the new resonator in the correct position;
- connect the parts and tighten the fastening clamps.
Note: the resonator tank must be parallel to the ground, otherwise the part will knock on the bottom of the car and cling to uneven road surfaces.
Resonator malfunctions and repairs
Resonator malfunctions include:
- pipe beating on protruding parts of the body and other elements;
- burnout of the end part of the tank at the welding site of the body and pipe;
- burnout of the housing or internal perforated channel;
- exhaust gases exit through the mounting joints.
An annoying knock coming from under the car's bottom is usually the result of a loose exhaust pipe beating against the body and other components. The reason for this is the rubber fasteners, which wear out and stretch over time and cannot provide rigid fixation of the exhaust tract when moving. The problem is solved by replacing these fasteners.
Other problems can be resolved in the following ways:
- The burnout on the side of the resonator can be welded. There is no need to remove the pipe to do this. An experienced welder will do the work on site, covering the body with a sheet of asbestos.
- If exhaust gases are observed escaping through the joints of the exhaust system, the mounting clamp or flange should be tightened further. You can also loosen the fastening, fit the parts closer together and re-tighten the clamp.
- If the housing or internal channel burns out, the resonator is usually replaced with a new one. If the fistula is small, you can try to weld it without removing it from the car.
Car enthusiasts with experience in welding can make a resonator tank with their own hands. To do this you should:
- Remove the resonator from the car.
- Carefully cut the body with a grinder.
- Take all dimensions (channel and hole diameters, body dimensions).
- Make a new tank according to the measurements taken.
- Weld old pipes to the new tank.
- Install a new resonator on the car.
Replacing the exhaust pipe (“pants”) of a VAZ 2107
When replacing the exhaust pipe, be sure to replace the gasket between it and the exhaust manifold. It is also better to change the nuts securing the “pants” to the manifold. The procedure is as follows:
- loosen the clamp and disconnect the pants from the resonator;
- unscrew the four nuts securing the exhaust pipe to the manifold;
Important: unscrew the nuts carefully so as not to twist the fastening studs. Otherwise, you will have to drill out and replace the studs.
- remove the “pants” (exhaust pipe) and gasket;
- install a new gasket;
- install a new exhaust pipe;
- connect the exhaust pipe to the resonator, tighten the fastening clamp;
- tighten the nuts securing the “pants” to the manifold.
If, after installing a new exhaust pipe, the exhaust system sags or hits the bottom, the following options are possible:
- the resonator or exhaust pipe is fixed at the wrong angles;
- engine mounts sagged.
In the first case, it is enough to loosen the clamps and install the parts correctly. In the second case, the engine mounts will have to be replaced.
The nuances of muffler repair
The muffler of “classic” VAZ cars, according to the manufacturer’s recommendations, cannot be repaired. If a malfunction occurs in any element of the exhaust tract, the part must be replaced with a new one.
In fact, motorists often prefer to repair holes burned in the muffler - the most common defect - by welding.
The occurrence of “fistulas” is indicated by a change in the sound of the engine and the appearance of smoke from under the car. To troubleshoot, place the machine on a platform and inspect the elements of the exhaust system.
If the cause is a burnt gasket, remove the muffler and replace it. When you have an assistant, you can do without removing all elements of the system. Proceed in the following order:
- Unscrew the pipe fastening to the gearbox.
- Unscrew the nuts securing the exhaust pipe to the manifold.
- Together with an assistant, pull the “pants” off the pins while simultaneously rotating the bend of the resonator pipe.
- Replace the gasket, install the pipe in place, tighten the fasteners.
Replacing a burnt muffler gasket eliminates extraneous sounds from the engine
A welded muffler usually lasts less than a new one. But welding is also cheaper than buying. Usually, if it is necessary to repair a muffler by welding, they turn to professionals. If you have the equipment, you can do the work yourself. For this you will need:
- welding machine;
- blanks for patches made of sheet metal 1–2 mm thick;
- a piece of pipe of the same diameter as the failed one;
- grinder with cutting disc for metal;
- metal brush;
- sandpaper;
- heat-resistant paint for metal.
To repair the muffler, follow this sequence:
- Remove the muffler from the vehicle.
- Using an external inspection, determine the location of the malfunction and the extent of the damage.
- If there is a large hole in the muffler body, evaluate the condition of the internal parts. It is possible that repairing the external surface will not bring the desired restoration of the functions of the muffler without replacing the internals. In this case, it is advisable to contact professionals or simply replace the faulty part with a new one.
- Cut out the burnt area. From the blank, make a patch larger than the damage. Weld the patch over the hole with a continuous seam.
- If there is damage at the junction of the pipe and the muffler body, cut out the defective area, replace the damaged part of the pipe, and weld the repaired pipe to the muffler with a continuous seam.
- Clean the repaired muffler from dirt and rust, paint the part with two layers of heat-resistant paint.
Video: repairing a VAZ muffler by welding
Repair (welding) of the muffler Lada 09-VAZ.
Replacing and repairing a muffler is a dirty and time-consuming job. But there is nothing complicated about it. You never know what you can do till you try.
Source
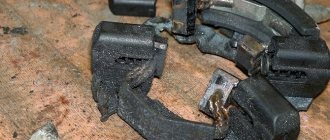
Exhaust System Mounting Parts
The clamps and suspension elements of the exhaust system are exposed to moisture and salt during machine operation. In addition to corrosion, metal “fatigue” accumulates in clamps. The clamps begin to loosely hold the connection, as a result of which exhaust gases begin to break out, creating noise. Old suspension cushions may break off, which can damage exhaust system parts. Therefore, it is advisable to change the mounting parts; whenever large parts are replaced, the mounting elements on which they are attached should also be changed. This will avoid unnecessary problems and expenses.