01/26/2022 1,826 Generator
Author: Ivan Baranov
The design of the generator unit as a whole is quite complex - this mechanism consists of many elements, each of which performs a specific function. During operation, almost all component parts of the device are subject to wear; one of the elements that most often wears out is the generator bearing. You can learn more about the purpose and malfunctions of this part from this article.
[Hide]
Maintenance frequency of car generator bearings
When servicing the unit, you need to know which bearings are on the generator, and which race of each of them is pressed into place. To extend the time between overhauls, bearings are lubricated at the time of installation at the factory or when replaced by the user. It is believed that this amount is sufficient for the entire life of the rolling elements.
The frequency of bearing replacement is determined by ear:
- if the generator is noisy, it means the clip has worn out;
- Before jamming, the generator bearing hums for quite a long time, so the owner usually has enough time not to let this happen.
Bearing wear
Attention: It is usually difficult to determine by ear which of the two bearings has become unusable, so the rolling elements are replaced as a set - front and rear.
Design features of the generator are:
- one bearing is called the front bearing, since it is pressed into the corresponding (front) generator cover by the outer race;
- the second one is put on the shaft with tension on the reverse side, called the rear one, and is located near the commutator group;
- Before changing standard rolling consumables, you need to prepare a special tool;
- To get to the rolling parts, you will first have to remove the generator and then completely disassemble it.
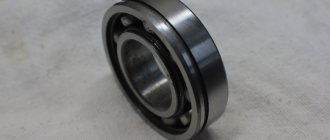
Generator front bearing
Generator rear bearing
For example, the front bearing can be knocked out, then a new rolling element can be installed in the mounting hole without a puller. It is important that the external dimensions match. It will not be possible to pull the rear bearing off the shaft in this way; a puller will be required. But you can put on a new standard product by tapping a hammer on a sleeve of a suitable size or an old bearing.
Symptoms of a problem
The main sign of wear on the generator bearings is the appearance of a distinct noise when the rotor rotates.
Typically, bearings begin to make noise due to insufficient lubrication, mechanical damage (destruction of the cage, severe wear of the tracks) or due to the rotation of the outer race in its seat, although this happens very rarely.
It is believed that if there is no lubricant, it is enough to apply a new one to get rid of the problem.
But this is not always the case; operation of this element without lubrication is accompanied by intense wear, so after adding new lubricant, the noise may stop, but not for long; the bearing will fail very quickly.
In any case, if problems are detected with the generator bearings, it is better to replace them immediately.
Next, we will consider how to replace these elements in the generator of a VAZ-2110 car.
The design of the generators is almost the same, so the sequence of work will be similar for generators of other cars.
Replacing bearings yourself
If the generator is repaired on its own, the main problems become:
- how to remove the front bearing of a generator - it is often rolled into the front cover housing, pressing in a new product becomes more difficult, since part of the housing is destroyed during dismantling;
- Removing the rear bearing - you need a puller with suitable dimensions.
However, if the generator starts to hum, you need to act quickly before the rotor completely jams.
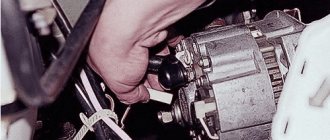
Dismantling the generator
On some cars, the generator can be removed through the hood, on others, for example, VAZ 2112, you will need an overpass, pit or lift. The dismantling sequence is as follows:
- disconnecting the “–” terminal from the battery;
- loosening the tensioner nut;
- dismantling the alternator belt;
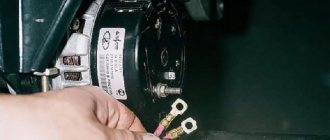
- disconnecting the terminals of the on-board system from the dismantled unit;
- removing engine protection;
- unscrewing the two mounting bolts from below;
- removing the generator from below.
Dismantling the generator step by step
After this, the repair continues on a table or in a vice. At this stage, the dimensions of the front and rear bearings of the auto generator are still unknown to the user if there is no manual.
Complete disassembly
Since the generator bearing can be checked for runout only after complete disassembly, it is necessary to follow the following sequence of actions:
- marking - using a marker, paint or colored nail polish to mark the relative positions of the casing, front cover and body;
Marking the relative position of body elements
- dismantling the pulley - the rotor is carefully blocked with a screwdriver from turning, the pulley is turned away with a key;
Pulley removal
- removing the casing - it is usually fixed with latches that need to be unscrewed with a screwdriver to remove the specified part;
Removing the casing
- dismantling the front cover - use a screwdriver to unscrew the screws.
Removing the Front Cover
Under the casing there is a voltage regulator, a diode bridge, brush clamps, and a capacitor. Before replacing the bearing, you should check the wear of the brushes, the performance of the diode bridge and the voltage relay in order to increase the next overhaul period.
Attention: The armature (rotor) is removed from the stator winding with the rear bearing mounted on the shaft, while the front one remains inside the corresponding cover.
Before replacing standard consumables, it is necessary to check the bearings:
- rear - use your fingers to turn the outer race, which should not emit any extraneous sounds when rotating and have no play;
- front - here, on the contrary, the inner race is rotated and the play is controlled when the bearing is rocked inside the seat with your fingers.
Manufacturers unanimously recommend replacing the front cover along with the bearing, especially if it is rolled inside the seat. In practice, to reduce the repair budget, the cover is left for further use, since it costs 150–300 rubles.
Front bearing
If the results of the previous test require replacement of the alternator front bearing, the old standard product is removed from the front cover:
- the bearing can be knocked out inside by placing the cover on the bricks with the outer side up;
- or secure the lid in a vice;
- or use a special puller.
Removing the front bearing
In the presence of rolling, this fixing element is broken irrevocably.
Broken rolling
After the owner has removed the worn-out consumable, a new bearing is mounted inside the front cover:
- the lid is turned over with the inside facing up;
- the seating surface is treated with sealant;
- a sleeve of suitable diameter is installed on the outer race;
- With light blows, drive the bearing into the seat until it stops;
- lubricate the balls between the races or fill the grease into special holes.
The bearing has been checked for runout and is ready for use; assembly is carried out in the reverse order.
Rear bearing
The rear generator bearing is replaced as follows:
- dismantling with your own hands - the jaws of the puller grip the outer race, and by rotating the central screw the bearing is pulled out of its seat;
- installation - the standard product is mounted on the shaft, a sleeve of a suitable diameter is installed on the inner race, after which its surface is tapped with a hammer.
Removing the rear bearing
Rear bearing installation
Then all that remains is to lubricate the bearing and check the runout and rotation of the outer race. The bearing is a closed type or with rubber seals and is already lubricated at the factory, which reduces repair time and its budget.
How to remove a bearing from a Samsung washing machine drum
In washing machines, ball bearings ensure uniform and dynamic rotation of the drum. Considering that spinning is performed at high speeds and the elements are subject to increased load, they often fail and must be replaced in order to prevent breakdowns of the main components of the equipment, the repair of which is quite expensive.
If it is not possible to invite a service technician, you can make the replacement yourself, having first read the step-by-step instructions. First you have to disassemble the machine. Two elements, large and small, are replaced in the tank housing bushing. A part with a larger diameter is knocked out using a metal rod, and a part with a smaller diameter is knocked out. The upper cage is removed by striking with a hammer, placing the end of a pin or rod against the edge. To avoid jamming, you should hit the entire circumference of the element evenly, until the body comes out completely. After dismantling the p/sh, the seals are removed and the seat is thoroughly cleaned. Then new parts are installed and assembly is carried out in the reverse order.
Bearing sizes and manufacturers
Before replacing a bearing with a new standard product, you need to buy it. The marking of these standard consumables is complex; the numbers in it are deciphered using special tables. Moreover, bearing designations according to GOST 3189 do not coincide with the markings of foreign manufacturers, so the user needs to know the following nuances:
- the marking consists of three parts (main, left, right), and blocks inside them;
- in the left and main parts the blocks are located from right to left, and in the right block on the contrary, from left to right;
- in cars, the front bearing of the generator most often has the designation of the main part 302 or 303, and the rear bearing 202 or 203;
- usually radial ball modifications with code 0 (0302 or 0202) or angular contact balls with code 6 (6303 and 6203) are used;
- therefore, for the specified parameters, you can decipher the dimensions using the table below;
- For foreign-made bearings, similar markings are used.
Marking of bearings according to GOST 3189
Table for deciphering bearing sizes by marking
Designation of imported bearings
The suffix (right side of the marking) of imported bearings contains additional information. For example, letters and numbers can represent:
- 2RS and RS – double-sided and single-sided rubber seals, respectively;
- N and NR – groove on the outer ring without a latch and with a latch, respectively;
- J – steel holder;
- Z – sheet protection on one side without seals.
The main problem for a car enthusiast when doing self-repair is the variety of bearing sizes inside the generator:
- it is difficult to guess the markings before disassembling, when the car is still running;
- after dismantling and disassembling the generator, the dimensions and markings are known to the owner, but he has to go to the store in a different car;
- in some stores, sellers practice a convenient system - the car owner takes 4 bearings 202, 203, 302 and 303, and returns two of them back.
These modifications have dimensions:
| Marking | External diameter (mm) | Inner diameter (mm) | Clip thickness (mm) |
| 6202 | 35 | 15 | 11 |
| 6203 | 40 | 17 | 12 |
| 6302 | 42 | 15 | 13 |
| 6303 | 47 | 17 | 14 |
In view of the variety of brands and brands of cars, different power and design of generators, it is easier to study the manual before replacing bearings. In it, the marking of these standard parts and adequate replacement options are mandatory.
The most expensive bearings are considered to be from the manufacturer FAG - 450 rubles (6303 modification) and SNR - 400 rubles (6203 ZZ). Bearings from Koyo are half cheaper - 200 rubles for 6303С3, NTN - 180 rubles for 6203ZZ and Nachi - 150 rubles for 6203ZZ. A set of standard products for the KZATE generator on the VAZ 2114 (16 V) from the Chinese manufacturer C&U costs 1,100 rubles. By default, this generator is equipped with Chinese consumables SKF 6202 and SKF 6303 (both with the suffix 2RS) at the factory.
In the old VAZ 2110, the generator was equipped with bearings 302 and 202 2RS; the new ones use a generator with a different shaft; standard products 303 and 203 are required, respectively.
How to remove a bearing from an LG washing machine drum
Household appliances from a well-known Korean manufacturer are highly reliable, but some parts and consumables require periodic replacement or maintenance. To remove the washing machine yourself, you must first disconnect all communications, drain the remaining water, and disassemble the washing machine to remove the drum.
Then the fixing bolts are unscrewed and the assembly is divided into two parts. Using improvised means or special devices, the bearings are knocked out, the seats are completely cleaned, and all parts are checked for damage and deformation.
Installation of new elements and reassembly is carried out in the reverse order.
Pullers for standard parts
It is enough to simply knock the front bearing out of the cover with a hammer, even if there is a flange, so in 99% of cases only a puller for the rear bearings of the generator of two types is used:
- with two legs;
- with three legs;
Two-jaw puller
Three-jaw puller
Moreover, the device can be made independently; the most popular are two designs:
- the lower part of the split bushing is put on the outer race of the bearing, a bolt passes through the upper part, the halves of the bushing are pulled together by a tubular casing, a cover made of thick-walled metal is put on the bolt under the nut;
- in a square pipe, cuts are made from below, into which, after being placed on the outer race of the bearing, steel plates are inserted; a nut is welded to the top of the pipe, into which a bolt of sufficient length is screwed.
Split bushing puller
Square tube puller
With homemade devices, replacing a generator bearing is both faster and cheaper. However, they will take some time to produce.
How to remove the suspension bearing from the cardan on a Gazelle
Before removing the shaft from the engine, it is necessary to make marks with a marker relative to the drive gear flange near the continuation of the gearbox housing to maintain balance after installation. Then the following actions are performed sequentially:
- unscrew the bolts securing the cardan to the rear axle flange;
- remove the shaft, remove the lock washer, unscrew the bolt and remove the U-shaped plate;
- by hitting the fork with a hammer, separate the splines and dismantle the element;
- Before installing a new part, check for corrosion and apply lubricant.
Having a puller makes the procedure easier.
Reasons for failure
There are many reasons for bearing failure, but there are several main reasons, which are discussed below.
Wear
Wear is a typical cause of bearing failure, since the number of revolutions of the generator rotor is huge over the Nth period of time. Consequently, the lubricant in bearings under the influence of high temperatures loses its properties and the bearing ceases to receive the required slip coefficient, which causes heating and increased clearances in the ball part of the bearing.
Briefly about prices
When you understand that changing bearings is inevitable, then you should not despair, even if you are not able to do it yourself. In service companies, such repairs will not cost you that much:
- for front-loading machines - 1-2 thousand rubles;
- for vertical - 1500 rubles;
- replacement in the forecastle - from 2 thousand rubles.
Prices by region may differ, but not by much; exact prices can be found in the service centers of your city.
If bearing failure leads to water leakage, the heating element may burn out, then the cost of repairs increases. The worst case scenario is that the electronics system burns out, then buying a new machine is inevitable, the old one will only be suitable for disassembly for spare parts.
Typical problems
The alternator is a maintenance-free component of the vehicle. On average, its service life is 8-12 years without repair.
Over time, some generator components age or wear out naturally. Most likely it will be:
- Brushes. With each revolution of the shaft, they imperceptibly wear out more and more, until the moment comes when the brushes lose their ability to provide electrical contact with the commutator.
- Voltage regulator. Its task is to control the electricity produced. When additional electrical equipment in the car is turned off, the generator supplies a minimum amount of current to the network. As the load increases, it increases power. If the regulator loses its ability to limit output, there is a risk of battery explosion. Or, conversely, underestimating the load can lead to the car not starting.
- Pulley and belt. If the belt becomes loose, the generator's performance will drop. Rarely, there are cases of belt rupture or pulley distortion. This is possible if the car generator is repaired incorrectly or replaced incorrectly.
- Connections. Wiring and terminals are susceptible to corrosion. As a result, contact is lost in connections important for proper operation.
A generator can fail prematurely when engine protection is damaged or missing. Sand and dirt from the road will shorten its lifespan. Leaking coolant, detergent or oil can also cause damage. It is advisable to keep the engine compartment clean and dry.
https://youtube.com/watch?v=69W44lBcIuw
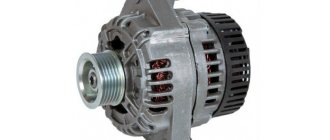
GENERATOR MODEL ON VAZ 2114 CAR
If on early VAZ 2108-09-099 models a generator of the 37.3701 series was installed, then on the VAZ 2110-2115 the brand 94.3701 began to be used. Generators of this series have significant power - the rated current (maximum output current) of such units can be 80A, 90A, 105A, and even 120A (manufacturer StartVolt). The price of the device starts somewhere from 3,500 rubles and can reach 5,000 rubles or more. The price depends on the manufacturer, the technical characteristics of the generator, the region of sale and the seller himself. Other main characteristics are:
- Rated rotation speed;
- efficiency;
- Rated voltage;
- The frequency at which self-excitation occurs.
Generator 94.3701 is an electrical machine that generates alternating current; direct current is obtained through a rectifier (diode bridge) located at the output of the electrical circuit of the machine. Type 94.3701 is used on VAZ passenger cars with an electronic engine control system (ECM), the units are capable of operating at temperatures from - 40º to + 45ºC, permissible humidity 90%. Products are sold both on the domestic market and exported to countries with different climatic conditions.
Generator set model 94.3701
Video herunterladen, kostenlos anschauen
3:40Aufrufe 1 074 345 96%13:35Ich teste den Amazon 49€ Beauty Adventskalender!Aufrufe 275 942 96%3:34Aufrufe 1 145 615 97%9:05Meine neue Wohnung | inscopelifestyleAufrufe 181 228 98%1:09Gülperi | 7.Bölüm - Fragman 1Aufrufe 399 780 99%3:09Zara Larsson - Ruin My LifeAufrufe 1 364 343 98%14:02JP Performance - Lexus LC 500 | Das Bodykit!Aufrufe 194 788 98%10:03Gamescom 2018 VERBOT | Ich entschuldige mich !Aufrufe 318 697 96%6:44Wie gut ist Bibis Bilou AppAufrufe 66 960 98%9:34Trump Paints A False Portrait Of The Migrant CaravanAufrufe 560 057 93%2:9:51Aufrufe 261 086 96%20:27Big Little Allies | The Daily ShowAufrufe 498 648 96%0:31Aşk ve Mavi - 75.Bölüm FragmanıAufrufe 642 882 81%5:53Fındık Ailesi. Mikail ve Elis'in anneleri tanışıyorAufrufe 402 202 32%7:29ぶAufrufe 2 655 468 65%3:58WizKid — Fever (Official Video)Aufrufe 503 696 96%3:04Cardi B - Money (Official Audio)Aufrufe 5 353 168 92%7:07Die große Schuldemo #41 | Krass SchuleAufrufe 583 642 96%2:14:01Müge Anlı ile Tatlı Sert 23 Ekim 2022 - Tek ParçaAufrufe 172 723 80%6:39Sarp çocuklarına kavuşuyor.. - Kadın 36. BölümAuf rufe 756 329 96%15:04INTIME CHALLENGES