Print this article Font size 16
Many people replace the input shaft bearing themselves, without the help of specialists from a service station. To perform such work, you need to know the location of the element you are looking for and the signs of its malfunction. Plus we will tell you in detail how you can understand this bearing.
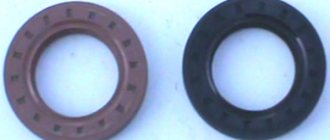
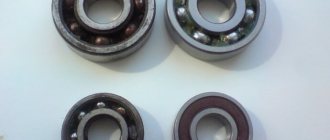
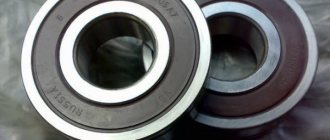
Element appearance
Location
Since we are talking about the VAZ 2114, the first thing we will do is determine the location of the element.
On the fourteenth, the primary bearing is located on the shaft behind the oil seal.
It is noteworthy that on some gearboxes this bearing additionally plays the role of an oil seal, taking on the load together with the release bearing.
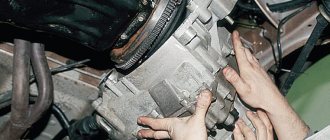
To get to the damaged transmission component, you will have to remove the transmission. When choosing a new element, be sure to check the recommendations from the instruction manual for your VAZ 2114 regarding the overall dimensions of the component.
What affects service life
There is no clear answer regarding the frequency of replacing the input shaft bearing. Therefore, the procedure is carried out depending on the current condition. The wear rate of elements is influenced by several factors, including:
- The quality of the bearings used;
- Driving style;
- Conditions under which the vehicle is operated (weather, road quality);
- Frequency of visits to car repair shops or self-diagnosis of the car’s condition, etc.
Signs of failure
All bearings, of which there are quite a few in a car, have approximately the same signs of failure. But since you know the location of the input shaft bearing, it will not be so difficult to determine that the problem arose with it.
There are several characteristic signs of its breakdown.
Peculiarities
Howling when the clutch is released in a parking lot
The element has failed and needs to be replaced. The howling is usually caused by the formation of chips, cracks, or the destruction of 1-2 rollers
Whistle when driving
The bearing is partially damaged or there is no lubrication. The problem in the absence of lubrication can only be determined by dismantling and visual inspection. To solve the problem, sometimes it is enough to simply lubricate the element and return it to its place
Clutch won't engage or disengage
Most likely the bearing is stuck. If the damage is serious, the input shaft may need to be replaced.
Knock in the area where the element is located
The bearing knocks only when the part is completely destroyed. If you do not replace it in time, the bearing will be welded to the shaft, so you will also have to replace the shaft itself
If you notice the first signs of a malfunction of the input shaft bearing on your gearbox, you should immediately check the condition of the element and, if necessary, replace it.
POSSIBLE FAULTS
Despite the imperfect operation, the VAZ 2114 gearbox, when used correctly, is distinguished by good endurance and durability. If you do not hesitate to prevent and promptly eliminate breakdowns, repairing it is not expensive.
Let's consider the main gearbox malfunctions that the owner of the fourteenth may encounter:
- Lack of speed fixation when switching. If the speeds are out of whack, the cause is most likely worn teeth on the gears and clutch. Accelerated wear of these parts is caused by incorrect gear shifting and non-compliance with the speed limit. The problem is resolved by replacing the gears.
- The gear shift lever is tight. The reasons are mechanical damage to the teeth of the lever fixing on the hinge or wear of the reaction rod; it’s also a good idea to check the integrity of the plastic parts of the gearbox drive;
- The VAZ 2114 gearbox is humming. Most often, the gearbox is humming in neutral gear. First of all, you need to check and, if necessary, add oil (in general, the box may hum due to the use of low-quality lubricants). If the oil is normal, the problem is wear of the bearing on the input shaft, which can only be determined through diagnostics or by disassembling the gearbox;
- Crunching sound when changing speed. Here it is necessary to change the worn out synchronizer, and it must be changed immediately after the problem has been discovered, because if you tighten it, the gear unit will completely fly off;
- Knock. The gearbox on a VAZ 2114 can knock both under load and without it, and in any gear. The cause of the knocking noise is a damaged drive gear of the problematic transmission.
One of the key factors for the trouble-free operation of gearbox number fourteen is the use of high-quality lubricants. The most suitable option is GL-4 mineral oil. It is not cheap, but it does its job at 5+; when using mineral oil, VAZ gearbox repairs are usually required extremely rarely.
Most VAZ 2114 owners agree that the best gearbox oil is 75W90. It is distinguished by greater fluidity than typical gearbox oils, due to which the lubricant better gets into those places of the gearbox, the lubrication of which is provided exclusively by splashing. Good options for 75W90 are Hypoid-Getriebeoil TDL and Liqui Moly Vollsynthetisches Getriebeoil (GL-5).
Checking the oil level should be carried out every three weeks. In the gearbox, the fourteenth gear is placed vertically, the topmost is the fifth, it is the one that is most susceptible to failure due to lack of lubrication, so it is always necessary to fill in oil to the maximum mark, and best of all - 200-250 ml. more than the required norm.
Replacement
Many people turn to a service station to replace this bearing. It is noteworthy that car services often refuse to perform such work. It’s understandable, because the procedure is painstaking, and you can’t get a lot of money for it.
Dismantling works
To do the job yourself, follow the instructions.
- You can often find advice about the need to completely disassemble the gearbox to replace the bearing. But this is optional. You can do without such complex manipulations.
- In any case, you will have to remove the box, so familiarize yourself with this procedure.
- Before removing the gearbox, remove the negative terminal from the car battery.
- All the chips are removed from the box, the wire from the speedometer is unscrewed.
- Next, the trousers of the vehicle exhaust system are dismantled.
- After this, you can completely remove the gearbox.
- At the next stage, the bell is dismantled. You can try to do without it, but then it will definitely constantly interfere with your work.
- Thoroughly clean the box from accumulated dirt.
- The bearing is secured using retaining rings. To remove them you will need a flathead screwdriver.
- The rings are pryed off and loosened a little, after which there will be no more problems with removal.
- To make it more convenient, arm yourself with tweezers that can be used to remove the ring.
- Using a flat-head screwdriver, pry the bearing by the ring groove, and at the same time move the input shaft slightly forward.
- Insert a pry bar between the gearbox and the bearing. It is unlikely that you will be able to do this without an assistant.
- You will operate the tools, while your friend will hold the pry bar.
- Your main task is to press out the bearing. To do this, precise, strong, but most accurate blows are applied to the input shaft.
- In the process of striking, the shaft must rotate.
- This work will take you about 20 minutes. But if you have a special puller at your disposal, you can speed up the work. Although it is really convenient to work with a puller only if you decide to disassemble the gearbox.
- Before installing a new input shaft bearing, be sure to lubricate the element with regular engine oil.
- Carefully press the component into place using gentle, light blows with a hammer. It is better to use a pipe of diameter or a stand.
- When pressing, apply blows to the inner race, in a circle, as evenly as possible.
- Once the bearing is pressed in, make sure it is seated properly. Scrolling should be calm, without obstacles.
- Reassemble the box in reverse order and install it on the car.
Do-it-yourself repair of VAZ 2108-099, 2110-2112, 2113-2115 gearboxes for the first time (brief instructions)
Problems with the gearbox began last summer, the 2nd speed was difficult to engage, in the spring the gear selector rod seal leaked, then the 3rd speed finally began to crunch when turned on. But the real juice was when you urgently need to go somewhere, and the reverse speed is not ALE!, and when you can go slowly, then with the reverse - everything is fine! Since I do the repairs myself, I decided to do everything myself this time (in the sense of not contacting service stations and other garage technicians), it’s not all that difficult))) We remove and disassemble the box (there are plenty of video instructions on the Internet)
If you take it apart, you need to change all the consumables at once, so you don’t have to go through it again later.
We press out all the bearings and seals from the gearbox housings, remove the satellites, disassemble the secondary shaft, in short, throw everything into the trash. We carry out troubleshooting and find the reasons why our gearbox did not want to work properly. We take old spare parts with us as an example, because VAZs also had parts of different sizes. Don’t forget to take a friend with you and let’s go with him for new parts. We buy everything we need and don’t need, spend all the money we had in our pocket, borrow money from a friend and spend it too. Satisfied, we go to the garage.
What was purchased and replaced:
1. Front bearing of the input shaft 6-42205 A1E1USH1 2. Front bearing of the secondary shaft 6-42305 A1E1USH1 3. Rear bearing of the primary and secondary shaft 4. Differential bearings 5. All 3 BRT engine mounts 6. All 5 oil seals 7. Reverse gear 8 . Sliding clutch for synchronizer 1-2 gears 9. Axle of satellites and satellites 10. Synchronizers 1-4 gears 11. Shift forks 1-2 and 3-4 gears 12. Spring in the gear selection mechanism, which either allowed the reverse gear to be engaged or no 13. Bolts with washers for the rear cover of the 4th gear (for glasses) 14. Locking nuts of the shafts 15. Retaining rings for the 1st-2nd gear synchronizer and the bearing of the first gear gear 16. Gasket for the crankcase and the rear cover of the gearbox 17. Nuts for the speed-locking balls - 2 pcs. 18. Copper washers for these nuts - 4 pcs. 19. Sealant and thread sealant 20. Oil Lukoil TM-4 80W-90 GL-4 (recommended by VAZ)
replacing the input shaft bearing of a VAZ 2114
Many owners of VAZ cars have encountered an unpleasant noise that comes from the gearbox when the clutch pedal is released. Often this sound indicates critical wear of the input shaft bearing. In our article we want to talk about how to replace the VAZ 2109 input shaft bearing without disassembling the gearbox itself. Of course, the gearbox of a VAZ car will have to be removed from the car in any case, but even a novice car enthusiast can handle this process.
But you won’t have to disassemble the box to replace the input shaft bearing, and this is the main advantage of this method, since only an experienced repairman can sort through the box. So, after dismantling the gearbox from the car, it is necessary to remove the bell and retaining rings. Next, you need to take a powerful flat-head screwdriver and pick up the bearing by its annular groove. Using the intermediate shaft bearing as a kind of support, we try to move the input shaft forward. Then we take a medium hammer and carefully hit the end of the input shaft.
We turn the shaft a little and continue striking. Depending on the tension in the shaft-bearing engagement, blows will need to be applied for from two to twenty minutes. As a result of these actions, the worn bearing will come off the input shaft. After this, you can press the new bearing onto the shaft. This is done by lightly hitting the inner ring of the new bearing with a small hammer. That's the whole procedure. As you can see, there is no need to disassemble the gearbox to replace the bearing.
Disassembling the VAZ 2115 gearbox
Wash the gearbox, preventing water from entering the crankcase, and place it on a disassembly stand. Remove the power unit suspension bracket and the clutch release cable mounting bracket.
Remove the primary and secondary shafts at the same time (
| Rice. 3.13. Removing the gear selector mechanism |
Unscrew the gear selector mounting bolts (
| Rice. 3.14. Secondary shaft parts: 1 – nut; 2 – thrust plate; 3 – sliding clutch of the 5th gear synchronizer; 4 – sliding coupling hub; 5 – synchronizer blocking ring; 6 – 5th gear gear; 7 – distance ring of the needle bearing; 8 – needle bearing; 9 – 5th gear gear bushing; 10 – thrust washer; 11 – ball bearing; 12 – thrust washer; 13 – 4th gear gear bushing; 14 – 4th gear gear; 15 – sliding clutch for synchronizer of 3rd and 4th gears; 16 – sliding clutch hub; 17 – third gear gear; 18 – retaining ring; 19 – thrust half-rings of the secondary shaft; 20 – 2nd gear gear; 21 – sliding clutch for synchronizer of 1st and 2nd gears with reverse gear; 22 – retaining ring of the synchronizer hub; 23 – hub of the sliding clutch for the synchronizer of 1st and 2nd gears; 24 – synchronizer spring; 25 – cracker; 26 – retainer; 27 – 1st gear gear; 28 – roller bearing |
If it is necessary to disassemble the secondary shaft, clamp it in a vice with soft pads and use a universal puller to press the ball bearing from the shaft. The bearing is pressed off the input shaft in the same way. Then remove the driven gears of IV, III, II and I gears and synchronizers assemblies from the secondary shaft in the order indicated on
| Rice. 3.15. Differential assembly: 1 – satellite axis; 2 – retaining ring; 3 – semi-axial gears; 4 – speedometer drive drive gear; 5 – differential box; 6 – satellite; 7 – driven gear of the main drive |
– if it is necessary to replace the driven gear, unscrew the bolts securing it and compress gear 7 (
| Rice. 3.16. Details of the gear selection mechanism: 1 – gear selection rod; 2 – gear selection rod lever; 3 – housing of the gear selection mechanism; 4 – three-arm gear selection lever; 5 – blocking brackets; 6 – axis of the gear selection lever; 7 – guide axis of locking brackets; 8 – reverse fork; 9 – clamp; 10 – thrust washer; 11 – spring |
If necessary, disassemble the gear selection mechanism by unscrewing the nut securing axle 6 (Fig. 3.16) of the gear selection lever and remove the retaining rings from the reverse fork axle and from the axle 7 of the locking brackets, remove the reverse fork 8, gear selection lever 4 assembly with a locking bracket 5, a lever axis 6 and a spring 11 with a thrust washer 10.
If necessary, remove the speedometer drive by unscrewing the nut securing it and, supporting the driven gear shaft, remove the speedometer drive.
Location
Since we are talking about the VAZ 2114, the first thing we will do is determine the location of the element.
On the fourteenth, the primary bearing is located on the shaft behind the oil seal.
It is noteworthy that on some gearboxes this bearing additionally plays the role of an oil seal, taking on the load together with the release bearing.
To get to the damaged transmission component, you will have to remove the transmission. When choosing a new element, be sure to check the recommendations from the instruction manual for your VAZ 2114 regarding the overall dimensions of the component.
Design
Based on the image, you can easily understand the design elements of the input shaft and determine the location of the components that interest you during repairs.
Node diagram
According to the figure, we are dealing with the following structural elements.
Front bearing inner race
The front bearing of the input shaft is located at the end of the engine crankshaft.
PV bearings
Sources:
https://tazovod.ru/raznoe/vaz-2114-zamena-podshipnika-pervichnogo-vala-kpp-podshipnik-pervichnogo-vala-na-vaz-2114-zamena-svoimi-rukami-diagnostika-neispravnosti.html https:/ /luxvaz.ru/vaz-2114/273-zamena-podshipnika-pervichnogo-vala-2.html https://inkam-auto.ru/raznoe/zamena-podshipnika-pervichnogo-vala-na-vaz-2114.html
Signs of failure
All bearings, of which there are quite a few in a car, have approximately the same signs of failure. But since you know the location of the input shaft bearing, it will not be so difficult to determine that the problem arose with it.
There are several characteristic signs of its breakdown.
Peculiarities
Howling when the clutch is released in a parking lot
The element has failed and needs to be replaced. The howling is usually caused by the formation of chips, cracks, or the destruction of 1-2 rollers
Whistle when driving
The bearing is partially damaged or there is no lubrication. The problem in the absence of lubrication can only be determined by dismantling and visual inspection. To solve the problem, sometimes it is enough to simply lubricate the element and return it to its place
Clutch won't engage or disengage
Most likely the bearing is stuck. If the damage is serious, the input shaft may need to be replaced.
Knock in the area where the element is located
The bearing knocks only when the part is completely destroyed. If you do not replace it in time, the bearing will be welded to the shaft, so you will also have to replace the shaft itself
If you notice the first signs of a malfunction of the input shaft bearing on your gearbox, you should immediately check the condition of the element and, if necessary, replace it.
Causes of wear
Replacing the VAZ 2110 input shaft bearing
You can find out about wear and when it is necessary to replace the bearings of the primary shafts of gearboxes based on such signs.
- in neutral gear, with the engine running, extraneous noise may be heard;
- When the car is moving in any gear, you can hear a knock in the gearbox;
- transmissions may switch off spontaneously;
- the clutch may not disengage (this often occurs due to jamming of the bearing);
- If the bearing is misaligned, the clutch disc may be destroyed.
Note! If you do not pay attention to the above listed signs of malfunction of this part, in the future you will not be able to do without severe repairs of the clutch or gearbox. By changing the gearbox shaft bearings in a timely manner, it is possible to avoid unnecessary problems and additional foreign exchange costs for repairs.
Replacement
Many people turn to a service station to replace this bearing. It is noteworthy that car services often refuse to perform such work. It’s understandable, because the procedure is painstaking, and you can’t get a lot of money for it.
To do the job yourself, follow the instructions.
- You can often find advice about the need to completely disassemble the gearbox to replace the bearing. But this is optional. You can do without such complex manipulations.
- In any case, you will have to remove the box, so familiarize yourself with this procedure.
- Before removing the gearbox, remove the negative terminal from the car battery.
- All the chips are removed from the box, the wire from the speedometer is unscrewed.
- Next, the trousers of the vehicle exhaust system are dismantled.
- After this, you can completely remove the gearbox.
- At the next stage, the bell is dismantled. You can try to do without it, but then it will definitely constantly interfere with your work.
- Thoroughly clean the box from accumulated dirt.
- The bearing is secured using retaining rings. To remove them you will need a flathead screwdriver.
- The rings are pryed off and loosened a little, after which there will be no more problems with removal.
- To make it more convenient, arm yourself with tweezers that can be used to remove the ring.
- Using a flat-head screwdriver, pry the bearing by the ring groove, and at the same time move the input shaft slightly forward.
- Insert a pry bar between the gearbox and the bearing. It is unlikely that you will be able to do this without an assistant.
- You will operate the tools, while your friend will hold the pry bar.
- Your main task is to press out the bearing. To do this, precise, strong, but most accurate blows are applied to the input shaft.
- In the process of striking, the shaft must rotate.
- This work will take you about 20 minutes. But if you have a special puller at your disposal, you can speed up the work. Although it is really convenient to work with a puller only if you decide to disassemble the gearbox.
- Before installing a new input shaft bearing, be sure to lubricate the element with regular engine oil.
- Carefully press the component into place using gentle, light blows with a hammer. It is better to use a pipe of diameter or a stand.
- When pressing, apply blows to the inner race, in a circle, as evenly as possible.
- Once the bearing is pressed in, make sure it is seated properly. Scrolling should be calm, without obstacles.
- Reassemble the box in reverse order and install it on the car.
REMOVAL AND REPAIR
Almost any DIY repair of a VAZ 2114 gearbox - installing new bearings, clutch or gears - involves removing it. To do this, you will need screwdrivers, a set of wrenches, WD-40 and hanging equipment to lift the unit.
Read also: The radio does not see the USB modem
Let's figure out how to remove the gearbox of the fourteenth:
- We drive the car onto an overpass or into a garage with a pit. First of all, we disconnect and remove the battery, then drain the oil from the gearbox and remove the starter. To do this, you need to disconnect the power wires from it, remove the protective jacket, unscrew the two fixing nuts from the bottom (from the pit) and one from the top of the starter;
- Now you need to remove the connecting cable from the clutch release fork and remove it from the bracket on the gearbox;
- Disconnect the wiring to the speed sensor. The wire block is secured by a spring, which must be compressed to disconnect the connection;
- We climb under the fourteenth and disconnect the wiring from the reverse sensor;
- We tighten the bolts with which the jet thrust bracket is attached to the unit body;
- We remove jet thrust. To do this, you need to loosen the clamp connected to the rod and move it back, which will make it possible to remove it from the hinge;
- Now you need to dismantle the wheel drives: remove the left one completely, and simply unscrew the right one, move it to the side and hang it on the car body;
- We unscrew the bolts from the ball joint (left) that secure it to the steering knuckle;
- We dismantle the gearbox mount to the engine on the lower right side; to do this you need to remove the supporting brackets from the stud;
- Remove the clutch housing cover (it is secured with 3 bolts);
- Unscrew the bolt on the lower left gearbox mount;
- Unscrew the nuts that secure the left and rear engine mount;
- Now we remove the fixing bolts with which the gearbox is attached to the rear engine support. We dismantle the support itself;
- Using a screwdriver as a lever, insert it into the hole between the engine cylinder block and the clutch housing, and move the gearbox off the guides as far back as possible. The rear part of the box body should pass on top of the suspension extension, and the input shaft will be disconnected from the clutch, after which the unit can be removed from under the car.
Now you know how to remove the VAZ 2114 gearbox. Good luck with your driving without any breakdowns!
Review from a car owner named Abdullah: Engine, gearbox, visibility, high seating position, trunk, cost, battery
Category: Car repair
Vehicle characteristics: The vehicle dimensions are as follows: body length - 3729, width - 1100, height - 1209 mm. The wheelbase is 2550 mm. Ground clearance 174 mm. The car is equipped with a hybrid power unit. The 2-cylinder engine is equipped with a system that provides engine power output. There are 4 valves per cylinder. The diameter of one cylinder is 75 mm, the piston stroke is 77 mm. The engine crankshaft accelerates to 4000 rpm. Maximum torque is maintained up to 2000 rpm.
Posted by admin: at the request of Eremey
Original name: . . . . VAZ 2114. . ?? .
Release date: 02/30/2022
Laughter on topic: - Dad, tell me... wife this is for a long time... Father with a sigh: “For life, son!” So is she... even worse than school?
Hello everyone, The problem is the following. The bearings in the gearbox of the VAZ 2114 - car 2113 were noisy. I replaced two bearings on the 305th without removing the box, assembled everything in order. For a couple of days, literally 140-160 km per hour, I have to squeeze it out))) In general, the same problem again. You squeeze the clutch, silence, let go, it makes noise. Who can use any additives? Any advice? How many bearings are there in the VAZ 2114 gearbox?
- What is needed to replace the input shaft bearing of a VAZ car?
- When is it necessary to replace the input shaft?
- Causes of wear on the input shaft bearing
- How to replace a bearing
- Removing the gearbox
- Where is the bearing located and how to remove it
- Rules for installing a new input shaft bearing
Sooner or later, every car owner will have to face a problem when it is urgent to replace the gearbox input shaft bearing. And certain signs will indicate a bearing malfunction. It is about them, as well as about the causes of wear, and how to change a worn input shaft bearing that we will talk about today.
Read also: Windshield wiper trapezoid
When is it necessary to replace the input shaft?
Certain signs of malfunction indicate that it is time to replace the secondary shaft bearing :
- Extraneous noise or whistling when the engine is running in neutral gear, which changes with increasing speed.
- The knock of the gearbox while the car is moving, and this knock is heard in any gear.
- Transmissions may turn on or off spontaneously.
- If the bearing is jammed, the clutch will not engage or disengage.
Causes of wear on the input shaft bearing
Bearing wear can be influenced by various factors:
- Poor initial bearing quality. When purchasing it, you should be picky in order to provide your car with a normal part.
- Driving style. When you drive too aggressively and tear the lever, the bearing will definitely not last long.
- Vehicle operating conditions. Garage storage and the absence of continuous overloads of the car can prolong the normal operation of all its components.
- Ignoring regular maintenance.
How to replace a bearing
It is possible to replace the old input shaft support bearing with a new one yourself without serious skills or special tools or devices. Replacing the bearing is done without disassembling the gearbox, but you still have to remove it.
Removing the gearbox
Removing the gearbox is best done in an inspection pit or on a lifting structure, and for this you will need the following tools: a set of wrenches, a screwdriver, and a pry bar. The process of removing the gearbox is as follows:
- Disconnect, or better yet, remove the battery.
- Engage neutral, disengage the handbrake, raise and remove the rear axle.
- Unscrew the bolts securing the cardan and the gearbox flange, and disconnect the cardan.
- Unscrew the bolts and remove the exhaust manifold exhaust pipe.
- Disconnect the oxygen sensor.
- Remove the starter.
- Inside the car, remove the console and gear lever knob.
- Remove the gearbox protection.
- Unscrew the clamp that connects the catalyst and the exhaust pipe.
- Remove the clutch slave cylinder.
- Unscrew the speedometer cable, remove the boot, and the reverse speed sensor wire.
- Remove the driveshaft.
- Unscrew the traverse while holding the gearbox.
- Unscrew and pull out the gearbox.
Where is the bearing located and how to remove it
On VAZ cars, the bearing is located on the secondary shaft behind the oil seal. Remove the bell and retaining rings from the dismantled gearbox; there is no need to disassemble it further. To remove the bearing itself you need to:
1. Using a strong screwdriver (serious efforts will be required, therefore the screwdriver must be powerful so as not to break) hook the bearing by the ring groove.
2. Push the transmission input shaft forward, using the shaft bearing as support.
3. Slowly pull the bearing off the input shaft by tapping it with a hammer. The process of knocking out the bearing can take from five minutes to half an hour.
Rules for installing a new input shaft bearing
The new bearing is installed on the input shaft by pressing. It is pressed in using a light hammer. It is necessary to apply them carefully and evenly on the inner ring of the bearing, while pulling the input shaft forward. After replacing the input shaft bearing has been successfully completed, you need to reinstall the gearbox, and this is done in reverse order.
Subscribe to our feeds on social networks such as Facebook, Vkontakte, Instagram, Twitter and Telegram: all the most interesting automotive events collected in one place.
Many people replace the input shaft bearing themselves, without the help of specialists from a service station. To perform such work, you need to know the location of the element you are looking for and the signs of its malfunction. Plus we will tell you in detail how you can understand this bearing.
Element appearance
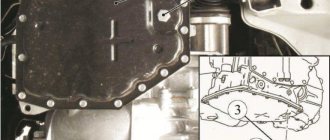
Dismantling
You will need help to complete the next steps. To press out the required part, you need to insert a pry bar between the bearing and the gearbox. One person should hold the pry bar and the other should strike the input shaft. The blows must be precise and strong, and in the process of applying them the shaft must be rotated. It may take more than a quarter of an hour to complete the job.
A special puller will allow you to avoid such a complex procedure. But in order to use this device, you will need to dismantle and completely disassemble the gearbox.