Hi all! I can’t say that car horn malfunctions occur very often and everywhere. But we cannot exclude a situation in which the signal does not work.
Car horns are safety features. Moreover, they must be present in all vehicles and be in good condition. This will allow you to give a timely signal to other road users, inform about the approach, and prevent collisions and other dangerous situations.
But at some point it happens that the sound signal located on the steering wheel suddenly stops working. It is necessary to address the issue of diagnostics as soon as possible, since it is dangerous to continue operating the car with a non-working horn.
It's time to stop
In fact, expressing your displeasure by beeping is completely inappropriate. The taxi driver will continue to behave in the same way on the road, regardless of your signal. In cities, it is illegal to use your horn in a residential area unless there is a traffic situation where you really need to do so, otherwise you will face a fine. In general, beeps are not intended to give your teenage son the opportunity to signal to his girlfriend that he has been waiting for her on a date. A short horn will help attract the attention of a pedestrian who steps out onto the roadway without looking around, or of some mother who is driving her children to the section, chatting on the phone and looking in the rearview mirror at her whining offspring.
Repairing a horn in a car service center
Having decided to go to a service station, the driver may be faced with a problem: which car service is best to take his car to, and how much the services of auto mechanics will cost. These questions are especially relevant if you are in an unfamiliar city. Now you don’t have to waste time searching for a quality car service center or handing your car over to the first specialists you come across.
The Uremont.com website will help you find a professional car service anywhere in Russia. To fully take advantage of the resources of the resource, you need to register on the site. By filling out the form, you can notify car services about the service you require. To do this, specify:
- Automobile model.
- Year of issue.
- Type of repair (for example, car signal amplifier - installation).
- Recommended cost of the service.
- Your location.
After this, you will receive responses from car services that are ready to repair your car. Among the proposed options, you can choose the service that suits you based on the quality of service and cost of work.
Symptoms of problems
How can you even determine that the horn is not working or has some kind of malfunction? It's actually extremely simple.
There are 2 main signs of problems with a car horn:
- The signal doesn't work at all. When you press the button, the driver, like other road users, hear absolutely nothing. This is a clear indication that the system has failed;
- The signal appears periodically. There is also a slightly different situation when the horn does not go off with every press. That is, they pressed it once, everything works, but when you try to honk again, the horn goes silent, there is no reaction to the press. Then the situation repeats itself.
There is nothing complicated or unusual in determining the nature of the malfunctions. But now we need to understand why this happens and where to look for the reasons.
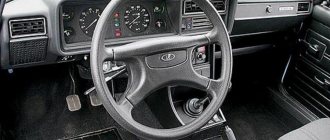
How it works
Before looking for reasons and finding ways out of the current situation, it would be useful to understand the principle of operation and structure of the signal.
Structurally, the horn includes a fairly extensive list of elements, among which are:
- anchor;
- kernel;
- core;
- tungsten contacts;
- frame;
- capacitor;
- relay;
- activation button;
- resonant disk;
- membrane;
- contact relays, etc.
When the driver presses a special button, current flows through the winding, thereby magnetizing the core and tightening the armature. Together with the anchor, the rod moves, bending the membrane.
Due to a special nut, the contact group opens and the electrical circuit breaks. Next, a number of horn elements return to their original position. At the same time, it closes the contacts again, and current flows to the winding. Opening occurs the moment the driver presses the button.
For the driver himself, everything is much simpler. He just presses a button and the machine emits a loud, characteristic signal.
Similar systems, having different signals, but identical operating principles, are used:
- on Niva;
- on Gazelle;
- VAZ 2110 cars;
- VAZ 2107;
- VAZ 2114;
- Renault Logan;
- Renault Sandero;
- Lada Priora;
- Daewoo Lanos;
- Lada Kalina;
- Chevrolet Lacetti;
- Skoda Fabia, etc.
If the sound signal suddenly stops working, or shows obvious signs of malfunction, action should be taken immediately.
The motorist should know what the signs of problems are and the main reasons for the horn’s failure to emit warning sounds.
No sound
Neither signal makes any sound other than a squeak? Then the problem lies somewhere in the wiring. Now is the time to check the fuse, which is most likely hidden deep down in the dash, driver's side dash, or under the hood - or just about anywhere in the front half of the car if it's not in one of the obvious places. Find the location of the fuse box and special fuse in the owner's manual.
Inspect the instrument panel cover or check your owner's manual to determine which fuse protects the signal circuits. If the S-shaped strip is broken (fuse on the right), replace the fuse.
If the metal strip inside the fuse appears to be broken, replace it with another of the same amperage rating. It is very rare, but fuses fail for no apparent reason. If the fuse is bad, chances are you have a problem that will cause it to blow again, sooner or later.
DIY repair and installation
What to do if the key fob does not work?
In this case, you need to start by changing the battery. In most cases, this is the reason for the key fob not working.
The next reason may be a loaded radio range, radio interference. This is not a malfunction. In such conditions, the key fob can only work if you bring it close to the alarm radio receiver.
Ignoring key presses often occurs due to a broken button (or buttons). To repair, you will need to disassemble the remote control. The button modules are located on the board and soldered to it. In a simple case, if the button is jammed, you can try soaking it in an alcohol solution.
This will help if sand or other substances get into the movable unit of the button. Any other repair of the button is impractical and it is much easier to buy a new button (not even necessarily from your key fob, but any suitable in size and pinout) and replace it.
But if the malfunction is more serious, then it is almost always easier to purchase a new suitable key fob entirely and register its ID in the memory of your alarm.
Fuse problem
In the procedure for replacing it, the most difficult thing is usually to find its location. Installers usually hide the fuse, since by pulling it out you can quickly and completely disable most alarms without consequences for the car (which car thieves will happily take advantage of)
The only nuance of replacement is the selection of a fuse of the same form factor and rating as the blown one.
Attention! Install only fuses of the recommended rating. A fuse with a larger amperage may not operate if the critical current is exceeded or if there is a short circuit.
But fuses rarely blow out for no reason. This is often due to damaged wires and short circuits. If the newly installed fuse blows again, look for the short one.
Sound siren repair
If the alarm speaker does not work, then in most cases the problem is in the wiring. The horn itself rarely loses its functionality. To check whether the signal is coming to the siren, use a multimeter. Or disconnect the wires and connect them to a car light bulb (the incoming signal will light it up). If the signal is received, replace the siren. If there is no power on the wires, look for an open circuit.
An error in the program or a breakdown of the unit can also be the cause of a working siren. However, you cannot fix this problem yourself.
System power problem
Since only the battery in the car is most often responsible for powering the alarm system (some advanced security systems have a built-in backup energy source), the system can be repaired by replacing or charging the battery.
If the battery charge is insufficient, the alarm goes to sleep. This can be understood by an obvious sign - the light on the windshield does not blink .
Software problem
Having found out that the problem lies in the incorrect operation of the alarm system at the software level, the average user can try to fix it in only one way - resetting the settings. A detailed reset algorithm is described in the instructions for your system. But most often, to roll back the settings, you need to remove the terminals from the battery for 2-5 minutes. During this time, the system itself will perform the reset procedure.
How to check the wires and what to do if the LED light does not light up?
If during the diagnosis you realize that the malfunction is caused by problems with the wiring harnesses, it is relatively not difficult to fix the breakdown. For example, you realized that the unit does not see the signal from the driver's door switch. From the instructions for the alarm, find out which wire from the common chip is responsible for receiving the signal from the driver's door opening sensor. Remove the sensor itself from the door and gain access to the wires. Using a tester, check the integrity of the wire from the block to the sensor.
Gradually “walk” along the damaged wire to the location of the suspected break. The wiring to the limit switch is most often damaged in the corrugation between the body and the door. After the break is found, restore the wire and carefully insulate the repair area.
The alarm indicator LED often does not work. You can restore its power supply circuit in the same way.
Horn problems
| Sound signals do not work | Debugg |
| a) The fuse has blown. | Replace the fuse, first eliminate the cause of the fuse blown. |
| b) Open circuit in the audio signal circuit: the tips of the wires in the detachable connections are oxidized or disconnected, the wires are damaged. | Check sequentially for the presence of a circuit in the detachable connections according to the diagram for switching on the sound signals |
| c) Oxidation, contamination of the contact ring on the steering wheel. | When the contact plate of the central switch is shorted to ground, the sound signals operate. Clean the slip ring and adjust. |
| d) The steering wheel fittings, the signal button lining are skewed, or the gap for turning on the sound signals is not adjusted. | When the contact plate of the central switch is shorted to ground, the sound signals operate. Clean the slip ring and adjust. Replace damaged parts, bend the steering wheel pad, adjust. |
| e) The horn switch plate of the central switch is bent or broken. | When the contact plate of the central switch is shorted to ground, the sound signals operate. Clean the slip ring and adjust. Bend the plate or replace the central switch. |
| e) The relay for turning on the sound signals does not work. | Check the relay for functionality, if damaged, replace it with a similar one. |
| g) The jumper is installed incorrectly at the installation location of the audio signal relay on the mounting block. | Check and install the jumper correctly: on the block. |
| i) Open circuit of the mounting block: burnt out tracks, false soldering. | Check the circuit according to the mounting block diagram. Replace the mounting block. |
| j) The sound signal does not work: misadjustment, open circuit of the coil winding, contact “pill” falling off, moisture ingress. | Adjust or replace the sound signal. When adjusting the signal with a screw, the contacts may permanently close and the fuse may blow. |
| Poor quality sound signals | Debugg |
| a) Malfunction of sound signals: misadjustment, membrane crack. | Adjust signals or replace. |
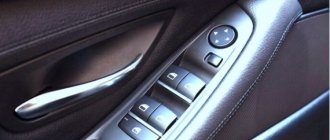
Switch repair
If there is still no sound, it's time to check the switch and its relay. It is worth remembering that the sound switch is usually located in the steering wheel, so it is inextricably linked to the airbag. Do not rush to disassemble the steering wheel, as one wrong movement may trigger the airbag. If you have reached this stage of repair, it is better to entrust the work to professional craftsmen.
But with the proper level of accuracy and knowledge of the steering wheel, you can check it yourself. Check if power is getting to the switch. If not, it will not signal. After this, using the instructions, find the switch relay and check the resistance values on it. To do this, connect one contact to the relay and the other to the battery (minus).
Already at this stage, in most cases, it is possible to determine the cause of the sound signal malfunction and eliminate it. If your efforts are in vain, you need to dig deeper - check the entire electrical circuit related to sound. If you don't have knowledge about electrical wiring, you don't have the necessary tools, or you simply don't have the time to spend hours in the garage delving into how a horn works, you should contact a car service center.
Methods for troubleshooting
If a fuse or relay has failed, they must be replaced with new parts. If the slip ring is worn out, then it is unlikely that you can repair the steering wheel, since the slip ring is difficult to find on sale. In this case, the most reasonable thing is to replace the steering wheel.
If the horn makes hoarse sounds or turns on intermittently, you should use a multimeter to check whether the battery is charging and the voltage is flowing to the terminals. If everything is fine with the power supply, the reason may be in the sound device itself. There is a screw on the horn body to adjust the volume. It should be rotated until the wheezing disappears and the sound becomes loud.
If adjusting the volume does not help eliminate the wheezing, you will have to disassemble the device to clean the contacts. You can also replace the membrane. Sometimes hoarse sounds appear when starting the engine. In this case, it is necessary to check the condition of the breaker contacts and the top plate. The contacts should be thoroughly cleaned and the plate replaced if necessary.
Common causes of malfunctions
All that remains is to talk about why such situations arise and what the motorist himself needs to do in order to restore the functionality of the horn.
Since a car signal consists of a fairly large number of components, the reasons must be looked for in them. To do this, it is good to understand the device, design and principle of operation of the warning system.
- Blown fuse. A trivial but common problem. The fuse is located in a special block. Look for information in the instruction manual. Sometimes simply replacing the fuse is enough;
- Burnt out relay. Since the horn is powered through a fuse and a relay, the latter is also necessarily checked in the mounting block, and changed if the problem is with it;
- Broken horn. If everything is fine with the relay and fuse, the problem may be in the device itself. To check, you can take the element and directly supply power through the battery. When the horn is working, the signal appears;
- Short circuit. The place to start your search is with the safety socket. And then move along the chain;
- The contact ring on the steering wheel is worn out. It will need to be replaced if necessary;
- The clamping contacts on the column are worn out. A characteristic feature of domestic cars;
- The contacts have oxidized. Check the contact group for rust or signs of oxidation;
- The winding on the horn has burned out. The problem is solved by replacement;
- Violation of electrical contact;
- The cable on the steering wheel where there is an airbag is broken.
In the vast majority of cases, and if desired, most of the possible problems can be solved on your own.
But for this you need to know how to use a tester or multimeter. These are truly integral tools that help determine the source of problems, check the condition of the electrical circuit, the power supply to the horn and other points.
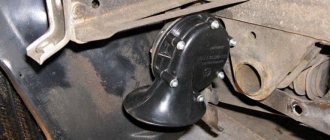
Horn relay
Sometimes, after replacing the fuses, the driver discovers that the horn still does not work. In this case, you need to check the horn relay. It is located in the block under the hood. To find its location, you will also need instructions.
Since the same type of relay can be used on several units, to check the functionality of the part we need, we simply need to swap similar spare parts. If the horn goes off, problem solved!
Alarm performance tests
After completing the repair work, it is necessary to check the functionality of all car alarm systems. Don’t rush to completely assemble the interior right away. Start by issuing commands to the door locks from the key fob. Open and lock the car, check other functions of the key fob (autostart, trunk opening).
If all functions work as they should, then test the machine while driving. Check the operation of the lights and sound signal. During the road test, drive the vehicle actively to check the reliability of all repaired parts.
Try turning on the alarm and hitting the car. Hit the wheels, hood, windshield. Start with weak blows and gradually increase force (within reason). If the sensitivity level of the sensors is unsatisfactory, adjust it.
Important! During checks, watch for the appearance of foreign odors (burning) in the cabin and near the car. If you detect a smell or smoke, immediately turn off the power to the on-board network and look for a fire in the electrical wiring.
After you are sure that everything is working stably, put all the removed interior elements back in place.
Repair of sound signals on VAZ cars of various modifications
Sound signals, as such, are not among the most complex elements of a car, however, traffic safety and the ability to avoid emergency situations largely depend on their good condition. Be that as it may, even with all its simplicity of design, the sound signal (including on various modifications of the VAZ) may stop working and if such an unpleasant situation arises, you can most often cope with the problem on your own, it is enough to have the appropriate diagram at hand and follow a few simple recommendations.
In general, the connection diagrams for the sound signal on the VAZ “classic” series and on subsequent front-wheel drive models are quite similar and the main differences relate to the relay markings, as well as the location of the fuse. Among other things, on the earliest versions of the VAZ (2101, 2102, 2103 and a number of modifications 2106), the electrical circuit of the sound signal or the presence of a unloading relay is not provided at all.
Follow-up system check
Upon completion of the repair, you need to check the operation of the security system. To do this, activate the alarm and try to open the door or lightly hit the roof. After this, start the engine by opening the car doors with the key. After starting, the alarm should also go off. Other functions of the security system should also be checked. If everything works and the car alarm goes off, then this means that the repair work was successful.
Checking the car alarm for serviceability
Important! Driving a car with a disabled alarm is extremely risky, as it can be stolen or hacked. Therefore, at the first sign of a system malfunction, it is necessary to carry out diagnostics.
Fuse OK
Now you need a 12-volt diagnostic light or voltmeter. You should also find the owner's manual, or at least a graphical representation of the signal's electrical circuit.
Start by checking the 12 volt signal connector.
Using a simple voltmeter, examine the horn connector to see if there is 12 volts when the horn button is pressed and the ignition is on.
One leg of the circuit is supported by a car metal frame, so you need to check between a good ground point and the wiring connector to the signal. If there is no voltage at the connector, check the signal relay.
Check the 12-volt voltage at the signal relay when the ignition is on. 1 – diagnostic lamp. 2 – signal relay connector.
The horn relay switches high voltage current to horns when signaled by a low voltage current button in the steering wheel. This is a simple, single throw, single throw (SPST) relay packaged in a small metal or plastic box with five spade terminal connectors. If you're unlucky, your engine has a relay that's built into a larger fuse box that also controls several other functions on your vehicle, such as the headlights or turn signals. This part is much more expensive. Consult your owner's manual for where the relay is located, as it, like the fuse box, can be located almost anywhere under the hood or under the dash - and not necessarily near the fuse box.
The horn relay increases the low voltage coming from the horn button to the higher voltage needed to operate the horn. 1 – battery. 2 – sound signal. 3 – closed contacts. 4 – signal button. 5 – relay coil. 6 – relay.
A simple SPST relay would have a constant 12 volt supply to it, a lead wire that goes through the wiring harness to the horn, another lead wire that goes to the horn switch in the steering wheel, and a ground. Check that voltage is entering the two terminals of the relay and leaving it through the other two terminals when you press the switch. If not, try grounding the lead wire that goes to the horn button to force the relay to pull in. If the horn buzzes, the relay is good, but the horn button or wiring is faulty. You can simply replace the relay if it is the problem. Otherwise, you will have to do some serious diagnostic work to find the open circuit.
Car alarm device
Modern car alarm is a complex system and consists of the following components:
- immobilizer;
- locks and blockers;
- special sensors;
- sound notification device;
- Remote Control.
Car alarm device
Pay attention! The main element of the anti-theft system is the immobilizer. This is a kind of “brain” of a car alarm.
The immobilizer consists of an anti-theft relay and a control unit. These elements are installed in a break in the electrical network. The design of modern systems does not provide for additional wiring to connect the elements with each other, so anti-theft systems are practically invisible. The alarm is triggered by a coded signal emanating from the control panel. Some manufacturers produce systems in which the car owner is recognized using a fingerprint.
Car alarm circuit
How to fix a broken horn
1. Purchase the necessary tools. To fix the signal on your car you will need the following: - a digital multimeter or a regular multimeter, protective gloves, a quick-release connection, a repair manual for your car, safety glasses, crimping pliers and wire strippers (can be replaced with a regular knife), and of course spare ones wires.
2. Locate the fuse box. First of all, you need to check whether the fuse or the relay itself has failed. The location of the fuses and their diagram can be found in the user manual. Typically, one fuse box is located in the dashboard on the driver's side and another one is located under the hood of the car.
Tip: -if you don’t have a car manual at hand, you can enter the model and year of your car in an online search, and then find circuit diagrams and manuals for fixing the signal on the Internet. There is a high probability that you will find what you are looking for there.
3. Finding the right fuse. Examine the diagram on the back of the fuse box and find the fuse number that matches the horn circuit.
Tip: -this information is duplicated in the manual for your car, in it you can look and find a diagram for each of the fuse blocks.
4. Remove the fuse. Once you have identified the fuse in the circuit you are interested in, pull it out with the special plastic pliers you will find in the fuse box. If they are not in their rightful place, then call on your ingenuity to help you. But be very careful not to break the connectors.
5. Check the fuse. In order to identify a breakdown, whether the problem is really in the fuse, you will need to check that it is working; perhaps it has simply blown. This can be done in two ways, for example, if a break is visible inside the U-shaped wire, then the fuse itself needs to be replaced, it naturally burned out. If the wiring inside it is intact, this is not a guarantee that everything is in order with the fuse. Thus, we move on to the second stage of verification.
6. Check the fuse using a multimeter. Test the fuse with a multimeter.
When using a digital multimeter, you must use the device’s adjustment knob to select the position for measuring the minimum resistance value with a sound signal (if your multimeter has such a setting).
When measuring with an analog (arrow) tester, it is necessary to select the starting position for measuring the minimum resistance value in Ohms. Then you need to calibrate the device by connecting the probes to each other and then, using the adjustment knob, move the arrow to the zero position, that is, set it to zero.
We press the probes to the fuse contacts. For a working fuse, the tester should show zero ohms. Conversely, if the needle or DMM readings do not change, the resistance is excessively high, then the fuse has blown.
7. Install a new fuse. If the fuse fails, then install a new one of the same current rating (10, 20, 25, 30 Amperes, etc.). To do this, simply insert the new fuse back into the appropriate slot.
Note: -Keep in mind that fuses do not blow out for no reason, they fail at the moment and in order to protect the circuit itself from excessive current. Watch the newly installed fuse for a moment. If it burns out again, you will need to check the circuit for faults.
8. Locate the relay box. If the fuse is good, the next part of the test we move on to is the horn relay. The location of this relay can also be found in the owner's manual. Typically, the relays are installed in the fuse box under the hood.
9. Check the relay. The simplest and at the same time effective way to check the correct operation of the relay is to take and swap the horn relay with another identical relay in the car. As a rule, “relays” of the same design can be used on a couple of other circuits, which, if necessary, allows you to replace them in the machine. If, after replacing the relay, the horn (sound signal) starts working, we can state the fact that the problem was in the relay and it should simply be replaced.
The fault may also lie in the horn switch.
10. Remove the relay and set up the tester. Use your vehicle's repair manual to determine which relay terminal is controlled by the relay switch. Most relay switches are located inside the steering wheel. This will require opening the steering wheel by accessing the two screws on the left and right side of the steering wheel.
Attention: -The horn switch is usually part of the steering wheel. In modern vehicles this means that it is part of the airbag system. Improper maintenance of the airbag system may result in accidental deployment of the airbag and/or damage to the airbag system itself. Thus, friends, remember, if you suspect that the malfunction lies precisely in the horn switch, then it is advisable to leave further repairs to qualified personnel in a car repair shop.
11. Check the horn switch. If the horn switch itself does not receive power, the horn button will no longer respond to pressing.
12. Check the relay switch. Remove the relay and set the position to measure the resistance value in Ohms. Apply one tester probe to the relay switch socket, and the other to the negative terminal of the battery. Have an assistant press the horn button to check the tester readings.
Tip: -You should see the numerical values on the screen. A continuous “Out of Limits (OL)” display on the tester means the breaker is not tripping and needs to be replaced.
13. Test the sound signal itself. Standard locations for sound signal devices are usually located behind the false radiator grille, in front of the main radiator.
14. Identify plus and minus. Using your vehicle's repair manual, determine which wire is the positive wire and which is the negative wire that goes to the horn.
15. Checking the sound signal directly from the battery. Disconnect the horn connector and place the wire directly between the positive terminal of the battery and the positive terminal of the horn. Do the same operation with the negative terminal from the battery and the negative signal terminal. When touched by the negative wire, a working signal should begin to emit sound. Otherwise, this horn is simply faulty and needs to be replaced. ATTENTION! BEWARE OF SHORTING THE TWO WIRES COMING FROM THE BATTERY TO EACH OTHER!
16. Check the circuit. If the horn still doesn't work after you've tried all the methods we've described above, and you've also replaced all the faulty components, then the last place to look is the horn circuit itself.
17. Check wiring. If you have checked everything, but the beep is still silent, then the problems lie in the electrical circuit itself. Check the circuit grounding, current and voltage parameters in the power supply, as shown below.
18. Check the circuit grounding. In accordance with the instructions for your car, determine the grounding of the circuit itself. To test the ground, you need to install a measurement meter in Ohms. Then, touch the negative pin with one tester probe to the horn (-) connector, and touch the ground with the other. If the wiring is working properly, the display should show numeric values.
19. Checking the power supply wire of the circuit. According to your car's manual, identify the power wire. Your device should show battery voltage when tested.
Everything we described in this article is designed for people who are curious and not afraid of difficulties. But in any case, and in principle, you and any motorist-driver will not have any difficulties here, especially if you have basic knowledge of electronics for your car and have already applied this knowledge in practice. For all other motorists-drivers, the most reasonable thing would be to visit a service station (service station), where they will diagnose the car and, if necessary, repair the car’s sound signal. Professional repairmen can save you not only time and money, but will also allow you to avoid such mistakes in the future.
Diagnosis and troubleshooting
Before starting repairs, you need to find the cause. The problem with searching is that different faults can have the same symptoms. In order not to make mistakes and not do unnecessary work, diagnostics must be carried out consistently.
If any malfunction occurs, start looking for the problem from the key fob. If in the near future it came into contact with water or fell from a height, the problem may be in the internal microcircuits and radio elements.
Check the battery. Most often, it is she who causes trouble. Try replacing it with a new one.
If there are no problems with the remote control, then the malfunction may arise from strong radio interference. Try to bring the pager as close as possible to the place where the alarm antenna or its main unit is installed. If this does not help, look for a breakdown in the system itself.
Make sure there is sufficient battery voltage under the hood. If the charge is insufficient, the car alarm goes into sleep mode and does not respond to signals from the key fob. The electrical wiring terminals must be tightly tightened on the battery contacts and there must be no oxides or rust on them. Check the integrity of the fuse in the power supply harness of the unit.
Next, inspect the wires themselves for breaks. To do this, use a tester and “ring” each wire in the harness one by one. Where possible, inspect the wires for mechanical damage and oxides.
Lastly, you need to check the software and control unit of the system. It is not possible to do this on your own without special equipment. You will have to contact the service for help.
We check the health of a car battery in different ways
If the engine is the heart of the car, then the battery is the very force that brings the car to life. It is in charge of starting the engine and powering the on-board network if it is turned off.
Methods for checking the battery
What batteries are there on the market? Lead-acid, lithium and alkaline. A rechargeable acid battery, or battery, is most often used in automobiles and motorcycles. Time-tested devices hold a charge for a long time and tolerate constant loads well. The disadvantage of lead-acid batteries is their vulnerability to cold. Negative temperatures combined with a low battery charge affect the density of the electrolyte inside the battery. To prevent the battery from freezing and discharging, you need to know how to check the car battery for performance.
Principle of operation
The operating principle of car signals is based on the cyclic closing and opening of contacts. This causes the membrane to vibrate. The volume, tone and strength of the current consumed are determined by the gap between the armature (moving contact) and the core (fixed contact). Depending on the current consumed, the signals can be switched directly by the switch or via a relay. Sound signals in a car can be hornless (noise) or horn (tone). The set of sound signals includes noise and tones, configured to work together. The main purpose of the sound signal is to attract the attention of other road users, especially when there is not enough visibility.
Sound signal of vibration type, hornless. The switch with a ring button is installed on the steering wheel. On the VAZ-2101 car, two signals are installed - low and high tones. The signal consists of a body, an electromagnet 3, an armature 4, contacts 6, a membrane 7 and a resonator disk 5. When you press the button, the electrical circuit is closed, and current from the battery flows through the closed contacts 6 into the winding of the electromagnet 3. At the same time, the electromagnet attracts the armature 4 , which bends the membrane 7 and simultaneously opens the contacts 6. The electrical circuit is interrupted, the electromagnet is demagnetized, and the armature moves back under the action of the elasticity of the membrane, as a result of which the contacts close, a closed electrical circuit is formed again, the armature is attracted again, and the process repeats. This creates frequent vibrations of the membrane (up to 100 vibrations per second) and sound appears. The sound tone of each signal is adjusted by screw 1 located on the rear wall. When the screw rotates clockwise, the sound intensity increases, and when rotated counterclockwise, it decreases.