In our short article we will look at how to replace brake discs on a Chevrolet Niva. The brake system is the most important part of any car, because it allows you to stop traffic as quickly and safely as possible. Naturally, this affects road safety - the system allows you to avoid emergency situations. It is prohibited to operate vehicles with a malfunction of the braking system; this entails not only administrative punishment. After all, if this mechanism breaks down, you can get into an accident.
Replacing a Niva Chevrolet brake disc
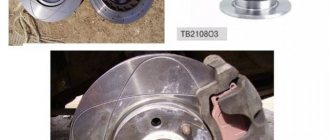
If there are scuffs, deep scratches and other defects on the working surface of the disc that increase pad wear and reduce braking efficiency, as well as in the case of increased lateral runout of the disc, causing vibrations during braking, replace the disc.
In specialized workshops, such a disk can be machined and ground on both sides to the same depth, but after processing, the thickness of the disk must be no less than the minimum permissible.
The minimum permissible brake disc thickness is 9.5 mm.
If the disk thickness is less, it must be replaced.
The axial runout of the brake disc surface should not exceed 0.15 mm.
You will need: keys “10”, “14”, “17”, “27” (preferably a head with a strong knob), pliers, drift, screwdriver, hammer.
Remove the caliper (see “Removing and installing the front brake caliper”) without disconnecting the brake hose from it.
Hang the caliper on a rope or wire, making sure that the brake hose is not kinked or under too much tension.
Mark them so that they can be put back in the same place when reassembling.
Remove the casing bolt.
Use a screwdriver to bend the locking plate of the upper and lower bolts securing the pad guide to the steering knuckle.
Unscrew the lower (shown in the photo) and upper bolts securing the pad guide
Removing the pad guide
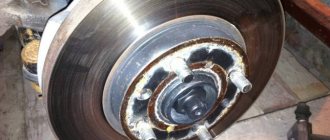
Unscrew the hub nut
remove the hub assembly with the brake disc
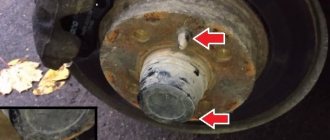
Screw the nuts onto the studs to avoid damaging the threads of the studs, and knock out the studs (one is shown in the photo).
Tapping the edge of the hub with a hammer.
. Disconnect the hub and brake disc.
Install the new brake disc and the removed parts in the reverse order of removal.
At the same time, do not forget to lock the bolts securing the guide pads by bending the antennae of the locking plates.
To repress previously pressed out studs, you can use the wheel nuts.
Screw them onto the ends of the studs through spacers (larger nuts can be used as spacers) and tighten evenly in a cross pattern until the studs are completely pressed into the disk and hub.
Before installing the disc, thoroughly clean the mating surfaces of the hub and disc from rust and scale, since the slightest particle of them, sandwiched between the mating surfaces, will cause the disc to run out and vibrate during braking.
If you are installing an old disk, use a file to remove the beads on the working surfaces of the disk that have formed as a result of wear on both sides of the disk.
Repair algorithm
And now you can start replacing the discs and brake pads on the Niva. The manipulations are not very complicated, follow these instructions:
- First, park the car on a level surface, squeeze the handbrake lever and hang out the entire front part. Be sure to place reliable supports under the car so that it does not fall. Place chocks under the rear wheels.
- Unscrew the nuts securing the wheel being repaired. Remove the wheel from the car.
- Remove the brake pads. If you plan to put them back, then mark which were on the outside and which were on the inside.
- Now you need to remove the caliper. There is no need to disconnect the hoses during removal. It is enough to unscrew the two bolts that secure the caliper to the steering knuckle, lift it and secure it with a wire to the car body. Try not to hang the caliper on the hose, as this may damage it.
- Now you can start removing the disk. To do this, just unscrew the casing bolt.
Replacing the front brake disc of a Chevrolet Niva
The braking system of a car is an extremely important element that ensures that the car stops, allowing it to be fully controlled and prevent emergency situations from occurring. According to traffic regulations, a car with faulty brakes cannot be operated on public roads. One of the important components of a car's braking system is the front brake disc. During operation, this element is subjected to heavy loads, as a result of which replacement is periodically required.
Brake disc design
The operation of the braking system is based on the principle of friction. To reduce speed or stop the car, friction forces act on the brake disc, which slows down the wheels. Due to the fact that the disk is exposed to numerous loads, especially durable components are used to prevent rapid failure:
Brake discs come in different shapes, the rear ones are made in the form of drums, which is why they got the corresponding name. The front ones have a slightly different structure.
Made in the form of a flat disk, which is affected by the working elements of the brake system. During braking, pads made of a special material that can withstand wear and high heat that occurs during friction are pressed against the disc.
Troubleshooting
The brake rotor is usually made of stronger materials, so its wear rate is usually less than that of the pads. But, like any part, it may need replacement. The pads wear out especially badly when exposed to dust or water if the car is operated in off-road conditions.
First of all, the malfunction can be determined by deterioration in braking performance. But it is important to remember that this problem usually occurs with severe wear and tear and can cause an accident at an unexpected moment. Therefore, there are several more signs by which, without a visit to a service station, you can determine the moment when it is necessary to replace the brake disc on a Chevrolet Niva:
- The appearance of extraneous sounds when braking: noise, grinding. The car may pull to the side.
- A visual inspection may reveal the appearance of cracks, chips and other defects.
To understand how bad the level of wear is, you may need a caliper. To do this, you need to compare the length of the new pads and those used in the car. If the difference is more than 3 millimeters, then the pads definitely need to be replaced.
If the changes in thickness are insignificant, but there are traces of wear from sand and dirt, then you can grind the wheel using a specialized tool. The thickness of the part after processing must be at least 9.5 mm.
Replacing Niva front brake discs
Hello everyone, today I’ll tell you how to replace the front brake discs of a Chevrolet Niva with factory ones or ventilated ones from a third-party manufacturer.
For any car, the braking system is an important element, since thanks to it it is possible to avoid emergency situations on the road. If this system is faulty in a car, it is prohibited from being allowed on the road. This article will focus on such an important part of the braking system as the front suspension brake discs. Chevrolet Niva sometimes needs to remove a damaged part and replace it, and therefore you need to know how this is done. So let's get started.
How to choose front pads?
There are many manufacturers that produce linings for Niva 21213 and 21214. Among them are the following:
- Original. Catalog number – 21213501090. Price is 556 rubles.
- PILENGA. The price is 401 rubles.
- BOSCH. Price: 839 rubles.
- LUGAS. Price: 853 rubles.
BREMBO is considered to be the best manufacturer of brake pads for Niva 4x4 and Niva Chevrolet. But their price is quite high - 1123 rubles.
The choice of pads should be based on operating conditions. If the car is often used on highways or in the city, then good pads, like Lucas and Brembo, are needed, but for off-road use the original will be enough. The manufacturer of the brake discs is much more important for Niva, since the discs more often suffer from factory defects and often arrive at the store already crooked.
Design features and purpose of Chevrolet Niva brake discs
Every car owner knows that the braking process involves friction. It helps reduce the speed of the car and stops its movement. The primary role in the braking process involving friction is played by the brake disc, which stops the movement of the wheels. This part can be cast iron, carbon fiber or ceramic. Chevrolet Niva is equipped with cast iron discs.
The car we are considering has brake discs on each wheel, which is why they are divided into front and rear. Their purpose is the same, but their design features are different. The rear discs are called drums with a shape corresponding to the name.
The Niva's front discs resemble a flat support, which is affected by working system elements. During the braking process, these elements heat up and eventually wear out.
The stronger the heating , the more worn out the disc is, so sooner or later the brake disc on the Niva will need to be replaced, which you can do yourself after reading this manual.
How to change brake discs in a Chevrolet Niva with your own hands: step-by-step replacement instructions
Is your brake making an unbearable squeak? Is your steering wheel vibrating so loudly that it feels like it's going to fail? This indicates problems with the brakes and the need to replace the brake discs. There's no need to worry, as there's no need to spend a fortune at the workshop or spend days without a car. The article will tell you how to independently replace brake discs on a Niva Chevrolet car.
Design features and purpose of Chevrolet Niva disks
Brake discs and brake pads are subject to natural wear and tear . This means they are designed to withstand wear and tear and must be replaced. This is a very easy task requiring only a few tools and gloves.
Reference. A disc is a technical device used to slow down a wheel and stop a car. The mechanism creates friction, which slows down the rotation of the wheel. This friction causes significant heat, which directly affects braking performance. A poorly maintained mechanism increases braking distance and can cause the vehicle's own brakes to stall.
Depending on the size, weight and power of the vehicle, the drive needs a more or less efficient cooling system . Thus, there are two types of mechanisms: solid and ventilated. The ventilated mechanism ensures better heat dissipation. In this regard, it is necessary to comply with the type of disk installed in the original version of the Chevy Niva car.
The Niva has discs made of cast iron and is on each wheel (front and rear). Their goal is the same, but their features are different. The rear mechanisms are called drums because of their shape.
Features of disc wear
During braking, the loss of material leads to a reduction in the size of the mechanism . This happens due to friction. Discs whose thickness is less than acceptable must be replaced. Wear on the mechanisms also depends on your driving style and the type of road (wear on winding roads will be higher than on highways). Therefore, it is imperative to check the condition of the discs, since wear impairs the quality of the vehicle’s braking.
Wear depends on the operating conditions of the car or, in other words, on the kilometers traveled. Although worn brake pads require periodic replacement, brake rotors also wear out, although their lifespan is much longer. Every time you replace brake pads, you need to check the discs. If brake pads are checked and replaced promptly, they will be more effective.
Malfunctions and their definition:
- Scratches on the brake mechanism. Scratches are caused by friction from an uncoated brake pad. When there is no coating left, it creates noise when braking.
- Deformed mechanism. Overheating leads to deformation (curvature), which causes the steering wheel to vibrate when braking.
- Cracks. The risk of cracking occurs when there is excessive wear.
- Broken brake discs. The risk of failure occurs when the mechanism is weakened by rust.
In each of the above cases, it is recommended to check the brakes . Depending on the type of vehicle and operating conditions, wear and tear for the same vehicle may be higher. In urban environments, brakes wear out faster than on roads and highways.
When replacing discs, the brake pads must be changed at the same time . However, only brake pads that are not too worn can be replaced.
Replacing Niva front discs
Changing disks during repairs is as easy as shelling pears.
Required Tools:
- Jack. Raise the car and be able to remove the wheels.
- Gloves. Protect your hands from any harmful substances.
- Key. To remove a wheel from a vehicle and loosen the brake caliper.
- Screwdriver. For removing the brake lining and accessing the brake disc.
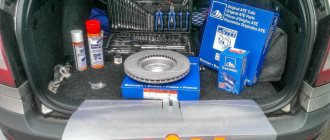
- Brake cleaner. To protect the new brake disc and remove dirt.
When purchasing new wheels for installation in a car, you may notice that they are covered with a layer of paraffin . Before installation, you need to degrease the discs using a cleaner.
Replacement is required when the minimum wear thickness is reached or when any anomalies are detected (scratches, bends, cracks, breaks). Each mechanism has a predetermined minimum thickness limit below which it must be replaced. This minimum wear limit is indicated on the description sheet. If the side of the brake mechanism is equal to or less than the specified minimum limit, then replacement is necessary.
When installing a flange on a disc contour, it is difficult to accurately measure the residual thickness . To effectively measure brake thickness, you need to measure the thickness at three different heights: first near the outer flange, second at the center, and third near the inner edge. To replace the mechanisms, you will first need to remove them, that is, raise the car with a jack.
Attention! It is necessary to thoroughly clean the hub so that vibration does not occur during braking.
Replacement occurs as follows:
- The wheel is removed.
- The bolt at the lower brake flap is turned out.
- Using a screwdriver, bend the screw stoppers.
- Remove the bolts from the guide block.
- The shield and caliper are removed.
- The support is suspended on a wire or rope.
- The protective cap of the hub is removed.
- The hub is held, the nut is unscrewed and removed.
- The disk is removed.
- A new disk and removed parts are installed.
Replacing Niva rear discs
Tools : keys, hammer, screwdriver, etc. Same as replacing front discs.
Replacement occurs as follows:
- The car is placed on a jack and the rear wheel is removed.
- The brake drum mounting bolts are removed.
- The drum is removed.
- Using a screwdriver, remove the tension spring and spacer bar.
- The shank of the front pad strut rotates.
- The front block is retracted and the lower tension spring is removed.
- The support strut of the rear block is removed.
About wear of brake discs and its detection
Unfortunately, a car does not last forever and all parts fail sooner or later. Brake discs are no exception. And water and dust bring this part closer to unusability even faster.
The first sign of disc failure is braking problems . You will feel it even without technical inspection. But it’s best if your fears are confirmed at the service station.
If you don’t want to go to specialists, you can try to identify the problems yourself by paying attention to the following signs of brake disc wear:
- When braking, extraneous noises and the car moves jerkily;
- Cracks and grooves appeared on the part in the form of grooves around the disk;
- The detail shows severe wear.
If any of the above symptoms are present in your car, then you need to replace the front brake discs as soon as possible.
What if the disk gets hot?
When operating a vehicle, it may occur that the disk becomes very hot. Of course, it will heat up during friction; this is a completely normal process. But sometimes it happens that the temperature just goes off scale. And many problems may appear - cracks, defects, severe wear. The problem of excessive heating can be solved quite simply if you take this issue seriously.
It is equipped with cast iron discs. Today you can find ventilated products on sale that have notches and holes on the working surface. It is with the help of such elements that a large amount of heat can be removed. And the brake disc will not heat up to critical temperatures.
Replacing Niva front brake discs
If malfunctions do occur, you will need to remove the damaged part. To do this you will need to use the following tools:
- A set of car wrenches (10, 14, 17 and 27);
- Screwdriver;
- Hammer;
- Pliers;
- And a jack.
So, let's get started - below is the sequence of steps and instructions on how to replace the Niva's front brake discs:
- The machine must be placed on a flat surface and secured with a hand brake, wheel chocks and the front part raised with a jack.
- Unscrew the nuts and remove the front wheel. Often you have to hit it with your foot to loosen a wheel that is tightly seated on a dirty hub.
- Next you need to remove the caliper. If you simply release the wheel caliper, they will hang on the brake hoses, which is very undesirable, because they can tear. To avoid having to replace brake hoses, hang the caliper from the shock absorber or suspension spring using a wire.
- Then remove the brake pads . Mark them before removing them to avoid confusion during reassembly.
- Then remove the disk by unscrewing the casing bolt that is attached to the disk.
- Next, take a screwdriver and bend the locking plate antenna from the upper and lower mounting bolts of the guide block in the places where it is attached to the steering knuckle.
- Then unscrew the upper and lower mounting bolts of the shoe guides.
- Remove the guide block and casing.
- Unscrew the hub nut and remove the brake element along with the hub.
- Then we disconnect the hub from the part. Before doing this, you need to screw the hub nuts back on so as not to damage the threads with a hammer and knock out the studs one by one.
- Then we repair or replace the disk.
- Then, in the reverse order of removal, we put all the elements, including the new or repaired brake disc, in their places. To reinstall the studs, you can use wheel nuts to screw them onto the ends of the studs. You need to tighten these nuts evenly to press the studs back into the disc and hub.
What to do if the Niva brake disc cannot be removed?
It often happens that the brake disc simply cannot be removed - it becomes stuck due to heat, rusts or sours due to dirt and scale. In this case, you have to use special pullers.
Experienced car mechanics remove the entire disc along with the fist and squeeze out the disc using a press.
If there is no puller, people often start hammering on the disc from the back side - sometimes this helps, but we do not recommend doing this. The edges of the brake disc simply break off from impacts.
If the disc cannot be removed because the pins cannot be knocked out, then you have to pick up a grinder and cut off the excess parts.
Below watch the video in which the author was unable to remove a disk using a homemade puller and used an angle grinder to remove the disk that was stuck on the hub. Sometimes this is the only option for the Chevrolet Niva - brute male power.
Niva's wheels are heating up - what to do in this case?
It happens that during operation the car wheels begin to heat up. This may indicate either their poor quality or breakdown.
Were you confused by the price of disc brakes and decided to buy a cheaper part? Then the heating problem can be solved very simply - replace the parts with better ones. In this case, you need to forget about saving. It is best if these are ventilated brake discs that match your “iron horse”.
Niva ventilated discs are parts with special holes and notches through which air passes and additional cooling occurs, preventing the brake disc from overheating. Such discs are very reliable, which has long been proven in practice. Most often, tire drivers choose brake discs from Brembo, Zimmerman, Delphi, Bosch and other manufacturers that have proven the quality of their products.
Having taken into account all the tips given above, you can be confident that the Niva, or rather its braking system, will never let you down and will work for your benefit for many years. This concludes the article about how to replace the front brake discs of a Chevrolet Niva. We can only hope that the new Chevrolet Niva will have fewer shortcomings and shortcomings in the braking system and that the designers will take into account the operating experience of the previous model. Good luck to everyone on the roads and safe driving.
PS: Watch the video with a review of the front brake discs and their replacement on a Chevrolet Niva from experienced car enthusiast Sergei Zykov.
Substitutes
| vendor code | Cost in rub. | vendor code | Cost in rub. |
| Chevrolet Niva BOSCH 0986478746 | from 1500 | PATRON PBD1725 | –/– |
| TRI-DF 254 | –/– | FERODO DDF092 | –/– |
| TRW DF1725 | –/– | ROTINGER RT 2798 | –/– |
| TEXTAR 92024487 | –/– | HELLA 8DD355100381 | –/– |
| BOSCH RA1372785 | from 1700 | GLOBER RA16003411 | –/– |
| LPR RA626584 | –/– | BREMBO RA1782407 | –/– |
| TRW RA2416674 | –/– | TRW RA2416835 | –/– |
Brake discs with notches and through holes are not taken into account, since they are not in great demand among Chevrolet Niva owners.
All about the front brake discs of the Niva Chevrolet
The braking system for a vehicle is a very important element, since thanks to braking, the car quickly stops, thereby preventing emergency situations. A car without brakes is a faulty vehicle that is strictly prohibited from being put on the road. Today we will talk about the important elements of the brake system of the Niva Chevrolet car - the front brake discs. Let's briefly look at their purpose, and also look in more detail at how removal and replacement are carried out. At the end of the article, we will consider the reason why the brake disc on the Chevrolet Niva gets hot, and how this problem can be solved. So, let's go...
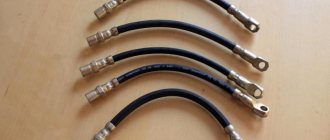
Niva Chevrolet replacement of rear brake pads, cylinders and drums. Video and photo instructions
We have a Chevrolet Niva car, produced in 2005, mileage 137 thousand km, for scheduled repairs, on which it is necessary to replace the rear brake pads, drums and cylinders. We will show you how you can do this yourself, without resorting to the help of specialists.
It looks like the pad on the rear left wheel has been torn off, there is a grinding noise when braking, and when reverse gear is engaged, the wheel jams and then breaks. Therefore, it was decided to immediately lift and change the pads, drums and cylinders on both sides. After this, we'll bleed the brakes with a vacuum.
Using a 12mm socket, unscrew the drum mounts:
Then screw in two bolts:
It really didn’t work out for us, all the threads remained on the bolts, it was very soured, so a hammer comes to the rescue, since we will eventually have to change the drum anyway. This situation arises when, when replacing fasteners, they are not coated with copper grease; I believe that there is no need to save on this!
First, soak everything in WD-40, then apply sharp blows with a hammer to the inside of the drum:
Purpose and design of the brake disc
Any driver knows that car braking is carried out due to friction. It is simply impossible to stop the car in any other way, so friction reduces the speed of the car. The main role in braking due to friction is played by the brake disc, which actually stops the moving wheels. The disc can be made of cast iron, carbon fiber or ceramic. Chevrolet Niva is equipped with a cast iron product.
Brake discs on the Chevrolet Niva are installed on all wheels, so there are front and rear discs. Their purpose is the same, only the design is different. The rear disc is predominantly called a drum, as it has the appropriate shape.
Substitutes
| vendor code | Cost in rub. | vendor code | Cost in rub. |
| BOSCH 0986478746 | from 2200 per set | TRW DF1725 | –/– |
| HELLA 8DD 355 100-381 | –/– | PAGID 51702 | –/– |
| BOSCH 0 986 479 904 | –/– | TEXTAR 92096332 | –/– |
| GIRLING 6017253 | –/– | BRAKE ENGINEERING DI839391 | –/– |
| COMLINE ADC2103 | –/– | BORG&BECK BBD4692 | –/– |
| NIBK RN3598 | –/– | TRI-DF 365 | –/– |
| GIRLING 6017487 | –/– | GIRLING 6017615 | –/– |