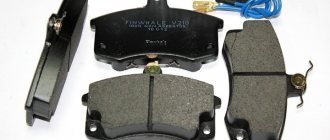
Working principle of brake pads
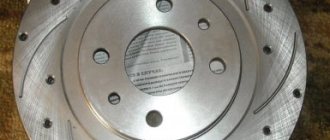
This mechanism is attached to the central part of the wheel, called the hub, and is something between the wheel itself and the hub. This arrangement allows the blocks to perform their function of reducing vehicle speed. Disc-type mechanisms are located on the front of the rotating axis, while drum-type mechanisms are located at the rear.
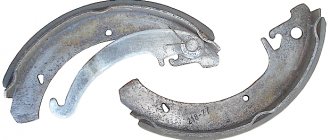
The drum mechanism acts on the pads, maintaining them in a compressed state, which is achieved thanks to two special springs. The upper part of the pads fits into the grooves of the brake cylinder, while the lower part fits into the hub.
- When you press the brake pedal, pressure appears on the pistons, which leave the cylinder.
- They push the pads, overcoming the resistance provided by two springs.
- Due to the friction that occurs between the drum and the pads, the drum slows down, which in turn leads to a decrease in the rotation speed of the wheel.
- The more pressure on the brake pedal, the more intense the friction, and the faster the speed drops.
When working with disk-type mechanisms, a slightly different operating principle is observed.
Diagnosis of brake pad wear
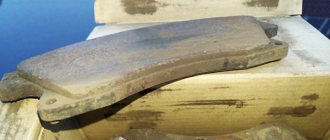
As you already understand, brake pads are the main element in the braking system. And they are the ones who ensure the safety of the car while driving. However, like any other spare part, they have to be changed from time to time.
Due to frequent interaction with other parts that are located too close to them (drum, disk), friction occurs between them and special friction linings. The latter, in turn, wear out, and there is a need to replace them.
To determine the degree of brake pad wear, pay attention to the following signs:
- While braking and until the vehicle comes to a complete stop, you hear a high-pitched squealing sound. It is this that indicates that the surface of the linings has completely worn out. Consequently, the drum is now in direct contact with the metal.
- If you notice that your vehicle starts to brake too hard or takes a long time to slow down, this also indicates that there is empty space between the worn out linings and the drum. Moreover, you need to apply much more effort when pressing the gas pedal. Additional effort when pressing provokes a slowdown in the braking process. In the case of a complete absence of friction linings, braking will be harsh, since the friction between the pad and the disc will increase. This, in turn, will cause damage to the drum or disc itself.
- If you notice a vibration in the brake pedal, this is also a sign of a problem. This is explained by the fact that the pads are worn unevenly.
If you notice at least one of the above signs, do not delay repairs.
Removing old pads
If there is a need to replace worn-out linings, you must first remove them. To do this, you need to knock down the rivets that secure the lining to the brake pad. For this purpose you will need a hammer and a chisel. With careful and targeted blows of a hammer on a chisel, the old rivets are knocked off one by one.
After the old linings have been successfully removed, it is necessary to clean the surface of the pad being repaired. Over a long period of vehicle operation, dirt and rust accumulate in the space between the block and the heel, which must be removed.
You can clean the part in various ways:
- Clamp the block in a vice and sand the surface with a grinder - for these purposes there are flap or disc wheels with sandpaper of various grain sizes.
- Use a sander
- Or use simple sandpaper. In this case, the surface cleaning process may be slightly delayed.
Next, wipe the treated surface with a dry and soft cloth and apply anti-corrosion paste or silicone grease.
What affects the reliability of the braking system?
It should be noted that there are points that have a great impact on the reliability and service life of brake pads.
These include the following points:
- How and what are the pads made of?
- Driver's driving style: aggressive, moderate.
- Quality of roads.
- Climate and time of year.
- Lifetime.
As mentioned earlier, the car’s braking system requires the most responsible care. You shouldn't skimp on it. Choose only high-quality spare parts from trusted manufacturers.
Moreover, if the pads you choose do not fit the dimensions of your car, do not under any circumstances attempt to modify them.
Understand that any impact in the future can disrupt the progress of their work and lead to irreversible consequences, the least of which will be the rapid failure of the pads themselves.
It is necessary to check the condition of the brake mechanism every 10 thousand km. Factors indicating the need to replace parts are:
- If the thickness of the residual friction layer is 2 mm or less.
- If there is damage on the pads that was not obtained naturally.
- If the mechanism has chips, cracks, grooves and irregularities.
When is replacement required?
You can avoid missing the moment of changing brake pads if you keep track of your mileage. As a rule, these parts wear out completely after serving their owner for 15 thousand km. Although now there are some that are enough for 30 thousand km. However, these figures are just a guide. The service life of the pads depends on many factors.
The riding style will play a decisive role: the more aggressive it is, the more difficult climbs and dizzying descents the cyclist overcomes, the sooner he will have to think about working with the brakes.
Slow, quiet walks around the park will allow the entire braking system to last longer, but only if they are adjusted correctly.
How to replace front brake pads
Replacing the front pads is easier than doing the same with the rear ones due to their design features.
The algorithm of actions is as follows:
- Place the car on a flat surface.
- Set the vehicle's parking brake. Make sure it does not roll back when changing position.
- Loosen the bolts that secure the wheels.
- Use a jack to raise the desired part of the car.
- Now you can remove the wheel from the hub and assess the condition of the brake system.
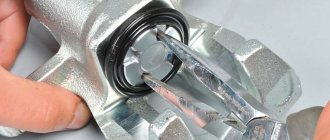
- If there is severe wear, unscrew the caliper bolt and carefully remove the caliper itself from the disc.
- Now you can remove the pads.
Before replacing the part, be sure to lower the piston completely into the cylinder. This is done so that the caliper can be reinstalled in its place.
Since the caliper is made of aluminum, you can apply force to it without damaging it.
Now you can install new pads, put the caliper and wheel back in place, and return the car to its previous position.
Preparing for replacement
Before changing the pads, it is necessary to prepare the car.
Preparation
It is necessary to pump out some of the brake fluid from the reservoir using a syringe or bulb. This is necessary to prevent excess fluid from leaking out of the top when the brake cylinder is compressed.
Next, we loosen the handbrake cable; if it is too tight, it will be impossible to compress the brake cylinder, which will complicate the work process.
Read how to adjust the handbrake here.
Then we prepare the necessary tools
Required tools:
- Head on "7"
- Torx head "E8"
- Open-end wrench "10"
- Ratchet
- Large flathead screwdriver
- Two mounts
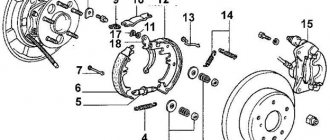
How to replace rear brake pads
If there is a drum-type mechanism, replacing the above-mentioned parts becomes much more difficult.
- You need to jack up the car and remove the wheel. To remove the drum, open and unscrew the nut that is attached to it. After this, the part is carefully removed from the hub. Be sure to pay attention to the bearing, which, if there is a parking brake, must be removed.
- Now you can start removing the springs. This action will require a lot of effort, as it creates significant pressure. After this, the clamps are removed from the pads. Now it seems possible to remove the pads themselves.
- As in the case of the front part of the car, the piston should also be recessed here.
- New elements are installed, fixed using clamps and springs, and the bearing is returned to its place.
- Now you can put the drum and wheel back in place.
After this, you need to take into account the fact that you cannot replace either the rear or front pads separately. Replacement must be done immediately and on all wheels.