The speed sensor is an element of the vehicle's electronic control system.
It depends on its readings how much fuel will be supplied, how much air will bypass the throttle valve when idling, and what the speedometer readings will be. The speed sensor of a VAZ car is based on the use of the Hall effect, that is, a stream of pulses is transmitted from the device to the car's ECU, the frequency of which is proportional to the speed of the car. Auto electronics, analyzing incoming data, selects the required idle speed and sends a signal to a device that regulates the engine idle speed, which optimizes the composition of the air-droplet mixture entering the combustion chamber, bypassing the throttle valve.
During a distance of one kilometer, the speed sensor transmits over 6000 pulses to the ECU. Based on the parameters of the time analysis of inter-pulse signals, the on-board computer transmits data to the dashboard, thereby determining the speedometer readings.
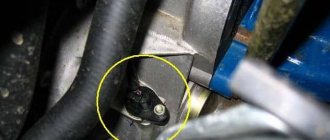
As in many other cars, the VAZ speed sensor is located in the upper part of the gearbox housing, not far from the engine oil level dipstick. You can get to it from two sides: from above, by opening the hood and disconnecting the adsorber, and from below, using the inspection hole for convenience.
VAZ speed sensor pinout and DS connection diagram
The speed sensor is an element of the vehicle's electronic control system. It depends on its readings how much fuel will be supplied, how much air will bypass the throttle valve when idling, and what the speedometer readings will be.
The speed sensor of a VAZ car is based on the use of the Hall effect, that is, a stream of pulses is transmitted from the device to the car's ECU, the frequency of which is proportional to the speed of the car. Auto electronics, analyzing incoming data, selects the required idle speed and sends a signal to a device that regulates the engine idle speed, which optimizes the composition of the air-droplet mixture entering the combustion chamber, bypassing the throttle valve.
During a distance of one kilometer, the speed sensor transmits over 6000 pulses to the ECU. Based on the parameters of the time analysis of inter-pulse signals, the on-board computer transmits data to the dashboard, thereby determining the speedometer readings.
As in many other cars, the VAZ speed sensor is located in the upper part of the gearbox housing, not far from the engine oil level dipstick. You can get to it from two sides: from above, by opening the hood and disconnecting the adsorber, and from below, using the inspection hole for convenience.
Connecting RS485 fuel level sensors.
Currently, Omnicomm RS-485 FLS is supported.
For pinout of inputs, see the corresponding section of the KU Operation Manual.
The control unit automatically adjusts to the connected sensor.
Connecting the CU significantly depends on its design (modification).
— The designation of the CU design as a whole contains:
· in the CU passport (acceptance certificate)
on the nameplate
ALVG 816.00.00-XX
XX Designations of the CU version.
In the following illustrations, for example:
Measuring the speed of a car has long been carried out non-mechanically. A speed sensor is responsible for this, the operating principle of which is based on the Hall effect. This sensor supplies the controller with electromagnetic pulses, on the basis of which the latter calculates the speed of the machine.
Vehicle speed is measured as follows. For each kilometer of distance traveled, the sensor sends a fixed number of pulses to the controller - 6004.
The faster the car moves, the higher the transmission frequency. Thus, the controller calculates the speed based on the time interval between pulses.
In addition to its main function, this sensor indirectly helps the car owner save fuel. When the car is coasting at a speed of over 20 km/h, the controller, based on sensor readings, does not open the fuel supply.
The speed sensor of the VAZ 2114, like all other cars of the VAZ family, including the VAZ-2109, Kalina, Priora, is located on the gearbox, or rather, on the speedometer drive mechanism. To find it, you need to crawl under the hood; it is advisable to remove the adsorber to open up the space (you can do without removing it, but getting to the speed sensor will be more difficult). On the side of the right inner CV joint, you need to find the wire that goes to the gearbox; it is this that is connected to the speed sensor connector.
Pinout DS 2109, 2110, 2112, 2114, 2115
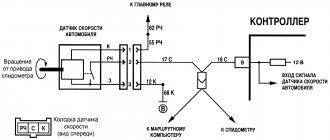
If you understand how to connect the speed sensor, then there is the following pinout that you should follow. At the same time, it is important to understand the essence of the operation of the DS to study the circuit diagram of the sensor, which is attached to this article.
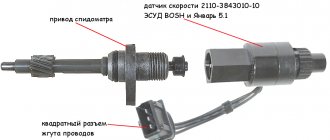
The factory speed sensor of VAZ cars is manufactured with some differences in connections to the block connector. The square-shaped connector is used in Bosh electronics systems. The circle-shaped connector is used in electronic systems such as January 4 and GM.
When connecting a sensor, you should choose devices with contact group digitization such as “-”, “A”, “+” (internal designation on the block contacts) instead of digital designations such as “1”, “2”, “3”. In addition, preference should be given to devices with a metal-type rod, since plastic rods are very short-lived.
DIY replacement instructions
Now let's take a look at the procedure for replacing the device. Before replacing, you need to buy a new sensor. It is best to purchase a DC with a metal rod - such devices are considered more reliable and usually work much longer. There is nothing complicated about the replacement; the procedure is described in detail below (video published by user Inzil Nazmutdinov).
Stages
How to change the speed sensor on the “Ten”:
- First of all, you should turn off the voltage in the vehicle's electrical network. Turn off the ignition, then open the engine compartment and disconnect the battery terminal.
- Then find the speed sensor and disconnect the wire with the connector from it. When disconnecting, it is advisable to remember the pinout of the contacts on the plug in order to connect the device correctly.
- As for removing the speed sensor, you can simply unscrew it by hand. If the device is fixed in the seat too tightly, then to dismantle it you will need a wrench of size 21 or 22. The size is inaccurate, since the design of the device and, accordingly, the dimensions may differ.
- After dismantling, we recommend that you check the correct operation of the drive itself. To do this, unscrew the nut that secures it to the transmission box. Remove the drive carefully, since its rod should under no circumstances get into the gearbox housing, otherwise you will need to dismantle and disassemble it.
- Install the new speed sensor; the installation procedure for all components is carried out in reverse order.
Photo gallery “Changing DS with your own hands”
How to check the VAZ speed sensor
A failed speedometer sensor in a VAZ car is easily determined - in this case, the speedometer stops working, and it may also show some signs of life, but display incorrect information.
Using a tube, pliers or other available tools, rotate the sensor axis. In this case, you should see the voltmeter readings changing: the higher the speed, the higher the voltage (from 0.5 to 10 V). If this does not happen, the sensor requires replacement.
Wiring pinout, what to pay special attention to when using a multimeter
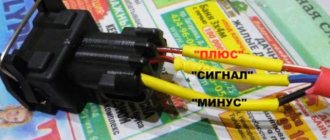
Pay attention to the pinout inside the block. With the ignition on, use a multimeter to determine which connector is connected to which wire. If you connect the wire to the “plus” connector, and the multimeter shows “minus”, then you should urgently change the polarity. Therefore, it is advisable to take a block with the appropriate designations. But if this doesn’t happen, you can take the regular one. In this case, the pinout is as follows - 1 is “+”, 2 is “signal output”, and 3 is “-“.
At the last stage, do not forget to check the drive, as well as the operation of the vehicle as a whole with the wheels hanging or while the vehicle is moving.
Replacing a car speed sensor
As for its location, look for the DS in the engine compartment in close proximity to the exhaust manifold. To be honest, the place where it is installed cannot be called ideal. While the car is running, the manifold heats up. The sensor wires rub against it, which over time leads to malfunctions and short circuits. Therefore, experts recommend that the first step is to properly insulate the wiring, and also use some kind of clamps so that the wires do not come into contact with the collector. This significantly extends its service life.
If the check shows that the DS is faulty, it needs to be replaced. Repairing sensors and similar small electronic devices is a thankless task. In a garage environment, this is unlikely to be possible, and the only thing that can be done is to clean the contacts from oxidation (this can be a problem).
It doesn’t matter whether you have an injection car or a carburetor with a Europanel - the connection of the speed sensor to the instrument cluster is identical.
Replacing the VAZ speed sensor: step-by-step instructions:
- Drive into the pit - it will be more convenient to work from below - and wait until the engine cools down.
- Turn off the vehicle's power by removing the cable from the negative terminal of the battery. Do not close the hood after this, this will provide you with lighting.
- Locate the speed sensor on the transmission. Clean it and everything near it with a rag to remove any dirt.
- By pressing the spring clip, disconnect the wire block from the sensor.
- Dismantle the sensor itself by unscrewing it counterclockwise - with your fingers or an open-end wrench to “22”.
- Carefully, so as not to break anything, install a new part in place of the removed part. Connect the wire block to it and the procedure for replacing the speed sensor can be considered complete.
How to properly connect a new DS? It is important here that the device rod fits correctly into the fixing sleeve, otherwise rotation will not be transmitted to the sensor. If the sensor fits into the socket the first time, then everything is in its place, and if something prevents it from moving, then the rod did not fit into the bushing.
CLICK HERE AND OPEN COMMENTS
Sorry, I didn’t understand the location of the sensor? Either write about the exhaust manifold or write about the box. These are completely different places! But my flexible shaft goes to the speedometer, which means I don’t have a sensor!
Source
Repair and replacement
We carry out dismantling according to the following scheme:
- We de-energize the car by removing the “-” connector from the battery;
- We disconnect the wire connector from the sensor and remember what their pinout is;
- We unscrew the sensor itself by hand. If this doesn’t work, use key 21 or 22 (there may be design differences);
- At the same time, we check how the drive feels. After removing the sensor, you need to unscrew the nut with which the drive is attached to the gearbox. You need to remove it very carefully, since if you drop the rod into the gearbox, you will have to disassemble it too. The new drive has a rubber ring, which is lubricated with transmission oil before installation.
How to check the speed/speedometer sensor on a VAZ 2110 and where it is located
The speed sensor is an element of the vehicle's electronic control system. It depends on its readings how much fuel will be supplied, how much air will bypass the throttle valve when idling, and what the speedometer readings will be. The speed sensor of a VAZ car is based on the use of the Hall effect, that is, a stream of pulses is transmitted from the device to the car's ECU, the frequency of which is proportional to the speed of the car. Auto electronics, analyzing incoming data, selects the required idle speed and sends a signal to a device that regulates the engine idle speed, which optimizes the composition of the air-droplet mixture entering the combustion chamber, bypassing the throttle valve.
Principle of operation.
The principle of operation of the VAZ 2110 speed sensor is based on the Hall effect: by transmitting electrical impulses (in VAZ cars, by the way, only 6 such impulses are used) to the ECU, the sensor informs it about the rotation speed of the driving rollers of the machine, on the basis of which the control unit not only acts to the speedometer needle/mileage display, but also monitors engine operation by sending the necessary signals to the idle speed controller and throttle position sensor.
VAZ 2110 speed sensor wire pinout
Straight to the point, a break began to appear on one of the wires at a break. The difficulty was that it was not possible to remove the contacts from the chip right away (I couldn’t find any information on such a petty procedure on the Internet, there was one post where a man couldn’t remove it and sawed it off! The connector) he tore off one wire and, without torturing the remaining ones, cut off the entire connector. In general, the essence of the message, the internal appearance of the connector is misleading and at first glance it seems that the antenna that holds the contact alone is a lie! there are two of them!
To remove the contacts you will need an awl, in my case half a honey. tweezers, another difficulty is that the mustache is springy, that is, we pull the wire and press the mustache, but pull it moderately so as not to press the mustache into the plastic of the connector. Regarding the silicone inserts, they create resistance, but the moment when the contact is released is basically noticeable. If you are reading this article after you have already torn off the wire)), then it will be easier to remove it by pressing with a small flat screwdriver across the contact plates, in this case there will be room for the awl to press the mustache, but you will have to suffer.
Now recovery. The contact for restoration is very inconvenient; in the place where the wire is crimped, it has greater strength, so I don’t recommend trying to open it and insert a new wire. The maximum that I could do, without causing much damage, to remove the remnants of the wire, was to open the crimping area with a small clock screwdriver, hitting it with a hammer, but the contact must be placed on a convex surface.
Connected by soldering. If you follow my path, then get ready for inconvenience; soldering contacts to wires will be inconvenient. We put silicone plugs on the wires, strip the wires to a length of 3-4 mm, tin (I use Zil-2 flux, a 100 W soldering iron) and move the plug to the edge of the wire so that about 1 mm of its insulation is visible. We insert the wire into the contact using rotational movements. Having aligned it at the junction, apply acid. We solder carefully so that the tin does not flow into the contact and solder its insides; it will be almost impossible to remove the tin and the functionality of the contact will be lost. In the photo: the top contact is soldered, the middle contact is prepared for soldering, the bottom wire is tinned.
That's it, after soldering we go through with a dry brush to remove any remaining acid (not necessary, since during soldering it all basically boils away), spread the mustache a little, remove dirt from the connector and insert the contacts into place, pushing the contacts from the side of the silicone plug, resting against it with a screwdriver until you hear a characteristic click.
Schematic electrical diagrams, connecting devices and pinouts of connectors
The speed sensor is an element of the vehicle's electronic control system. It depends on its readings how much fuel will be supplied, how much air will bypass the throttle valve when idling, and what the speedometer readings will be.
The speed sensor of a VAZ car is based on the use of the Hall effect, that is, a stream of pulses is transmitted from the device to the car's ECU, the frequency of which is proportional to the speed of the car. Auto electronics, analyzing incoming data, selects the required idle speed and sends a signal to a device that regulates the engine idle speed, which optimizes the composition of the air-droplet mixture entering the combustion chamber, bypassing the throttle valve.
During a distance of one kilometer, the speed sensor transmits over 6000 pulses to the ECU. Based on the parameters of the time analysis of inter-pulse signals, the on-board computer transmits data to the dashboard, thereby determining the speedometer readings.
As in many other cars, the VAZ speed sensor is located in the upper part of the gearbox housing, not far from the engine oil level dipstick. You can get to it from two sides: from above, by opening the hood and disconnecting the adsorber, and from below, using the inspection hole for convenience.
How to check the VAZ speed sensor
A failed speedometer sensor in a VAZ car is easily determined - in this case, the speedometer stops working, and it may also show some signs of life, but display incorrect information.
Using a tube, pliers or other available tools, rotate the sensor axis. In this case, you should see the voltmeter readings changing: the higher the speed, the higher the voltage (from 0.5 to 10 V). If this does not happen, the sensor requires replacement.
How to diagnose a problem
There are only 3 ways to check the tens speed sensor. One of them involves the use of a control lamp, the other two are based on a circuit.
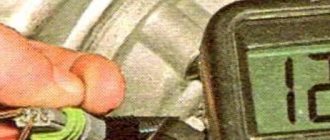
But before moving on to any of them, make sure that there is grounding and voltage on the contacts; to do this, disconnect the electrical connector from the sensor by simply squeezing the “antennae” and removing the chip, and ring each of them. One of the contacts should show a voltage of 12V.
If everything is fine with the power supply, proceed directly to the diagnosis itself.
Method No. 1 - carried out according to the above scheme without removing the sensor from the car. Jack up the front wheels. Using regular wires (if you have an assistant) or with alligator clips (if you don’t have an assistant), connect the voltmeter to the speed sensor, not forgetting to supply current to it. Place the gearbox in 5th gear and rotate the wheel. If everything is in order with the sensor, in response to these actions you will see changes in the voltage of the pulse contact - between the output and ground - the higher the speed, the greater the voltage. The range of changes is 0.5-10V.
Method No. 2 - carried out according to the above diagram on a sensor removed from the car. Remove the speed sensor (how to do this will be described in detail below in the instructions for replacing it). Using wires, again repeat the above diagram. Take a tube, pliers or any other handy item that allows you to rotate the sensor axis (the main thing here is not to forget about safety precautions), and rotate the sensor around its axis. The resulting multimeter readings (from 0.5V to 10V) will indicate that everything is in order with the sensor.
Method number 3 – “light bulb test”. Applies to the speed sensor without removing it from the vehicle. Using a jack, raise the drive wheels on the ground. According to the diagram below, connect a light bulb to the element being diagnosed. Place the gearshift lever in 5th gear and rotate the wheel. The light should blink. If this does not happen (if there is voltage in the network, of course), the sensor should be replaced.
Replacing a car speed sensor
As for its location, look for the DS in the engine compartment in close proximity to the exhaust manifold. To be honest, the place where it is installed cannot be called ideal. While the car is running, the manifold heats up. The sensor wires rub against it, which over time leads to malfunctions and short circuits. Therefore, experts recommend that the first step is to properly insulate the wiring, and also use some kind of clamps so that the wires do not come into contact with the collector. This significantly extends its service life.
If the check shows that the DS is faulty, it needs to be replaced. Repairing sensors and similar small electronic devices is a thankless task. In a garage environment, this is unlikely to be possible, and the only thing that can be done is to clean the contacts from oxidation (this can be a problem).
It doesn’t matter whether you have an injection car or a carburetor with a Europanel - the connection of the speed sensor to the instrument cluster is identical.
Replacing the VAZ speed sensor: step-by-step instructions:
- Drive into the pit - it will be more convenient to work from below - and wait until the engine cools down.
- Turn off the vehicle's power by removing the cable from the negative terminal of the battery. Do not close the hood after this, this will provide you with lighting.
- Locate the speed sensor on the transmission. Clean it and everything near it with a rag to remove any dirt.
- By pressing the spring clip, disconnect the wire block from the sensor.
- Dismantle the sensor itself by unscrewing it counterclockwise - with your fingers or an open-end wrench to “22”.
- Carefully, so as not to break anything, install a new part in place of the removed part. Connect the wire block to it and the procedure for replacing the speed sensor can be considered complete.
How to properly connect a new DS? It is important here that the device rod fits correctly into the fixing sleeve, otherwise rotation will not be transmitted to the sensor. If the sensor fits into the socket the first time, then everything is in its place, and if something prevents it from moving, then the rod did not fit into the bushing.
How to check the speed sensor, what types they are and where they are located on VAZ 2110 (2111, 2112 or 2115) cars.
Troubleshooting
First you need to know where the VAZ 2110 speed sensor is located, and then check its drive. It is located under the hood, in the engine compartment, next to the exhaust manifold. It is on the heated collector that wires sometimes rub and melt.
Replacing the plug and speed sensor
Changed the sensor
speedometer and found that the wires going to the plug were completely frayed! I had to solder it.
Lada Kalina speedometer does not work. Replacing the speed sensor connector
Maybe this video will help someone. The speed sensor is not always at fault
. By the way, the old sensor turned out to be working.
The result is a short circuit. Usually it is enough to insulate the wires, then route them so that they do not touch the collector.
Check if the cable is broken; this is also one of the possible causes of breakdowns. If your visual check does not give results, then you need to change the sensor
or its drive.
When is diagnostics needed?
Due to the limited number of pulses and for many other reasons (motor oil, dirt has gotten on the sensor, contacts or wires located near the speed sensor have oxidized, there is mechanical damage to the part, etc.) in the “tens” it is often possible to observe flaws in the operation speedometer or its complete inoperability. At the same time, most often, problems arise when coasting at idle and the “CHECK” system lamp turns on (error code “24”). Be that as it may, any of the mentioned signs requires the car owner to mandatory diagnose the speed sensor, because the causes of malfunctions may lie in it, or they may lie in a completely different place.
Symptoms of a problem
The problem may be that the connection diagram is broken, there are disturbances in the electrical circuit, or the connector does not work. In addition, the pinout of the speed sensor, which was mixed up during the assembly process, often becomes a problem.
An indirect sign of a malfunction is that the car stalls when idling.
You, as a driver, will easily notice the presence of incorrect indicators on the speedometer, and also pay attention to the warning light that requires you to check the engine (Check Engine). If such phenomena are detected, there is no doubt - the speed sensor needs to be replaced.
Speed sensor malfunctions
Typical symptoms of failure of the electronic speed sensor may be:
- lack of electrical signals - error code P0500;
- intermittent electrical signals with EMF - error code P0503;
- the arrow moves chaotically in different directions, incorrect readings or other types of incorrect operation of the speed indicator;
- unstable operation of the engine at idle: interruptions, floating speed, etc.;
- increased consumption;
- power failures, when you press the pedal the engine does not “pick up” speed, etc.
There can also be several reasons for problems with the Electronic Speed Sensor, for example:
- power supply circuit break,
- oxidation of contacts,
- breakage of connecting wires or wear of the mechanical drive of the sensor.
How much does a replacement cost?
If the breakdown is not due to dirty contacts or broken wiring, it is better to replace the sensor. Moreover, it costs 170-400 rubles, depending on the type and manufacturer. The cost of replacing it at a service station is 100-150 rubles. Sensor part numbers:
- with mechanical drive - 2110-3843010F;
- electronic (new) - 2170-3843010.
When choosing a DS, pay attention to where it was manufactured. If a mechanically driven sensor requires replacement, under no circumstances buy Asian analogues - the drive gear is made of very low quality plastic. It happens that it breaks on the third day of use. In this case, you will have to disassemble the entire box to remove its fragments.
It is better to purchase a sensor with an all-metal drive.
[custom_ads_shortcode3]
Vehicle traffic control
This function is performed by the speed sensor, which takes part in the formation of the fuel mixture by the controller. It replaced the mechanical cable drive previously installed on carburetor VAZ 2112 models. The operating diagram of the element is as follows:
A malfunction of the speed meter is indicated by such signs as failure of the speedometer, unstable operation of the power unit and loss of idle speed when coasting. An indirect sign can also be the short-term display of the “Check Engine” sign on the instrument panel. If you pay closer attention, increased gasoline consumption will become noticeable. If the sensor fails, you can continue driving, but you should replace it as soon as possible. The product cannot be repaired.
Signs of trouble
If the odometer suddenly refuses to work, and the speedometer works jerkily, or “lies” regarding speed and mileage, these are direct indications that the speed sensor or its drive is failing. It may also be that there are problems in the electrical circuit, the connector is failing, the pinout is confused, if the operation of this system has been interfered with, etc.
In addition, an indirect indication of a malfunction may be that the car stalls at idle (although there may be other reasons for this).
Read
Naturally, if the speedometer begins to give false readings in advance, and the “CHECK ENGINE” light is on on the dashboard, then the reason is the speed sensor.
How to check the speed sensor
Most often, the failure of the EMF is a consequence of a break in the electrical circuit. Therefore, it is first advisable to check the integrity of the wiring and the condition of the connectors (contacts).
It is easy to check the functionality of the electronic sensor with your own hands if you have a multimeter. To do this, you must first dismantle the product. Then determine the contact through which electrical impulses are transmitted.
It is usually located in the middle of the block.
- Connect it to the positive lead of the measuring instrument.
- Having closed the negative cable to the machine body, rotate the EMF rod within a speed of 5 mph.
- Check the multimeter readings.
- As the rotation intensity increases, the device readings (frequency and voltage) should increase proportionally.
We check all elements for functionality
After carrying out such work, any problem associated with the indicators on the instrument panel should disappear. If it remains, you should pay the greatest attention to the condition of the wiring of all contacts and connections.
Recently I had a problem the speedometer stopped working and I had to replace the speed sensor. I bought a new electronic one to last longer. Everything is described correctly and clearly in the article.
Even if there are problems with the speed sensor, it is replaced within 10 minutes. Everything is very simple there; the article describes the procedure for replacing the sensor.
Source
Instrument panel test on video (speedometer self-diagnosis)
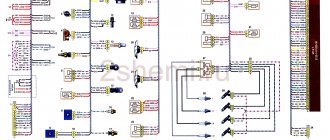
There are some things we don't specifically consider.
Power to the circuit shown in the previous chapter comes from main relay 6. It is also called the “ignition relay”. There is also fuse 1 in the circuit.
Additional relay and fuse box
When the ignition circuit is broken, both the speedometer and the ECU module do not work on the VAZ-2112, and the engine does not start at all. So advice about checking the relay would seem stupid.
Advice for those who have an oscilloscope
If you still decide to dismantle the sensor, connect a 1 kOhm resistor to its output (to the middle terminal). The resistor tap is connected to the “plus” of the power supply. By turning the shaft by hand, pulses can be observed at terminal 2. There are six pulses per revolution.
Connecting inductive speed sensors and ABS sensors
https://pandia.ru/text/78/003/images/image007_31.jpg" align="left" width="288″ height="217″>
The figure shows a standard European speedometer with connector: ISO 16844-2:2011 (same as on the KU). Speedometers with other types of connectors are connected in the same way, depending on the purpose of the contacts.
In the KU with versions AVLG816.00.00-10...15 (serial numbers No. 4, the output stage B7 was connected to the on-board power supply (12 or 24 V) through a resistor. Therefore, before connecting, you should check the technical data sheet for the speedometer what signal level is acceptable at the corresponding speedometer input.
If the Input is designed for a voltage of no more than 9.5 V, then a resistor Rs* should be connected (shown in the diagram). Select the resistor value according to Table 2. For KU versions AVLG 816.00.00-16 and higher (serial/factory numbers from No. 000 and higher), there is no need to install an additional resistor.
Table 2.
VAZ speed sensor pinout and DS connection diagram
The speed sensor is an element of the vehicle's electronic control system. It depends on its readings how much fuel will be supplied, how much air will bypass the throttle valve when idling, and what the speedometer readings will be.
The speed sensor of a VAZ car is based on the use of the Hall effect, that is, a stream of pulses is transmitted from the device to the car's ECU, the frequency of which is proportional to the speed of the car. Auto electronics, analyzing incoming data, selects the required idle speed and sends a signal to a device that regulates the engine idle speed, which optimizes the composition of the air-droplet mixture entering the combustion chamber, bypassing the throttle valve.
Basic faults
Among the obvious malfunctions of the speed sensor on the VAZ-2112, the following can be identified:
- Incorrect and inconsistent readings on the speedometer or odometer.
- Unstable engine operation at idle speed.
- Errors on the on-board computer ( P0500 and P0503 ).
Speed sensor diagnostics
Diagnosing a mechanically driven device is not difficult. It is enough to connect the power wire to the removed sensor and turn its gear. If the sensor is working properly, the needle on the speedometer will change its position.
Diagnostics of the electronic analogue will also not be difficult. It is enough just to touch one metal end to the middle contact of the connector, and the other to the motor housing. If the sensor is working properly, the needle will begin to move.
Location of all elements
On VAZ 2110-2112 cars, electronic sensors are located as follows:
- Coolant temperature control. Installed in a large pipe coming out of the engine on the right side (in the direction of travel).
Wires go from all electronic monitoring devices to the processor, which must be checked periodically, since insulation failure often causes replacement of the measuring elements themselves. Naturally, such a replacement of a VAZ 2110 speed sensor or other device will not produce results without installing new wiring.
Types of speed sensors, their differences. Where is the speed sensor located?
- Electronic 6-pulse sensors are equipped with cars with injection engines, launched into series since 2006.
- On carburetor Samaras you can sometimes find 10-pulse EMF.
- Until 2006, VAZ cars used mechanical devices in the form of special inserts between the speed indicator cables and the gearbox gear outputs.
The key difference between different types of EMF is the absence of wires and connecting connectors. For example, GM or Yantar systems are equipped with products with round (oval) ports. At the same time, Bosh uses wireless versions with square connectors.
- On the VAZ-2110 (2111, 2112), speed sensors are mounted on the gearbox housings slightly to the right along the route, directly next to the oil control dipstick.
- The device is easy to find by looking in the area of the right CV joint.
- On the VAZ-2115, the electronic device is mounted on top of the front part of the gearbox (along the way) directly above the differential. The product with the connected cable is secured with one bolt on the box body.
Pinout DS 2109, 2110, 2112, 2114, 2115
If you understand how to connect the speed sensor, then there is the following pinout that you should follow. At the same time, it is important to understand the essence of the operation of the DS to study the circuit diagram of the sensor, which is attached to this article.
The factory speed sensor of VAZ cars is manufactured with some differences in connections to the block connector. The square-shaped connector is used in Bosh electronics systems. The circle-shaped connector is used in electronic systems such as January 4 and GM.
When connecting a sensor, you should choose devices with contact group digitization such as “-”, “A”, “+” (internal designation on the block contacts) instead of digital designations such as “1”, “2”, “3”. In addition, preference should be given to devices with a metal-type rod, since plastic rods are very short-lived.
Preparing for replacement
In order for the replacement of speed sensor to be successful and bring the expected result, first of all - the resumption of normal operation of the speedometer, you need to prepare for it, then carry it out correctly.
When choosing a new sensor, pay attention: it is desirable that each connector inside the block has the designations “-, then A and ” instead of the usual 1, 2, 3. Although this does not seem to have any fundamental significance, this way the pinout will be carried out faster, and, the main thing is correct.
Read
Speed sensor pinout
Another important point is to choose a device with a metal stem, which will last much longer than the six months “allotted” for a plastic one. Don’t forget to check how the rod rotates, whether there is any play in it, and whether you forgot to equip it with a washer.
Preparatory activities
Proper replacement of the speed sensor on a VAZ 2110 implies the mandatory purchase of a new device that meets all the requirements of your car.
Connector
Basically, when purchasing a device, follow two basic rules.
- Choose a sensor whose connectors inside the block are marked -, A and +. Usually the designations 1, 2 and 3 are used there. There is no fundamental difference between them, it will simply be much easier to carry out the pinout with such markings. It is the incorrect connection that often becomes the reason that you have to seek help from a service station. And these are completely different financial costs.
- The rod on the element must be made of metal. If the stem is plastic, it will last you about 6 months. It is not in your best interest to replace regularly. But don’t forget to check the metal rod for play, correct rotation, and the presence of a washer in the package.
Replacement
Now to the question of how to make replacements. To do this, we dismantle the old device and connect a new one in its place. Your steps look like this step by step:
- Remove the negative cable from the battery, which will allow you to turn off the power to the car;
- Now disconnect the wires from the sensor and be sure to remember what form the pinout was in;
- The device can be dismantled by simply twisting it by hand. There is usually no need to use any tools. But if the device fits tightly, then use 22 or 21 millimeter keys. Depending on the modification of your “ten”, the design of the sensor may differ slightly;
- At the same time, we recommend checking the wiring;
- After removing the meter, unscrew the fixing nut that holds the wire going to the gearbox;
- Remove carefully so as not to drop the rod into the box. If this happens, you will have to completely disassemble the gearbox. This is clearly not in your best interest;
- A new device with a rubber ring must be lubricated with transmission fluid so that the fixation in the new place is as reliable as possible;
- Assembly is performed in reverse order;
- Pay special attention to the pinout. Connect the multimeter with the ignition on. If the device showed “minus”, then you connected the wire to positive, which is absolutely not allowed. This is why we initially advised using a sensor that is not labeled 1, 2, or 3.
If you couldn’t avoid using a new device with inconvenient markings 1, 2 and 3, then remember an important pinout detail:
- 1 corresponds to “+”;
- 2 denotes signal output;
- 3 is “-“.
How to check the VAZ speed sensor
A failed speedometer sensor in a VAZ car is easily determined - in this case, the speedometer stops working, and it may also show some signs of life, but display incorrect information.
Using a tube, pliers or other available tools, rotate the sensor axis. In this case, you should see the voltmeter readings changing: the higher the speed, the higher the voltage (from 0.5 to 10 V). If this does not happen, the sensor requires replacement.
Source
Replacement procedure
In order to make the replacement, you don’t need any skills, just follow our instructions.
On older models
- Disconnect the negative terminal on the battery.
- On older models it is located at the top of the gearbox, accessible from the throttle valve.
- If the clamps get in the way, loosen them.
- We press the fixing brackets from the block.
- Using the key set to “17”, unscrew it.
The old type speed sensor is in place.
Screw the sensor carefully, strictly clockwise.
On new models
- Disconnect the negative wire from the battery.
- We also loosen the corrugation clamps if they interfere and remove them to the side.
- Disconnect the power supply from the sensor.
- Using a “10” wrench, unscrew the fixing bolt.
Seat speed sensor
