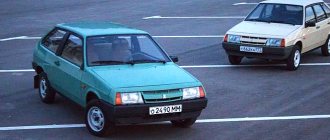
Do-it-yourself body repair of VAZ 2108
On the VAZ 2108, body repairs can be carried out by the car owner himself or in a car service center. In both cases, the goal is the same - to give the metal frame of the car standard dimensions and its original appearance. Repairing the body of a VAZ 2108 is akin to art. Here you need to understand many nuances and details, know the design features.
Types and features of repairs
ATTENTION! A completely simple way to reduce fuel consumption has been found! Don't believe me? An auto mechanic with 15 years of experience also didn’t believe it until he tried it. And now he saves 35,000 rubles a year on gasoline! Read more"
On a VAZ 2108, body repairs can be carried out in several areas. In this case, much will depend on the degree of damage to the vehicle, service life and much more. For example, work on a complete restoration of the body and partial processing/removal of scratches and chips will differ in complexity.
VAZ body repair 2108
You can also correct the geometry of the body with your own hands. It will be enough to remove dents on your favorite V8, polish and paint the body.
Note. Polishing is an important procedure that helps not only improve the appearance of the body, but also protect it from further corrosion.
As for the car service, we immediately note that the price of repairs here is quite high. And this often explains the fact that many people strive to carry out repairs on their own, especially since most of the work can be done by anyone.
A corroded body, punctured in several zones, is already a “patient” that needs to be worked with. To begin with, you will have to remove the “tail” from such a body, and then treat them with anticorrosive. In particular, we are talking about doors, bumpers and other hinged elements.
Advice. The most difficult thing to unscrew on the “eight” is the nuts that have been exposed to aggressive environmental influences. For example, rear bumper nuts. To be able to remove them without much difficulty, it is enough to pre-lubricate the fasteners with brake fluid or pure gasoline.
How to treat holes in the body
Do-it-yourself body repair VAZ 2108 photo
Over time, no metal surface can avoid the appearance of defects, among which notches stand out. Holes in the body can be of different types. If they have rusted edges, then urgent intervention is required. Here's what you'll need to do:
- First, you will have to remove all the paintwork in order to be able to assess the scale of the upcoming work.
Note. The easiest way to remove paint from the body is to use an electric drill with a wire attachment.
- The second stage of work will involve the removal of corroded areas. First, the rotten edges bend inward. A hammer helps with this. Then a piece of tin or a special metal mesh with small holes is placed, and then putty is sealed on top;
- The final stage is polishing and painting.
VAZ 2108 body geometry: restoration and expansion of the body, checking the original dimensions
On the VAZ 2108, the geometry of the body is very important. It is usually violated during an accident. Diagnostics, carried out correctly, will help in this case to determine the degree of distortion of the metal frame of the machine. It is a mistake to believe that the geometry of the VAZ 2108 body is violated only after serious accidents. It is enough to bump your bumper into some obstacle or hit a rock with your wheel, and the consequences can be very disastrous for the body or its parts. Let's learn more from this article about the geometry of the VAZ 2108 body, options for its modernization, factory dimensions and much more.
Major renovation
To carry out a major overhaul of the G8 body, you will need to be well versed in body work. So to speak, the specifics of performing this operation must be studied inside and out.
VAZ 21083 body repair
Preparation
First of all, you need to start by dismantling the body parts:
- All electrical wiring located deep inside the doors is disconnected;
- The door opening retifier is removed. The limiter is usually fixed with fasteners at “10”;
- The fasteners connecting the door hinges and the body are also turned away.
After the main doors have been removed, you can begin to dismantle the rear door:
- The casing is removed, which is held in place with self-tapping screws;
- The room lighting supply and all wiring are turned off;
- The stops are disconnected;
- The bolts holding the hinges are turned out.
Now the hood:
- The starting position of the hood fasteners is marked so that re-installation does not cause any problems.
Note. If a new engine compartment cover is installed, naturally, you will no longer need to mark the bolts.
- The front window washer tube is removed;
- The light bulb for the vehicle's engine compartment is de-energized;
- The wiring harness is pulled out;
- All bolts are removed;
- The hood is pulled out from the brackets (an assistant is definitely needed in this case).
Note. Again, if the same hood is put in place, you will have to stretch the wire along the internal channel to facilitate the subsequent task of installing the wiring.
We continue dismantling, removing the radiator grille and bumper:
- The grille is secured to the body by two bolts, which will need to be removed;
- Then you will need to press out the plastic latch;
- The grate can be removed if you apply some force.
G8 bumpers
As for the bumpers on the VAZ 2108, they are made of a plastic alloy and have good springy properties, allowing the parts not to burst during hard use. This body element is removed as follows:
- The two nuts holding the bumper to the body are unscrewed;
- The bumper is then completely dismantled.
Main part of the work
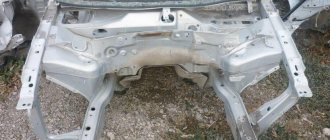
Having removed the attached body parts, the car owner will have to deal with the seats. They are also dismantled, the interior trim is removed, and the owner of a used G8, as a rule, sees such a sight.
VAZ 21083 body repair
Once you start working with a brush and a screwdriver, it becomes clear that rust reigns here, and everything is held together by sound insulation.
It is advisable to always start checking with the side members and beams. On such a used car, as a rule, the fastening of these two body elements leaves much to be desired. As soon as you drive into some hole or small ditch at speed, all hell breaks loose. The same can be said about brake pipes, which simply break with a small bend.
Rust has eaten through the body
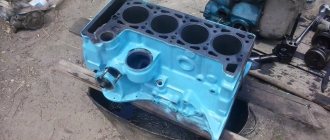
After dismantling the beam, an even more terrifying picture opens up. If you poke the iron with a screwdriver to determine its condition, you realize that there is nothing left of it here. Everything rotten will have to be cut out at the root, and first of all the “basin” and the side members.
Components of the VAZ G8 body with names
Body parts for cars such as the VAZ 2108 are a sought-after product. This is explained by the fact that even without physical impact they relatively quickly become unusable due to corrosion. Repairs are very complicated, and their cost is low, so it is easier, and often more profitable, to replace body parts than to restore them. This article discusses the body elements of the VAZ 2108.
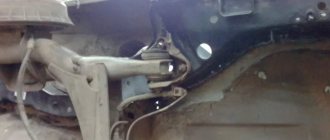
Spars
The structural feature of the G8, like other vehicles of the current type, implies operation as a load-bearing support for the car body. Previously, when frame structures were popular, the situation was different. For this reason, today special requirements are placed on the power elements of the car frame. And as you know, the basis of the reinforcement is the spars.
Purpose of the element
VAZ 21083 body repair
The spar on the “eight” can be compared to an extraordinary frame that runs along the entire metal frame and experiences various structural loads. Here are the important roles that spars perform:
- They serve as a kind of rod for most of the hinged parts of the frame;
- They give rigidity to the body and ensure the geometric integrity of the latter;
- They are almost the main element of the passive safety of a car;
- Thanks to the side members, the elements of the machine's chassis are fixed;
- The spars are responsible for fastening the brackets of the exhaust, fuel and brake systems.
It turns out that such an important role given by the designers to the side members simultaneously turns it into the most loaded component of the car? Yes, that's how it is. The spar will not be threatened by anything only if the owner operates the car only under normal conditions and periodically monitors the anti-corrosion protection and condition of parts close to the power plant. Only the greatest external impact can negatively affect such a spar.
In reality, the situation on Russian roads is completely antagonistic. Bad roads, many obstacles on the way, inattention of service station workers and the owners themselves, who do not have enough time in difficult times of crisis - all this has a negative impact.
How is recovery carried out?
As a rule, restoration of original forms is carried out these days in car repair shops. It uses special equipment, often electronic, a slipway and other useful tools to bring the car to its original condition.
Note. A special platform is called a slipway. This design implies a rigid machine with strong, perfectly geometric shapes. It is on the slipway that the vehicle is rigidly attached to the basic, fundamental points. The metal of spaced apart, deformed elements is also drawn out on the slipway to the required, original dimensions.
The operation of fine-tuning the original geometry of the body and its parts is considered very delicate. It definitely requires individual skill and increased accuracy. Without the necessary equipment, such as a slipway machine, it is almost impossible to complete it.
On the other hand, many craftsmen have adapted themselves in garage conditions to bring skewed body elements to the required dimensions. True, this is done with errors, but they imply a slight deviation from the original indicators.
Most often, in the current conditions, the car’s suspension has begun to fail. Such deformation occurs, clearly, due to bad roads. And its displacement is very difficult to determine. After the car falls into a hole or receives a strong impact, it is highly recommended to immediately check the condition of the car for wheel alignment.
You can learn more about the operation of the slipway from this video.
Creating a substrate that saves paint
In order to apply paint in no more than two layers, the car must be primed with a composition of appropriate brightness. The term “brightness” implies a rating in terms of lighter or darker from white to black. For example, if your car is white, buy white primer; if it’s black, buy black primer. It’s more difficult with metallic and mother-of-pearl. In these cases, you will have to mix black and white in certain proportions.
To understand how bright the ground should be, you need to look at the car not at a right angle, but from the side. Let's take the popular silver metallic “Snow Queen” as an example. When viewed at an angle of 90 degrees to the surface, the color will be very bright and the aluminum powder will be clearly visible under the varnish. If we move the viewing angle along the car, the brightness will gradually decrease and we will see a neutral gray color. This is what your soil should be like.
Moreover, it does not matter at all what shade of metallic or mother-of-pearl is yellow, red or green, the degree of brightness of the gray primer will simply change. In any case, it should be such that it can be easily painted over with two layers of paint.
Geometry check: factory dimensions
Geometry is the exact dimensions of the VAZ 2108 body. And when checking, the most important of them come forward. As a rule, one of the main parameters of the body is the size of the side member, wheelbase, distance between the wheels on one axle, etc.
Note. When changing the dimensions of the VAZ 2108, it is imperative to observe the weight of the body and its curb weight.
No less important is the distance between the points of the door and window openings, the location of the internal combustion engine compartment, the dimensions of the trunk, and so on.
Note. Wheelbase and track width are one of the most important indicators of correct body geometry. The first coefficient is measured by measuring the distance between the front and rear axles of the car (for the “eight” it is 2460 mm), the second - by measuring the distance between the right and left wheels on the same axle (for the “eight”: 1400 mm in the front - 1300 mm in the rear).
The table below shows the original, factory dimensions of the V8 body, which will make it possible to check the metal frame for deformation and find out how much the VAZ 2108 body weighs, which is also important.
Seat reupholstery
Seat reupholstery
'); if("undefined"===typeof loaded_blocks_drive){loaded_blocks_drive=[]; function n(){var e=loaded_blocks_drive.shift(); var t=e.adp_id; var r=e.div; var i=document.createElement("script"); i.type=”text/javascript”; i.async=true; i.charset=”utf-8″; i.src=»https://www.drivenetwork.ru/data/»+t+».js?async=1&div=»+r+»&t=»+Math.random(); var s=document.getElementsByTagName("head")||document.getElementsByTagName("body"); s.appendChild(i); var o=setInterval(function(){if(document.getElementById(r).innerHTML&&loaded_blocks_drive.length){n(); clearInterval(o)}},50)} setTimeout(n)}loaded_blocks_drive.push({adp_id:e ,div:t})})(47602)
In order to reupholster the seat, you must:
- 1. Decide what materials will be used for this and purchase them. Experienced car enthusiasts recommend using leather and Alcantara (material similar to suede);
- 2. Remove the seat.
- 3. Carefully examine the fragments of the standard case and decide from what material each of them will be made.
- 4. Remove the standard cover by pressing out the metal clips on the back of the seat.
- 5. Rip the removed cover at the seams into separate elements.
- 6. Using the removed fragments, mark and cut out elements from the prepared materials with scissors. In this case, the Alcantara fibers should be oriented in one direction.
If desired, you can install a seat heating system under the fabric upholstery yourself. To do this, you need to purchase standard heaters, which, for reliability, are best sewn from the inside to the Alcantara of the “seat” fragment.
Glue the manufactured fragments of the cover onto foam rubber with a fabric base (the glue is applied from the side of the foam rubber). For gluing, it is best to use a special spray adhesive for reupholstery. Carefully sew the resulting fragments of the cover together. To do this, it is better to contact a sewing workshop that has the necessary equipment.
Front seat reupholstery
Glue the seam flaps on the wrong side of the cover and then sew them together. Turn the finished cover right side out and carefully straighten it out. Put the seat cover on. This operation begins from the back. To do this, you need to thread the straps, pull the cover to the back of the seat and carefully smooth it out.
The cover is attached to the “seat” using plastic clamps threaded through the holes in the cushion. Dry and steam the new case using a hair dryer. After steaming, the cover should be ironed with steam through a cloth. After this, the cover should stretch and become smooth.
You can connect heating elements to the on-board network of the VAZ 2108 by connecting it to the cigarette lighter circuit. It is recommended to use a relay that will turn off the electrical circuit when the ignition is turned off. When completing the work of reupholstering the seat with your own hands, you need to remove any remaining adhesive and fingerprints from the surface of the cover.
Replacement or welding
If a crack forms on the spar, a patch is usually placed in this place. The crack is first welded, covered with a piece of metal and spot welded on top for reliability. Typically, a semi-automatic machine with carbon dioxide is used for this.
During welding, spacers are placed on the spar to prevent it from being pulled to the side. Otherwise, the body may become deformed. If possible, it is always better to purchase a new part, which costs more than temporary repair work. But, with a limited budget, in some cases, you can save money.
For example, if the metal is rotten, then the side members (front and rear) can no longer be repaired. Even if you weld, the rot will continue around it. In addition, welding on soft metal can disrupt wheel alignment, tires will begin to wear out faster, transmission parts will begin to break, and body deformation may occur. How long will this repair last? At most, for a couple of weeks. Agree, replacement is much cheaper.
But if the crack is a consequence of a VAZ impact or collision, welding will be sufficient. But here you need to be very careful. Typically, a crack forms after an accident only if the body has also become deformed.
And in this case, it will be necessary to first level it, and only then can you proceed to welding work.
But is it necessary to contact a service station or can the replacement for 2108 and 2109 be done independently? Remember, you shouldn’t skimp here either. Do your own VAZ repairs only if you understand body work and know how to work with a welding machine. When you encounter it for the first time, you are unlikely to be able to perform high-quality repairs. And all of the above problems may follow.
Straightening and repairing the body can also only be done in a car repair shop. If you do not have the skills and special equipment, it will be difficult to cope with the task.
Installation process
Let us describe the process of replacing the front side member on VAZ 2108/2109 cars:
- Using a plasma cutter, in the absence of which you can use a hand hacksaw for metal, you need to cut off a new spar. Its size must be identical to the size of the damaged VAZ part.
- Once you have everything you need to make the repair, you can begin installation. The spar is connected to other parts, using guide templates, you can achieve precise installation.
- Now you can start welding parts 2108 / 2109, but first you need to check everything carefully. Only after this will it be possible to secure the part in several places. She welds the joint to the joint using arc welding.
- Fix the side member on the front panel of the VAZ. The method of spot or through welding is used here. Please note that if you replace the spar, the second option is more reliable.
- All you have to do is go over the welding areas with a grinding machine. It will be enough to tap the new contact points between the spar and the wheel arch with a hammer to secure the result. Finally, apply primer, soundproofing and sealant to 2108 or 2109.
If you have completed all stages of the work, then you can be proud of yourself! But remember that doing the repairs yourself is quite difficult. If you have doubts about your skills, it is better to contact a car service. It may cost a little more, but the car will serve you for many years.
Body modernization through extension
To protect the body from rapid deformation, today it is customary to simultaneously carry out not only preventive procedures aimed at restoring the original shape, but also tuning. Extending the body of the VAZ 2108 is one of these possibilities.
It is not difficult to expand the body on the G8. It is enough just to stock up on a set of parts for carrying out in accordance with the car model.
The expansion is carried out through:
- Body kits;
- Wings;
- Composite bumpers;
- Wheel arch.
If you are able to carry out this tuning correctly, not only will the appearance of the car improve, which will now look more solid, but the body protection will also increase and the weight of the VAZ 2108 body will decrease, which is undoubtedly important.
Widening is especially often done today using wheel arches. This makes it possible to install much wider wheels or install spacers up to 4 centimeters in size.
Expansion is also done using plastic linings or by welding metal. Often the part is simply replaced entirely with a tuned one, enhancing the low-slung effect and adding relief to the car.
Tuning is a creative process. If the owner of the G8 is a person close to art, then it is not difficult for him to do something amazing with his car. Here is what he is recommended to do:
- Sketch a future sketch, invented by yourself;
- Try it on directly on the car;
- Transfer the dimensions to the appropriate material (foam or anything else), making a layout;
- Treat the masterpiece with glass mat with added resin;
- Bring the arch to perfection with putty as soon as polymerization is complete;
- Sand, prime and you're done. Yes, we must not forget to paint it at the end.
By the way, the sketch of the future product can be entrusted to a professional designer. He will draw a sketch for you, focusing on the wishes of the car owner.
Approximately according to the same scenario, the body is expanded with other elements. Wide bumpers, additional door trims - all this, together with finished arches, will fit into the new style.
Brief overview of bodywork
Let me remind you that this preparation was carried out for a major overhaul of the VAZ 2108 body, which includes the subsequent painting of the entire car. Next, try typing into a search engine the request: “body repair of a VAZ 2108 video, photo,” and you will see for yourself what a labor-intensive and costly process this is. What stages does this most “confused” part of car resurrection consist of? So:
- Replacement of rusted elements and their parts;
- Adjusting sagging doors;
- Correcting dents and dents;
- Restoration of the overall geometry of the body;
- Painting, polishing.
If you have more or less figured out the overhaul of the body, then it is worth getting to know a little more closely with partial repair of the body or repair of its individual parts. Although, what’s stopping us from doing a partial overhaul, right?
Preparatory work
If you nevertheless decide to repair the spar on a VAZ yourself, first you will need to acquire the following tools for the job:
- welding machine;
- metal hacksaw or plasma cutter;
- grinding machine;
- metal spatula.
Since spar replacement and repair are carried out using the same technology, the set of tools will also be the same. First you will need to dismantle all electrical equipment, parts, engine components and chassis.
The next stage is heating the parts. But first you will need to get rid of the old coating, remove the sealant, sound insulation and primer. Now you can cut off the heated spar. Please note that if the wheel arch is also being replaced, there is no need to separate it first.
Please note that it is better to purchase spars complete with other parts. This way you will be sure that they will fit each other perfectly and will not spend so much time installing them.