Comments: no Published: 01/06/2016
Rating:
Tags:VAZ 2108/2109/21099Replacement spar
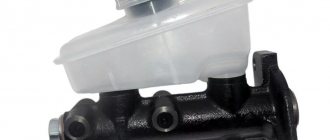
The problem of a spar failure on a VAZ 2108/2109 is an unpleasant situation, but this does not mean that it cannot be corrected. There are many ways to fix the problem: replacement or welding, do-it-yourself repair or in a workshop. You will learn further how to make the right choice.
Purpose and location of the spars
To answer the question of where the side members are located, you should study a little the principles of the layout of modern cars. So, side members are special body elements that are installed under the bottom and serve as a kind of reinforcement of the car body. The functional responsibilities assigned to the spars include:
- support, thanks to which suspension elements are attached to the body;
- thanks to them, the body receives additional rigidity, and the geometric integrity of the car is also ensured;
- spars ensure passive safety of the machine;
- act as fastenings for chassis elements;
- They also secure parts of the fuel, brake and exhaust systems.
Since the side members bear great responsibility for the condition of various vehicle systems, including the safety factor, the driver must carefully monitor their condition, including carrying out the necessary inspections from body repair specialists. In some cases, car owners can independently carry out certain operations to repair side members. And even if they don’t have the necessary experience, today you can use a video to learn how to weld the rear side members.
About the purpose of the spar
The spar used on the VAZ 21099 is a kind of integrated frame that runs along the entire length of the body and carries several specific functional loads:
- support for mounted body elements;
- imparting rigidity to the body, ensuring its geometric integrity;
- ensuring passive safety in the car;
- fastening of chassis parts;
- fastening of fixing elements (brackets, etc.) for fuel, exhaust, and brake systems.
The main reasons for the destruction of the front spar
As noted above, the submarine bends from impact and rusts over time. The following also have a destructive effect on this body element:
- constant engine vibrations, especially if the engine or gearbox mounts are loose;
- driving a car on bad roads;
- extreme driving.
Since the side members are practically the skeleton of the body, a large load falls on them. All vibrations and shocks are transmitted to these elements; as a result, the body parts cannot withstand, become deformed, and cracks appear on them.
Causes of damage
As we have already found out, the spar absorbs the bulk of the shock absorption when driving; manufacturers specially develop special designs for this part so that it absorbs all the kinetic energy and takes on the entire impact force in an accident. But even if the car has never been in an accident, the spar may crack over time from driving on our roads.
If you notice that the car is starting to pull sideways, or the doors are not closing well, the rubber is rubbing against the body - these are the first signs that the spar is cracked or misaligned. But don’t panic, how to pull out the spar is described in this article, and you can solve this problem yourself or turn to the services of a car repair shop. In today's article we will look at the method of drawing out a spar with our own hands using the example of a VAZ car.
To damage or bend the spar, it is not necessary to make a head-on collision at “crazy speed”; this can also happen in a light collision, as a result of which the entire car body changes its geometry.
Features of replacing the rear side members of the VAZ-2109, the cost of repairs in a car service center
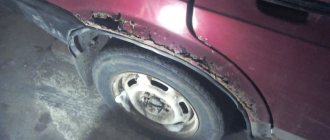
Cars of the VAZ-2108-09 family are not distinguished by a strong body or durable body iron; the metal rusts especially quickly if it is not treated with anticorrosive. Over time, rust appears on the metal surface, and the rear spar often rots on either side, and cracks appear on it during use. If you drive for a long time with a rotten side member, the rear beam can tear out, which will lead to unpredictable consequences. To avoid a major nuisance or even disaster along the way, it is better to change the spar in advance; this work can be done in a car service center or with your own hands in a garage if you have sufficient experience, the necessary tools and materials.
This is interesting: Cleaning the throttle valve - detailed instructions on how to clean it yourself
Preparation for work
Considering the long-term use of the VAZ 21099 sedan, the condition of the vehicle’s structural frame may not be the best. Therefore, if you need to replace the rear side member of a VAZ 21099, you need to purchase all the necessary spare parts.
Replacing the rear beam
It is equally important to decide how the replacement will be carried out. If you do everything in a garage, you will need a lift and the necessary equipment. If you are replacing the rear side member yourself, you need to perform a number of preparatory work before lifting the car on the lift.
- Seats, carpets and interior floor coverings must be removed. This is done to comply with fire safety and maintain the quality of materials.
- Considering the welding work, it is advisable to dismantle (or at least protect with special material) the fuel tank with gasoline residues. And after the car is on the lift, be sure to disconnect the negative terminal from the battery.
Further operations are carried out in the following sequence:
- drive the car onto a lift, remove the wheels from the hubs;
- release the rear beam with suspension elements, otherwise it will be impossible to carry out work;
- clean the rear spar to determine the mounting points.
It should be borne in mind that the spar is usually secured by spot welding, so it is important to locate all such places. For better cleaning, use a wire brush. We clean the welding areas using an angle grinder.
Replacement procedure
- We drill out the attachment points of the power element, and if this fails, then the remaining points need to be cut off using a chisel and a hammer.
- After dismantling the old spar, it is necessary to thoroughly clean the area for the replacement part purchased, install it and, if necessary, adjust it to the required size.
- A new part is being prepared for welding. This must be done in the same places where factory welding was used. A minimum of three welding points will be required for initial fixation.
- The prepared part is secured to the place to be installed using removable clamps.
- We sequentially weld the spar to the body according to previously prepared marks, after which we evaluate the correctness of the design.
- The final stage of installation is the final welding of the part. In this case, the structure is strengthened by applying additional strength elements.
- After completion of the work, the welding areas must be processed by cleaning with a grinding machine. Finishing is mandatory.
This stage involves thoroughly cleaning the welding areas from scale and other foreign contaminants. The surface is thoroughly degreased, coated with primer and anticorrosive. Epoxy resin can be applied to the weld areas to permanently protect them from spot corrosion. The final step is to reinstall the suspension parts and secure the beam. The interior elements are installed, the car is completely cleaned, put on wheels and rolled out of the garage.
The body will have to be thoroughly disassembled
Despite its apparent simplicity, before starting work, you need to assess your own capabilities. After all, redoing it is more difficult than doing everything right in the first place. Mistakes that can be made during poor-quality installation can lead not only to the rejection of the new spar, but also to a violation of the geometric shape of the car or its incorrect behavior while driving. Thus, replacing the rear side members is a process that can be done independently, but a responsible approach to the work is required.
Rear spar repair kit 2108-09
The rear spar repair insert allows you to replace only part of the body part, which simplifies the repair and makes it cheaper. The repair kit is a reinforcing element located on a bend; it is believed that this particular place on the body is subject to intense rusting.
In practice, it is not always possible to use a repair insert, since both the rear beam fastening in the side member (the main problem of 2109) and the jack often rot. The average cost of a repair insert in auto stores is 700-800 rubles, catalog numbers are 2108-5101372 and 2108-5101373 (right and left sides).
Replacing rear side members on a Nine in a car service center
Replacing rear LPs is a labor-intensive and quite complex job that requires care, metalworking skills, and the ability to use welding. Not every car owner undertakes to carry out such repairs on their own, so quite often the owners of front-wheel drive VAZs turn to professional technicians. The cost of replacing the rear spar 2108-09-099 can vary significantly, it depends on various factors:
- the location of the auto repair company, usually in the metropolitan region and large cities, repairs are more expensive;
- car service level;
- general technical condition of the car.
If the car body is heavily rusted, not all craftsmen agree to repair such a vehicle. I would also like to note that many auto repair shops fundamentally refuse to hire VAZ-produced cars, preferring to engage in more profitable repairs of foreign cars.
The average cost of replacing one rear spar 2108-09 is from 3,500 to 5,000 rubles; of course, car owners consider such prices to be simply extortionate. The price of body work, including materials, is sometimes a third of the cost of the used car itself, which cannot be considered normal. Private auto repairmen in garages have more affordable prices (from 2000-2500 rubles), but there are pitfalls here:
- a good repairman is not easy to find, and it is difficult to get to him, since due to high demand, repairs are carried out by appointment;
- among private traders working at low prices, there are many outright hacks;
- in garage conditions there is not always everything necessary for high-quality repairs;
- the work is carried out by repairmen with insufficient experience, technology is violated.
When replacing rear LPs, it is important to weld the body part exactly in place; if the spar is shifted to the side, the geometry of the body will be disrupted, the rear beam will “move” to the side, and the car will drive sideways with all the ensuing consequences.
Recommendations for replacing the rear side members of the VAZ-2108-09
- When replacing a LP, many craftsmen cut off the old body element with a gas cutter, but it is better to drill out the part.
- When installing a new spar, it is very important to find the control points correctly and not to disturb the geometry of the body, otherwise the work will have to be redone and problems will arise.
- It is recommended to grab the spar at three or four points; before thoroughly welding the part, it is recommended to try on the rear beam - the fasteners must match the studs.
- Before installing the body element, the seat must be thoroughly cleaned of rust and well primed; if the metal is rusty, new plates must be welded.
- You cannot weld with a continuous seam, this will weaken the metal of the body.
Replacing rear side members is not an easy job, if you are not confident in your abilities, you should not take on it, it is better to use the services of professionals.
Body repair is a harsh thing, or use a chisel to “CHISEL”
For everything about garage welding of rotten cars, see the new book on car repair from Khoma
In August 2009, a nice young lady approached me with a small request - to weld a hole in the side member of a VAZ-21093 car, in common parlance - “chisels”, they say, the husband is a diagnostician, “fumbles” with engines at 10c plus, but there is no one to do auto body work.
Well, helping your neighbor is a sacred thing, I thought and invited them to the show. The initial examination raised a lot of questions, ranging from year of birth to:
WHERE IS THE CAR'S FLOOR? Brief questioning of the owner revealed the following: the car was produced in 1996, stupidly stood in a pit for three years, after which it was bought outbid, hastily patched up, coated with various mastics and successfully sold off to the current owners, and since the diagnostician husband figured out that the engine was in good condition, he didn’t bother with the condition of the body…..But in vain!
The young lady was offered the following options:
— replace the floor, sills, rear side members
— completely change the body (the engine is excellent)
- cover it up again and sell it off to other less fortunate buyers at an even lower price (there was no recycling program at that time).
Ultimately, the decision was made - COOK!
Disassembling the interior took two hours, they opened the Shumka and “rejoiced”:
the floor of the car was practically destroyed by corrosion (see photos 1, 2, 3) The place of the “happy” driver, who almost ran along the “path with his own legs” (photo 4) looked especially impressive
Since the floor tunnel miraculously survived, only the “trough” was replaced
After cutting off the rags, cleaning off mastics and other offal, drilling out resistance welds on the side members, and carefully marking them, welding of the floor began.
By the way, everything was cooked using a domestic carbon dioxide semi-automatic PDG-165.
Next in line were the rapids.
After opening the outer panels, a view appeared no less gloomy than the appearance of the floor (photo 9, 10)
In order not to take risks, stretchers were installed in the body for rigidity (see photo 26, where the car looks quite naked) and this measure, I think, was not unnecessary - it’s better to be overdressed than underdressed.
The remains of the side members and jacks brought tears to my eyes... (photo 11, 12)
Having mercilessly chopped off pieces of old metal with a grinder and a chisel, we got to the living metal of the body. We welded in the amplifiers, connectors and front jacks. Buy a new book on auto repair from Khoma. We decided to wait a while before installing the doors to install the external sill panels in order to prevent the appearance of unnecessarily large gaps.
Finally, the turn came to the spars. This “hole” was what the sweet girl wanted to seal (photo 14)
The same photo shows that the edges of the wheel arches still have the same deplorable appearance. Removing the rear bumper and examining the trunk for integrity forced me to take up the camera again:
Replacing the rear right side member 2109
The condition of the rear spar is determined by external inspection; if the body element has traces of severe corrosion and is thoroughly rotten, it must be replaced; in many cases its repair is impractical. Even before performing work, it is necessary to inspect the car body itself; often the iron on the 2109 rots to such an extent that there is practically nothing to weld to.
To carry out repair work you will need:
- welding machine;
- electric drill with drills;
- screwdrivers;
- a set of keys;
- hammer;
- core;
- chisel;
- cleaning wheels.
You must first buy the floor spar itself (LP), the average retail price of the body element in auto stores is from 1800 to 2500 rubles, catalog number is 2108-5101372. This spare part is suitable for model 2108-09-13-14, with minimal modifications it can be installed on VAZ cars 21099 and 2115. Since when replacing a spar you basically have to work under the car, you need to think about how to make it easy to get to below. There are several options here:
- use a car lift;
- carry out work in the inspection pit, hanging the rear part of the body on “goats” or other stands;
- turn the car over on its side, using a reliable support.
Before you start drilling out the old spar, you need to partially disassemble the car and remove:
- rear seats;
- gas tank;
- rear floor trim;
- rugs;
- rear beam (you will have to disconnect the handbrake cables and brake hoses).
After disassembly, you can begin to directly remove the rear LP; to do this, you need to find the attachment points, drill them at the spot welding points using a drill clamped into the drill chuck. After dismantling the body part, it is necessary to thoroughly clean the metal under the spar and prime it, remove the shipping primer from the new part (it can be removed very effectively and quickly using sandblasting). In order for the right side member to fit exactly in place, you should use measurements (there are control points for attaching units), there must be a certain distance between the elements of the front and rear suspension (between the fastening of the rear beam and the front wishbone).
This is interesting: How to remove the wing on the fret Kalina - step-by-step instructions
After determining the control points, the spar is tacked by welding in several places, the correct installation is checked, then the part is finally welded to the seat. The final stage of repair consists of the following steps:
- cleaning welding scale with a grinding wheel;
- degreasing the metal surface;
- application of primer and anti-corrosion coating.
Very important conditions when performing welding are an intermittent seam, a maximum length of 4-5 mm. A continuous weld is unacceptable; with such welding, the body loses its elasticity and becomes very rigid. The left rear lip on the “Eight” or “Nine” changes in exactly the same way as the body element on the right side, the procedure for performing the work and the installation principle are the same.
Installation process
Let us describe the process of replacing the front side member on VAZ 2108/2109 cars:
- Using a plasma cutter, in the absence of which you can use a hand hacksaw for metal, you need to cut off a new spar. Its size must be identical to the size of the damaged VAZ part.
- Once you have everything you need to make the repair, you can begin installation. The spar is connected to other parts, using guide templates, you can achieve precise installation.
- Now you can start welding parts 2108 / 2109, but first you need to check everything carefully. Only after this will it be possible to secure the part in several places. She welds the joint to the joint using arc welding.
- Fix the side member on the front panel of the VAZ. The method of spot or through welding is used here. Please note that if you replace the spar, the second option is more reliable.
- All you have to do is go over the welding areas with a grinding machine. It will be enough to tap the new contact points between the spar and the wheel arch with a hammer to secure the result. Finally, apply primer, soundproofing and sealant to 2108 or 2109.
Body geometry of the VAZ 2108/2109
If you have completed all stages of the work, you can be proud of yourself! But remember that doing the repairs yourself is quite difficult. If you have doubts about your skills, it is better to contact a car service. It may cost a little more, but the car will serve you for many years.
Author: Ekaterina
Front spar VAZ 2109 and its replacement
The VAZ 2109 spars strengthen the car body, especially the floor and luggage compartment. They also act as shock absorbers, maintaining the front part of the body. The VAZ 2109 spars are mounted in such a place that they absorb deformation. Replacing the VAZ 2109 side members is necessary if they have become unusable. This publication will tell you how to replace the side members of a VAZ 2109.
If necessary, replacement of VAZ 2109 side members can be carried out only in some places. The manufacturer's instructions indicate where the spars can be cut. There are areas that are specifically designed to absorb shock.
Replacement of VAZ 2109 side members should be carried out with a significant degree and zone of deformation. If the deformation is small even along the entire length of the spar, then it will be sufficient to restore the previous geometry and position of the spar using a jack or square. This will preserve the characteristics of the spar.
Partial replacement of VAZ 2109 side members involves the use of a special coupling. When performing a partial replacement, there is no need to specifically strengthen the side members. They should act as shock absorbers, and reinforcement will increase the strength of the zone.
When the body collapses, the side members take the load upon themselves, and thus the rest of the body suffers less.
The cost of replacing the front side member of a VAZ-2108-09 in a car service center
Since replacing a submarine is not an easy job even for an average car service center, not all craftsmen undertake it, especially since not everyone is eager to begin restoring the body of a used Nine. Mostly, small auto repair shops carry out minor and medium body repairs, while large auto repair centers do not want to deal with domestic cars at all. Prices for body work from auto repair companies and private owners are most often approximate; often the final cost of the repairman is announced closer to the end of the repair. The fact is that “pitfalls” may unexpectedly appear, and as a result of their identification, the work is delayed and becomes more complex.
Some car service centers indicate two values in the price list at once - the upper and lower limits; in large cities or the capital, they charge from 3,500 to 9,000 rubles for replacing the front side member; usually, work from private repairmen in garages costs less. Often, along with the submarine, it is necessary to change the wing splash guard, sills, and repair the bottom; some auto repair shops note in their prices that the cost of repairs in the price list is indicated without painting.
Repair of the front side member of the VAZ-2109
The main reasons why submarines have to be repaired are the appearance of cracks on the body element. In some cases, the spar bursts in a circle, the metal rots through and through, if the part itself is not yet in a completely deplorable state, patches are put on it, and the iron is strengthened using spot welding. If the spar is pulled away as a result of an accident, it is pulled out on a stand. You can try to pull out the submarine without a slipway; in garage or field conditions, craftsmen carry out a similar operation using a strong metal chain, a hand winch and some kind of support, for example, wood.
In this case, the rear beam must be fixed so that the car does not move forward; it should be pulled carefully, constantly checking for deformation of the rear axle. If the beam bends due to excessive force, it will have to be replaced. Only professionals can say whether it is worth repairing a car after damage to the spar; in some cases it is easier to sell the car for spare parts than to restore it.
Design advantages
Each design has advantages. Thus, “angular” spars allow the wheel to turn at a larger angle, and devices with vertical bending allow the vehicle’s center of gravity to be lowered and the bottom level to be lowered.
Parts with horizontal bending are structural elements that also make it possible to lower the level of the bottom, increasing safety in the event of a side impact.
To increase rigidity, the spars are strengthened with cross members. The latter come in different profiles - in the form of the letter K, X, or be straight.
This type of crossbar is made of a special profile made of reliable and deformation-resistant metal.
To increase reliability in freight transport, cross members and side members are combined with special rivets, and in passenger transport - by welding.
An important point is the fixation of the body on the frame, which occurs using special brackets.
Considering the spar design as a whole, it is worth highlighting the following advantages:
- Minimum weight and torsional rigidity;
- High level of controllability and dynamics, as well as minimal fuel consumption due to the low mass of the unit;
- Greatest passive safety. The latter is possible thanks to special zones that “absorb” excess energy and increase the level of comfort.
Toyota Mark II front side members.
Worth about:
- If one node breaks down, the integrity and connections of the structural elements are disrupted. This is due to the fact that the load is distributed evenly over the area;
- Difficulty in repair. In case of serious deformations, the only solution is to replace the unit.
Basic malfunctions and problems associated with side members, solutions
During operation, the following problems are possible:
- Deformation (curvature) due to exposure to loads over long periods of time. It is worth remembering that the spars are made of metal, which gets tired and damaged over time.
- If you get into an accident, the part may be severely damaged. In such situations, many car parameters are violated. So, in the event of an accident, it is possible that the suspension or power unit may shift in relation to the body part, the location of the wings or doors may change, the geometry of the body will be deformed, obvious cracks may appear on the outside, and so on.
If there is obvious damage (cracks appearing) in the part, the integrity of the structure is also destroyed.
That is why after an accident it is worth making sure that there is no deformation of the components. In practice, in 90% of cases after an accident, the front side members have to be repaired.
The method of restoration is determined taking into account the severity of the problem and damage to the damper section. So, the spar, which is part of the frame, is easy to change. If the assembly is part of the supporting body, then restoration work may be useless.
The possibility of repair depends on the degree of deformation:
- If the damage is minimal, the assembly is pulled out on a special stand, after which the parameters of the part are checked;
- If the deformation is severe, the best option is replacement. If you try to make corrections to a distorted part, you may change the structure and reduce the strength of the structure. The result is deterioration in body characteristics.
There may be situations where the replacement is not complete. In this case, new parts are attached by welding. The use of couplings to connect structures is prohibited.
We must not forget that the main function of the spar is to strengthen the body, so during the repair process maximum attention is paid to strength. On the other hand, excessive strengthening of the unit leads to a decrease in shock-absorbing functions, which is unacceptable
On the other hand, excessive strengthening of the unit leads to a decrease in shock-absorbing functions, which is unacceptable.
So when repairing, you should take this parameter into account and try not to overestimate the level of rigidity.
Replacement of side members of VAZ CLASSIC No. 50.
Replacement procedure if you decide to do it yourself
- Raise the entire car on a rack lift, or just the damaged side.
- The VAZ 2109 spar is attached using spot welding, it must be drilled out. Anything that cannot be drilled out, cut off with a grinder.
- If some elements of the part are inaccessible to you, then remove the suspension (the wheels will have to be removed in any case).
- If, after all that has been done, you still cannot remove the spar, cut it off with a chisel.
- Let's try on a new part. If it is larger, then we will cut off the excess part.
- In the new case, we make holes in the places where you will weld it.
- We attach the part to the body by welding.
- We clean the welded points with a grinding machine.
- We prime the new part and paint it in several layers.
- If desired, you can carry out anti-corrosion treatment.
As you understand, you can’t joke with the spar. And if you are not an expert in body repair, then all defects need to be repaired at an auto service center. Well, and lastly, a funny video of how our compatriots decided to quickly straighten the side member of a VAZ 21099.
Garage masters: Roman from Nizhny Novgorod
You can read about the impressive repair of the VAZ-21093 car, which was almost destroyed by corrosion, on the page of the garage master Roman from Nizhny Novgorod
When purchasing a used car (for example, VAZ 2108, 2109, 21099), you should first of all pay attention to the condition of its body and body covering. This is not surprising, since the body is the most expensive component of the car.
List of main weak points of VAZ 2108, 2109, 21099 car bodies
- Places for attaching the rear beam to the car body.
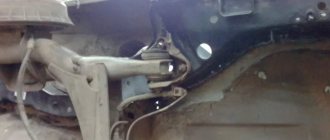
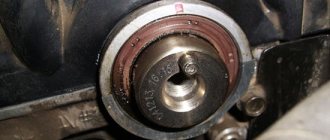
The rear beam of VAZ 2108, 2109, 21099 cars is attached with its levers through rubber-metal hinges to triangular brackets on the right and left sides of the body. The brackets, in turn, sit on studs and are secured with nuts (three studs and three nuts per bracket). The studs are welded to a special thicker metal reinforcement located inside the rear side member.
Over time, a corrosion center appears around the brackets (possibly due to a violation of the protective layer of the spar, untimely treatment of its internal cavity with a protective composition, or vibration loading of this part of the body). First, corrosion eats away the metal of the threshold around the bracket, then it is taken over by the amplifier. After some time, the attachment of the beam to the body is simply torn out, and the car becomes uncontrollable. It is very important to repair this connection at an early stage of destruction (before the amplifier inside the spar is destroyed).
In this case, the metal of the spar under the brackets can be replaced with a thicker one. In severely advanced cases (for example, when a beam has already been torn out), repair is also possible, but it is more labor-intensive, since it requires the restoration of destroyed elements in compliance with geometric parameters (otherwise the car may pull to the side and the rubber of the rear wheels may be eaten away). For more information about the repair of the rear beam fastenings, see “Repair of the rear beam fastening points to the body on VAZ 2108, 2109, 21099 vehicles.”
- Places for attaching the front suspension brace brackets (“crabs”) to the car body.
A similar situation occurs when corrosion forms in the area where the “crabs” are attached to the lower part of the radiator frame. In the places where the brackets are attached, the radiator frame also has reinforcements made of thicker metal. Basically, the destruction begins around them. Repair inserts for brackets are available for sale, which need to be welded in place of the damaged ones. Repairs must be carried out in compliance with all geometric dimensions, since otherwise the alignment of the wheel angles is disrupted, which cannot be adjusted in the future. See “Repair of places where the front suspension extension brackets are attached to the body of VAZ 2108, 2109, 21099”.
- Front suspension strut cups.
How to weld the rear spar on a VAZ 2109
About 1.4 million copies of VAZ-2109 cars were produced and it, along with classic VAZ models, became a truly people's car. Not least of all, this was achieved thanks to the high maintainability of the “nine”. In this article I would like to dwell on such an important problem as replacing side members on VAZ-2109 and 2108.
Replacing side members on a VAZ-2109
Tips for welding the side member of the VAZ 2109
When the spar cracks, a patch is placed in place of the crack. But first they weld the crack itself. At the same time, you cannot cook one place for a long time, since the metal becomes less durable. Then they put on the patch and secure it with spot welding. For welding, you can use an automatic field with carbon dioxide. Also, when welding, it is necessary to place spacers on the spar so that it does not drift to the side. Otherwise, the body will be deformed.
Content
From the author
About 1.4 million copies of VAZ-2109 cars were produced and it, along with classic VAZ models, became a truly people's car.
Not least of all, this was achieved thanks to the high maintainability of the “nine”. In this article I would like to dwell on such an important problem as replacing the side members on the VAZ-2109 and 2108
Replacing side members on a VAZ-2109
Welding of the spar is used in two cases:
- When fatigue cracks started to appear. Then it makes sense to put a patch over the crack and weld it using semi-automatic welding.
- When there are small pockets of corrosion. In this case, the metal is cleaned, treated with a rust converter and primed. If necessary, small patches are applied.
If the car was involved in an accident in which the side member was significantly deformed or rotted, then a complete replacement would be advisable. It is necessary to understand that you need to repair the spar if you have sufficient skills in body work and welding. For an inexperienced person, this process will be quite complicated, so if you are not confident in your own abilities, then it is better to trust the professionals.
Required tool:
- Semi-automatic welding.
- Bulgarian.
Semi-automatic welding
- Electric drill.
- Wire brush.
- Spars for VAZ-2109.
- Mastic, primer, solvent.
Dismantling of the spar must be carried out on a slipway or with the machine turned over on its side. In addition, you need to completely remove all the trim and soundproofing of the trunk. After this, we clean the weld seams. Next, we will need to find all the resistance welding points of the spar and drill them out using a 7-mm drill. At the end of this process, we need to completely cut off the old spar. We clean the place of its attachment from rust and paint. This is done using a metal brush on an angle grinder and a rust converter. If necessary, we cut out the rotten body elements and put patches in their place.
Removing the rear side member
Before installation, the mounting area is degreased and primed. The new spar also needs to be cleaned of transport soil, primed and holes made in it for welding points. If everything is done correctly and the geometry of the body is not damaged, then the new spar will fit into its seat without any problems. We weld the spar at the welding points to the body and cross member. At the end of this process, coat the seams with automotive mastic.
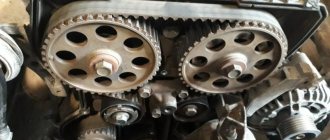
Features of repair and replacement of the bottom of a VAZ 2114 and 2115 car
The front spar is more loaded than the rear. This is because it bears the entire weight of the engine and gearbox. If we add to this operation on bad roads and aggressive driving, then its service life will be only about 4-5 years. In some cases, a special repair insert, which is welded into place of the damaged fragment, can save you from the labor-intensive process of completely replacing the spar.
Before you begin replacing the spar, you need to remove the entire front suspension and engine, and partially disassemble the interior
When disassembling the front part of the car, pay attention to the condition of the remaining body elements, such as glasses, radiator frame (most likely, the frame will have to be changed along with the side members, because
it serves as a structural reinforcement), mudguards. It is possible to partially replace the front spar. In this case, the old one is cut off, and a new one is welded in place of the cut out part. However, next we will look at the process of completely replacing the front side member.
What to do if the spars are rotten
These days, most cars have a fairly high mileage range. This is explained by the fact that many of these cars are quite old. Therefore, they often have problems with various body elements, including side members.
Unfortunately, the quality of the metal from which our cars are made meets the highest standards. Because of this, the body does not withstand high humidity, which is quite common in our latitudes. The side members mounted under the car body also suffer.
Fuselage power kit
Typically, longitudinal parts of the frame, such as stringers and spars, extend the entire length of the aircraft. They are presented as a bent profile with different cut sections. The main task of the stringer is to distribute loads. As for the spars, they provide overall structural rigidity.
The transverse parts of the frame consist of simple and reinforced frames. They allow you to maintain the shape of the fuselage under external and internal influences. Reinforced frames are installed near large cutouts in the hull or at the point of attachment of components.
The skin of aircraft is made of sheet metal, which forms the surfaces of the fuselage. The aircraft skin is attached to the load-bearing frame. The joints of the sheathing sheets are located on the transverse and longitudinal parts of the load-bearing frame. In modern aircraft manufacturing, composite materials are increasingly being used to reduce the weight of aircraft.
How much will the repair cost?
Restoring the worn out bottom of a “nine” or “eight” costs a significant amount - from 5 to 29 thousand rubles. The price of overcooking in car services varies depending on several points taken into account by the craftsmen:
- size of damage, depth of corrosion;
- possibility of carrying out repair work;
- difficulty of recovery;
- order fulfillment time;
- car service pricing policy;
- place of work.
The cost of overcooking the bottom of 2109 when purchasing the cheapest repair kit will be 5–8 thousand rubles. Purchasing consumables in specialized auto stores will cost 11–12 thousand rubles. For the work of a service technician, you will have to pay from 20 to 30 thousand rubles, depending on the assessment of the damage, the volume performed, and the complexity of the restoration.