Adjustment or how to set timing marks on a VAZ 2106 yourself
Decoding notes
Without pre-basing the pistons and valves, installing the timing chain on the VAZ 2106 according to the marks is impossible. Therefore, the significance of the marks is not at all conditionally decorative. The signs give an understanding of the position of parts inside the motor:
- The mark on the KV pulley, which coincides with the long line on the front cover, means that the pistons of cylinders 1 and 4 have reached TDC.
- The mark on the RV sprocket, combined with the tide on the bed, informs about the closed valves in cylinder 4 - this is where the compression stroke occurs.
For your information. The numbering of the “pots” starts from the radiator side.
When the marks coincide, the ignition distributor slider is turned towards cylinder 4, and the valves of the latter are closed. By analogy with setting the clutch on a “classic”, the unambiguity of the relative position of the crankshaft and camshaft serves as the basis for adjusting the clearances in the valve mechanism and the ignition setting procedure.
How to restore tag matches
When the chain is pulled out, the marks will go away. The main difficulty is to return them to a position of mutual coincidence. This work is combined with dismantling the old chain. However, there is no need to rush to remove it - misalignment of all factory markers is fraught with danger.
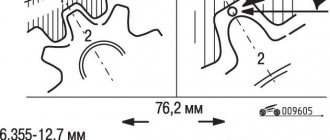
The base is the position of the crankshaft at which the pulley mark coincides with the long line on the front cover. In this case, the drilling hole for the camshaft star should be closer to the high tide. This must be achieved first. It is worth remembering that the transmission is made with a 2:1 ratio - two revolutions of the crankshaft correspond to one revolution of the camshaft.
- Remove the camshaft sprocket, remove all other gears and the chain stopper.
- Take out the chain.
- Put the camshaft sprocket back (without the chain), tighten the bolt, tighten it, securing the part by the teeth with a screwdriver.
- Rotate the camshaft until the marks on the sprocket and bed coincide.
- After fixing the sprocket with a screwdriver, unscrew the bolt and remove it.
- Install a new chain, sprockets, tensioner shoe and damper plate.
Unnecessary fears when dismantling the RV sprocket are not appropriate. The shaft design includes a pin. In addition to transmitting torque, it serves as a fixator of a certain position.
How to put on a chain
Installation of a new chain begins with its attachment to a new crankshaft sprocket. Next, the damper, tensioner shoe, and limiter are mounted. The chain is passed through the drive shaft gear and secured along the way. Afterwards it is mounted on the camshaft sprocket, and its position is adjusted according to the cycle:
- Put it on the shaft.
- Look at the relative position of the drill bit and boss.
- Take off.
- Move one tooth in the desired direction.
The final procedure is to tighten the chain, during which the tensioner is twisted all the way with good force. After rotating the HF key, the final check of the coincidence of the signs is carried out.
Nuances in installing a timing chain according to factory marks on a VAZ 2106: pitfalls
It is difficult to achieve perfect alignment of two pairs of marks. The main reason is the use of components with dimensions within the maximum limit. By the way, adjusting the VAZ 2106 carburetor with your own hands also never follows the ideal scenario - additional recommendations from experienced craftsmen are almost always used.
Allowable elevation shifts
One of the unwritten norms allows for a discrepancy between the sprocket drilling and the camshaft bearing housing boss within a half-tooth in one direction or another. To be more specific, the installation of the timing chain of the VAZ 2106 engine according to the marks is considered complete when the camshaft sprocket is aligned exactly, and the mark of the crankshaft pulley goes slightly forward. This guarantees stable traction throughout the entire speed range.
If the camshaft star is aligned with the mark, and the knee pulley does not reach the TDC mark, the engine operates stably only up to a speed of 100 km/h. After crossing the border, there is a loss of traction and increased fuel consumption.
Extremes
A discrepancy of one tooth between the timing marks and the camshaft sprocket is unacceptable. This is usually evidence of critical chain stretch. When it is new, it is worth inspecting the seat under the key on the crankshaft - perhaps it is broken, hence the excessive play.
Engines with significant mileage are often prone to arbitrary changes in the location of the RV star mark during the rotation of the HF. This leads to:
- Slicked teeth in engagement of the gear shaft of the oil pump drive with the drive shaft (“fungus” with “pig”).
- Play in the distributor.
- Ellipse of timing sprockets.
For your information. Using a split star helps achieve perfect mark placement. It is installed to replace the standard camshaft gear.
Briefly about the main thing
The technology for setting timing marks on a VAZ 2106 engine is performed with the chain removed. A sprocket mounted on the camshaft without a chain is fixed with a screwdriver and tightened with a wrench. After rotating the camshaft in the desired direction and combining the drilling with the boss on the bed, the gear is again immobilized with a suitable object and dismantled. Next, the new chain is installed.
Perfect alignment of the marks can only be achieved by using a split gear. However, this is not at all necessary to comply with. It is quite possible that the camshaft marks coincide and the crankshaft pulley moves a little forward.
The marks of the camshaft and the crankshaft on the VAZ 2103 do not match. No matter how much I struggle, it either doesn’t work or it goes over. What do you advise?
- VAZ 2103 starts poorly and stalls - 5 answers
- How to unscrew the lower pulley to look at the mark on a VAZ-2106 with a VAZ-21083 engine? – 4 answers
- Are rockers compatible with old-style hydraulic compensators? – 3 answers
- How to set the ignition on a VAZ 2105? – 2 answers
- VAZ chain guide broke off - 2 answers
Does it jump after installing the tensioner?
The head is obviously milled. Here it is better to purchase and install a split camshaft sprocket. If this is not possible, it is better to mark it as non-income. The engine will be faster than during transition.
If, after cranking the engine manually, the marks are lost, this means you did something wrong.
Adjustment of valves
If knocking, unstable operation, or increased vibration occur, you should pay attention to the valves.
If the valve timing of the gas distribution mechanism is disrupted, they do not operate accurately, that is, the full volume of gas does not enter the working area of the cylinders, complete combustion of the fuel-air mixture in the working chamber does not occur, and the cylinders are not purged. This is all accompanied by the appearance of a shock load on the camshaft cams on the drive lever and the shaft rod. Fuel and engine oil consumption also increases. What happens if you drive with unadjusted valves? Answer: rapid wear of engine parts, increasing cost and repair time.
Rubber oil deflectors, also known as oil deflectors, also burn out due to a burnt valve cap, which leads to increased engine oil consumption. If the wear of engine parts is large, then it may be better and easier to do an engine swap with your own hands or at a service station.
Even if your engine does not have a belt drive, but a chain drive, then if you do not change the chain before its service life expires, the valves will bend on the piston, as, for example, in the sr20det engine manufactured by Nissan.
Signs of Camshaft Wear
The operation of the camshaft is associated with constant exposure to high loads, as a result of which the part gradually wears out and requires replacement. The need for repair arises when characteristic symptoms appear:
- knocking when the engine is running under load;
- reduction in power indicators.
There are a number of reasons why the RV fails:
- natural wear and tear;
- low-quality motor oil;
- low oil pressure in the lubrication system;
- insufficient oil level or so-called oil starvation;
- engine operation at high temperatures, which leads to deterioration of the lubricant properties;
- mechanical damage (wear or broken chain).
The main malfunctions that impair the performance of the camshaft are scuffing on the working surfaces (journals and cams) and deterioration of the limiter.
Over time, the camshaft's cams and journals wear out.
It is quite problematic to determine from the sounds coming from the engine compartment that the problem is related specifically to the camshaft, but it is still possible. The knocking sound of the engine resembles the dull blows of a hammer, which become more frequent as the engine speed increases. However, the best way to diagnose a shaft is to dismantle, disassemble and troubleshoot it. During inspection, the shaft should not move in the housing relative to the axis, otherwise a dull sound will be produced when hitting the limiter.
The procedure for adjusting valves VAZ 2101-2107
First we prepare the car:
- wait until the engine cools down if it was running;
- park the car on level ground;
Valve adjustment procedure:
- Remove the air filter cover and the filter itself.
- Remove the air damper control cable (choke).
- Remove the throttle linkage.
- Unscrew the nuts securing the valve cover and remove it.
- Before adjusting the valves, immediately check how the chain is tensioned. If the tension is not normal, you will have to do the work again.
- Remove the distributor cover.
- We install the piston in the 4th cylinder at top dead center (TDC). TDCs are set using marks on the internal combustion engine crankshaft pulley and the camshaft drive cover, and marks are also applied to the camshaft gears and camshaft cover. The mark is set with a special key for the internal combustion engine crankshaft pulley bolt. If you don’t have a key, you can set the 4th piston to TDC by rotating one of the rear wheels. Raise one side with a jack and place the gear shift lever in 4th gear to make it easier to turn and turn the wheel slowly. When setting marks without a key, you will need an assistant to look at the marks.
- When the marks on the camshaft and the camshaft cover are aligned, check that the marks on the crankshaft are also aligned. You can also check whether the marks on the distributor slider match. The contact terminal should be directed to the high voltage wire terminal of the fourth cylinder. We have already discussed how to determine whether ignition is early or late in another article.
- After the marks match, we proceed to adjusting the valve clearances.
The correct procedure for adjusting the valve mechanism of the VAZ “Classic” 2101-2107. Crank angle Adjustable valves 8 and 6 180 4 and 7 360 1 and 3 540 5 and 2
Disconnect the filter mounting tubes and remove the mount.
From the table we see that if the 4th piston is set to top dead center, then we measure and adjust the 6th and 8th valves.
Preparation for service operations
Control of the tension of the chain drive of the gas distribution mechanism begins on an engine with a power system such as an injector or carburetor, similar to each other. The operation is performed in the sequence established by the manufacturer:
- We place the car on a flat area with a hard surface and fix its spontaneous movement by installing chocks under the wheels and applying the parking brake. Set the gear shift lever to the neutral position.
- Remove the cover from the cylinder head by unscrewing all the nuts along its contour using a tubular wrench. It is recommended to replace the old gasket; the use of sealants is not allowed.
- Using a key set to “38”, we turn the crankshaft of the VAZ 2107 engine in order to align the marks on the moving parts and the stationary ones. Care must be taken when performing this action, and the locations of the control points should be illuminated with a flashlight or carrying device.
- We combine two marks: the first is on the generator drive belt pulley with a special protrusion on the cover body, the second is on the upper sprocket of the gas distribution mechanism of the VAZ 2107 power unit with an injector power system.
With this relative arrangement of parts, the piston of the fourth cylinder is at the dead center at the top. Now you can begin performing service work on engine systems, in particular, timing belt and some others.
How the timing chain drive of the VAZ 2106 car works: review and replacement
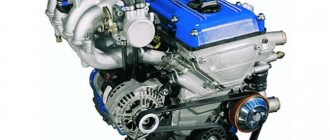
The popular VAZ 2106 car, whose production began during the Soviet era, was equipped with three types of engines - with a displacement of 1300, 1500 and 1600 cm3. The design of the listed motors is the same, the difference is only in the sizes of the cylinder-piston group, crankshaft and connecting rods. On all power units, the timing gears are driven by a double-row chain. The latter gradually stretches out and needs periodic tightening; the minimum service life of the part is 100 thousand kilometers. When tensioning does not produce results, the entire chain drive is changed - along with the gears.
Performing powertrain maintenance
VAZ 2107 cars with injection engines are still produced at enterprises in our country. They are highly reliable and economical at an affordable price, which is what determines their high popularity among consumers.
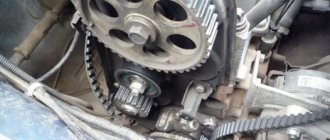
The main reason for replacing a double row timing chain is excessive stretching. The critical elongation is detected remotely by noise - the chain rattles and rubs against adjacent parts. In fact, extreme wear leads to loss of power, throttle response and unstable engine operation due to the mutual displacement of the camshaft and crankshaft. This will be visually indicated by a displaced auxiliary drive pulley.
Purpose and design of the drive
The gas distribution mechanism is responsible for supplying the fuel mixture to the cylinders and releasing exhaust gases. To ensure timely opening of the intake and exhaust valves, the camshaft must rotate synchronously with the crankshaft. In the Zhiguli, this function is assigned to a chain drive installed in the front of the engine.
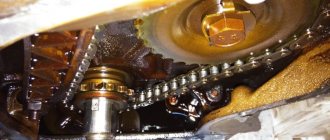
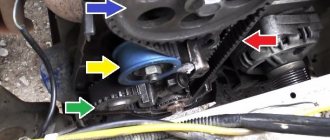
Replacing the timing chain and gears cannot be classified as complex operations, but the procedure is quite labor-intensive. To do the work yourself, you need to understand the operating principle and design of the drive, which consists of the following elements:
- a small-diameter drive gear is installed at the front end of the crankshaft;
- above it there is an intermediate large sprocket, which is responsible for rotating the drive of the oil pump and distributor;
- a third driven gear of large diameter is attached to the end of the camshaft;
- The 3 above stars are connected by a double-row chain;
- on one side, the chain is tensioned by a curved shoe, which presses the plunger device;
- to prevent the weakened chain from beating, a second shoe is provided on the other side - the so-called damper;
- A limit pin is installed near the drive sprocket, which prevents the chain from jumping off the teeth.
The gear size ratio is approximately 1:2. That is, while the crankshaft drive sprocket makes 2 revolutions, the camshaft gear rotates 1 time.
The required tension of the VAZ 2106 timing drive is provided by a plunger device supporting a semicircular shoe. Older cars were equipped with a purely mechanical plunger - a retractable rod with a powerful spring, which had to be tightened manually. Later models received a hydraulic chain tensioner that operates automatically.
Unknowingly, I once found myself in a stupid situation. A friend’s chain on the “six” was stretched out and began to make a lot of noise, I advised it to be tightened. On site it turned out that the plunger fixing bolt was missing; the advice turned out to be useless. Later it turned out that the car has an automatic tensioner that is activated by oil pressure. The stretched chain had to be replaced.
The timing drive is lubricated by engine oil coming from the camshaft. To prevent lubricant from splashing, the mechanism is hidden behind a sealed aluminum cover, screwed to the end of the cylinder block with 9 M6 bolts. Another 3 screws connect the protective casing to the oil pan.
So, the chain drive performs 3 functions:
- rotates the camshaft, which alternately presses the cams onto the valve stems;
- through a helical gear (in driver's jargon - “pig”) transmits torque to the oil pump;
- rotates the shaft of the main ignition distributor.
How to choose a chain length
When purchasing a new spare part, you need to take into account one parameter - the length, determined by the number of links. The indicated value depends on the type of engine installed on a particular car. For engines with a working volume of 1.5 and 1.6 liters (modifications VAZ 21061 and 2106) the piston stroke is 80 mm, and in 1.3 liter power units (VAZ 21063) this figure is 66 mm. Accordingly, the 1.5 and 1.6 liter engine blocks are taller and the chain is longer:
- versions VAZ 21061 and 2106 - 116 sections;
- VAZ 21063 - 114 units.
The number of sections of a new spare part can be found out without a grueling recalculation. Lay the chain on a flat surface so that adjacent links touch. If the outer sections look the same, there are 116 links in the chain. The 114-piece part reveals one last link, turned at an angle.
When replacing the drive chain, it is strongly recommended to install new sprockets - driving, driven and intermediate. Otherwise, the mechanism will not last long - the links will stretch again. Gears are sold in sets of 3 pieces.
Video: choosing a new chain for the Zhiguli
Camshaft defect
After the PV is removed from the engine, all its components are washed in gasoline to remove contaminants. Troubleshooting involves a visual inspection of the shaft to identify damage: cracks, burrs, cavities. If they are detected, the shaft must be replaced. Otherwise, check the basic parameters characterizing the degree of its wear, for which a micrometer is used.
A micrometer is used to check the size of the necks
The condition of the RV can be assessed by other parameters, for example, runout, but special tools are required to remove them.
Replacing a chain drive - step-by-step instructions
Some of the repair work is carried out from the inspection ditch. You will have to loosen the generator axle, remove the protection and unscrew the ratchet nut - the above operations are performed from below the car. To completely replace the drive, it is better to purchase a ready-made timing repair kit for the VAZ 2106, consisting of the following spare parts:
- three stars;
- chain with 114 or 116 sections depending on the engine displacement;
- damper and tensioner shoes;
- mechanical plunger (it is not necessary to change the hydraulic one);
- gaskets for the lid and plunger device.
Consumables you will need are silicone high-temperature sealant, rags and fabric gloves. Before disassembling, pay attention to the appearance of the front part of the engine - it happens that the front crankshaft oil seal leaks lubricant, and the engine becomes covered with a layer of oily dirt. Since the oil seal is installed inside the timing cover, it is easy to change during repairs.
Preparation of tools
To successfully disassemble and change the chain along with sprockets, prepare the following working tools:
- standard set of heads with a wrench equipped with a return ratchet;
- a set of open-end or ring wrenches measuring 10-19 mm;
- a powerful flat-tip screwdriver;
- hammer;
- pliers;
- mount, preferably with a curved end.
To loosen the large ratchet nut, find a special 36mm socket wrench with a long handle. It is also used when combining marks by manually turning the crankshaft. As a last resort, take a spanner wrench with a handle bent at 90° like a wheel “balloon”.
Pre-disassembly stage
It is impossible to immediately get to the timing assembly - the generator drive belt, crankshaft pulley and electric fan are in the way. In older VAZ 2106 models, the impeller is attached to the pump shaft, so it is not necessary to remove it. To remove the chain drive, follow these steps:
- Drive the car into the pit, brake and wait 20–60 minutes until the engine cools to a comfortable temperature of 40–50 °C. Otherwise, you will burn your hands when disassembling.
- Go under the car and remove the grille protecting the oil pan of the power unit. Using a 10 mm wrench, remove the 3 screws securing the timing case to the sump cover, then loosen the 19 mm nut on the generator axle.
During disassembly, check the condition of the valve cover gasket - it may be swollen and leaking oil. Then buy and install a new seal.
Before removing the aluminum cover that hides the timing assembly, it is recommended to remove all dirt from the front end of the engine. When you remove the cover, a small gap will open between the block and the oil pan. You should not allow foreign particles to get in there, especially after a recent oil change.
On a car equipped with an electronic fuel injection system (injector), disassembly is carried out in the same order. Only here the adsorber hose is disconnected, and the air filter box is removed along with the corrugation connected to the throttle valve block.