Repair / From Alexander Smirnov
- Symptoms of a problem
- Diagnostics
Checking the electrical circuit
- Pressure check
- Video: how to distinguish an original from a fake
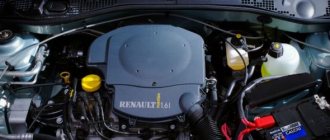
Fuel pump malfunction in VAZ 2114 and VAZ 2115 cars is a fairly common phenomenon. You can solve this problem yourself, without resorting to the services of a car service. The pump replacement procedure is quite simple. It will require only a few hours of free time and a standard set of tools.
What fuel pumps are installed on the VAZ 2114/2115
The gas pump (or fuel pump) pumps fuel from the gas tank to the engine. On models 14 and 15 of the VAZ family, the fuel pump is located in the fuel tank. The gas tank is located on the bottom of the car, in the rear. Therefore, in order to get to the fuel pump if necessary, you will need to remove the cushion from the rear seat in the cabin and find a small hatch hidden underneath.
The device is “hidden” under the rear seats, under an inconspicuous hatch in the car body
On cars of the Samara VAZ family (that is, on “fourteeners” and “tags”), “native” factory fuel pumps of the “Saratov” brand are installed. Their performance is average, but in terms of tightness they can let the driver down at any time. However, their main advantage is their low cost.
Each owner of a VAZ-2114/2115 can easily replace an unwanted fuel pump with a better one. For example, the domestic “DAAZ” or the time-tested “Pekar”.
The production of gasoline pumps is located in Dmitrovgrad
Foreign analogues: QH (England) and OTA (Italy) also fit perfectly into the fuel system of domestic cars, however, their cost is almost three times higher than the price for a Saratov fuel pump. However, unlike domestically produced pumps, QH and OTA products are equipped with only one membrane, but a very thick one. Therefore, when using foreign expensive gasoline pumps, the possibility of fuel getting into the oil is practically excluded.
Pekarov production was opened in St. Petersburg
Table: comparative characteristics of fuel pumps for VAZ 2114/2115
| Fuel pump test results | |||||
| Characteristic | "Baker" | DAAZ | Saratovsky | QH | OTA |
| Zero supply pressure (at a crankshaft speed of 2000 rpm), kgf/cm2 | 0,26 | 0,28 | 0,26 | 0,3 | 0,36 |
| Capacity for free drainage (at a crankshaft speed of 2000 rpm), l/h | 80 | 76 | 73 | 92 | 74 |
| Suction period at crankshaft speed 200 rpm, s | 4 | 13 | 12 | 9 | 6 |
| Valve tightness at a pressure of 0.3 kgf/cm2 (fuel leakage within 10 minutes), cm3 | 8 | 12 | 20 | 8 | 8 |
| Place | 3 | 4 | 5 | 1–2 | 1–2 |
Removing and installing the fuel pump
Removing and installing the fuel pump is a simple operation. The fuel pump, together with the gaskets, is mounted on two studs and secured with nuts, which must be unscrewed with a 13 mm wrench. To remove the fuel pump, you need to disconnect the supply and discharge fuel lines, unscrew the fuel pump mounting nuts, remove the spring washers, and then the fuel pump itself.
When removing it, be careful, as you can damage the thin gasket, which often sticks to both the pump and the thick heat-insulating gasket. The thermal insulation gasket itself, as a rule, can be easily removed by hand without the use of any tools. In the worst case, make it easier to remove by lightly tapping it with the handle of a screwdriver. Do not forget also that under the thick thermal insulation gasket there is another thin installation gasket, which is also a sealing gasket.
Installing a repaired fuel pump has its own characteristics. First of all, install a sealing gasket A with a thickness of 0.70-0.80 mm, and then a heat-insulating one. Next, install a thin gasket B with a thickness of 0.27–0.33 mm.
With such a set of gaskets between the fuel pump body and the cylinder block, the minimum output of the pusher (its inner end touches the back of the cam) should be in the range of 0.8-1.3 mm. This dimension (d) can be easily checked by installing spacers and a pusher (rod). If the pusher protrudes from the gaskets by an amount less than 0.8 mm, then gasket A is replaced with gasket B with a thickness of 0.27-0.33 mm.
In the case where the pusher protrudes more than 1.3 mm, instead of gasket A, it is necessary to install a thicker gasket type C with a thickness of 1.20-1.30 mm. It should be clarified that a gasket with a thickness of 0.27-0.33 mm should always be installed between the fuel pump body and the heat-insulating gasket.
How to check the performance of the fuel pump
Often, for those problems for which the car owner blames the fuel pump, other elements of the fuel system are to blame. To establish whether a fuel pump has failed, you will need to know the reasons why it might break.
Causes of fuel pump malfunctions
Most often, the device may fail while the vehicle is moving. The gas pump may simply refuse to pump fuel from the tank to the engine, or a leak may form, causing the device to malfunction. If the power supply is interrupted, the pump stops working completely.
The main causes of fuel pump malfunctions include the following:
- lack of tightness in the pump itself (leakage);
- damage to membrane surfaces;
- the resource of the pump motor has been used up;
- contacts have oxidized;
- wiring or relay problems;
- dirt and debris in the fuel tank, which, along with gasoline, enter the pump.
As you can see, there can be many reasons for a fuel pump to fail.
Dirt deposits on the filter mesh are a common cause of fuel pump malfunctions.
Symptoms of a problem
There are only four main signs by which you can diagnose malfunctions in the fuel pump without special tools:
- The car simply won't start. Of course, the engine may not function for a number of other reasons, however, first of all, you will need to check the functionality of the fuel pump itself.
- After the car starts, the characteristic buzzing of the fuel pump is inaudible. The whirring noise should be clearly audible in the rear of the cabin, as the fuel pump is located under the rear seats.
- Recently, interruptions in the operation of the power unit have begun to be observed: the engine does not start the first time, while driving you can hear the engine straining.
- The car starts to jerk when driving at low speed.
Where is the fuel pump located
The fuel pump is the most important device of any vehicle, since without it the supply of fuel and movement of the vehicle is impossible. Its location depends on the type of fuel system, make of car and many other factors; in the VAZ 2114, just like in 2113 and 2115, it is located inside the gas tank.
The tank itself is located in the lower surface of the bottom at the rear of the car; You can find it under the rear seat cushion, so you will need to remove it first.
Repair of fuel pump VAZ 2114/2115
When repairing the fuel pump, as the website provaz2114.ru reports, we will proceed from the fact that we have already removed the fuel pump from the tank. How to properly dismantle the device will be written below, but we will dwell in more detail on the description of the progress of the repair work:
- You will need to remove the protective cup from the module - to do this, you will have to pry the cup latches with a screwdriver, and the fuel pump will come out freely.
- We unscrew the two screws from the fuel pump housing that secure the fuel level sensor, then disconnect the cable of wires coming from the sensor and put it aside.
- Next, you will need to disconnect the filter mesh from the pump using a flat-head screwdriver.
- To complete the disassembly, you need to remove the housing itself from the device - there is a cotter pin on the surface that needs to be pulled out.
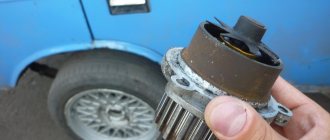
- You will need to carefully examine all parts of the device for cracks, tears and deformations. As a rule, most often some specific parts of the fuel pump fail, which are much easier and cheaper to replace than to buy a new device. Replacing membranes, rubber bushings or filters is not particularly difficult: use a screwdriver to pry off the old product and pull the new one in its place. The fuel pump mesh, float or fuel level sensor can also be easily mounted with a regular screwdriver.
- The unit is reassembled in the reverse order.
Device
In the VAZ-2115, the fuel supply system contains the following components:
- ramp;
- fuel line;
- filter;
- Control block;
- fuel injectors.
The fuel module itself includes:
- gasoline level sensor;
- gasoline pump;
- float;
- primary filter.
The latter's mesh is located directly at the suction port of the pump. It quite well rids the fuel of contaminants, the presence of which significantly reduces the service life of the entire system as a whole.
In addition, the gas line also has a filter that provides fine cleaning of the fuel.
What to do if the fuel pump does not work
Before deciding anything regarding the repair or replacement of this device, it is worth remembering that the function of the gas pump is to create a certain pressure in the fuel system of the car. Accordingly, the first step is to measure the fuel pressure, quite possibly in order to accurately diagnose the failure of the fuel pump.
Measuring pressure in the fuel system
Normal atmospheric parameters in the VAZ-2114/2115 fuel system are as follows:
- at idle - 2.5;
- after turning on the ignition - from 3;
- without pressure regulator tube - 3.3;
- with pinched drain - 7;
- after pressing the gas pedal - from 3 to 4.5.
You will need to measure the pressure in five operating states of the fuel system at once in order to obtain accurate data. There is a pressure fitting under the hood of the car; you will need to unscrew the cap from it and attach a pressure gauge with a hose. By turning on the ignition, holding the drain, pressing the gas, it is necessary to take all five pressure measurements.
Using a pressure gauge, you can measure the fuel pressure and, based on this indicator, look for a malfunction.
Wiring check
If the pressure readings are almost identical to normal, you will need to check the wiring for a short circuit. It is quite possible that the fuel pump itself is in working order, only the contacts that go to it have been damaged.
It is necessary to check the fuel pump wiring for short circuits.
You need to know that the wiring system, which goes directly to the fuel pump itself, has three wires: positive, negative and an indicator of the fuel level in the tank. You will need to take a regular light bulb with a power of no more than 12 V and attach its wires to the “+” and “-” contacts on the external connector of the pump. After starting the engine, if the lamp blinks, then there is contact.
If there is a flaw in the wire circuit, the light bulb will not light up. The internal contacts of the fuel pump are checked as follows:
- one by one, the light bulb wiring is connected to the “+” and “-” connectors of the fuel pump, then to its ground and relay;
- if the lamp blinks when connected to the negative contact, then the fuel pump contact is considered not working, and if it does not blink, then the “+” contact is not working.
After this, you will need to first check the relay and fuse: if they are normal, then the wiring is damaged somewhere between the pump and the relay.
Checking the electrical circuit
At the beginning of the diagnosis, you should check the electrical circuit of the fuel pump. To do this you will need:
- car tester (multimeter);
- crosshead screwdriver;
- two pieces of wire about 2 m long.
Checking the electrical circuit is carried out in the following order:
- Turn on the ignition without starting the engine. When the key is in the first position, a click should be heard, characteristic of turning on the relay, followed by a slight whirring of the pump electric motor. If there is no click, the relay is faulty or is not receiving power. If there is a click, but no buzzing, the wiring coming from the relay or the pump motor itself is faulty.
- Under the glove compartment, find an additional mounting block consisting of three relays and three fuses. The pump relay is located in the middle, and the fuse is located to the left of it. Remove the fuse from its socket, test it with a multimeter, and if the result is negative, replace it. When replacing the fuse, please note that it is rated for a maximum of 15 A.
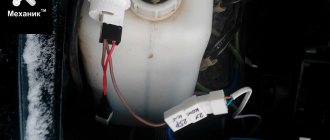
The relay and fuse for the fuel pump on the VAZ 2114/2115 are located in the mounting block under the glove compartment.
- Set your multimeter to voltmeter mode. Connect one probe of the device to the relay terminal to which the pink wire fits, and the second to the car body. Turn on the ignition. The device should show the on-board network voltage in the range of 11.7–12.4 V. If there is no voltage, the problem may be a broken wiring or a malfunction of the ignition contact group. In this case, it is better to contact an auto electrician. If power is supplied, check that the relay is working. With the ignition on, use a screwdriver or a piece of wire to close the contacts to which the pink and gray wires go. This closes the circuit bypassing the relay. If the fuel pump works, replace the relay.
- Be sure to check the connection of the pump's negative wire to ground. Often it is the lack of “ground” that causes interruptions in the operation of the fuel pump. Remove the plastic trim from the center console near the parking brake handle. Under it there is a “negative” wire of the pump, screwed to the body with a self-tapping screw. Unscrew it, clean the contacts, screw it back and repeat the test.
The ground wires of the fuel pump are attached to the body with a self-tapping screw
- Then check the fuel module. Remove the rear seat, peel back the carpet and sound insulation. Unscrew the two screws securing the gas tank flap and disconnect the electrical connector on the fuel module cover. Using two wires, supply power to the pump directly from the battery. If the pump works, the wiring is faulty; if it doesn’t work, the pump itself is faulty.
Replacing the fuel pump on a VAZ 2114/2115
Before you begin work, you should relieve the fuel pressure in the system. Even when the pump is not working, the pressure can remain very high, which will lead to the pressure of a stream of gasoline during dismantling work.
To reduce the pressure in the fuel system of a car, it is enough to let it stand on level ground for three hours. The fuel pressure in the hoses and pipes will noticeably decrease, and replacing the device will take place without any difficulties.
Not in all cases it is necessary to replace the fuel pump with a new one; sometimes it is enough to simply repair it
Preparing tools
To make all stages of the work easier, you will need to prepare several tools. As a rule, most car owners have all of them:
- crosshead screwdriver;
- flat screwdriver;
- open-end wrench 17;
- head at 7;
- extension for key.
How to remove a faulty fuel pump in a VAZ 2114/2115
The procedure for dismantling the fuel pump determines the following stages of work:
- Open the hood and disconnect the negative terminal from the battery.
- Raise the rear seat cushion inside the vehicle.
- There is a small hatch under the seat - it is under it that the fuel pump is located.
- Using a 17mm wrench you will need to unscrew all the nuts securing the hatch to the floor.
- Putting the hatch cover aside, you will need to disconnect the two wire blocks. To do this, you will first need to bend the fixing element on the plug.
- Next, using a 17mm wrench, you will need to unscrew the nuts on the fuel line and disconnect the fuel pipes.
- After this, the fuel pump itself will become accessible. Using an extension cord and a wrench, you will need to unscrew all the fasteners that connect the pump to the metal surface of the car.
- The best way to remove the fuel pump is to use a screwdriver to hook it onto the rubber ring.
How to install the fuel pump back
The procedure for installing the fuel pump in the VAZ 2114/2115 is completely reverse: that is, you will first need to insert the device into the cavity under the seat, and then connect all the disconnected wires and tubes. The final stage is closing the hatch and returning the rear seat cushion to its original place.
The ability to independently diagnose a fuel pump failure, as well as quickly replace or repair the device, will be especially useful for those drivers who are accustomed to servicing their car themselves. In addition, the procedure for checking the fuel pump and its repair cannot be considered particularly complex work, so even an inexperienced owner will be able to get the fuel pump into working condition without contacting a service station.
Pressure check
If the pump is working properly, but the engine begins to operate intermittently, you should check the fuel pressure in the system. For this you will need:
- pressure gauge (can be a tire gauge with a measurement limit of 5–7 kPa);
- petrol-resistant hose with a diameter of 10–12 mm and a length of 50–80 cm;
- two clamps for a hose of the appropriate diameter;
- Phillips screwdriver;
- nipple cap;
- dry rag.
In addition, the presence of an assistant is desirable.
The verification procedure is as follows:
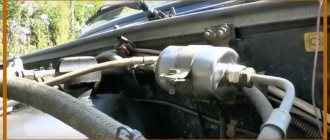
- In the engine compartment on the engine fuel rail, locate the pressure measuring fitting (on the right side).
- Remove the plastic cap (plug) from the fitting.
Find the pressure fitting and remove the cap from it
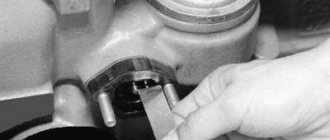
- Using the nipple cap, unscrew the spool valve from the fitting. When unscrewing the spool valve, fuel may spray out of the fitting. To remove it, use a dry cloth.
When unscrewing the spool valve, fuel may spray out of the fitting.
- Place one end of a gas-resistant hose onto the fitting and secure the connection with a clamp. Connect the other end of the hose to the pressure gauge fitting and also tighten the clamp.
Connect the pressure gauge to the fitting using a hose and clamps
- Ask an assistant to turn on the ignition. Wait a few seconds and watch the meter readings. If the pump is working properly, the pressure gauge should show a pressure of 2.8–3.2 kPa for engines with a volume of 1.5 cm3 and 3.7–3.9 kPa for engines of 1.6 cm3. If the pressure is noticeably higher, the pump is faulty.
Replacing the fuel pump VAZ 2114
The frequency of replacing the fuel pump on Samara 2 (VAZ 2113,14,15) cars is not regulated. Change it only if necessary.
It is quite easy to understand that the fuel pump is faulty. If the car does not start, or starts and immediately stalls, in this case, the first thing you can do is listen and understand whether the pump is pumping or not. Usually the sound of a running fuel pump is heard in a car.
If there is no sound, then you must first check the fuse and relay (it is located at the bottom right of the center console), and then only climb into the tank. It's another matter when the pump is still running, but pumping little fuel. In this case, you will not be able to check the pump yourself without special tools.
When the car begins to pick up speed poorly, drops in speed when you sharply press the gas pedal, or simply has unstable engine operation, you need to check the pressure in the fuel rail. If the pressure is less than 2 bar, the pump must be replaced.
The normal pressure of this fuel pump is 2.5 - 3.5 bar.
Symptoms of a problem
A faulty fuel pump can be determined by several signs:
- Starting the engine is difficult or not possible at all;
- Unstable engine operation in idle mode;
- When the ignition is turned on, the fuel pump does not operate briefly to create pressure in the system;
- Loss of power, “dips” during acceleration.
The above symptoms also appear during other malfunctions of engine power system components. Before you start checking the fuel pump, you need to be sure that:
- The pressure regulator and nozzles operate in their own mode;
- The fine fuel filter is not dirty;
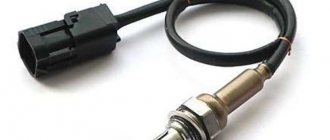
- Sensors that affect mixture formation work properly. We recommend checking the mass air flow sensor, throttle position sensor, and lambda probe.
Also, if the “CHECK” lamp on the instrument panel lights up, you need to perform computer diagnostics.
Which fuel pump to install on a VAZ 2114
On the VAZ 2114 and others of this family, they are installed from Bosch or Denso, since the original fuel pump only comes complete with a module (article 21102-1139009-02). Other manufacturers may be preferred only for reasons of economy.
| Manufacturer | vendor code | Average price, rub. |
| SAT 3.9 | STFP06 | 799 |
| MEAT DORIA 3.9 | 76416 | 1056 |
| DENSO 4.6 | DFP0105 | 2504 |
| BOSCH 3.8 | 580453453 | 2899 |
Tool required for work
- 10mm wrench;
- Screwdrivers “+” and “-“;
- Construction hair dryer;
- Pliers;
Article: 21082-1101138, additional articles: 21082-1101138Р
Order code: 023299
- Buy with this product
- show more
- Passenger cars / VAZ / VAZ-21081 drawing
- » href=»/catalog/vaz-3/legkovye_avtomobili-30/vaz_2108-18/bak_toplivnyiy-79/#part27994″>GasketPower system / Fuel tank
Passenger cars / VAZ / VAZ-21111 drawing
» href=»/catalog/vaz-3/legkovye_avtomobili-30/vaz_2111-11/bak_toplivnyiy-114/#part44927″>Gasket Power system / Fuel tank
Passenger cars / VAZ / VAZ-21151 drawing
» href=»/catalog/vaz-3/legkovye_avtomobili-30/vaz_2115-65/bak_toplivnyiy-79/#part53067″>GasketPower system / Fuel tank Passenger
cars / VAZ / VAZ-2110, 2111, 21121 drawing
» href=»/ catalog/vaz-3/legkovye_avtomobili-30/vaz_2110__2111__2112-415/bak_toplivnyiy-124/#part1302975″>Gasket Power system / Fuel tank
Passenger cars / VAZ / VAZ-21131 drawing
» href=»/catalog/vaz-3/legkovye_avtomobili-30 /vaz_2113-648/bak_toplivnyiy-16/#part1669107″>GasketPower system / Fuel tank
Passenger cars / VAZ / VAZ-21101 drawing
» href=»/catalog/vaz-3/legkovye_avtomobili-30/vaz_2110-10/bak_toplivnyiy-114/ #part40619″>GasketPower system / Fuel tank
Passenger cars / VAZ / VAZ-21121 drawing
» href=”/catalog/vaz-3/legkovye_avtomobili-30/vaz_2112-12/bak_toplivnyiy-114/#part49235″>GasketPower system / Fuel tank
Passenger cars / VAZ / VAZ-2120 “Nadezhda”1 drawing
» href=”/catalog/vaz-3/legkovye_avtomobili-30/vaz_2120__nadejda_-245/bak_toplivnyiy-70/#part55816″>GasketPower system / Fuel tank
Passenger cars / VAZ / VAZ-21141 drawing
» href=»/catalog/vaz-3/legkovye_avtomobili-30/vaz_2114-647/bak_toplivnyiy-16/#part1669107″>Gasket Power system / Fuel tank Passenger
cars / VAZ / VAZ-21091 drawing
» href=»/ catalog/vaz-3/legkovye_avtomobili-30/vaz_2109-701/bak_toplivnyiy-17/#part1929931″>GasketPower system / Fuel tank
- There are no reviews for this product yet.