The timing belt (gas distribution mechanism) is an extremely important component of the engine in every car. Any damage, let alone a belt rupture, will lead to a breakdown, after which the vehicle will no longer start. Therefore, the timing belt requires regular diagnostics and replacement. Below we will talk about how the timing belt is replaced on Renault Logan with 8-valve engines of 1.4–1.6 volume.
Frequency and signs of replacement
According to the regulations provided by the manufacturer, the timing belt of Renault Logan cars is changed after a mileage of 60 thousand km or after 4 years of operation. In addition, it is recommended to inspect transmission parts, as well as check and adjust the belt drive every 15,000 kilometers. And although the belt itself (provided it is original) easily runs for 90-120 thousand, it is not recommended to ignore factory requirements. The fact is that the pistons of the 8-valve engines K7J, K7M do not have enough recesses for the valve discs. If the belt breaks, the meeting of the valves with the pistons will be fatal: they will simply bend and the engine will fail. The belt may need to be replaced sooner than expected. Here are the factors that lead to its premature wear:
- ingress of engine oil;
- excessive tension force;
- a low-quality non-original distribution is used;
- the pump, tension roller or camshaft is blocked.
- cracks;
- material layering;
- cord separation;
- deforming changes in the form of folds, folds;
- wear or damage to individual teeth;
- lubricant
Repair of automatic gearbox (automatic transmission)
Slide the clamp along the rod and separate the latter from the lever. Press the fastener of the speed sensor block with a screwdriver or a sharp object, and then discard the wiring harness. Take a screwdriver and use it to pry off the fasteners of the block with the wires that supply power to the reverse speed lamp switch. Take out the engine harness, then move it to the left or right so that it does not interfere with further removal.
Tighten a pair of mounting bolts for the TDC sensor mounted on the crankcase, and then remove the device. Press out the block fastener of the oxygen control sensor, and then separate the block from the clamp. Remove the transmission breather tube from the holder. Tighten the caliper mounting bolts on the front brake assemblies.
Causes of gearbox failures
After this, remove them without disconnecting the brake system pipes; this will simplify and speed up assembly. At the same time, tie a knot using wire or rope. Push the steering rods away from the knuckles, and then tighten a couple of shock absorber mounting nuts. Now take out the bolts and disconnect the levers and steering rods.
If you can't do it yourself, ask a partner. During the repair, the clutch, crankshaft oil seal and other parts are replaced. The exact cost of repairing a Renault gearbox in Moscow can hardly be calculated in advance, since it depends on the type of malfunction, which, by the way, also affects the completion time of the work.
Need to restore the technical condition of the transmission? We will carry out professional repair of the Renault gearbox. Warranty and post-warranty repair of the Renault gearbox, during which failed components are replaced with new parts, will make it possible to restore the trouble-free operation of the transmission system.
All necessary work is carried out by car service specialists who have both the skills to provide such services and high qualifications. In most cases, repairing a Renault automatic transmission, as well as a manual one, involves restoring failed elements, and if this is not possible, replacing them with new ones. Replacement of gearbox components and assemblies and repair of Renault transmissions in strict accordance with the manufacturer’s instructions. Our company’s specialists, who have the appropriate skills and qualifications, will perform professional repairs of Renault transmissions in a short time.
Work such as repairing the rocker or replacing the fifth gear, other procedures are carried out in strict accordance with the recommendations of the manufacturer. If they need to repair a Renault manual transmission or automatic transmission, then in their work they will use technical documentation that corresponds to this technological process.
Low timing belt tension in Renault Logan 1.6
The block should fit through the hole in the crankcase. To be secure, hold the motor on the side of the wheel removed with a crowbar and insert a flat wooden stop between the motor and the frame. Lower the jack to raise the airbag off the fender.
The Renault Logan engine is securely mounted and secured.
In order not to properly tighten the Renault Logan timing belt, it is possible to remove the oil dipstick and cover the hole with a rag. Install the new timing belt, making sure the belt direction arrow painted on it is clockwise b.
At the same time, we connect the marks and install the timing belt in place in the following order: Tension the timing belt as described at the beginning of the page. Then unscrew the locating pin. Rotate the crankshaft two turns, align the marks on the pulley and the cylinder head cover, and screw the dowel pin back into the hole to check the TDC position of the first piston. Reinstall the belt if necessary. Unscrew the alignment pin and install all removed parts in reverse order.
Removing the timing belt on an 8-valve Logan
First, lift the right front wheel, then unscrew the screw clamp at the top right and the second clamp on the lower edge of the bumper. Next, we simply pull the plastic protector towards us, move it to the side, wrap it, it is not necessary to remove it completely. Now we can easily get to the crankshaft bolt, but we don’t touch it yet. First we need to loosen the alternator belt, which is tensioned by the tensioner. In general, there should be a tension bolt, first unscrew the two mounting bolts, then unscrew the tensioner, the tensioner will rise, which will allow you to remove the drive belt. We can now safely remove the crankshaft pulley.
To prevent the crankshaft from turning, you can put an assistant in the cab, he must engage fifth gear and hold down the brake pedal. In this case, it is more difficult to turn the wheels with the crankshaft. By the way, the crankshaft bolt is 18, that’s how interesting the French are.
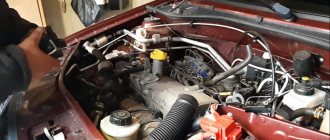
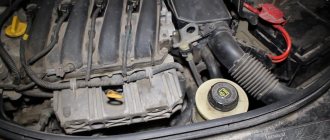
Now let's go to the beginning. Here you need to remove the cushion to gain direct access to the timing belt cover. The problem, as many believe, is that when the mounting bolts are unscrewed, the motor will fall apart, which is actually not true: the motor will rest on a guard, or between the sump and the crankcase you can lay a metal plate about 1 cm thick, a protective casing, then the engine will stand securely on place.
Using a 16mm socket, unscrew the three bolts securing the airbag to the engine and the two bolts to the body frame. The order doesn't matter. We remove the pillow and go directly to the engine. Now you need to remove the top cover. It is secured with three 13 and one 10 bolts and is slightly hidden from below. This is where the ratchet comes in handy. Don't be afraid if the 13 screws get loose, that's normal. To remove the cover, twist it slightly counterclockwise to release it from the mounting lug.
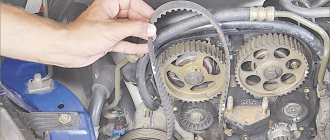
Well, now we need to remove the lower part of the casing, it is plastic. It is better to unscrew two of the 8 bolts at the top and two at the bottom. The cover can be easily removed. To finish, remove the tension roller. But first, engage fifth gear, turn the left front wheel until you see the camshaft mark at the top. His position is not important, it is important to see him. There is an opinion among people that there is a mark on the head, but there is one, but this is not critical, what is important is the coincidence of the crankshaft / camshaft marks. Therefore, when we saw the mark, we unscrew the tensioner pulley with a 17 key, remove the old timing belt, and install a new one.
Preparatory procedures
To carry out the work, by default, you will not need any special tools. It is desirable, but not at all necessary, that the garage be equipped with an inspection hole.
First you need to free access to the gas distribution mechanism. To do this you need:
- Remove the engine protection;
- Loosen the tension on the accessory belt and remove it;
- Jack up the car and remove the right front wheel;
- Remove the protective shield in the wheel arch to provide access to the crankshaft pulley.
To continue the work of replacing the belt, it will be necessary to dismantle the engine support located on the right, but to do this it is necessary to support the engine from below, for which a support is installed under its crankcase, on which the power unit rests securely. After that, the 5 bolts securing the support are unscrewed, and the part is removed from the car.
The next step is to remove the crankshaft pulley . It is better to perform this procedure with an assistant, since the bolt securing the pulley to the crankshaft is tightened with considerable force, and to unscrew it, you need to use a pneumatic impact wrench, or, if it is not available, the help of a partner. To do this, ask an assistant to engage 4th or 5th gear and press the brake pedal firmly. Then unscrew the bolt and remove the pulley from the shaft.
Having installed a spacer sleeve on the bolt (you can screw a couple of nuts on it or gain a thickness equal to the thickness of the pulley using washers), you need to screw it back. It will be needed to rotate the crankshaft when aligning the gas distribution mechanism to the top dead center (TDC) position of the first cylinder.
We remove two covers covering the mechanism: the lower plastic and the upper aluminum. And you need to start by removing the bottom cover.
While turning the crankshaft, we combine the triangular mark of the camshaft gear with the image of the letter “D” cast on the block head (Dacia logo). Thereby setting the piston of the first cylinder to TDC.
At the next stage, it is necessary to unscrew the tension roller fastening and dismantle it , after which the timing belt can be freely removed from the mechanism.
Important! After removing the belt, under no circumstances should you change the position of the shafts! Since subsequent adjustment of the timing mechanism can take quite a long time.
The process of replacing a Renault timing belt with photographs and descriptions
Step 1: Jack up the vehicle and remove the right front wheel, then place the removed wheel under the subframe.
Photo 1 rotates under the stretcher Step 2. Remove the side cover, the procedure is quite simple.
Photo 2 Plastic case on the right Step 3. Put the car in 1st gear, press the brake and unscrew the crankshaft pulley on the generator belt with an 18mm socket.
Photo 3 Crankshaft Pulley Step 4: Using a 13mm wrench, loosen the alternator tensioner, lift the pulley, and remove the alternator belt.
Alternator tensioner Please note that the tensioner design will be different for vehicles with and without air conditioning. But don't be alarmed, you just need to loosen the tensioner and remove the belt. Step 5. Now unscrew the generator belt pulley itself.
Photo 5 Step 6. Pull out and remove the oil dipstick. We remove or remove all the cables that interfere with the removal of the engine mount (engine mount). But first, place a support under the pan as shown in photo 7 (for example, a crowbar so that the engine does not fall). Photo 6 Upper motor mount
Photo 7 Step 7. Using a 16 mm socket or wrench, unscrew the 5 bolts of the upper motor mount, as shown in Photo 6.
Photo 8 Step 8. Now we need to remove the two covers of the junction box, plastic no. 5 and duralumin No. 8. Remove first the plastic one, then the duralumin one. Using an 8 mm head we unscrew 3 bolts of the plastic casing, with a 13 mm head we unscrew 4 bolts of the duralumin casing, and with a 10 mm head we unscrew 1 bolt. Please note that the lower bolts on the duralumin body can be unscrewed with force, since these channels are covered with sealant at the factory.
Photo 9 Engine diagram
Photo 10 Step 9. Set the time by tag. The mark on the camshaft gear should look like the “dacha” icon, see Photo 11. And the gear mark on the crankshaft pulley should also look down, but it happens that this mark is not factory and then you need a photo with your own hands. 12, but top dead center must be open.
Photo 11
Photo 12 Step 11. Unscrew the take-up reel. To do this you will need a 16 key and a special one. Timing belt tensioner, see Photo 13.
Photo 13 Step 12. Remove the belt itself.
Photo 14 Step 13. Putting everything back together in reverse order, first put the tension roller in place. Step 14: Reinstall the belt. The belt must be marked with marks, we put them in accordance with them, photos 15 and 16. That is, all marks on the belt must coincide with the marks on the camshaft and crankshaft gears. The white danger should hit the tooth with danger to the gear. Note. The arrows on the belt should be in the direction of travel, for example, see Photo 17
Photo 15
Photo 16
Photo 17 Well, we won’t explain further, since we do everything according to these instructions, replacing the timing belt only in the reverse order. Also, if you don’t understand something from the photo, you can watch a detailed video about replacing the belt below.
Let's get started
We hang up the front right wheel and remove it, remove the engine protection and the right plastic mudguard, it is held on by two pistons and a plastic nut.
We tear off the crankshaft pulley bolt. To do this, we put an assistant in the cabin, who engages fifth gear and presses on the brakes, while we ourselves, with a slight movement of the hand and the head, loosen the crankshaft bolt by 18.
We jack up the engine, but remember that Logan’s sump is made of aluminum, so we place a wide board between the jack and the sump. Unscrew the five engine mount bolts.
We remove the drive belt of the attached units; on this engine there is only one, which rotates the air conditioner, the hydraulic booster, and the generator.
Belt location, bottom view.
We place a 13 key on the tension roller bolt and turn it clockwise to loosen the service belt. At the same time, remove it from the power steering pump.
Using keys 10 and 13, unscrew the upper protective timing cover.
Remove both covers and wipe with a clean rag.
And now the easiest way
We simply set the camshaft mark up and specifically corrected the old mark on the timing belt for clarity. The mark on the catfish belt may not line up due to the fact that the belt arms between the marks are different, and two teeth move with each turn. If you are patient, then after a certain number of revolutions all the signs will fall into place, but we don’t need them.
The circled icon will be needed if we go a long way towards the end of the article.
If the old mark on the belt and camshaft matched, then the second mark on the belt and crankshaft also matched.
If you have a newer Logan, the camshaft sprocket will look like this.
And here a warning appears: to remove the belt, you will have to move the gear towards you using a special puller or a homemade device.
We mark the marks on the belt with a marker; if they are not stored, remember which camshaft it is. Loosen the take-up reel nut and remove the belt along with the roller.
New timing kit.
In the new generation, the roller is already automatic, and the belt is tensioned until the indicator aligns with the notch on the roller in the direction indicated by the arrow on the roller.
The new timing belt has markings and the direction of movement.
We put the old belt on the new one and are amazed at how clearly all the marks fit together.
We put the new timing belt in place, aligning the marks on the belt with the marks on the camshaft and crankshaft. We twist it with a roller using a regular VAZ device. We check the belt tension, turn the long branch with two fingers and, if it can be turned more than ninety degrees, tighten it again. This is all. You can put in place everything that was previously deleted.
Articles
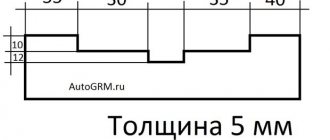
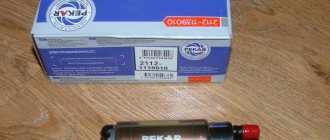
Belt + Tensioner Pulley Kit for Various 8-Valves:
- For internal combustion engine K7M (K7J) 710-7701477024, width 17.3 mm, number of teeth 96;
- For internal combustion engine K7M (K7J) 800 - 130C17480R. The difference between the two sets is small. The belts are the same, the rollers are different.
Set “belt + two rollers (tensioner, guide)” for 16-valve gasoline engines:
- K4M 690 or 697 - 130С17529R, 27.4 mm, 132 teeth.
All items are taken from the Renault catalog.
Kit for 16 valves
About the engine
In addition to 8 valve power units, Logan is equipped with engines that have two camshafts and 16 valves installed in the cylinder head. The engine displacement is 1600 cm 3 with a compression ratio of 9.8 units. These are the K4M models and the newer modification N4MK, the power of the first is 102 hp, the second is more powerful, producing 113 hp. On the latest modification of the N4MK engine, a chain operates in the timing drive. The engines work in tandem with “mechanics”, as well as automatic transmission.
Renault Logan with K4M engine
The K4M engine has certain advantages:
- High reliability of the motor, service life can be more than 400 thousand km.
- Relates to Euro 4 environmental standards.
- Low noise, no vibration during operation.
- The engine cooling system has become more efficient.
However, there are some disadvantages of this power unit:
- Expensive spare parts.
- A broken timing belt leads to damage to the valves.
- Some problems when accelerating the car.
Installing a belt on a 16-valve internal combustion engine
- The marks on the new belt should line up with the notches on the pulleys.
- Even if the tension pulley is still functional, it is still best to remove it during installation to free up more space.
- In place of the old belt, we mount a new one and first install it on the camshafts, then pull it onto the water pump and the parasitic roller.
- When installing the belt drive, it is important to ensure that the pulleys do not rotate. Even a slight deviation in this case is unacceptable.
- Now install the tensioner pulley and use it to tension the timing belt itself. If the belt flexes more than 90 degrees, tighten it again.
- After installing the belt, tensioning and checking the marks, you can mount everything in the reverse order and replace the camshaft covers.
- After assembling the timing case, you need to reinstall the right engine mount, remove the block from the jack, put on the crankcase protector, assemble the receiver, install the barrel and screw the wheel.
See Installing a New Timing Belt below.
What problems might there be?
- A sign of a malfunction is an uncharacteristic whistle from the engine compartment (the belt is whistling). This suggests that most likely the pulley and belt have a strong deflection, therefore, using the tool, the belt tension is increased to eliminate whistling sounds. But if sound occurs due to a defective regulator or other problems, a new mechanism must be installed.
- The most radical option to eliminate whistling is to install a new belt and pulley.
- Whistling also occurs on parts with a broken regulator. If a whistle occurs and a malfunction of the regulator is determined, this unit is removed from its seat and installed.
- Also, the cause of malfunctions is the malfunction of the bearing elements. They break for various reasons. The owner of a French Renault Logan 1.6-liter car with power steering, when installing a new component, should rely on the advice of the Renault automaker when purchasing a new part.
Renault prefers Bosch generators and belts in this matter. It is these components and assemblies that are mounted on the sedan.
Now you can find many alternatives, but for normal operation you should install Bosch components.
Features of replacement and adjustment
You can replace the Renault Logan timing belt yourself if you follow the instructions and have the necessary tool (repair kit) in your arsenal. In addition, you can find a large number of photos and videos on the Internet that show in detail how to replace the specified element. Carry out the work in the following order:
- The front wheel is removed from the right side.
- The protective cover of the generator belt is disassembled, where for this purpose its upper fastening is unscrewed (it is enough to tilt it to the lower corner).
- The generator belt is removed, for which you need to move the self-tensioning roller with a 15mm wrench.
- The belt is bent, using a pneumatic gun the crankshaft pulley is unscrewed and removed.
- Two timing belt bolts are unscrewed using head 8.
- The upper engine mount is removed and rests on it - a fastener is placed under the oil drain plug.
- The right engine mount is unscrewed (5 mounting bolts are unscrewed with a 15mm socket).
- The upper timing belt cover is removed.
- Next, you should set the marks (move the key to 16).
- The tensioner mounting nuts are loose.
- The belt and tension roller are removed, while the crankshaft pulley is first removed.
- Next, you need to determine the condition of the pump: if there is play or stains, the part is also replaced with a new one.
- Before installing a new belt, you need to pay attention to the condition of the seals: even a small amount of sprayed oil is a reason for replacement.
- The correct procedure for installing a new element involves cleaning the area from dust and dirt.
- The new belt is installed together with the round gear of the crankshaft - the gear is inserted into the belt and the timing marks are aligned (after installation, you need to try not to knock them off).
- tension roller installed.
- All inscriptions are aligned and checked.
- Assembly is performed in reverse order.
When replacing the timing belt, pay attention to the condition of the camshaft cover O-rings.
The belt can break before the regulated 60 thousand km, which will not only entail expensive repairs, but also the air conditioning compressor, generator and power steering will fail. Therefore, it is absolutely not worth violating the inspection schedule. As mentioned above, if the belt falls or breaks, it will cause the valves to malfunction (they will press on).
Sources
- https://autogrm.ru/renault/grmt-logan-16.html
- https://ProAutoMarki.ru/reno-logan-zamena-remna-grm/
- https://AlanSpb.ru/dvigateli/kak-natyanut-remen-grm-reno-logan.html
- https://nivovod.ru/renault/zamena-remnya-grm-reno-logan-8-i-16-klapanov-svoimi-rukami/
- https://fastmb.ru/autoremont/1495-zamena-remnya-grm-na-logane-8-klapanov.html
- https://znaypravila.ru/zamena-remnya-grm-reno-logan-s-dvigatelem-1-6-i-1-4-litra/
- https://www.zr.ru/content/articles/771245-proverka-sostoyaniya-zamena-remnya-privoda-grm-8-klapannogo-dvigatelya-renault-logansandero/
- https://avto-mechanik.ru/zamena-remnja-grm-reno-logan-1-6-8-klapanov/
- https://logan-50.ru/inomarki/kak-pomenyat-remen-grm-na-renault-logan-artikuly.html
- https://topmekhanik.ru/kogda-i-kak-menyat-remen-grm-reno-logan-s-8-klapannym-dvs/
- https://NewLogan.ru/skhema-zameny-grm-reno-logan.html
- https://avtogrm.ru/117.html
About the car
This car of this model is equipped depending on the country to which it will be delivered. This also applies to motors, the working volume of which can be from 1 thousand cm 3 to 1600 cm 3. Motors of the following modifications are intended for the regions of the Russian Federation:
- The 1.4 MPi engine has a displacement of 1400 cm3, 8 valves in the cylinder head.
- Engine 1.6 MPi with a displacement of 1600 cm3, 8 valves in the cylinder head.
- K4M engine with a working volume of 1600 cm3, 16 valves.
The main feature of this line of engines is the fact that the timing valve mechanism uses a toothed belt. The difference between belts for engines with 8 and 16 valves is their length and number of teeth. Power units can work together with both manual gearboxes and automatic transmissions. This car model is very popular among taxi drivers in the Russian Federation and CIS countries, as it is easy to maintain and has a decent service life before major repairs.
1.6 MPi engine on Renault Logan
Chain or belt
When considering the technical conditions of the car being developed, the designers considered the question of how to drive the timing valve mechanism. The chain was considered a more reliable drive element in this mechanism, but many motors in this drive already have a belt. Its use in the drive makes it possible to reduce the length of the power unit, which is mounted transversely in the engine compartment.
If you follow all recommendations for engine maintenance and use high-quality consumables, this will allow you to use the engine for a long period without significant problems. Therefore, in the debate about whether to use a belt or a chain in the drive in Renault Logan engines, the toothed belt won.