Car service center on Piskarevka - Energetikov Ave., 59.
Located next to the metro station "Pl. Lenin". Covers car repairs in the Kalininsky, Vyborgsky and Primorsky districts of St. Petersburg. Performs all work on the chassis, engine, suspension and installation of additional equipment. A new wheel alignment stand for cars and minibuses has been installed. Does not do car painting or body repairs. Convenient access from the Ozerki, Prospekt Prosveshcheniya, Udelnaya and Pionerskaya metro stations. There is a cozy cafe in the building. 10 minutes to the Ring Road.
Car service in Kupchino - st. Dimitrova, house 1
Initially, the service only dealt with body repairs and painting. Subsequently, several buildings were built in which new two and four post lifts were installed. Large car wash for cars and commercial vehicles. Separate workshop for diagnostics of diesel and gasoline injectors. Repairs of steering racks, turbines and auto electrics are carried out. Repair of mechanical and automatic transmissions is widely represented. Within walking distance from the metro stations "Zvezdnaya", "Kupchino", "Obukhovo". Suitable for residents of the Frunzensky and Kirovsky districts.
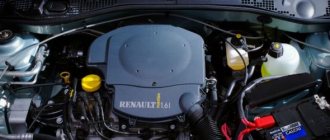
To ensure vehicle reliability and extend its service life, you should regularly inspect it and perform scheduled replacement of consumables. Regulated procedures include replacing the Chevrolet Aveo timing belt. The article provides detailed instructions for replacement, and also has a video that demonstrates this procedure.
[Hide]
How to check the serviceability of the mechanism
If you decide to replace the belt, you should first carry out diagnostic work. Find all possible signs of wear, if any. To do the job you need a five-point hex or a bit.
The execution procedure is as follows:
- Unscrew the bolts securing the front cover, which covers the timing drive.
- Place a jack on the passenger side to support the wheel.
- After this, engage fifth gear and rotate the wheel, while you need to inspect the timing belt for damage.
- If you find cuts, cracks, or peeling, you will need to replace it. If traces of antifreeze are found near the pump, the belt must also be replaced.
- Inspect the tension roller. It has a maximum resource of 100,000 km, so it is replaced every other time.
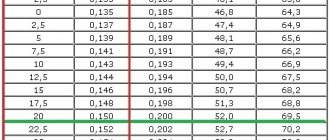
- Measure the belt deflection under a force of 10 kg. The deflection distance must be measured between the camshaft gears. The belt should bend by 5-7 mm.
- The next step is to check the degree of belt stretch. To do this, look at the marks. If the deviation is too large, the belt is overstretched.
What is a timing belt for?
– a rubber rim with a metal frame inside. This part connects the shafts: crankshaft and camshaft, thus synchronizing the movement of valves and pistons.
It is especially important in the gas distribution mechanism, where valves and pistons are located in the same space. In this case, he does not allow them to meet. If the belt breaks, the pistons hit the open valves. At the same time, valves bend and pistons deteriorate, which leads to expensive repairs. This is true for Chevrolet Aveo cars with engines of 1.2 and 1.4.
To avoid high costs for repair work, you need to monitor the condition of timing components and replace worn parts in a timely manner. The belt drive requires replacement if:
The tension roller and pump are replaced along with the strap if scratches, chips, or play are found on them. Oil marks on the surface are usually caused by worn oil seals, in which case they need to be replaced.
Part selection
Almost all Chevrolet cars, including those made in Korea, are equipped with General Motors spare parts. At the same time, Aveo was no exception. The original timing belt for the Chevrolet Aveo has a catalog number of 24,422,964. The average cost in the automotive markets is about 4,000 rubles.
Also, it is worth considering that you will have to take two tension rollers. You can purchase everything in one set, but it is better to select them separately. Timing belt tension roller - 55,574,864, cost - 8,000 rubles. Timing belt guide roller - 24 436 052, with a price tag - 2000 rubles. The total cost of replacement parts for the original is 14,000 rubles.
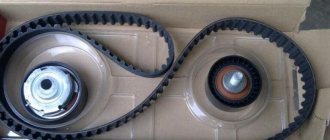
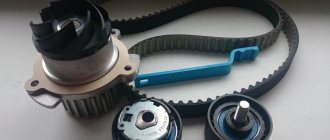
Timing belt replacement kit.
Analogs
You can choose analogues for those who want to save money without losing quality.
Source
We change the belt ourselves
The timing for replacing consumables is specified in the Chevrolet Aveo operating instructions. According to manufacturers' recommendations, the toothed belt should be changed after 50,000 km. The resource of high-quality products is large, so it is better to make a decision on replacement after a visual inspection.
Necessary tools
To carry out the replacement, you need to prepare: purchase consumables and prepare a set of tools, which includes:
- set of keys and sockets;
- knob;
- pliers;
- Phillips and flat screwdrivers;
- torque wrench;
- jack.
Repair kit for Chevrolet Aveo
For comfortable operation, the car must be installed on an accessible device: a lift, an inspection groove, an overpass.
The procedure should be performed on a cooled engine. For safety, you need to put the car on the handbrake and secure the wheels so that the car does not roll.
Stages
The sequence of actions when replacing the timing belt on a Chevrolet Aveo is as follows:
- First of all, you need to de-energize the car by removing the negative terminal from the battery.
- To provide access to the work site, it is necessary to dismantle the air filter housing and the air duct.
- Then you need to disconnect the intake air sensor.
- Next, jack up the car a little and unscrew the power engine bracket.
- Then you need to remove the right front wheel and front engine protection.
- Next, remove the right power unit support and the pillow by unscrewing the mounting bolts and nuts.
- Using a flat-head screwdriver, fix the flywheel, and then unscrew the crankshaft pulley mounting bolt.
We fix the flywheel from turning. In this case, you need to apply some force. You can use WD-40 to make it easier to unscrew. - Once the mounting bolt is removed, the crankshaft pulley can be removed.
- Next, remove the generator strap and tension roller. The removed parts should be inspected. If they are defective, they must be replaced.
- Having unscrewed the fastening bolts, we first dismantle the upper and then the lower cover of the gas distribution mechanism.
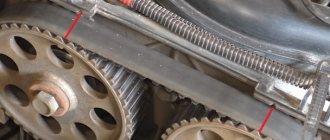
- Next, you need to tighten the crankshaft pulley mounting bolt and, turning it clockwise, you need to align the mark on the pulley with the slot on the bottom of the timing case.
Aligning the marks on the pulley and casing - The marks on the camshaft pulley and the upper part of the timing housing are aligned in the same way.
- Now loosen the mounting bolts on the water pump. To loosen the tension on the belt drive, you need to turn the pump counterclockwise.
- Remove the timing belt.
- At the next stage, unscrew the bolt securing the tensioner roller and remove the tension roller.
- We install the new tensioner pulley in its original place.
- If necessary, change the water pump. To do this, you need to remove the intake and exhaust camshaft gears, as well as the plastic protection.
- After replacing the pump, we reinstall the plastic and the removed gears.
- Next, tighten the new timing belt.
- The tension is adjusted by turning the water pump clockwise. In this case, the pointer on the tension roller should coincide with the mark on the tensioner mount.
- Check all alignment marks again. If they do not match, repeat the installation.
- If everything is fine, we begin the assembly in reverse order. At the same time, tighten the bolts to the torque specified in the Chevrolet Aveo manual.
After completing the work, you need to start the car and listen to how the engine works. If no extraneous sounds are heard, it means the replacement was completed correctly. Thus, you can save on visiting a service station by learning how to change the timing belt on a Chevrolet Aveo.
An old, battered Chevrolet Aveo, under the hood DOHC 1.4 liter, timing belt replacement at 120,000 kilometers. The E-TEC II engine bends all valves when the belt breaks.
Since the car is manufactured by General Motors, the replacement procedure will be very similar to. The only problem with replacement is that the belt is tensioned by the pump.
In order to change the timing belt on this car we will need: a great desire, two cups of coffee and a special key for 41. If there are no problems with the first two, then the special key must either be ordered in advance (for example, the price is 700 rubles) or made by yourself. We used to make it out of metal about 2 mm thick, it didn’t turn out very nicely, but as they say, “no fish, no fish.” Materials: timing belt, tensioner and idler pulley, and always a pump. We definitely change the pump
.
Because as soon as you turn the old pump, when you re-tension it, it will definitely leak.
We begin work with an external inspection.
Sequencing
1. First, turn off the power to the car. To do this, disconnect the left terminal of the battery. 2. Remove the air filter housing and air duct. This way we will provide access to the necessary nodes. 3. The air inlet sensor should be disconnected. 4. Remove the power unit bracket by slightly lifting the car. 5. We dismantle the wheel on the right, and with it the motor protection. 6. Remove the engine mount by unscrewing all fasteners. 7. Now fix the flywheel using a flat screwdriver. Unscrew the crankshaft pulley mounting bolt. Get ready for the fact that you won’t be able to do this quickly, and you will have to try.
8. Remove the crankshaft pulley. 9. Remove the tension roller along with the generator drive. Carefully inspect the removed parts and, based on this, decide whether they need to be replaced. 10. Now remove both timing casings - first the upper and then the lower. 11. Now we need to turn the crankshaft pulley so that the mark on it aligns with the slot on the lower timing case. In order for the pulley to be easily rotated, you need to tighten its fastening bolt. There is no need to screw it in completely.
12. In exactly the same way, align the mark on the crankshaft pulley with the slot on the bottom of the timing housing. 13. Turn the water pump clockwise. To do this you will have to unscrew all the necessary bolts. 14. Dismantle the belt drive. 15. Remove the tension roller by unscrewing all the bolts securing it. 16. We put a new video in its place.
17. It is quite possible that it will be necessary to dismantle the water supply pump. To do this, remove the plastic protection and camshaft sprockets (intake and exhaust). 18. When the pump has already been replaced, replace the removed sprockets. 19. We tighten the new belt drive.
20. Turn the water pump clockwise, thereby tensioning the belt. The mark on the rollers must be aligned with the mark on the tensioner fastener. 21. Once again, check that all marks are aligned correctly. If necessary, we make adjustments. 22. If everything fits together, we begin to reassemble the mechanisms.
After finishing the work, start the car and listen to the engines work. If extraneous noise is detected, the procedure will have to be repeated. By making repairs yourself, you will not only be able to save a lot of money, but also gain the experience that every car enthusiast needs so much.
Let's get started
First, remove the air filter cover and all interfering pipes.
As well as the air filter housing.
We remove the front right wheel, engine protection, drain the antifreeze and jack up the engine. We unscrew the right mudguard, a 10mm socket will help us, and remove it.
Remove the right engine mount. To do this, unscrew the four bolts and two nuts to 17.
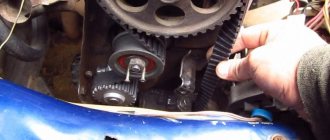
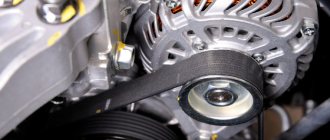
We remove the cushion and see the attachment belt and tension roller.
View from under the wing.
1 – tension roller.
2 – crankshaft pulley.
3 – air conditioning compressor clutch.
Using a 14mm wrench, turn the tension roller bolt clockwise until the service belt loosens and remove the latter.
Remove the upper protective timing cover; to do this, unscrew two 10mm bolts.
Set the top dead center. We turn the crankshaft by the pulley mounting bolt clockwise until the two marks on the camshaft sprockets coincide.
Remove the crankshaft pulley. To remove the bolt, we will need to either lock the crankshaft in any way, or use some trick. Let's consider the second option. We engage fifth gear, place stands under the rear wheel and insert a suitable screwdriver into the brake disc so that it jams the disc against the caliper. Unfortunately, we didn’t take a photo, the picture shows the installation location, the only thing that needs to be installed is below the caliper, because it will spin counterclockwise.
We tear off the bolt.
The mark on the crankshaft should also match.
We put additional tags, you can do without them, but additional control will never be superfluous. “It’s better to be safe than sorry!” - folk wisdom.
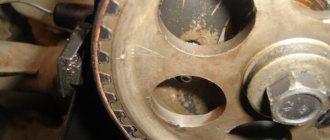
We remove the lower protective timing cover and again the ten-point head will help us. There is a latch at the bottom left.
A wonderful picture appears before us.
1 – intake camshaft sprocket.
2 – exhaust camshaft sprocket.
3 – tension roller.
5 – pump (water pump).
6 – crankshaft sprocket.
Loosen the pump mount, a 5mm hex wrench will come in handy here.
We substitute a basin, because even though we drained the antifreeze, there is still a lot of it left in the block.
Remove the engine mount bracket.
Remove the old timing belt.
We unscrew the camshaft sprockets with a 17 key, having previously locked them.
Remove the camshaft sprockets.
Remove the tension roller and plastic protection. The photo doesn't show the top two bolts, but you can easily find them.
We remove the old pump and install a new one, as shown in the photo. Do not tighten the fastening bolts.
We put the plastic, rollers, camshaft sprockets in place, and tighten all the bolts.
We install the new timing belt in the direction indicated on it. First we check all the marks; the intake camshaft will slide down a little. We put on the timing belt in the following sequence: first on the crankshaft sprocket, idler pulley, exhaust camshaft sprocket, intake valves, tension roller and pump. We check that the descending branch of the belt is always tensioned,
We tighten the belt. Using a special 41 key, turn the pump clockwise until the marks on the tension roller match. Tighten the water pump mounting bolts.
We check all the marks.
We turn the crankshaft two turns and check the marks again.
If everything matches and the pistons and valves do not meet, we assemble them. We put everything that was removed in the reverse order of removal, tighten all the bolts and nuts. Fill with antifreeze. Now you can change the timing belt on a Chevrolet Aveo without much effort.
Replacement procedure
Before proceeding directly to the replacement process, you need to understand that this procedure is quite complicated and will require considerable time. Thus, it is recommended to study the technological diagrams, as well as the design features of the motor. Next, we will collect the necessary tools to carry out the replacement.
Belt and two rollers.
Let's consider the sequence in which operations should be carried out to change the timing belt on a Chevrolet Aveo:
Remove the side timing belt protective cover.
We set the timing marks.
We match the marks with the crankshaft pulley.
We dismantle the belt and two tension rollers.
We install new tension rollers.
Installing a new belt.
The process of replacing the Chevrolet Aveo timing belt may seem difficult, and therefore it is worth calculating your strength. If the car owner is not sure, it is recommended to contact a car service center for operations. On average, the shift process can take from 1 hour to 3 hours.
Chevrolet Aveo belt replacement video
Good luck on the roads. Not a nail. Not a rod!
The timing belt is designed to ensure smooth transmission of torque from the crankshaft to the camshaft. This ensures synchronized closing of the valves and operation of the pistons. If such a belt breaks while the engine is running, then there is a possibility that the valves will be damaged by the impact of the piston. As a result, you can suffer big losses in terms of finances for engine repairs. Therefore, it is recommended to periodically check the condition of the belt and change it if necessary.
Preparatory work.
Removed the valve cover.
We hang the car on a lift. Remove the right front wheel. Unscrew and remove the valve cover. We inspect the condition of the camshaft cams. There are no burrs on the cams, the cover is clean, there are no oil clots. This means that they used normal oil and changed it regularly. To get to the belt itself, you need to remove the drive belt. That's what we do. We also inspect the drive belt roller for the presence of roll or play. He is OK. We unscrew the side protective cover of the timing belt and inspect its condition and the presence of oil leaks. There are no leaks, the seals are fine.
Replacing the timing belt on a Chevrolet Aveo with your own hands
- Remove the right front wheel.
Remove the right front wheel. - Remove the plastic protection. To do this, use the key at “10”.
- Remove the air filter housing.
Disconnect the temperature sensors and loosen the clamps. Here you will need a key “10” and pliers. Remove the air filter housing by unscrewing bolts 1,2,3 and the air duct, disconnecting the supply air temperature sensor 4 and loosening clamps 5 (optional), 6 and 7. - Place the engine on a jack and hang it up by unscrewing the engine mounting bolts.
- Block the flywheel with an iron rod.
- Remove the crankshaft pulley.
- Unscrew the generator belt tensioner pulley and remove the belt.
Unscrew the generator belt tensioner pulley and remove the belt. - Unscrew part of the timing case from the top.
Remove the upper part of the timing case. - Do the same work with the lower part of the casing.
Remove the lower part of the timing case by unscrewing 3 bolts. - Tighten the bolt that secures the pulley.
Next, the crankshaft rotates clockwise. It is necessary to rotate until the marks on the crankshaft pulley align with the same ones on the timing case. Align the marks on the crankshaft pulley and the timing case. - Use a hexagon to loosen the pump mounting bolts.
At the same time, you should try not to twist them too much so that the liquid does not leak. Loosen the pump mounting bolts. - Using a wrench, turn the pump counterclockwise to loosen the belt tension.
To loosen the belt tension, turn the pump counterclockwise. - Remove the timing belt.
We remove the timing belt. - Remove the tension roller.
This completes the disassembly work. Assembly is carried out in reverse order.
When to change the timing belt?
Planned replacement should be carried out in accordance with the deadlines specified in the car’s operating instructions. Everything will depend on the type of engine and car model. Chevrolet Aveo must be replaced every 60,000 kilometers
.
According to the operating instructions, the timing belt should be changed every 60,000 km.
If the owner of a car has doubts about when it needs to be changed, then it should be inspected periodically. If cracks or peeling appear on the surface, then the timing belt must be replaced. Also during the process you need to pay attention to the condition of the tension rollers.
It is worth noting that the timing belt is made of metal and rubber, which is a limitation on its service life. The belt cannot be repaired. It just needs to be completely changed.
Also, replacement should be carried out in cases where there are no obvious signs of damage on the belt, but the belt itself is weakened. As a result, the coordinated operation of the valves will be disrupted and this will cause the engine to not operate stably. For this reason, it will also be difficult to launch.
Which timing belt to buy
Preference should be given to original spare parts, although they are more expensive than analogues. The original part passes all quality tests, and therefore will last longer. But even among non-original belts, there are examples that are of fairly good quality. If you give preference to such spare parts, then you should choose a company that produces them on an assembly line. This can be determined by the appearance of the belt. You can also ask a specialist for help.
Timing belt BOSH.
You can make the replacement yourself if you have certain skills and experience. To do this, you can use this article, as well as watch a video where you can familiarize yourself with the process in more detail. If difficulties arise with carrying out such work, it is recommended to contact the specialists at the service station.
Which timing and pump kit to choose for Aveo T250 1.6
Timing kit (belt + rollers)
| Manufacturer | vendor code | price, rub. |
| Original | ||
| General Motors | 96183352 | 4671 |
| Analogs | ||
| AMD | AMD KITBR7 | 2666 |
| INA | 530033210 | 3001 |
| GATES | K015419XS | 3517 |
Which timing belt is better?
water pump
| Manufacturer | vendor code | price, rub. |
| Original | ||
| General Motors | 96930074 | 3589 |
| Analogs | ||
| DOLZ | D211 | 1095 |
| INA | 538006610 | 1215 |
| HEPU | P795 | 1895 |
Which pump should I put on my car?
Typically, the choice of a water pump for a car is based on several parameters - the material or shape of the impeller and the manufacturer. The most effective is. More details
Since during dismantling it is necessary to drain the coolant, make sure that you have the required amount of coolant when filling (old or buy fresh). The working volume of the cooling system in the 1.6 engine is 6 liters . Antifreeze of class G11 or class G12 , at the choice of the car owner. Just don’t mix these antifreezes!
Which antifreeze to choose
Do you know what influences the choice of antifreeze, its color (red, green, etc.) and the manufacturer? But the service life of it and the cooling system depends on this. Choose the one recommended by the manufacturer Read more
Tools required for work
Video about replacing the timing belt on a Chevrolet Aveo
4.6 Replacing the timing belt
Do not bend or twist the belt! After removing the timing belt, do not rotate or rotate the camshafts to avoid damage to internal engine components due to the valves on the piston bracket hitting the engine! Before installing the belt, thoroughly clean all gears, completely removing dirt, grease and moisture! The timing belt must be installed on a cold engine!
Parts for installing timing components
- Apply the parking brake, support the rear wheels with anti-skid shoes, then separate the front of the car and install it on stands (see Illustration Diagram for installing stands for securing the vehicle in a raised position
). If necessary, remove the crankcase protection. - Empty the radiator. Try to prevent coolant from getting into the drive belts.
- Remove the radiator.
- Remove the cooling fan and water pump pulley.
- Remove the steering wheel, K/V compressor and alternator drive belts.
- Remove all spark plugs.
- Remove the distributor protective screen.
- Remove the support bracket for the K/V compressor belt drive belt idler pulley.
- Remove the tube connecting the timer cover to the air intake hose.
- Remove the coolant hose that was connected to the thermostat.
- When turning the crankshaft with the bolt of its pulley, bring the engine to the TDC position of the end of the compression stroke of the piston of the first cylinder.
- Remove the crankshaft pulley bolt and use a suitable remover to remove the latter.
- Remove the top and bottom of the front timing cover.
- Set the registration mark of the left camshaft gear to the counter mark on the top of the rear timing cover.
Tools
If you replace the coolant pump, you will also have to change the fluid in the cooling system. The tools for carrying out the work are as follows:
- Set of spanner wrenches.
- Socket head for 14.
- Allen key or sprocket, it all depends on what year the car was produced.
- Screwdriver Set.
- A key for adjusting the roller, usually included with the original belt and rollers.
It is worth noting that the presence of an inspection hole or overpass is not necessary, since you will carry out most of the manipulations under the hood.
What affects belt life?
Of course, there are many cases where drivers drive even more without even thinking about replacing the drive. But the serviceability of this product is characterized not only by its integrity. During operation, stretching necessarily occurs, because of this the tension decreases, and the risk of slipping, on the contrary, increases significantly.
Please note that timing belt life can be affected by various factors. In particular, this is the original quality of the product, driving style, and the ingress of liquid or foreign objects into the timing compartment. It is almost impossible to say exactly how long a belt will last. To avoid having to repair the cylinder head, it is best to check the condition of the product from time to time.