Self-installation or replacement of the VAZ-2106AutoRemka steering column
You should never forget about periodic inspection and testing of the steering system. It is one of the most important car systems responsible for driving safety. If we notice even small errors in its operation, then it is better to eliminate them before they result in serious malfunctions, and right at high speed.
The most common problem is a broken steering column. Note that replacing the steering column of a VAZ 2106 requires special tools and certain skills of an auto mechanic. Therefore, we are preparing heads for 30 and 17, an elongated and strong driver, a handle with a ratchet, a driving tool and an open-end wrench.
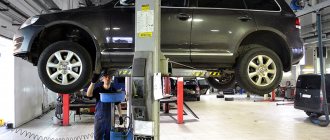
First, let's determine where exactly the problematic mechanism is located. It is located on the left side of the engine compartment, that is, almost at the very bottom left. But before you begin the repair, you must first unscrew the steering shaft. After this, we take the long lever and remove the fasteners that hold the columns to the steering rods. In some cases, two strong wrenches will do instead. You need to be prepared for the fact that it will take a lot of effort to unscrew the fastener. To do this, you can rest your feet on the bottom and gradually break the connection. Some craftsmen prefer not to touch this nut at all, so as not to later remove the column from the splines. This activity will take a lot of time and effort. Sometimes you can simply remove the problematic part along with the steering wheel ends. But often the steering column is changed during some major repair, when the system is already almost completely disassembled.
When we deal with the nut, we begin to unscrew the bolts that attach the column to the spar. In VAZ models there are no more than three bolts. It's difficult to get to them, so it's smarter to first remove the left wheel to gain access to them. Next, use a 17 mm wrench to unscrew the fasteners, holding the parts on the side with an open-end wrench for reliability. You should not hold it from the inside, since there is almost no space there, and the key will have to be placed from the end. In principle, you don’t have to unscrew the bolts completely, but just make them move. And then take the ratchet and unscrew the fastenings with greater convenience and less time.
So, the bolts are unscrewed. Now we move the column to the side and see if the tips are disconnected. If this is the case, then the column is removed from its place easily and simply. Otherwise, you will still have to deal with its slots
They should be knocked down carefully so as not to destroy the entire part. The device is assembled in the reverse order
autoremka.ru
Operating principle of electrical equipment
The ignition switch on 21063, in accordance with the diagram, has four modes, when each of them is turned on, certain equipment is activated:
- In mode 0, the pulse from the battery is supplied to only two connectors - 30 and 30/1, the remaining connectors are de-energized.
- In mode 1, the pulse begins to be supplied to other connectors, as a result of which the side lights, windshield wipers, fan, and also the rear window heating device can work.
- In mode 2, the circuit turns on the ignition system, sensors on the dashboard, turning lights, and the starter.
- In mode 3, only the side lights, steering horn, and window wipers work.
In constant current mode in model 21063, in accordance with the circuit, the steering horn, brake lights, light signaling, lighting on the control panel, and the cigarette lighter operate. The main elements of the circuit are protected by fuses located in the main and additional blocks installed under the instrument panel opposite the driver's seat (video author - Vyacheslav Viter).
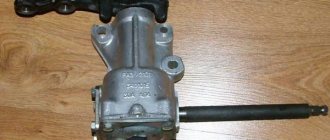
Purpose of the VAZ 2106 steering gear
The steering gearbox is an integral part of the “six” control system. And its purpose is to ensure timely rotation of the steering wheels in the direction desired by the driver.
Thanks to the steering gearbox, the effort that the driver spends turning the front wheels is significantly reduced. And finally, the gearbox allows you to reduce the number of steering wheel revolutions several times, which significantly improves the vehicle's handling.
Steering gear design
All elements of the steering gear are housed in a sealed steel case, which is produced by casting. The main parts of the gearbox are the gear and the so-called worm. These parts are in constant engagement. The housing also contains a bipod shaft with bushings, several ball bearings and springs. There are also several seals and gaskets that prevent oil from leaking out of the housing. You can learn more about the details of the “six” gearbox by looking at the figure.
Gearbox design
In a simplified form, the steering gear design represents a mechanical gear transmission with a gear ratio of 15 - 30. This makes it possible to reduce the torque force that the user must apply to the steering wheel. The main nuances are:
- with an increase in the gear ratio, it is much easier to turn the shaft inside the steering column;
- at the same time, the angle through which you need to turn the steering wheel deviates to a larger direction;
- at high speeds this is dangerous for an accident, since the driver may not be physically able to cope with this task.
In this regard, in vehicles with hydraulic booster or electric power steering (power steering and electric power steering, respectively), these units duplicate the reduction in torque on the steering wheel. For example:
- in a gearbox with a gear ratio of 30, to turn the wheels by 25 degrees, the steering wheel must be unscrewed by 750 degrees;
- a gear with a ratio of 15 will require a 375 degree rotation of the steering wheel to achieve similar wheel rotation;
- however, in the first case, 6 kN of force must be applied, and in the second, 3 kN, which is half as much.
Vehicle designers put a scheme into the gearbox - from a neutral position (wheels in the direction of travel) within 2.5 turns of the steering wheel, they must turn 30 - 45 degrees to the left or right at most. That is, the total stroke of the steering wheel will be 4–5 revolutions, so that the bearing will last longer and the user will have comfortable control at different speeds.
Spatial position
The steering column is located vertically or obliquely, and the rods and levers of the rotary wheels are horizontal, so the simplest option for converting rotation is a horizontally located gearbox - a rack.
In all other cases, that is, when using gearboxes (transmission in a housing), vertical modifications are used:
- the worm, lower bevel gear or screw are located vertically;
- The slide mounted on their shaft rotates in a horizontal plane.
In complex circuits, an angular steering gear usually transmits rotation from cardan to cardan, and then to the control mechanism. Accordingly, each gearbox uses a different bearing design.
Transmission type
Gear and worm gears are traditionally considered the most effective. However, they can use bevel, spur and combination gears. There are kinematic diagrams of gearboxes of several modifications:
- single-stage, two-stage, multi-stage;
- with split steps;
- with deployed coaxial steps.
The most commonly used schemes are:
- gear – worm (worm);
- bevel gear – bevel gear (angular);
- screw – ball nut – rack – gear (screw).
Executive-class passenger cars, heavy trucks and buses are equipped with screw mechanisms. Worm modifications are installed on other cars; they are not sensitive to uneven road surfaces; the gear is in constant mesh and provides greater maneuverability.
In practice, the worm can be mated with a two-tooth or multi-tooth crank, a 2-5 tooth sector and a roller with two or three ridges. Most machines use a globoid worm rather than a cylindrical worm (saddle-shaped work surface). This allows you to reduce friction by 15 - 25%.
Gear ratio
This characteristic is strictly tied to the design of a particular vehicle. Cars with steering racks are considered the most maneuverable, but the steering wheel has to be turned with noticeable tension, which is especially noticeable on old VAZs that are not equipped with an electric steering and power steering.
How to adjust the steering gear
Adjustment of the steering gear may be necessary if the steering wheel becomes very difficult to turn or a slight sticking is clearly felt when turning the steering wheel. Adjustment is carried out using a 19-mm open-end wrench and a flat-head screwdriver. In addition, for precise adjustments you will definitely need the help of a partner.
- The car is installed on smooth asphalt. The steering wheels are installed straight.
- The hood is opened, the steering gear is cleaned of dirt with a piece of rags. There is an adjusting screw with a lock nut on the crankcase cover of the gearbox. This screw is covered with a plastic cap, which will need to be pryed off with a screwdriver and removed.
How to reduce backlash?
The gearbox does not require special care during operation; the main thing is to prevent oil leakage and maintain its level at normal levels. If play appears in the gearbox, the wheels turn only after the steering wheel reaches a certain angle of rotation. This creates inconvenience in driving a VAZ 2106.
You can reduce the backlash yourself; for this you will need an assistant, a 19-mm wrench and a flat-head screwdriver:
- Unscrew the nut on the adjusting bolt;
- Have an assistant turn the steering wheel a quarter turn in both directions;
- At the same time, screw in the screw until you are sure that the play has disappeared;
- Tighten the nut firmly.
After these manipulations, the steering movement will become tighter.
14.10. Steering mechanism repair
Section of the steering gear housing
1 – plate of the bipod shaft adjusting screw; 2 – bipod shaft adjusting screw; 3 – adjusting screw nut; 4 – oil filler plug; 5 – steering gear housing cover; 6 – worm; 7 – steering gear housing; 8 – bipod; 9 – nut securing the bipod to the shaft; 10 – spring washer for the bipod fastening nut; 11 – bipod shaft cuff;
12 – bronze bipod shaft bushing; 13 – bipod shaft; 14 – bipod shaft roller; 15 – worm shaft; 16 – upper ball bearing; 17 – lower ball bearing; 18 – adjusting shims; 19 – lower worm bearing cover; 20 – roller axis; 21 – needle bearing; 22 – worm shaft cuff.
Drain the oil from the gearbox housing, unscrew the adjusting nut and remove the lock washer.
Using a 10mm wrench, unscrew the four bolts securing the top cover of the gearbox.
We remove the head of the adjusting screw from the groove on the bipod shaft and remove the cover.
When replacing the bipod shaft, the axial gap between the screw head and the shaft groove is eliminated by selecting the thickness of the adjusting plate. The gap size is allowed no more than 0.05 mm. The plates have a thickness of 1.95 to 2.20 mm in increments of 0.025 mm.
We remove the bipod shaft with the roller from the crankcase.
Using a 10mm wrench, unscrew the four bolts securing the worm shaft cover and...
. remove it along with the ball bearing adjustment gaskets.
Gaskets are available in thicknesses of 0.1 and 0.15 mm.
With light blows of a soft metal hammer, knock out the worm shaft from the gearbox housing along with the bearing.
On the end surfaces of the worm there are raceways for the bearing balls.
Using a screwdriver, we remove the cuff of the worm shaft.
Similarly, remove the cuff of the bipod shaft.
We use a punch to knock out the outer ring of the second bearing.
We wash all parts in kerosene or diesel fuel. We carefully check that there are no signs of wear, scuffing or damage on the working surfaces of the roller and worm. The gap between the bipod shaft and the bronze bushings should not exceed 0.1 mm. Ball bearings must rotate freely, without jamming, and there must be no damage or signs of wear on the surfaces of the rings, cages and balls. Cracks of any length are not allowed on the crankcase itself. We replace worn and damaged parts with serviceable ones. We replace the cuffs with new ones in any case. Before assembly, lubricate all internal parts with transmission oil.
Using light blows of a hammer on a piece of pipe of suitable diameter, press the inner bearing ring into the crankcase.
You can press in the bearing ring using a tool for replacing rubber-to-metal hinges on the front suspension (see Appendices).
We install a separator with balls into the bearing ring and insert the worm shaft. We put the outer bearing separator on it and press the outer ring into place with light blows of a hammer. We put the cover with gaskets and...
. We press in the cuffs of the worm shaft and bipod, lubricating the working edges with Litol-24 lubricant.
We install a worm in the crankcase. Using a set of adjusting shims, we set the turning torque from 2 to 5 kgf.cm. We install the bipod shaft and adjust the engagement gap according to the moment the shaft rotates. It should be 7–9 kgf.cm when the worm shaft is turned 30° to the left and right and smoothly decrease to 5 kgf.cm with further rotation until it stops. Fill the crankcase with transmission oil to the level of the lower edge of the filler hole (0.215 l).
Dimensions of the main mating parts and limits of permissible wear
Dimensions of mating parts, mm
Permissible gap in mating, mm
Steering bipod shaft bushing – steering bipod shaft
Steering housing - upper worm bearing
Free movement is not allowed
Steering gear housing - lower worm bearing
Swingarm Bracket - Swingarm Axle Bushing
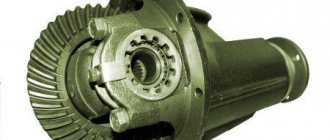
↑ Disassembling the rear axle gearbox
Having installed the gearbox on the workbench, use a 10mm wrench to unscrew the two bolts securing the locking plates of the differential bearing nuts and remove the plates.
We use a core to make marks on the bed and the corresponding bearing cover so that during assembly we can install the covers in their places.
Using a 14mm wrench, unscrew the bolts securing the bearing caps.
Remove the outer bearing rings and adjusting nuts from the differential housing.
If we do not change the bearings, then we mark the outer rings so as not to mix them up during installation, because The bearings are individually worn in and it is not advisable to disassemble them.
We check the absence of radial play in the axle gears.
Use a puller to compress the inner rings of the tapered bearings.
Using a 17mm wrench, unscrew the eight bolts securing the driven gear to the differential housing and remove it.
We use a beard to knock out the satellite axis.
We turn the axle gears and remove the satellite gears.
We take out the axle gears with adjusting washers, marking their position.
We remove the drive gear and the deformed spacer from the crankcase. When assembling the gearbox, we replace it with a new one.
Using a soft metal drift, knock the inner ring of the tapered bearing off the drive gear shaft.
An adjusting ring is installed under the bearing to ensure the correct relative position of the main gear gears.
Use a suitable tool to knock out the outer rings of the tapered bearings from the crankcase.
Steering - how to repair the steering column on a VAZ 2106, 2107 with your own hands
Hello, dear car enthusiasts! Without a doubt, one of the most important attributes for safe driving is the steering. Attempts to find another way to give the machine the required direction of movement do not stop.
But in the coming decades, automakers are not going to change their traditions of putting steering wheels in cars. The steering is very reliable, durable, and informative. The steering system does not have many parts, and it is not difficult to understand.
As a rule, almost no attention is paid to such a part of the steering system as the steering column, mistakenly believing that a piece of metal rod cannot create problems.
Despite its structural simplicity, the steering column also wears out and can give the driver many “surprises”. A heart-rending squeak when turning the steering wheel is the most harmless nuisance that a steering column can cause.
The rotation of the steering wheel seems much more frightening when the car does not change the direction of its movement due to such actions. Such a breakdown can cost the life of the driver, passengers and other road users. The steering column must be monitored and kept in good condition.
Steering column VAZ 2106 – 2107. Design and purpose of elements
Despite all the unity and similarity of the structure of the elements of classic VAZ models, there are still differences between them. This also applies to the steering column. Any car enthusiast knows that the steering column or steering wheel shaft is designed to transmit rotational motion from the steering wheel to the steering worm shaft.
The column itself is held on the body using a special bracket, as well as a rigid clutch to the steering mechanism. The steering column of the VAZ 2106 is an all-metal shaft, which in the upper part has an external spline connection and thread for attaching the steering wheel, as well as an internal spline connection for attaching the worm shaft to the upper part.
Steering tuning
Tuning the VAZ-2107 steering can begin with a well-founded decision to replace the factory steering wheel with a sportier device with a diameter of 320 mm. Such a unit will give the car owner many advantages: firstly, he will be able to park with greater maneuverability. When upgrading the steering wheel, do not forget about installing a safety glass.
Those motorists who prefer sports tuning (low-number rack) should be prepared to pay twice as much money for the unit than for a simple standard device. However, after installation, the car will be able to turn the wheels in just two steering turns.
The third step to improve the car could be adjusting the camber and toe. Experts who have been working with different VAZ models for many years increase toe-in and negative camber on the front axle. At the same time, it is imperative to pay attention to the toe-in of the rear wheelbase, which should, on the contrary, decrease.
Replacing the steering gearbox on a VAZ 2101, VAZ 2102, VAZ 2103, VAZ 2106
Welcome! The steering gearbox is an integral part of any car, because only thanks to this thing the forces from turning the steering wheel are transmitted to the wheels. But like any other unit, the steering gear wears out over time, which makes it necessary to replace it. You can find detailed instructions for replacing the steering gearbox below.
Note! To replace the gearbox, you definitely need to take a set of tools for its removal and installation, the set of tools should include: A basic set of wrenches, as well as pliers, and you will have to buy a special puller for pressing out the pins of the ball joints, otherwise removing the steering gearbox will be difficult without it!
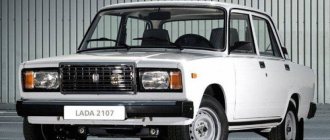
Where is the steering gear located? It is located in the engine compartment of the car, so after opening the hood you can immediately see it, but to get an approximate orientation, the brake master cylinder is located just above the gearbox, and the gearbox itself is indicated by an arrow in the photo.
When should the steering gear be replaced? When it breaks down, control over the car is immediately lost; in other words, the control simply fails. But how can you understand an impending gearbox failure? We will answer this question!
The first signs of gearbox wear include:
- The appearance of various kinds of sounds or so-called squeaks in the steering gear, which are especially audible when turning the steering wheel.
- And also more serious defects of the gearbox include the appearance of large play when turning the steering wheel in the right direction.
Note! But the backlash can also be caused by a loose adjustment screw, which can be treated simply by tightening this screw to the required point. (For information on how to tighten the adjusting screw, see the article: “Adjusting the steering wheel play”) If adjusting the screw does not produce results, then most likely you will have to replace the entire steering gear!
How to tighten the steering rack on a VAZ 2110, 2111, 2112.2113,2114,2115
The steering rack is responsible for the quality control of the car. Over time, like other mechanisms, it becomes loose or becomes unusable. And bad roads have been and remain an unpleasant reality for motorists. In this article we will figure out how to tighten the steering rack quickly and with your own hands. Before repairs, you should carefully prepare - designate a work area and prepare the necessary tools. In this case, you will need only one tool - a steering rack wrench.
You won’t be able to use improvised means, so if it’s not in the kit, you’ll need to buy it. The key is selected specifically for the racks of cars 2110, 2111, 2112, as well as Lada Kalina.
How to tighten the steering rack on a ten - step by step instructions
Getting to the unit on the “ten” is not difficult, unlike Kalina - here there is enough space under the hood to get under the key. Don’t forget to take a flashlight in your other hand, or put a light bulb in the engine compartment:
Use a wrench to lift the nut from the bottom (circled in red above in the picture). The tightening on the right thread is counterclockwise, since the nut tightens the assembly from below. Turn the key 1/4 turn.
Check the performance of the rack: the knocking has stopped - the tension is set correctly. Otherwise, tighten it a little more and check again. The work will not take much time, since tightening the steering rack is a matter of five minutes. It is not advisable to tighten the nut tightly (more than 1 turn) - this will make the steering wheel “tight” and cause wear of the part and jamming. How often should I tighten the steering rack? On average, this is 10,000 km. Depending on driving conditions, the figure may fluctuate in one direction or another.
When driving on uneven roads, you should pay attention to the unit more often. Knocking and rattling even after tightening indicate a malfunction of the unit, so the only correct solution here is to completely replace the rack.
Replacing the steering column on a VAZ 2107
I would like to warn you right away that replacing the steering column on a VAZ 2107 is not a pleasant task, and not everyone wants to tinker with this work on their own. But if you still decide to carry out this repair on your own, then you should be patient and have the necessary tools for this, the list of which is given below:
- Open-end wrench and socket wrench 17
- Socket heads for 17 and 30
- Ratchet handle
- Hammer
- Mount
- Powerful crank
The procedure for repairing and replacing the steering column on a VAZ “classic”
I would also like to say that I did this work quite a long time ago and I may not remember some points, but I will try to give the main essence of the work done with photographs and a description of the actions performed.
So, the first thing you need to do is remove the steering shaft. which is sandwiched in the column.
Then we take a 30mm wrench, preferably a head and a powerful long wrench, and try to rip off the steering column mounting nut:
After this, unscrew the three bolts securing the column to the car body. To be honest, this is quite inconvenient to do, since the distance between the nuts (under the hood) and the body itself is very small and you have to turn the key almost inside out to keep the bolts from turning.
The photo above shows the bottom bolt, which is the most inconvenient to remove. On the reverse side, unscrew the nuts with a ratchet to make everything more convenient and much faster:
After all the nuts are unscrewed, the column moves away from the body, but still rests on the tie rod splines. and it is not so easy to knock it off the shaft. You can first pry it with a tire iron and try to knock it down with jerks, or by pushing with your feet:
Once you have managed to knock down the column, you can begin installing it. Of course, we first buy a new column for the VAZ 2107, the price of which is approximately 2,000 rubles. Replacement is carried out in a strictly defined sequence.
Installation of a sports steering wheel without an adapter on a VAZ 2104-07
If you are not too concerned about the steering column trim in the cabin, then a tuning product from the Sparco brand, equipped with a quick-release device, can be put in “four” without using an adapter. The essence of the method is to use as the last part the central part of the standard steering wheel with a wide platform and slots, and simply cut off the rest. To work you will need:
- electric drill with a 6.5 mm drill bit;
- long M6 bolts – 6 pcs.;
- hammer and core;
- grinder with a circle on iron;
- hex wrench to suit the size of the bolts;
- caliper, ruler.
Steering gear and swing arm
Removing and installing the steering mechanism
For this operation you will need the following tools: a special puller, 13 mm, 17 mm, 22 mm keys and pliers.
1. Disconnect the steering shaft from the steering gear (see “Removing and installing the steering shaft”).
2. Disconnect the steering rods (1) and (2) from the steering gear bipod and move them to the side (see “Removing and installing the rods”).
3. While holding the fastening bolts (indicated in the photo by arrows) of the steering gearbox from turning, unscrew the nuts securing them.
4. Remove the steering gear along with the bolts and adjusting washers through the bottom of the car.
Note Mark the location and number of shims to ensure they are reinstalled.
5. Installation is carried out in the reverse order of removal.
Note Before final tightening of the steering gearbox mounting bolts, it is necessary to turn the steering wheel in both directions several times so that the steering shaft and gearbox self-align (take the correct position).
Removing and installing the pendulum arm
For this operation you will need the following tools: a special puller, two 17 mm keys and pliers.
1. Disconnect the steering rods (1) and (2) from the pendulum arm and move them to the side (see “Removing and installing the rods”).
2. While holding the fastening bolts (indicated in the photo by arrows) of the pendulum arm housing from turning, unscrew the nuts securing them.
3. Remove the bolts and remove the swing arm from the vehicle.
4. Installation is carried out in the reverse order of removal.
When purchasing a book in PDF
1. You will be able to download the book immediately after payment.
2. The book will be downloaded in PDF format, and you can download it to any device.
1. All books are of ideal quality, since we work with publishers directly.
2. Electronic books are in no way inferior to paper books and are their complete analogue.
3. Our company has offices in Ukraine, Russia and Poland, you can always contact us at a specific address.
4. All payments on the site are maximally protected and are made using global payment systems.
The book is not intended for sale in your country.
You can place an order for the paper version of this book on the website autoinform96.com.
Payment for goods and downloading of the book in electronic form (PDF format) is made on the website.
To do this, you need to find the book you are interested in and click on the “Buy” button. The price of the book is indicated on the button.
For convenience, the price on the website for residents of Russia, Belarus and Kazakhstan is presented in rubles.
For residents of Ukraine in hryvnias, and for all other countries - dollars.
After clicking on the “BUY” button, you will be taken to the payment page, where you can select a payment system with which you can pay for the selected book using any bank card (Visa, MasterCard, MIR, etc.)
- Yandex (payment from any bank cards, Yandex Money account, QIWI Wallet, terminals, etc.);
- Portmone (payment from any bank cards, Portmone account);
- PayPal (payment from any bank cards, PayPal account);
- WebMoney (payment from any bank cards, payment from WebMoney wallets).
Installing electric power steering
If a car owner wants to install an electric booster on a VAZ-2107, he should give preference to factory units. Before setting up and upgrading the system, the transmission speed sensor should be adjusted. This will avoid turning the steering wheel too “tight”.
Among other additions, when installing an ESD in your car, the vehicle owner will have to install a new choke cable (you can purchase it as part of the ESD kit for the VAZ-2108), replace the gearbox and install a MUR1100E diode.
Electric power steering on a VAZ-2107, when purchasing a ready-made kit, requires the presence of a speed sensor, various fasteners, a choke cable, an ignition switch, several switches and a casing for the steering column.
When assembling an electric power steering for a VAZ-2107 with your own hands, you need to start with the adapter plate and cardan. After removing the crosspiece, you need to select a cardan of the appropriate length. The welded and assembled crosspiece, or rather its bearings, are equipped with new lubricant. After this, the steering device is installed and the electrical component of the power steering is connected. The red wire should go to the battery, and the brown wire should go to its mounting stud. The blue cable for the ignition switch should go to the orange one. The tachometer wires should go to the dashboard chip, and the connecting elements between the speed sensors should go to the ninth pin of the ECU.
Instructions for replacing the steering column
The steering system of a car must be treated very responsibly, since it is primarily responsible for the safety of the car when driving. If control problems arise, they must be corrected immediately. One of the breakdowns in this system is the failure of the steering column. The procedure for replacing it is quite problematic, but if you have the right tool, you can get by with minor sacrifices. So, we will need:
- Head for 17 and 30
- Long and powerful crank
- Mount
- Hammer
- Ratchet handle
- Regular open-end wrench 17
So, the steering mechanism (column) is located on the left side of the space under the hood of the VAZ 2106, it turns out in the very bottom left corner
It is worth noting that before you start replacing it, you first need to remove the steering shaft
When everything is ready, you can start repairing. The first step is to unscrew the lower nut securing the column to the steering rods. To do this you will need a fairly long lever, which can be made from two powerful cranks:
To unscrew it, you will need a very strong force; I pressed my feet from below to break the connection:
In general, it is advisable not to unscrew this nut, since then you will have to knock the column off the splines, which is not a very pleasant task. It is more convenient to simply disconnect the column along with the steering tips. But since I completely disassembled the car, this was not important for me.
After the nut is unscrewed or the ends are disconnected, you can begin to unscrew the bolts securing the steering column to the side member. It is secured with three bolts. To get to them, it is better to remove the front left wheel, it will be more convenient.
We take the head with a 17mm knob and, holding it with an open-end wrench, unscrew the bolts one by one:
Holding from the inside is not very convenient, since there is very little space there; you have to insert the key from the end, especially for the lower nut on one side:
After the bolts have moved out of place, you can use a ratchet, as with it you can do everything much faster.
After the bolts are unscrewed, you can safely move the column to the side:
If the tips are disconnected, the column can be freely removed without any problems. If you unscrewed the largest nut, you will have to knock it off the splines, which brings quite a lot of trouble. The price of a new steering column for a VAZ 2106 and other “classic” models. If replacement is necessary, we buy a new mechanism and install it in reverse order.
Tuning and adjusting the carburetor VAZ 2106
Before adjusting the carburetor on a VAZ 2106, you need to check the ignition system and fuel supply. The main causes of ozone carburetor malfunctions are a rich or lean mixture, which directly affect the stable operation of the engine. An enriched mixture manifests itself in the form of increased engine temperature under stable operating conditions and increased fuel consumption. Before adjusting the carburetor on a VAZ 2106 car, you must completely check the adjacent systems and filters.
A lean mixture leads to a loss of power, acceleration dynamics of the car, and loud sounds in the form of pops. You should pay attention to the engine temperature; if the increase occurs too quickly, it is necessary to correctly adjust the amount of mixture. As a preventive measure during car maintenance, it is recommended to check thermal clearances, the condition of the fuel system and filters.
Checking the strainer
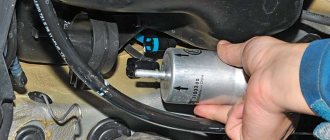
The correct amount of fuel is not always supplied to the carburetor. The reason is negligence regarding the frequency of replacement of coarse filters, which has a detrimental effect on the mesh filter, which cleans the fuel before being supplied to the float chamber of the carb. The filter is dismantled after unscrewing the plug that protects the structure. Cleaning of soot and dirt must be done from the inside by thoroughly blowing the filter with compressed air. The operation must be performed with extreme caution; if the thin walls of the filter are damaged, it cannot be restored.
When installing, pay attention to the condition of the fuel supply nozzle. If it is possible to visually determine scale or dirt, it is necessary to remove and blow it out. Before removing the nozzle, the float chamber should be emptied of fuel, because the needle valve may be damaged or the system settings may be lost. When screwing the plug, it is necessary to visually inspect the gasket; if damaged, replace it with a new sealing ring.
Setting up the float chamber
The float chamber device is responsible for the constant presence of fuel in the system. The camera mechanisms can be adjusted and answer the question of how to adjust the VAZ 2106 carburetor for lower fuel consumption. The main reason for incorrect float settings may be increased fuel consumption and unstable engine operation during acceleration. Before dismantling, you must make sure that the fuel nozzle is screwed in place, because It is not uncommon for it to twist out of place due to increased vehicle vibrations. Fuel overflow can also occur due to a low fuel level in the float chamber, which may result in weak engine thrust, popping noises or wet spark plugs.
Setting the float chamber: 1 - carburetor cover; 2 — needle valve seat; 3 - emphasis; 4 - needle valve; 5 — locking needle ball; 6 — valve needle pull-out fork; 7 — float bracket; 8 - tongue; 9 — float; 10 - gasket.
Adjusting the VAZ 2106 carburetor will require removing the cover; in a state where the upper part is horizontal and upside down, the gap should be no more than 6 mm. This position is taken as the maximum level of gasoline in the chamber with the needle-type valve closed. The float tongue is used to adjust the level of the fuel mixture; after setting the correct position, it is necessary to check the operation of the needle valve. The float axis is dismantled, the valve is removed from the threaded connection. Visually you can identify mechanical damage, scuffs and scratches.
Checking the work yourself is done as follows:
- The cleaned and configured nodes are mounted in their places;
- Gasoline is pumped through a mesh filter with a rubber bulb; the needle valve should clearly allow fuel to pass through;
- Bleeding the system is repeated with the parts fully installed;
After checking, you need to make sure that the gasket is correctly in its seat, because it can block one of the channels and cause unstable operation. Before the process of adjusting the mixture of the VAZ 2106 carburetor, the engine is completely warmed up, the air suction lever is completely recessed.
Starting system, setup and adjustment
The starting device can be adjusted correctly on a dismantled carburetor in the car. You can adjust the VAZ 2106 carburetor with your own hands without removing the carburetor; just remove the air filter, pull the choke drive towards you, and take your foot off the gas pedal in the car's interior. According to the tachometer readings, with the air damper completely closed, the speed should vary from 3200 to 3600 per minute.
Carburetor starting device: 1 - choke drive lever; 2 - air damper; 3 - starting device rod; 4 — starting rod; 5 - adjusting screw; 6 — throttle valve of the primary chamber; 7 — throttle drive rod. B, C - starting gaps of the dampers.
At the next stage of adjustment, you need to force open the air damper by 30 percent of its stroke. Through these actions, the engine speed should be reduced by 300 units; if this does not happen, the rod length is adjusted.
In cases where the carburetor of a VAZ 2106 removed from the car is adjusted, the following instructions must be followed:
- Adjust the distance of the closed air damper;
- The gap should be no more than 5.5 mm, measured from the camera body to the shutter;
- We adjust the gap using the quantity screw; when unscrewing, the gap increases, and in the opposite direction it decreases.
It is important to remember that it is necessary to control the distance between the diffuser and the throttle; it should be no more than 0.8 mm.
Adjusting the VAZ 2101 gearbox
Adjusting the VAZ 2101 gearbox consists of one thing - reducing the steering play. This is done quite simply; you do not need to know the structure of the steering gearbox from the inside. Just look at it from the outside and see that on top there is one large screw (adjusting) and one small one (for filling oil and controlling its level).
Adjustment procedure
When adjusting the VAZ 2101, the help of a second person will be required. However, you can do everything alone, because even replacing a column on a penny turned out to be within your power. Completely unscrew the nut that is located on the screw and is necessary to secure it.
You try to tighten the screw with a screwdriver, when it refuses to go any further, your partner should pull the steering wheel in different directions. And the bolt will go easier. The steering gearbox on the VAZ 2101 is adjusted until the play is acceptable. At the end, the nut is tightened and the car is ready for further use.
https://www.youtube.com/watch?v=https://www.youtube.com/watch?v=jgvC3sMuOvc
How to replace the gearbox?
VAZ 2106 gearbox diagram Replacing the gearbox is a more complex operation, but this will make the steering mechanism more reliable. To replace the gearbox, use the following instructions:
- Raise the left side of the VAZ 2106 to make room for manipulation;
- Remove the wheel on the left side;
- Unscrew the nuts, after removing the pins;
- Tighten the puller bolt, remove both tips;
- Tighten the bolt on the steering shaft near the gearbox;
- Remove the shaft from the splines;
- Tighten the nuts that secure the gearbox to the body;
- Repair or replace the gearbox.
To return the gearbox to its place, follow the same instructions, but in reverse order.
Classification of steering gears
It must be said that there are a large number of types of gearboxes. Therefore, all of them can be combined into several groups, classified according to the following criteria:
- According to the type of gears, they can be gear, worm or gear-worm.
- According to the number of stages: single-stage, two-stage, and so on.
- By type of gears: cylindrical, bevel, bevel-cylindrical.
- Depending on the location of the shafts in space, gearboxes are divided into horizontal and vertical.
- Depending on the features of the kinematic scheme: they can be with a bifurcated stage, or they can be with a deployed coaxial scheme.
It is worth noting that such a great variety of steering gearboxes is due to the fact that each of them has a different load capacity and, accordingly, a completely different efficiency.
As you know, different types of cars have different weights. And the heavier the car, the greater, in turn, will be the weight that rests on the steering wheels. This means that it will be more difficult to drive this car. That is why, for example, the UAZ steering gear will be completely different from the gazelle steering gear or the VAZ steering gear. That is, the greater the mass of the vehicle, the greater the efficiency of the steering gearbox must be to ensure normal controllability of the vehicle.
For a more complete and detailed acquaintance with the design of the steering gear, you can view the diagram of its structure.
So, this is the steering gearbox of the VAZ 2107. The image shows that its design includes the following parts:
- Sealing cap;
- The nut is low;
- Lock washer;
- Adjustment screw plate;
- Adjustment screw;
- Bipod shaft;
- Ball separator:
- Worm shaft lower bearing ring;
- Adjusting gasket;
- Lower crankcase cover;
- Screw;
- Bipod;
- Spring washer 20;
- Cork mk;
- Upper crankcase cover;
- Top cover gasket;
- Worm seal;
- Steering gear housing:
- Bipod shaft bushing;
- Bipod shaft oil seal;
- Upper bearing ring;
- Worm shaft:
- Nut M20×1.5.
It is clear that this is just one example of a scheme. Based on it, you cannot draw conclusions about which gearbox is in a car of another brand, because they are all different from each other. Although there are analogues, for example, the steering gearbox 2105. The steering gearbox VAZ 2106 and the steering gearbox 2101 are also similar in structure. All these devices differ from each other quite slightly. Therefore, they can even be replaced with each other. So, for example, if the steering gearbox of a Niva is broken, and there is no way to find a new one, you can install a VAZ 2105 steering gearbox. In this case, the price of a VAZ steering gearbox will be significantly lower, and you will only have to take a bipod from the previous steering gearbox 2121.
Signs of breakdown of the gearbox and other elements of the steering system
The steering gearbox on a VAZ 2106 very rarely fails alone. As a rule, a gearbox failure is preceded by the failure of several elements of the steering system, after which the gearbox itself breaks down. That is why it is better to consider the problems of this system as a whole. We list the most well-known signs of a breakdown of the control system on the “six”:
- when turning the steering wheel, a characteristic grinding or loud creaking sound is heard from under the steering column;
- the driver observes a constant leak of lubricant from the gearbox;
- turning the steering wheel began to require more effort than before.
Now let’s look at what exactly can cause the above symptoms and how to eliminate them.
Steering system noise
Here are the main causes of noise behind the steering column:
- The clearance on the bearings installed in the steering wheel hubs has increased. Solution: adjust the gap, and in case of significant wear of the bearings, replace them completely;
- The fastening nuts on the steering rod pins have become loose. It is these nuts that usually cause loud squeaking and grinding noises. Solution: tighten the nuts;
- The gap between the bushings and the pendulum arm of the steering system has increased. Solution: replacing the bushings (and sometimes you have to change the bushing brackets if they are very worn);
- The worm bearings in the gearbox are worn out. A grinding noise when turning wheels can also occur due to them. Solution: replace the bearings. And if the bearings are not worn out, it is necessary to adjust their clearances;
- loosening the fastening nuts on the swing arms. Solution: tighten the nuts after placing the car wheels straight.
Leakage of lubricant from the gearbox
A lubricant leak indicates a violation of the seal of the device.
Here's how it happens:
- The seals on the bipod shaft or on the worm shaft are completely worn out. Solution: replace the seals (sets of these seals can be purchased at any spare parts store);
- The bolts holding the steering system housing cover have become loose. Solution: tighten the bolts, and they must be tightened crosswise. That is, first the right bolt is tightened, then the left, then the top bolt, then the bottom, etc. Only such a tightening pattern can guarantee the tightness of the crankcase cover;
- damage to the sealing gasket under the crankcase cover. If the above tightening pattern does not lead to anything, it means that the seal under the crankcase cover has worn out. Therefore, the cover will have to be removed and the sealing gasket replaced.
The steering wheel turns hard
If the driver feels that it has become very difficult to turn the steering wheel, this can happen for the following reasons:
- Incorrect alignment of the steering wheels. The solution is obvious: install the car on a stand and set the correct toe and camber angles;
- one or more parts of the steering system are deformed. Steering rods are usually deformed. And this happens due to external mechanical influences (flying stones, regular driving on uneven roads). Deformed rods will have to be removed and replaced with new ones;
- the gap between the worm and the roller in the steering gear has increased (or vice versa, decreased). Over time, any mechanical connection can become loose. And worm joints are no exception. To eliminate the problem, the roller gap is adjusted using a special bolt, then the gap size is checked using a feeler gauge. The resulting figure is checked against the figure specified in the operating instructions for the machine;
- The nut on the swing arm is too tight. The peculiarity of this nut is that over time it does not weaken, like other fasteners, but rather tightens. This occurs due to the specific operating conditions of the pendulum arm. The solution is obvious: the nut should be slightly loosened.
How to replace the steering column of a VAZ-2106
When owning a personal car, car owners must carefully monitor the operation of all systems and components and, of course, promptly replace an element that has become unusable.
In the “classic” VAZ-2106 models, however, as in other cars, all systems are important, but special attention should be paid to the steering wheel, since it is she who is responsible for the safe movement of the car. If any, even the most minor, problem is detected in the control system, it must be eliminated as quickly as possible
One of the most common malfunctions in this system is a broken steering column.
It is worth noting that this element cannot be repaired, so it will simply need to be replaced. Replacing a faulty VAZ-2106 steering column, of course, is a long process, but if the work is carried out step by step and taking into account the recommendations provided by professionals, then every car enthusiast can easily cope with this work.
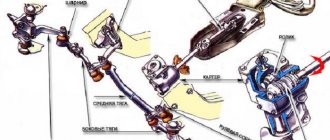
The design and principle of operation of the VAZ 2106 steering mechanism
The design of the VAZ 2106 steering mechanism is very complex. However, it is precisely this that allows the driver to confidently control the car in a variety of situations. All elements of the control system are shown in the figure below.
Here it should be said about the ease of control of the “six”. To turn the steering wheel, the driver makes a minimum of effort. And therefore, less tired on long trips. The steering of the “six” also has one more feature: play. It is very minor and is not a sign of a problem with the steering system. Play in the “six” steering wheel is a common occurrence; it occurs due to the abundance of various rods and small elements in the control system. Finally, in the latest models of the “sixes” they began to install injury-proof steering columns, which could fold in the event of a strong impact, increasing the driver’s chances of surviving a serious accident. The VAZ 2106 steering mechanism works as follows:
- The driver turns the steering wheel in the desired direction.
- A worm shaft begins to move in the steering gear, driven by a system of hinges.
- The gear mated to the worm shaft also begins to rotate and moves the double-ridge roller.
- Under the action of the roller, the secondary shaft of the steering gear begins to rotate.
- The bipod is attached to this shaft. When moving, they set the main steering rods in motion. Through these parts, the driver’s force is transmitted to the front wheels, which rotate to the required angle.
Increased steering wheel play
In order to check the steering play, you must perform the following steps:
- Park the car on a level surface.
- Inflate the tires to equalize the pressure.
- Position the steering wheel so that the front wheels are directed parallel to the center axis of the car.
- Position the ruler so that it rests against the dashboard and lightly touches the light switch and steering wheel.
- Slowly try to turn the steering wheel and at the same time pay attention to how the front wheels are positioned.
- When the wheels shift, you need to stop the rotation of the steering wheel.
- Make a mark on the steering wheel opposite the ruler.
- Start turning the steering wheel in the opposite direction until the wheels begin to turn.
- Set the second label.
After all the steps taken, it is necessary to measure the distance between these two marks. With normal play, which is 5 degrees, the distance will be 17 mm. In the same case, if this value is less, you will need to replace the steering gear or tighten the worm gear nut.