Torque from the gearbox is transmitted to the rear wheels of the “seven” through the rear axle gearbox. The gears installed in the gearbox wear out over time and begin to make noise when moving. In this case, you will have to change or repair the rear axle gearbox of the VAZ 2107.
Signs of a malfunction of the rear axle gearbox of the VAZ 2107
The gearbox is a fairly expensive part, and its repair is a labor-intensive and complex process. Therefore, you should first make sure that the cause of the noise is a gearbox malfunction. You can do this as follows:
- Choose a flat section of the road and gradually accelerate on it from 20 to 90 km/h. While driving, you should listen carefully and note the appearance and disappearance of extraneous noise from the rear axle gearbox.
- Release the gas and start braking with the engine. While the speed is decreasing, you should also note the moments when noises appear and disappear.
- Accelerate the car to approximately 100 km/h and, switching to neutral, turn off the engine. While the car is coasting, note the presence and disappearance of noise.
To verify the presence or absence of a mono problem like this:
- Park the car, securing it with wheel chocks.
- Raise it with a jack, hanging the rear axle.
- Start the engine, turn on the speed and add gas so that the wheels rotate without load, and the speedometer shows the same speed as during tests on the move.
If the noise remains the same when operating without load as under load, the problem is not in the gearbox. Other rear-wheel drive components should be checked.
If the gearbox does not make noise without load, you will have to start restoring it. Worn gears begin to make noise only under load.
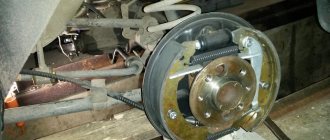
Removing the rear axle gearbox of VAZ 2107
Before removing the gearbox, it is necessary to drain the transmission oil that is poured into the rear axle of the VAZ 2107. To do this, place an oil container under the drain hole of the axle and unscrew the drain plug.
Important: after repair, new transmission oil should be poured into the gearbox.
The next procedure is as follows:
- Unscrew the bolts securing the cardan to the gearbox flange;
- Uncouple the rear part of the cardan and lower it down;
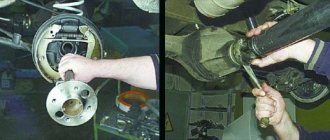
- jack up the car (if it is not on a lift) and remove the rear wheels;
- Unscrew the guide screws of the brake drums;
- remove the brake drums;
- unscrew the 4 bolts securing the axle shafts;
- pull out the axle shafts, freeing the gearbox;
- unscrew the 8 gearbox mounting bolts;
- remove the gearbox.
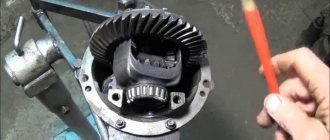
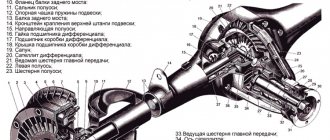
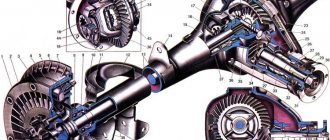
Device
In order for the car to move, it is necessary to transfer the rotation of the engine to the wheels. But the engine speed is too high, and in order to correctly distribute the torque, a mechanism is needed that changes the gear ratio. Due to the gearbox and different engine speeds, the speed of movement changes, and the main pair of the rear axle takes over the rotation and transmits it to the wheels through gears.
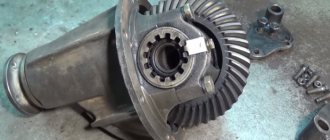
- flange, it is fixed on the drive gear (shank) of the RZM, and is an intermediate link between the driveshaft and this gear;
- the shank of the main pair, at one end of which there are splines for pressing the flange, at the other end there is a bevel gear with a small number of teeth;
- driven gear (planet gear), it is in mesh with the drive gear, and it is with it that it forms the main gear;
- center differential, allowing the rear wheels to spin at different angular speeds.
The differential design is very simple - the mechanism consists of two axle gears, two satellites and a satellite pin. From the gearbox, the movement is transmitted to the axle shafts, on which the wheels are mounted.
Repair and adjustment of the VAZ 2107 gearbox
Adjusting and repairing the gearbox requires some skills and careful adherence to technology. It is also necessary to have pullers, stands and special tools. If the above is not the case, you should entrust the work to professionals.
If your qualifications are insufficient, it is better not to start working with the gearbox. Assembly and adjustment work requires fairly high metalworking skills. It is not difficult to disassemble the VAZ 2107 axle, but this is one of the few components of the “Seven” that requires highly qualified maintenance. It is not worth saving on these works.
Disassembling the gearbox is performed in the following sequence:
- unscrew the shank nut;
- remove the flange and remove the drive gear and adjusting rings;
- remove the oil seal, oil deflector, inner ring of the bearing;
- press out the outer rings of the bearings with a puller;
- disassemble the drive gear with the differential (the spacer sleeve in this case must be replaced).
When disassembling the gearbox, it is necessary to put marks on the bearing caps in order to then install them in their original position. To do this, you can use a core (which is more reliable) or a pencil. Marks must be placed on the covers and on the body, so that later during assembly they can be aligned. You should also mark the left and right covers so as not to confuse them.
This can be done this way: on the covers, in addition to the marks opposite the marks on the body, apply numbers or letters with a pencil. The disadvantage of this method is that the marks will be erased when you clean the lid. Therefore, it is safer to simply make marks with a core. For example, one on the left cover and two on the right.
The inner rings with the separator are removed using a hammer and drift. You need to knock out the rings by lightly tapping them in different places. If you hit only one place, you won’t be able to pull out the ring.
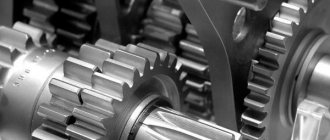
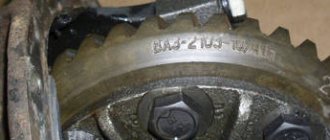
Typically repairs consist of replacing bearings or the main pair. These parts most often fail.
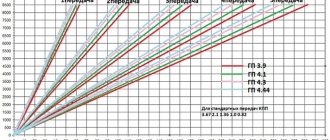
The main pair is available in several variations and determines the gear ratio. The higher the gear ratio, the greater the traction; the lower, the higher the maximum speed of the machine. There are three standard versions of the main pair, used on different VAZ models.
| main couple | number of teeth on gears | number of revolutions of the propeller shaft per 10 wheel revolutions | gear ratio | |
| on the slave | on the leading | |||
| 2102 | 40 | 9 | 22,2 | 4,44 |
| 2101 | 43 | 10 | 21,5 | 4,3 |
| 2103 | 41 | 10 | 20,5 | 4,1 |
| 2106 | 43 | 11 | 19,5 | 3,9 |
VAZ 2107 owners sometimes install the main gearbox pairs with a non-standard gear ratio. To increase traction, pairs are set with a larger value, to increase maximum speed - with a smaller one. If the task is to tune a car, you can take this opportunity to change these characteristics of the VAZ 2107.
Reference: the VAZ 2102 axle had the maximum gear ratio (4.44). After this model was discontinued, finding pairs with this ratio became problematic, but as practice shows, the best option is installation on a VAZ 2107 with a 1.5-1 engine ,6 gearboxes with 2103 (4.1 gear ratio). When choosing this gearbox in conjunction with a five-speed gearbox, traction and speed are maintained.
Repairing the rear axle gearbox of a VAZ 2107 is not always advisable. It is often easier to replace the gearbox with a new one. It is worth considering that the new unit will be more durable than the restored one.
Clarifying the diagnosis
Many motorists, out of ignorance, confuse noise from the gearbox with other faults, and then begin to change completely working parts. Often they are helped in this by garage “masters” who are incompetent in the work of gearboxes. Following their advice, the owner of a VAZ 2106 can pour some additive into the crankcase of a working gearbox, which will disable it. This cannot be done; additives will not restore a humming unit, but they can ruin a working one.
To make an accurate diagnosis, you need to check the following points:
- make sure there is lubricant in the crankcase;
- check if the seals are leaking;
- measure the amount of play in the mechanism.
The backlash is determined by freely turning the cardan manually and placing marks on it and the gearbox housing. The ideal backlash is 2-3 mm, the acceptable one is 10 mm.
In order not to confuse the noise from the gearbox with the hum of axle bearings or the crunching of crosspieces, it is recommended to perform an on-site hearing test. To do this, you need to, together with an assistant, hang the rear of the car so that both wheels do not touch the ground. After starting the engine, turn on the gear and listen in different modes to where the sound source is. The procedure is performed on an inspection ditch or lift.
The axle gearbox is such a pest that when it starts howling, you wonder what this gearbox needs to do, how to eliminate the howling that begins to hurt your ears when driving a car.
There are few craftsmen who are engaged in adjusting the gearbox, since you need to know and feel the gaps between the gearbox and the cone, the tightness of the bearings.
Usually the howling starts due to bad oil, wear of the tip and gearbox, or improper tightening of the nut on the shank of the tip. If you overtighten the nut, tighten the cone bearings too much, the gearbox can jam, if you tighten it too weakly, the gearbox will howl, tighten the nut so that there is no play and The gearbox was easily turned by hand.
I will give you the factory instructions for adjusting the gearbox, I hope you can repair and adjust the axle gearbox yourself at home.
Adjustment and installation of the VAZ 2107 gearbox
Before assembling the gearbox, all parts must be thoroughly washed in kerosene. They should be inspected before installation. Gear teeth should not be chipped or scored and have the color of metal, and not be covered with a black coating of oil. Minor scuffs on the satellite axle, journal and axle gear seats can be treated with fine sandpaper. If there are large scuffs or large wear, the parts must be replaced.
The gearbox parts are assembled in the reverse order of disassembly. You can press in the bearing rings using a hammer and a special tool (a socket wrench head will do).
The gaps between the gears of the gearbox are adjusted using an adjusting ring, the thickness of which is selected individually. For selection, you need a caliper and probes of various thicknesses. The flange nut must be tightened with a torque of 18 kgf-m.
Adjusting the VAZ 2107 gearbox
AUTOFIZIK.RU / auto repair
We assemble the main gear in the reverse order of disassembly, lubricating the bearings and gears with transmission oil.
Having installed the drive gear in the gearbox housing,... ...with a torque wrench, tighten the flange nut with a torque of 16–20 kgf.m, while the gear must be rotated for proper installation of the rollers in the bearings.
We install an indicator with a division value of no more than 0.01 mm on a tripod, resting its leg against the end of the flange...
...and moving the shaft by the flange, we measure the axial play of the drive gear.
To eliminate play, remove the spacer ring installed on the gear shaft (see Dismantling the rear axle) and measure its thickness with a micrometer. We select and install a new spacer ring. It should be thinner than the amount of play removed and additionally thinner by 0.05 mm - if the drive gear bearings are new or by 0.01 mm - if the bearings are left the same. If there is no axial play of the drive gear, use a special torque wrench with a scale of up to 0.5 kgf.m to check the moment of resistance to shaft rotation. With proper adjustment, the resistance moment should be 15–20 kgf.cm for new bearings or 7–10 kgf.cm if the bearings are left the same. With sufficient accuracy, the moment of resistance can be measured using a household steelyard...
...hooking its hook onto the hole in the flange.
In this case, the required values will be less - 3.8–5 kgf and 1.8–2.5 kgf, respectively. If the moment of resistance is greater, we change the spacer ring to another one, 0.01–0.02 mm thicker; if it is less, we select a ring of smaller thickness accordingly. Before assembly, the bolts for fastening the parts of the differential box and the bolts for fastening the driven gear, as well as their threaded holes, are degreased and coated with anaerobic sealant. We pay special attention to the cleanliness of the end mounting surfaces of the gears and the gearbox; the slightest contamination or nicks are unacceptable.
When installing the driven gear on the gearbox, we center it using long M10×1 bolts (you can use bolts from old connecting rods).
When installing the driven gear on the gearbox, we center it using long M10×1 bolts (you can use bolts from old connecting rods). Using adjusting nuts, we tighten the differential bearings with a slight tension, while turning the gear in one direction or the other so that the bearing rollers take the correct position.
To measure the lateral clearance in the meshing of the final drive gears, we attach an indicator to the rear axle housing by moving its probe to the top of the tooth on the outside of the driven gear.
The gap should be 0.15–0.20 mm. Measurements should be repeated on at least six teeth in opposite zones of the crown. To reduce the gap (using a screwdriver or a thin steel rod), loosen the adjusting nut on the side opposite the driven gear and tighten the other. You need to unscrew one nut and tighten the other by the same amount, guided by the grooves of the adjusting nuts. In this case, each unscrewing of the adjusting nut must be completed by tightening it slightly. For example, to loosen a nut by five grooves, unscrew it by six, and then tighten it by one groove. This will ensure that the bearing outer race is in constant contact with the nut and thus ensures that it remains in place during operation. To increase the gap, repeat the entire procedure in reverse order. After adjusting the lateral clearance in the engagement, we check the axial play in the differential bearings, for which:
...we fix the indicator on a tripod, resting its probe against the end of the driven gear. By rocking the gear in the axial direction, we measure the play in the differential bearings.
Using an adjusting nut located on the opposite side of the driven gear, we set the axial play to 0.035–0.055. Next, by tightening the nut, we set the bearing preload: 0.1 – when the bearing mileage is less than 10 thousand km; 0.05 – with a mileage of more than 10 thousand km. Turning the nut one notch corresponds to “compressing” the bearing by 0.03 mm. Once adjusted, tighten the bearing cap bolts and install the locking plates (see Rear Axle Disassembly) and check the side clearance again.
ATTENTION Before final tightening of the cover bolts, turn them out one by one and apply anaerobic sealant to the threaded part.
Adjusting the final drive according to the contact patch of the teeth is an effective way to adjust the gear mesh. It also allows you to check the quality of adjustments made by other methods.
Apply paint, preferably bright paint, to the teeth of the driven gear.
We turn the drive gear flange several times in both directions, while simultaneously slowing down the driven gear until the paint wears off at the points where the teeth contact. We inspect the contact spots on the driven gear teeth from the convex and concave sides. If the contact patch is located at the top of the teeth, it is necessary to increase the thickness of the adjusting ring at the drive gear, and if at the base, reduce it. If the contact patch is shifted to the center of the gear, it is necessary to increase the gap between the driven and driving gears, and if outward, reduce it. After adjustment, we install the gearbox in the rear axle, while applying a thin layer of oil-resistant sealant to the mounting bolts and flange. Having assembled the rear axle and filled it with oil (see Changing the oil in the gearbox), we test the gearbox on the move. To do this, we travel at a speed of 60–70 km/h for 20–30 minutes. The temperature of the crankcase neck should not be higher than 95° (water drops should not boil). Otherwise, it is necessary to reduce the preload of the pinion bearings.
Contact patch in final drive gears
A – forward sides; B – reverse sides;
1 – correct location of the contact patch;
2 – the contact patch is located at the top of the tooth – to correct it, move the drive gear towards the driven gear;