AUTOFIZIK.RU / auto repair
We assemble the main gear in the reverse order of disassembly, lubricating the bearings and gears with transmission oil.
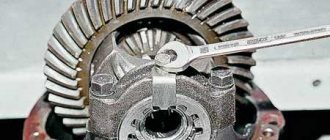
Having installed the drive gear in the gearbox housing,... ...with a torque wrench, tighten the flange nut with a torque of 16–20 kgf.m, while the gear must be rotated for proper installation of the rollers in the bearings.
We install an indicator with a division value of no more than 0.01 mm on a tripod, resting its leg against the end of the flange...
...and moving the shaft by the flange, we measure the axial play of the drive gear.
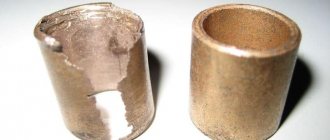
To eliminate play, remove the spacer ring installed on the gear shaft (see Dismantling the rear axle) and measure its thickness with a micrometer. We select and install a new spacer ring. It should be thinner than the amount of play removed and additionally thinner by 0.05 mm - if the drive gear bearings are new or by 0.01 mm - if the bearings are left the same. If there is no axial play of the drive gear, use a special torque wrench with a scale of up to 0.5 kgf.m to check the moment of resistance to shaft rotation. With proper adjustment, the resistance moment should be 15–20 kgf.cm for new bearings or 7–10 kgf.cm if the bearings are left the same. With sufficient accuracy, the moment of resistance can be measured using a household steelyard...
...hooking its hook onto the hole in the flange.
In this case, the required values will be less - 3.8–5 kgf and 1.8–2.5 kgf, respectively. If the moment of resistance is greater, we change the spacer ring to another one, 0.01–0.02 mm thicker; if it is less, we select a ring of smaller thickness accordingly. Before assembly, the bolts for fastening the parts of the differential box and the bolts for fastening the driven gear, as well as their threaded holes, are degreased and coated with anaerobic sealant. We pay special attention to the cleanliness of the end mounting surfaces of the gears and the gearbox; the slightest contamination or nicks are unacceptable.
When installing the driven gear on the gearbox, we center it using long M10×1 bolts (you can use bolts from old connecting rods).
When installing the driven gear on the gearbox, we center it using long M10×1 bolts (you can use bolts from old connecting rods). Using adjusting nuts, we tighten the differential bearings with a slight tension, while turning the gear in one direction or the other so that the bearing rollers take the correct position.
To measure the lateral clearance in the meshing of the final drive gears, we attach an indicator to the rear axle housing by moving its probe to the top of the tooth on the outside of the driven gear.
The gap should be 0.15–0.20 mm. Measurements should be repeated on at least six teeth in opposite zones of the crown. To reduce the gap (using a screwdriver or a thin steel rod), loosen the adjusting nut on the side opposite the driven gear and tighten the other. You need to unscrew one nut and tighten the other by the same amount, guided by the grooves of the adjusting nuts. In this case, each unscrewing of the adjusting nut must be completed by tightening it slightly. For example, to loosen a nut by five grooves, unscrew it by six, and then tighten it by one groove. This will ensure that the bearing outer race is in constant contact with the nut and thus ensures that it remains in place during operation. To increase the gap, repeat the entire procedure in reverse order. After adjusting the lateral clearance in the engagement, we check the axial play in the differential bearings, for which:
...we fix the indicator on a tripod, resting its probe against the end of the driven gear. By rocking the gear in the axial direction, we measure the play in the differential bearings.
Using an adjusting nut located on the opposite side of the driven gear, we set the axial play to 0.035–0.055. Next, by tightening the nut, we set the bearing preload: 0.1 – when the bearing mileage is less than 10 thousand km; 0.05 – with a mileage of more than 10 thousand km. Turning the nut one notch corresponds to “compressing” the bearing by 0.03 mm. Once adjusted, tighten the bearing cap bolts and install the locking plates (see Rear Axle Disassembly) and check the side clearance again.
ATTENTION Before final tightening of the cover bolts, turn them out one by one and apply anaerobic sealant to the threaded part.
Adjusting the final drive according to the contact patch of the teeth is an effective way to adjust the gear mesh. It also allows you to check the quality of adjustments made by other methods.
Apply paint, preferably bright paint, to the teeth of the driven gear.
We turn the drive gear flange several times in both directions, while simultaneously slowing down the driven gear until the paint wears off at the points where the teeth contact. We inspect the contact spots on the driven gear teeth from the convex and concave sides. If the contact patch is located at the top of the teeth, it is necessary to increase the thickness of the adjusting ring at the drive gear, and if at the base, reduce it. If the contact patch is shifted to the center of the gear, it is necessary to increase the gap between the driven and driving gears, and if outward, reduce it. After adjustment, we install the gearbox in the rear axle, while applying a thin layer of oil-resistant sealant to the mounting bolts and flange. Having assembled the rear axle and filled it with oil (see Changing the oil in the gearbox), we test the gearbox on the move. To do this, we travel at a speed of 60–70 km/h for 20–30 minutes. The temperature of the crankcase neck should not be higher than 95° (water drops should not boil). Otherwise, it is necessary to reduce the preload of the pinion bearings.
Contact patch in final drive gears
A – forward sides; B – reverse sides;
1 – correct location of the contact patch;
2 – the contact patch is located at the top of the tooth – to correct it, move the drive gear towards the driven gear;
Chassis
Frame.
Adjusting the differential on a UAZ Patriot SUV. Adjusting the rear axle UAZ
The frame is the main load-bearing element of a truck. The engine, chassis units, cabin and car body are installed and secured on it. The frame absorbs loads from the mass of the vehicle, as well as loads arising during movement.
According to the design, the frames can be spar or spinal. Spar frames consist of two longitudinal beams (spars) connected by cross members. Spinal frames consist of one longitudinal beam with cross members.
Spar frames are the most common on trucks (Fig. 1).
Fig.1. UAZ car frame.
Such a frame has two spars 2 and five cross members 1. The spars are stamped from steel in the form of a variable profile channel. The highest profile height is in the middle part of the frame. The cross members are also stamped in the shape of devices for installing various units (engine, gearbox, etc.). Various brackets 3 are welded or riveted to the side members and cross members, necessary for attaching the corresponding units or parts of the car. The cross members and spars themselves are connected to each other by welding.
On passenger cars, the role of the frame is performed by the body, the frame of which is a rigid welded structure, reinforced with external cladding panels. The overall rigidity of the body is achieved by appropriately connecting steel cladding panels into which reinforcing reinforcement is molded in the form of various thin-walled profiles.
At the point where the engine is attached to the body shell, a short frame is welded, which is connected to the base (floor). The body floor is made of thicker metal sheets and is reinforced on the sides with box-shaped thresholds. Body cladding panels are stamped from thin-walled metal sheets. Parts of the supporting body are most often connected by welding.
Front non-driving axle.
The front non-driving axle of trucks is used to install front steered wheels. It transmits longitudinal and lateral forces arising from the contact of the car with the road from the wheels through the suspension to the car frame.
The basis of the front axle (Fig. 2) is an I-beam 2, which has bosses at the ends that are bent upward. The middle part of the beam is curved down, which allows the engine to be placed lower on the frame. The upper flange of the bridge has support platforms 3 for attaching suspension springs. A kingpin 4 is inserted and rigidly fixed into the beam boss, which serves to install a rotating axle 1 on it. The wheel hub is mounted on bearings on the axle of the axle, and the axle itself can be rotated on the pivot using a rotary lever 5.
Fig.2. Beam of the front non-driving axle.
On rear-wheel drive passenger cars with independent front wheel suspension, the front axle is formed by a short beam or cross member attached to the car body. It also serves to mount the engine.
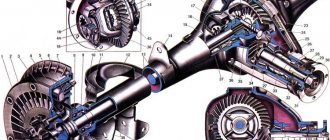
Rear drive axle beam.
On vehicles with a 4X2 wheel arrangement, it transmits pushing forces from the drive wheels in traction mode and braking forces during braking through the suspension to the frame or car body.
Depending on the design, the drive axle beam can be detachable or one-piece. The drive axle mechanisms are located inside the beam, and the drive wheel hubs are installed on bearings at the ends. The axle beam has a flange at the front for attaching the main gear housing and differential, and a cover at the rear. In the upper part, two support platforms for attaching springs are welded to the beam.
The beam of the front drive axle of a truck has minor differences in design from the beam of the rear drive axle.
- to the begining -
Purpose and principle of operation of the gearbox
The rear gearbox of the “seven” is a transmission link between the axles of the rear wheels and the engine. Its purpose is to transmit torque from the engine crankshaft to the rear wheels while simultaneously converting the rotation speed of the axle shafts.
In addition, the gearbox must be able to distribute torque depending on the load applied to the left or right wheel.
Principle of operation
Here are the main stages of transmitting torque from the motor to the gearbox:
- the driver starts the engine and the crankshaft begins to rotate;
- from the crankshaft, torque is transmitted to the car’s clutch discs, and then goes to the input shaft of the gearbox;
- when the driver selects the desired gear, the torque in the gearbox is transferred to the secondary shaft of the selected gear, and from there to the driveshaft connected to the gearbox with a special crosspiece;
- the cardan is connected to the rear axle gearbox (since the rear axle is located far from the engine, the “seven” cardan is a long rotating pipe with crosses at the ends). Under the action of the cardan, the main gear shaft begins to rotate;
- rotating, the gearbox distributes torque between the axle shafts of the rear wheels, as a result the rear wheels begin to rotate.
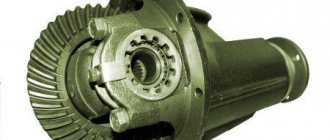
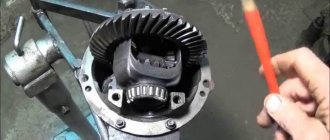
Differential box device
The axle shafts (5) (3) facing each other at their ends . The same gears (4) , but of smaller diameter (satellites), are installed between them in the differential box. When braking forces begin to act on one wheel, its rotation slows down. The second disk continues to rotate at the same speed. If the wheelset were rigidly connected, large torsional forces would be exerted on the axle.
This is where satellites come into play. They simply scroll, allowing one axle shaft to rotate relative to the other. The mechanism operates the same way, regardless of whether the differential is in the transfer case , axle housing or gearbox. That is, one wheel can remain stationary and even rotate in the other direction.
- Drive gear
- driven gear
- Axle gear
- Differential satellites
- Wheel axles
Conventional gearboxes are ineffective for driving in difficult road conditions. On jeeps, differentials are installed in transfer cases and have forced or automatic locking. This is necessary so that when one wheel hits a surface with poor grip, all the torque is not transferred to it.
For example, the differential of the Niva transfer case of the Lada family is locked mechanically. This unit distributes force between the front and rear axles. Center differentials do not have locking. That is, one axle does not slip relative to the other, but the wheels always rotate independently.
On Chevrolet Niva cars, all three differentials are locked : in the transfer case and between the axle shafts on each axle. In addition, on Niva Chevrolet you can disable one axle. For example, if the rear wheels are slipping, you can switch the car to front-wheel drive mode. In this case, all the torque from the engine is transmitted to the front axle, which will pull the car.
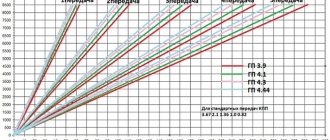
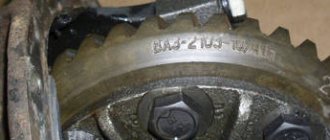
Differences in VAZ rear axle gearboxes
RZMs differ in the gear ratio of the main pair; in total, there are four types of gearboxes on the VAZ classic:
- 2101;
- 2102;
- 2103;
The slowest one is the RZM 2102, its drive gear has 9 teeth, and the driven gear has 40 teeth. To calculate the gear ratio, you need to divide the number of planetary gear teeth by the number of teeth on the drive shaft; for the VAZ 2102 the drive gear is equal to 4.44.
The “penny” gearbox (2101) accordingly has the number of teeth on the gears 10/43, so its IF is 4.3. The next, faster one is RZM 2103 - it has a ratio of 1041, which means the gear ratio is 4.1. And finally, the “fastest” will be the 2106 gearbox, with the number of teeth 11/43 and an inverter frequency of 3.9, respectively.
Many VAZ 2101-07 owners strive to install the fastest gearbox, but this is not always necessary. If the car often carries cargo, that is, the car is a “workhorse”, high speed is of no use, but high-torque power will be very useful. It should be noted that RZM 2102 was not supplied as spare parts; it was installed only on station wagons.
Diagnostics and causes of malfunctions
The fact that the gearbox is in a faulty condition is indicated by the appearance of a characteristic noise (hum) when the vehicle is moving. To accurately determine the gearbox malfunction, there is the following experiment.
You need to accelerate the car to 25 kilometers per hour and gradually pick up speed, starting from this mark. If suspicious hums appear, be sure to record the speed at which you hear them.
Once you reach the desired speed, slowly release the gas pedal and apply engine braking. Again, listen for extraneous noises and pay attention to the speed at which they appear or disappear.
Certain noises should appear and disappear at the same speed. If this happens, it means that the rear axle gearbox is in a faulty condition. However, to be 100 percent sure, be sure to put the car on the parking brake, put the gear in neutral and try to gain speed, if the noise appears again, then the problem is not in the rear axle gearbox, and if there is no noise, then you can be sure that it is rear axle gearbox.
The cause of malfunctions, most often, lies in the use of low-quality oil, loss of its viscosity, as well as its complete absence. In addition, the gearbox may fail due to failure of oil seals, bearings and special gears. Sometimes, the cause of a rear axle gearbox failure is a broken axle shaft.
Operating principle of differential
Simply put, this mechanism reduces the speed from the gearbox to the drive wheels, and also allows the drive wheels of the car to rotate at different speeds. To see how this mechanism works, watch this educational video:
The basis of the design is a planetary gearbox. The gearbox has worm, cylindrical and bevel gears. The VAZ 2110 has a bevel differential and has the following device:
The location of this unit depends on what type of drive the drive wheels are. In the VAZ 2110, as in all front-wheel drive cars, the differential is located in the gearbox.
The cause of failure of this important unit may be wear or damage to bearings, oil seals, and differential crosspieces. Damage may occur due to insufficient oil level. As a result, the noise level in the axle or gearbox (gearbox) increases noticeably.
The price of a disc differential lock for a VAZ 2108-2110 from ValRacing is 11,000 rubles. And the cost of a helical limited slip differential for Daewoo, Opel or Chevrolet “ValRacing” with preload is about 15,500 rubles.
Removing the rear axle gearbox of VAZ 2107
Before removing the gearbox, it is necessary to drain the transmission oil that is poured into the rear axle of the VAZ 2107. To do this, place an oil container under the drain hole of the axle and unscrew the drain plug.
Important: after repair, new transmission oil should be poured into the gearbox.
The next procedure is as follows:
- Unscrew the bolts securing the cardan to the gearbox flange;
- Uncouple the rear part of the cardan and lower it down;
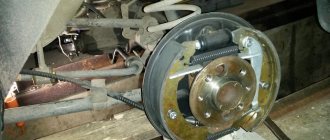
- jack up the car (if it is not on a lift) and remove the rear wheels;
- Unscrew the guide screws of the brake drums;
- remove the brake drums;
- unscrew the 4 bolts securing the axle shafts;
- pull out the axle shafts, freeing the gearbox;
- unscrew the 8 gearbox mounting bolts;
- remove the gearbox.
Answer-addition
You hang up both rear wheels, remove the wheel and brake drum, crawl under the car with a basin, a ratchet and a 13mm socket, and unscrew all the bolts on the rear cover of the gearbox in a circle. Next, you substitute the basin and use a screwdriver to pry off this very lid sitting on the sealant. You wait until all the old transmission drains. Then you remove the remaining oil with a rag from the gearbox housing so that it does not drip under the car. Next, turning the satellite axis, you look for which side the small bolt sticks out, 8 mm under the head. You unscrew it, jamming the gearbox gear with a pry bar, not forgetting that this pinion axis clamp is quite long and you need to unscrew it in a position in which it can all come out. Next, pull out the satellite axis by lightly pressing it from the top with your finger. After this, with a light blow of a hammer or fist, you drive the axle shaft inside to release the retaining ring. Next, you remove this very ring and calmly, with your hands, pull the axle shaft out of the stocking. Actually the next task is to remove the old oil seal. Because I forgot at home the power screwdriver with which I planned to remove it, I had to take pliers and simply tear out the old oil seal, having first torn it in half.-) Next, using a pre-selected pipe as a mandrel, the new oil seal is driven into place with light blows of a hammer. The main thing is to make sure that he sits down completely. I am guided by the change in the sound of the impact. After all these procedures, everything was washed with gasoline and wiped dry (including the axle shaft), after which, carefully, so as not to spoil the new oil seal, the axle shaft was inserted into place, secured with a retaining ring, etc., in the reverse order of disassembly. .-) The oil seal, before installing the axle shaft, it is recommended to lubricate it with the transmission. Next, the remnants of the old sealant were removed from the stocking and the cover, a new one was smeared, the cover was screwed into place and tightened crosswise. After which a new transmission is poured into the bridge - that’s basically all. It makes sense that after driving for a couple of days, remove the drum again and make sure that there are no leaks from the bridge. If they are found again, either the oil seal was damaged during installation, or the axle bearing was killed. Although the bearing can be diagnosed during the process of replacing the seal. In general, the most important thing here is to do everything carefully and buy a seal for the exact axle that is on your car.-) I almost forgot. After removing the axle shaft, be sure to make sure that there is no wear on it. Where to look for workings see here. If there is a hole, there are 2 options - change the axle shaft, which is not budgetary on the one hand and it is not a fact that you will be able to find it right away on the other. The second option is to scald the area and then turn it on a lathe. Thank God, no workings were discovered, although I had already made an agreement with the nearest turner, just in case.-)
When and how does the gearbox hum if the bearings are worn out?
If the VAZ gearbox howls constantly, regardless of the driving mode, and the sound resembles a buzzing, there is most likely a problem with the bearings. Moreover, we can say with confidence that the parts on which the drive shaft of the gearbox rotates have exhausted their service life. The fact is that the roller bearings of the shank rotate about 5 times faster than the axle shafts and satellites, and wear out faster. Another reason for accelerated wear is an overtightened shank nut. If the gearbox hums not very melodiously, the sound is more like a crunching sound - the problem should be looked for elsewhere. This is usually how a malfunction of the differential bearings or axle shafts makes itself known. You can verify this by listening to a car with the drive wheels hanging out. The operation should be performed in a viewing hole or on a lift.
Registration rules
When the delegation established by the domain name administrator is terminated due to the expiration of the domain name registration, the registrar installs temporary DNS servers for the domain that redirect requests via the http protocol to the registrar's service website with information about the reason for the termination of delegation.
The right to submit an application to renew a domain name registration remains with the previous administrator until the expiration of the preferential renewal period. The duration of the preferential renewal period is 30 days after the end of the registration period.
The registrar has the right to accept applications for registration of domain names that are in the preferential renewal period (registration of vacated domain names). Domain name registration is carried out at the end of the preferential renewal period, unless the previous domain name administrator renews the domain name registration.
Where is the gearbox located?
On the "sevens", as on all representatives of the rear-wheel drive family, the gearbox is located at the rear, under the bottom of the car. It connects the cardan to the VAZ 2107 axle and causes the wheels of the car to rotate. Rotation occurs thanks to axle shafts engaged in the gearbox, which, due to the technical features of the rear axle of the VAZ 2107, will have to be removed later. If the car is lifted, or when viewed from a garage pit, the gearbox is simply impossible not to notice.
Signs and malfunctions of the classic rear axle gearbox
Replacing a gearbox with your own hands is a labor-intensive process, which includes not only the purchase of a new unit (quite expensive), but also time costs. Therefore, before you start, you need to make sure that the gearbox is faulty. You can define the signs like this:
- gradually accelerating the car, listen carefully and remember at what moment the noise appears;
- while driving, start engine braking (remove your foot from the gas pedal at speed), at this time listen to the gearbox and note the moment the noise appears;
- accelerate the "seven" to hundreds, switch to neutral and turn off the engine - listen to how the gearbox behaves while coasting.
“If the bridge is noisy both in neutral and at speeds, the gearbox has nothing to do with it. If the hum occurs only at speed (regardless of the number), repairs, or, as a last resort, replacement of the gearbox are inevitable.”
When the signs are identified, it is necessary to carry out another check:
- park the car, secure the front wheels with shoes;
- jack up the rear so that the bridge hangs over (it is necessary that the wheels come off the surface);
- start the engine and accelerate the “seven” to the point at which noise occurs, while the wheels should spin without load.
If the noise has not changed, then the gearbox is clearly in good working order and it is not the cause of the trouble. Here other drive units are checked. Well, if there is no noise when driving without a load, then we are talking about worn gears of the gearbox, which make noise only when driving with a load.
The “seven” gearbox itself is a fairly reliable unit that can withstand a period of 100 to 300 thousand mileage, and there is no need to even look into it. Gears, gear spacer, differential adjustment - all these problems arise during improper operation:
- the use of oil with a low viscosity level, as well as failure to comply with the terms of its replacement;
- operating the “seven” with an amount of oil insufficient for this;
- During movement, the bridge is subject to extreme loads (frequent and unsuccessful slips).
Gearbox removal process
In order to repair or replace the rear axle gearbox of a VAZ 2107, you first need to remove it from the car:
- Drain the oil. This, by the way, may be a reason to replace it.
- Separate the flanges of the cardan and gearbox. To do this, you need to unscrew four bolts and nuts. At this time, it is necessary to fix and immobilize the cardan with a screwdriver or by holding the brake pedal. After unscrewing the nuts, you need to tie the cardan to the muffler. You can simply hang it, but this can also lead to negative consequences for the cardan.
- Remove the axle shafts, because without this the gearbox cannot be removed. At the same time, you can inspect the seals, and if they are worn out, replace them. This will save time and prevent possible malfunctions.
- Separate the beam and gearbox by unscrewing all eight bolts that secure it. When unscrewing the latter, it is necessary to hold the gearbox so that it does not fall. The bolts are unscrewed - carefully remove the gearbox.
Repair and adjustment of the VAZ 2107 gearbox
Before you start repairing the gearbox and its subsequent adjustment, you need to have certain skills, backed up by skills, observe all the nuances and subtleties of this process, and also strictly follow the technological nuances of the process. Therefore, if a person starts work for the first time, then it is better to abandon this idea. In addition, you must have all the necessary tools:
- pullers;
- stands;
- a set of keys, screwdrivers and other accessories.
Algorithm
- Before driving onto an inspection pit or a stationary overpass, it is necessary to warm up the transmission fluid in the axle shafts; it is enough to drive 5-6 kilometers at different speeds. This is done in order to drain the oil from the cavity as completely as possible. In its thick state, it is almost impossible to bring it down;
- Be sure to secure it with shoes under the front wheels;
- We unscrew the plug, substitute an empty container for draining, which we have prepared in advance with a volume of at least 5-6 liters;
- While the oil is draining, inspect it carefully; you may notice particles of metal or other fragments of components.
If gear pieces are available
or planetary mechanism, then first check:
- The gear stroke, which should be no more than 0.4 mm, if more, then it must be urgently replaced in full. There is no partial replacement or repair;
- Landing locations for tapered bearings;
- Use a wheel wrench to remove the bolts securing the rear axle wheels and lift the axle shafts using a stationary jack;
- Unscrew the brake cylinder housing, which is secured with 4 bolts;
- Using a puller, remove the bearings. Be prepared that some effort will be required;
- Next, we proceed to the direct removal of the gearbox itself. To do this, you need to unscrew all the bolts around the perimeter in the rear part of the bridge, unscrew the four bolts of the propeller shaft with a cape and move it to the side for convenience;
- Using a “24” socket, we tear off the control nut and unscrew it;
- We press out the oil seal and seats, in this way we provide ourselves with free access to the planetary mechanism itself, which is visible from all sides;
- We remove the gearbox itself and fix it in a vice, press out the bearings, which, if necessary, need to be replaced;
- We remove the planetary mechanism, using a hammer and a wooden block, knock the satellites off it;
- Now we have disassembled the mechanism piece by piece and are conducting a thorough diagnosis of the internal components. To do this, first wipe them with a rag so that the defects are visible. If there are no obvious cuts or chips, then replacement is not necessary. If available, it is advisable to replace them, since their service life is already limited;
- Having replaced the parts, you can begin assembly in the reverse order;
- Upon completion, fill in the transmission fluid in accordance with the technical specifications in the operating instructions.
Some recommendations on how to extend the life of the node:
- Do not overload the car;
- Try to switch to second gear as quickly as possible, since the first one kills the gearbox. Article to help “At what speed is it better to change gears”;
- Do not try to start from a standstill; in this way you will erase and tear off the splines from the rod;
- The oil change period is no later than 35,000-40,000 km. mileage;
- Try to minimize slipping on soft or slippery surfaces.
Changing the oil in the rear axle of a VAZ 2106
Often, car enthusiasts who own a vehicle such as the VAZ 2106 ask the same question. They are interested in which oil fluid is best suited for the rear axle of their car. At the same time, they ask - what volume is needed and how to change the oil?
There are different opinions. But experts recommend filling the rear axle gearboxes of this machine with transmission oil, which is marked 80W90 . For example, this is Lukoil 80W90 GL. This group of oils also includes TAD-17 80W-90 or the so-called TNK.
When we've sorted out the oil, it's time to answer another question. Perhaps he is one of the most important. Namely, how much oil is required? So, the oil volume is as follows - 1.3 liters. At the same time, it is possible to change the oil in the gearbox. True, in this case you will need 1.4 liters.
As for the interval, it is necessary to change the oil fluid after every 30,000 kilometers of the vehicle. If you convert the mileage into a time frame, you get 3 years of operation.
The oil fluid is replaced in accordance with the established procedure:
- First of all, you need to use a lift or inspection hole. You will also need a key for “seventeen” and a hexagon for “twelve”.
- Next, unscrew the drain plug in the bridge and place a special container designed for draining the oil fluid. At the same time, the filler plug is also unscrewed. This is necessary so that the oil fluid flows out faster.
We unscrew the drain and filler bolts. When the oil fluid is drained from the bridge, the drain plug is screwed in and new oil is poured. Here you need to use the filler hole. You will also need a special syringe or other suitable tool.
Fill with a watering can
Types of forced blocking
Let’s make it clear right away that we are not considering barbaric options like welding satellites on the “native” differential. Also, the partial option of establishing “preload” is not considered.
- Increased friction disc locking. Friction clutches are installed. When the wheels begin to experience different resistance, the friction inside the clutch increases and locking occurs. Locking with discs requires adjustment due to their wear and the use of special gear oil.
- Viscous coupling blocking (viscous coupling). Its principle is similar to a disk clutch, but a hydraulic clutch has many sticky disks (Fig. 7). The discs are immersed in a special viscous liquid. The basis of this liquid is silicone, which hardens when heated. When the rotation of one axle shaft is ahead of the other, heating occurs, solidification of the liquid and rigid engagement of the disks occurs. This type of blocking begins to work softly at first, then as it hardens, the effect increases sharply, and lasts until the axle shafts begin to work evenly, then, along with cooling, the gel liquefies. The big plus is the lack of maintenance. A necessary condition for long-term operation is complete tightness. Such viscous couplings are installed on “parquet” city SUVs. On severe off-road conditions they work poorly and overheat.
- Self-locking helical worm gearbox. Reliable option. When moving in a straight line, the worm-shaped screws rotate freely in the housing (Fig. 8). When the nature of movement changes, the screws move to their extreme positions and are fixed in the grooves. In this case, the blocking is triggered. The response time depends on the screw profile. When the torque is equalized, the screws again protrude from the grooves into free rotation. The advantage is low wear, the service life is equal to the life of the “native” differential. In addition, no special oil is required, just regular transmission oil. The cost of a screw lock on a VAZ 2107 is about 10–13 thousand rubles.
Planetary differential locking mechanism (DAK), or Krasnikov scheme (Fig. 9). This mechanism uses a classic differential circuit, but instead of satellites, chains of balls work. This differential is locked not due to the difference between the load on the wheels, but when a change occurs between the axle load and engine traction. The cost of installation on a VAZ 2107 is about 10,000 rubles.