The VAZ-2112 engine was installed on LADA cars of the “tenth” family: 2110, 2111 and 2112. Two timing shafts in this engine are driven by a belt. When replacing a belt, you need to be able to control the tension, and it seems that special equipment is produced for this. We believe that tensioning the timing belt on a VAZ-2112 can be done using a dynamometer. In this case, the tension force can be set without errors. You just need to make a technological plate used instead of a tension wrench. The drawing will be given below.
The following video shows how exactly the tension is checked, without even using a dynamometer.
When is it necessary to replace the timing belt on a VAZ 2112
The VAZ 2112 16 timing belt is replaced at intervals of several tens of thousands of kilometers or earlier if visual defects appear. If cuts, cracks, or delaminations are found during inspection, a new unit must be installed. Breaks and defects appear naturally over time, or due to violation of operating requirements. The timing belt cannot be used for more than the specified period.
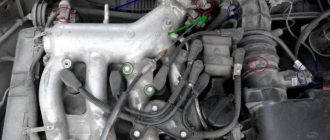
Where is the belt
To install the VAZ 2112 timing belt, you need to determine where it is located. The location is the same in all car models. You need to open the hood, find a toothed rubber element covering a whole set of pulleys. If you have any questions, you should look at the instructions. From a technical point of view, the mechanism engages the camshaft, crankshaft and several auxiliary elements. This combination reduces timing life, but increases driving comfort.
It is convenient to search for a belt assembly according to the diagram from the instructions
If not replaced in time
If you do not change the timing belt on your VAZ 2112 on time, you can bring the situation to a critical state. The rupture disrupts the functioning of the motor. The result is that pistons and valves constantly rub against each other, since their movements cannot be controlled. As a result of mechanical shocks, the valves are deformed, the pistons touch, the cylinders are scratched, the walls are damaged, and the system fails.
Natural wear and tear of the unit over time is inevitable
When to tension the timing belt
The timing belt of the VAZ-2112 and other VAZ models is tensioned in the following cases:
- Installing a new belt;
- Loose belt;
- “Slipping” of the belt with a violation of the timing adjustment;
- Replacement of the tension roller and other timing drive mechanisms.
If the cause of the intervention is a broken or “slipping” belt, you must first ensure the integrity of the valves. A broken gas distribution mechanism (drive) leads to engine damage on 16-valve 1.5-liter power units. However, in cases of drive failure at high speeds, valves and CPGs are also destroyed on other engines.
They check the operation of the timing belt on the VAZ-2114 and other models equipped with 8-valve units by turning the camshaft manually. A working mechanism should turn with some effort. A faulty one, as a rule, cannot be affected.
During the procedure, it is necessary to check the compression in each of the cylinders. The easiest way to do this is to tightly cover the spark plug hole with paper. If there is pressure in the cylinder, the plug is knocked out of its seat at a certain stage of camshaft rotation. It is not recommended to carry out a similar test on 16-valve engines. The risk of damage to an initially good valve mechanism is too great. There are no grooves in the pistons of one and a half liter engines of this type. Therefore, valves that move down bend when they contact the piston surface.
How to remove the old timing belt on a VAZ 2112
To install a VAZ 2112 timing belt from a purchased kit, you need to remove the old one. To do this, pry off and carefully dismantle the plug and inspect the assembly. If the timing belt is in order, you can leave it alone and continue driving without replacing it. Any defects indicate the need for urgent service. Using wrench 10, unscrew the 6 bolts on the protection, then remove it.
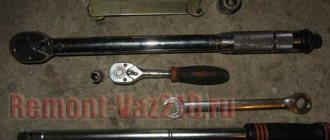
To carry out the work you need all the main standard sizes of keys
Using wrench 17, carefully turn the crankshaft until the marks on the shafts are set in the optimal position. Secure it using a screwdriver and unscrew the belt drive pulley. Using a wrench with the same head 17, loosen the nut, remove the belt, and put on a new one. If everything is in order, screw on the generator drive pulley and return the belt protection.
The process of tensioning the timing belt “from start to finish”
We perform all operations on a cold engine . Let's say the belt is now being replaced and the nut on the roller is not tightened. Then just skip "step 1":
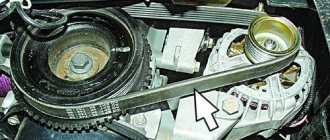
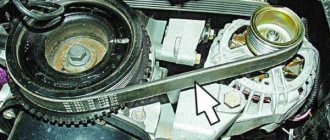
- We take a crocodile clip for the battery and fix the belt on the pulley. Then use a 17mm wrench to loosen the nut (see photo).
First step before adjustment
- We screw an M8 pin into the threaded hole next to the roller. We screw two nuts onto it. We put a plate on the roller and set the force with a dynamometer - exactly 4 kgf.
- The inner nut on the stud should touch the plate. Screw another nut on top, securing the plate in place.
- Taking the key “17”, tighten the nut on the roller. Recommended force – 33.2-41.1 N*m.
- All that remains is to remove everything unnecessary - the plate and the pin.
On a VAZ-2112 engine, the timing belt tension depends on the force applied to the adjusting key. The force should be 2.0 N*m. And our distance from the axis to the “ear” is 51 mm (see below). Multiply 0.051 by 39.2266 (4 kgf in Newtons) and you will get what you need.
Preparation for installing a timing belt on a VAZ 2112 16 valves
To change the timing belt on a VAZ 2112 in a garage, prepare everything you need. Sometimes it is better to seek professional help.
Tools
The basic set of tools includes a five-sided wrench with 6 edges, socket heads 10-17 mm in diameter. Be sure to take a 13 mm open-end wrench or a standard socket wrench, for tension, a flat-shaped screwdriver.
Accessories
To replace the kit, buy a new extension tube and timing kit. If possible, it is better to install the belt right away - this way it will work longer and the system will be able to function properly.
Replacing a belt and two rollers, all steps in one video
Correctly tensioning the timing belt on production vehicles is a simple procedure, but it requires certain special knowledge. The algorithm of actions may vary slightly depending on the model of the power unit, and not on the make of the car. There are differences in the procedure for replacing and tensioning the belt on 8-valve and 16-valve engines. Read on to find out how to tighten the timing belt on both types of car hearts.
Four-cylinder eight-valve power units are more often found on:
Sixteen-valve engines are mainly used:
- On VAZ-2112;
- Lada Priora;
- Lada Kalina;
- Lada Largus;
- Lada Granta;
- Lada news.
A number of cars of the Samara 2 family were also equipped with 16-valve engines. In addition, such engines were also installed on models 2110-2111.
Step-by-step instruction
To replace the timing belt on a VAZ 2112, you can use the video or regular instructions. The following describes the procedure for servicing a car according to the standard plan.
Timing belt marks for VAZ 2112 16 valves
Before attaching the new unit, fix the camshaft and crankshaft taking into account the markings. The gears are fixed at zero. Points in the range from A to F must strictly match. When everything is ready, set the marks of the belt casing and shafts in a single specified position.
Find the plug installed under the thermostat on the box, remove it, then find the flywheel. When the marks on the camshaft and the casing match, you need to check the correspondence in the section of the flywheel, on the iron casing.
Installation
Installation procedure for the node:
Reassemble in reverse order. Finally, remove the screwdriver that was previously clamped in the crankcase.
Belt tension
The VAZ 2112 timing belt is tensioned by rotating the roller element clockwise using a special key until the optimal marks are reached. You can check the tension without special tools - simply by grabbing the unit in the area between the crankshaft and camshaft pulleys. The optimal values are those at which the mechanism can be rotated 90 degrees or more.
Regulations and articles
Check the timing belt tension every 15 thousand km - this is the regulation. We will not give the belt part number - we were not talking about replacement. And if you decide to change the tension roller, find part 2112-1006120-XX. Instead of XX there may be numbers from 00 to 10, and all of these are products of domestic factories (00 is VAZ).
Components produced in Russia
All analogues
Let's jump straight to the list:
- MASTER SPORT 2112-1006120-AT-PCS-MS
- TORQUE KR5048 or 830900AE2
- INA 531075010
The brands GATES and INA are especially popular.
How to check the timing belt on a VAZ 2112
To see whether the VAZ 2112 16 valve timing belt needs adjustment and whether the unit is in order, do a visual inspection. Tools for work – a tension wrench, a thin screwdriver (it’s better to take a long one), a steelyard, a socket wrench, a caliper. Attach the steelyard hook to the handle of the socket wrench, wind the hook around the socket wrench so that it goes from above, not from below.
Regular visual inspections are mandatory
Then jack up the front right wheel and remove the dirt protection shield from the engine compartment. Using a 17mm crosscut tool, carefully turn the crankshaft by the pulley bolt and inspect the belt. There should be no oil leaks or foreign contamination. After contact with fat, the service life of the rubber will be noticeably reduced.
This is what the new node looks like
Place a long screwdriver on the pulleys, push the belt with a socket with a steelyard. The force that needs to be applied should be about 10 kg. Using a caliper, measure the deflection relative to the screwdriver. If everything is done correctly, maintain an interval of 5.4 mm. If the deflection is greater, tighten the belt more, if less, reduce the tension. Tighten the nuts strictly without releasing the roller itself.
Performing tension
If there is no wear on the V-belt drive, but there is a whistle, first of all, check the tension level. We will not use complex terminology, but will simply advise you to press with some force on the belt in the middle.
The problem is not the whistling. Due to weak tension, the battery does not charge effectively, and the drive itself begins to wear out faster. Excessive tension can lead to damage to the alternator bearings and stretching of the belt.
Correct tension of the VAZ 2110 generator belt is performed as follows:
- Loosen the generator from the bottom and top. A nut is used for this;
- Turn the adjusting bolt and adjust the belt;
- If you want to increase the tension, the bolt is turned to the right. Thus, you move the generator away from the cylinder block;
- To loosen the tension, move in the opposite direction - to the left;
- Use a wrench to grab the fastening bolt and turn the crankshaft a couple of turns, then check the tension;
- If all is well, the tension is correct, the nut can be tightened back.
We have already figured out how to tighten the alternator belt. But such measures are not always relevant. If the element is cracked, overstretched and no longer tensioned, then there is nothing left to do but replace it with a new one.
In fact, replacement cannot be called a complex procedure. Follow the instructions and everything will work out.
- Slightly loosen the bolt nut from the lower mounting of the car generator, as well as the tension nut.
- Loosen the tension of your belt further. You already know how to do this from the previous section, where we talked about tensioning the alternator belt.
- Move the generator towards the power unit, which will allow you to remove the belt from the crankshaft and generator pulleys.
- The next step is to install a new element. To do this, you will need a high-quality belt purchased from a trusted store. What exactly this part will be and what size it will be is not difficult to determine. But quality comes first.
- First, the belt is put on the crankshaft pulley.
- Now it goes to the generator pulley.
- At the last stage, you have to repeat the tension adjustment procedure. You already know very well how this procedure is carried out, so there should be no problems.
Lada 2112 (21124) › Logbook › Replacing the timing belt 16 cl. engine
Replacing the timing belt VAZ 2112 1.6 16 cl.
1. Remove the timing belt protection. The timing belt guard is secured with six bolts. Remove the chip from the crankshaft sensor, unscrew one bolt and remove the sensor.
2. One tooth is missing on the pulley, this is not without reason, this allows the crankshaft sensor to determine the top dead center, and also allows you to block the crankshaft in order to unscrew and tighten the pulley mounting bolt.
3. This is done like this: the pulley is aligned with the hole for the crankshaft sensor and through the hole for the sensor, a suitable size tube or other suitable object is inserted, in my case it is a hexagon, the pulley is blocked, and then unscrewed and removed.
4. Loosen the tension roller nut and remove the old timing belt.
5. Install a new belt, the belt can be installed by turning the right camshaft with a wrench, or you can remove the tension roller, whichever is more convenient for you.
6. Tighten the pulley mounting bolt back and align the timing belt drive gear according to the marks. If there are no marks on the oil pump housing, put marks on the flywheel and, using a chisel, make a mark on the oil pump, this will be more convenient.
7. Align the marks of the camshaft pulleys so that the timing belt drive gear does not go astray
8. Using a special wrench, tighten the belt with a tension roller. If there is no key, don’t be upset, you can tighten it with two nails and a screwdriver between them, or you can take a steel fork, remove the two middle teeth completely, and shorten the two outer ones in half and bend them. Be sure to remember to tighten the tension pulley nut. (To tighten the belt, turn the tension roller counterclockwise (about 10–15°); to loosen it, turn it clockwise)
9. Turn the crankshaft two full turns and check the marks; if all three marks match, put the pulley in place, do not forget about the generator belt and crankshaft sensor, then the belt protection and you can start the engine.
Timing belt tension
1. Check the belt tension. A correctly tensioned belt should rotate 90° from finger force (1.5–2 kgf) in the middle between the crankshaft and camshaft pulleys.
2. I take it with two fingers between the camshafts and up and down. 5-6 mm fluctuates back and forth, then I leave it.
3. Adjust the timing belt tension using a special device. The most correct belt tension is 2 kGs. Having achieved this result, fasten the fastening nut.
4. In the "Manual", the manual verification method is described in detail. It involves checking the tension of the toothed belt in the middle part of the branch between the camshaft pulleys. It should be such that under the action of an object 3 mm wide with a force of 10 kg, the belt deflection is 5.4 mm. Deviations in any direction are allowed no more than 0.2 mm. The engine must be at “room” temperature (+15-30°C). An overtightened belt breaks - the strength of the cord threads is limited. And the tighter the belt is, the faster the threads will break. A loose belt will also not last long, because... when entering the pulley, the belt teeth do not fall into the cavities of the pulley teeth - undercutting occurs and the subsequent separation of the teeth from the base.
Types and design of timing belt deflection rollers
The design of all types of products is fundamentally the same. The roller consists of a radial bearing (accepting only radial loads) and a pulley pressed onto the outer ring of the bearing. Both ball and roller bearings are used. In addition, they can be single-row or wider, double-row. The bearing end is protected from dust, moisture and contamination by a metal cap or bushing. The pulley is non-separable and can be made of metal by stamping or plastic by casting. Pulleys also differ in size (width and diameter) depending on the specific type of motor.
The material used to make the pulley is:
- steel or aluminum alloy;
- plastic.
Today, plastic products are widespread. Compared to metal ones, plastic deflection rollers are cheaper, lighter and create less noise during operation. Due to their low weight, they also reduce the overall weight of the entire timing belt. Modern plastic products have a long service life. Although subject to wear and tear, they can last a full season between belt changes.
More wear-resistant metal idler rollers are used in powerful and loaded internal combustion engines, where the reliability of the timing belt drive is of paramount importance, regardless of the engine operating mode.
All idler rollers differ in the type of surface (raceway) of the pulley:
- with a smooth working surface;
In this case, the path is devoid of any irregularities.
with a corrugated working surface;
Shallow longitudinal grooves are applied to the raceway, reducing the area of contact between the pulley and the belt.
with a serrated working surface;
The track has transversely spaced teeth.
The latter type is made exclusively of metal (steel or aluminum alloys), while the first two can be either metal or plastic.
Products with a corrugated and smooth surface are covered by the smooth (back) side of the belt. The toothed roller elements are located on the working side of the belt and are respectively covered by its toothed surface. It is impossible to change one type of part to another, since in this case the characteristics of the entire timing drive change, and this can lead to engine failure.
Pulleys of any type can also be:
- with persistent shoulders;
- without stop collars.
In the first case, the pulley has low collars on one or both sides that prevent the timing belt from slipping. The collars for the toothed deflection rollers are made in the form of removable parts and are installed during the installation of the parts. In other cases, the collars are inseparable from the pulley and are formed during the manufacturing process of the part by stamping, casting or turning.
Timing idler rollers are installed on the engine:
- through a special bracket;
- directly to the motor block.
In the latter case, installation is carried out by placing the bearing against the corresponding area of the engine block and then fixing the part with a bolt and washer of a sufficiently large diameter. When using a bracket, the latter is attached to the engine block with two or more bolts, and the roller part itself is mounted to the bracket.
Checking on 16-valve engines
1. Hook the steelyard hook onto the handle of the socket wrench extension. Use insulating tape or tape to secure the steelyard hook to the extension cord.
2. Check the belt tension in the middle part of the branch between the camshaft pulleys. We apply the edge of a ruler to the pulleys. Using the extension cord, pressing the belt with a force of 10 kgf, we measure its deflection, which should be 5.4 mm.
In what cases is it necessary to replace the belt?
Replacing the timing belt material on a 16-valve VAZ-212 engine must be carried out without fail if:
- there are oil stains on the belt;
- the outer side of the material is heavily worn;
- cracks and delaminations are visible on the part;
- on the outer surface you can see peculiar threads.
If any of the above reasons are present, you should immediately begin replacing the belt to protect your own health, as well as that of all passengers who may be riding in a faulty car. Only timely replacement will help to avoid trouble on the road, so this activity must be carried out on time.
If the plate is not made
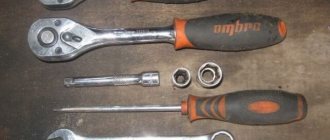
Everyone knows that on a VAZ-2112 engine, tensioning and replacing the timing belt is done using a key. Its appearance is shown in the photo.
Tension adjustment key
You can make a slot on the handle, and then, installing a dynamometer, adjust the force as shown above.
If the force is 4 kgf, then the distance from the slot to the midpoint between the pins should be 49.5 mm.
The difference between methods “1” and “2” is very simple: in the second case, the plate (key) is not fixed. This means that the key will have to be held at the same level while tightening the nut. Make a choice.
Error warning
If we talk about the VAZ-2112 engine, the timing belt tension can be increased or decreased. In this case, you must adhere to the recommendations:
- Let the holes for the pins first be in the lower left quarter;
- Taking the tuning key, the tension is increased by rotating the roller counterclockwise.
The result of correct and incorrect settings is shown below.
Left - which is correct
Turning to the right should correspond to a loosening of tension. And the one who did the opposite, then let him take offense at himself: the belt will wear out very quickly!
If all recommendations are followed, the holes cannot be at the top (as in photo 2).
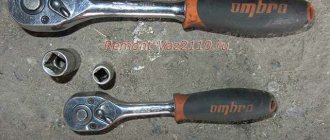
Replacement with a self-tensioning roller (automatic tensioner)
On engines 11194 and 21126, rollers with an “automatic tensioner” are installed. It would seem that the automatic roller is suitable for any VAZ engine. But don't rush.
Two different tension rollers
The roller from the VAZ-2112 engine is equipped with protrusions on the sides. There are no protrusions on part 21126-1006238. This is the problem.
Don’t take unnecessary risks - you only need the original roller 2112-1006120 or its equivalent.
What did we try for?
If the timing belt malfunctions, the VAZ-2112 engine successfully bends its valves, requiring their replacement. Violations include belt breakage, as well as jumping over several teeth. The second malfunction occurs when the tension force is too low, and the first is the result of wear on the belt as a whole. Draw conclusions.
Belt tension on 16-valve VAZ engines
Tensioning the timing belt on Priora and other cars equipped with 16-valve engines is generally done in the same way.
However, there are slight differences. Thus, the gas distribution mechanism cover of these engines is mounted on 6, and not on 3 bolts, as in the previous case.
In addition, the timing belt on VAZ-2112 power units (16 valves) is tensioned using two rollers. One of them is movable, used for tension. The second one is the support one. » alt=»»> When tensioning the belt of a “Prior” motor or motor 2112, special care must be taken. After putting it on and tightening it, you must definitely try to crank the engine by hand.
If the crankshaft cannot be turned, you should once again check that the marks are installed correctly. On these engines, an error almost always leads to damage to the valves and piston group.
Have you noticed that the timing belt on the VAZ 2110 eats up? The reason may be wear on the rollers or timing belt. The timing belt should be replaced every 75,000 km. mileage on VAZ-2110 and VAZ-2111 engines and once every 45,000 km. on VAZ-2112. Regularly check the condition of the timing belt for signs of wear on the toothed surface, cracks, undercuts, folds or peeling of fabric from the rubber. If defects are found, the belt should be replaced as soon as possible.
Replacement
And so replacing the VAZ 2112 timing belt begins with assessing the condition of the timing belt. On a VAZ 2112 this can be done through the plug on the drive belt cover.
We assessed it, looked at it and came to the conclusion that a replacement is in our corner.
Then we take a ratchet with a 10″ head in our hands and unscrew the bolts securing the front drive cover and carefully remove it and lay it to the side.34
Next we need to remove the right front wheel and the plastic shield of the engine compartment. In this case, we gain access to the crankshaft pulley. What is it for? We must turn the crankshaft using the head 17 clockwise until the marks on the camshaft pulleys match the marks on the rear timing belt cover.
At the same time, do not forget to make sure that the mark on the crankshaft flywheel coincides with the mark on the clutch housing.
Now we need to fix the crankshaft in a stationary state. This can be done using a screwdriver by inserting it between the flywheel teeth and the hole in the clutch housing.
Unscrew the mounting bolt of the generator pulley and remove it.
Loosen the nut securing the tension roller using a 17mm wrench.
Gradually turning the tension roller, loosen the tension of the timing belt and remove it from the camshaft timing pulley and water pump.
Next, remove it from the crankshaft timing pulley.
To install the belt, perform all the described operations in reverse order. Turn the tension roller to tighten the belt and tighten its nut. Be sure to check the alignment of the marks on the crankshaft and the camshafts.
After installing the belt, check the crankshaft two turns clockwise and check that the timing marks match again. Check the belt tension in the middle part between the two camshaft pulleys. The belt should bend by 5.4 mm when pressed with a force of 10 kgf.
Upper engine mount at the link.
Tension
For work we will need: a caliper, a long screwdriver, a wrench for tensioning the timing belt, a socket wrench and a steelyard.
We attach the steelyard hook to the handle of the socket wrench, for example, we wrap the hook to the socket wrench with electrical tape so that the hook is not below, but on top of the wrench, i.e., so that the measurement is taken when pressing.
Remove the upper front belt cover.
Jack up the right front wheel of the car and remove the right mudguard of the engine compartment.
Using a 17mm socket wrench, we slowly turn the crankshaft by the pulley bolt and inspect the belt itself. There should be no traces of dirt or oil on it.
If oil gets on the belt, its service life is significantly reduced.
Check the belt tension in the middle part (between the camshaft pulleys).
To do this, place a long screwdriver on the pulleys as shown in the figure, and press the belt with a socket wrench to which the steelyard is attached with a force of 10 kg and measure the deflection relative to the positioned screwdriver using a caliper.
When properly tensioned, the timing belt deflection should be 5.4 mm. If the deflection is greater, then you need to tighten the belt; if it is less, then loosen it.
We adjust the belt as follows:
Using a 17 wrench, loosen the nut that holds the tension roller, and use a tension wrench to adjust the belt tension. It is necessary to tighten the roller fastening nut without releasing the roller.
Preparatory operations
We remove the absorber and power steering reservoir so that they do not interfere in the future.
We loosen the bolt by seventeen, the tension roller of the drive belt of mounted units, also known as the generator belt, and remove the latter. It will not be possible to remove it completely because the engine mount is in the way. If the drive belt requires replacement, you will have to unscrew the engine mount. We don’t touch the generator, it doesn’t bother us.
Remove the tension roller. We unscrew the bolts securing the upper protective cover; they are hexagonal.
Let's take it off.
Remove the right wheel, plastic mudguard and drain the antifreeze.
Setting Top Dead Center
We see the crankshaft pulley. Using its bolt, clockwise, rotate the crankshaft until the marks on the camshaft pulleys and the timing belt protective cover match.
Markings on the left exhaust camshaft. The mark on the protective cover is highlighted in red.
Likewise for the intake camshaft. He's on the right. Its pulley has an inner ring for the phase sensor, so it is very difficult to mix up the pulleys.
Remove the crankshaft pulley. Let's lock the crankshaft with the help of a friend. We put him in the car and force him to turn on fifth gear and press the brake all the way. And at this time, with a slight movement of your hand, unscrew the crankshaft pulley bolt. Remove it and the lower protective cover.
We see that the mark on the pulley and the slot on the oil pump ebb coincide. The repair manuals also advise putting marks on the flywheel, but I think this is unnecessary, because if the flywheel was changed, it could simply be put on the wrong mark.
Loosen the seventeen bolts of the tension and idler pulleys and remove the timing belt. Then the videos themselves. We change them anyway.
Replacing the pump
We lock and unscrew the camshaft pulleys and remove them. Remember that the right camshaft has a pulley with an inner ring for the phase sensor. The picture should look like this.
We unscrew everything that holds the protective plastic cover and remove the latter. Unscrew the three bolts holding the pump. They are hexagonal.
And we take it out.
The pump for a sixteen valve engine is slightly different from the usual for an eight valve engine. It has a small threaded ear for attaching the protective casing.
Lubricate the gasket with a thin layer of sealant and put the pump in place. Tighten the fastening bolts. We put the protective cover in place. We make sure that he sits in his place, otherwise he will rub the belt. If everything is in order, tighten everything that holds it and install the camshaft pulleys and new rollers.
Replacing the belt drive
First, about the tools that we will need when carrying out repair work:
4. The marks on the flywheel crown should also converge. To trace their coincidence, you need to unscrew the plug on the crankcase. The mark is on the flywheel gear. If it matches the mark (cut) located on the crankcase, then everything is fine.
5. Loosen the tension on the belt drive and check the mark located on the crankshaft. We fix the flywheel by installing a screwdriver between the crankcase and the crown. 6. Unscrew the crankshaft pulley. We check the alignment of the marks on the crankshaft gear and the oil pump. 7. Now you can change the belt. To do this, you first need to remove the tension roller. Then the belt is removed. 8. We tighten the new gear. The tension roller rotates clockwise. This is easier to do with a special key, which should be prepared in advance. If there is no key, then you can use pliers for this, the ends of which are curved. The tension needs to be adjusted until it is optimal. 9. Now we collect everything from the opposite. Don't forget to remove the screwdriver from the crankcase.
How is the replacement made?
Before replacement is carried out, you need to buy a new high-quality spare part and a set of car heads and keys. The price of a high-quality timing belt fluctuates around a thousand rubles. For that kind of money you can buy components made in Germany, the USA or Russia.
The cheapest components for the VAZ-2115 eight-valve engine are currently supplied from China, but their quality leaves much to be desired. Car enthusiasts increasingly prefer German spare parts from the BOSCH, Finwhale and ContiTech brands. The American brand Gates is not bad in terms of its quality characteristics. Do not buy cheap components, as they quickly fail. In this case, you will need replacement very often.
Once you have everything to carry out the work, you can proceed to it, following the instructions:
- Using a wrench or spanner, unscrew the three bolts that secure the cover, which prevents lubricant and dirt from getting on the belt.
- Be sure to remove the negative terminal from the battery - this is necessary so that parts of the car are de-energized. Before proceeding with further replacement work, set the pistons of the first and fourth cylinders to top dead center.
- Loosen the timing roller until it begins to rotate. To do this, use a 13mm wrench to slightly unscrew the bolt holding it down. Carefully rotate the roller.
- After this procedure, the belt will loosen and can be easily removed from the camshaft.
- To gain access to the gas distributor from below, it is necessary to remove the right front wheel.
- Using a spanner wrench, unscrew the bolt that secures the generator pulley. This is not so easy to do, since this pulley is constantly spinning. The trick is that there is a special black plug on the left side of the clutch housing; it needs to be removed. Insert a mounting blade or screwdriver into the resulting hole so that it fits between the teeth of the flywheel. After that, unscrewing the bolt from the pulley will not be difficult.
- Once the generator pulley is loose, the belt can be easily removed. After which it is replaced.
After you remove the worn part of the gas distributor drive, you need to install the new one in the reverse order:
- first stretch on the crankshaft pulley;
- then install through all the rollers on the upper (camshaft) shaft.
Important! After you remove the worn belt, do not spin the shafts. Changing the position of the pulleys leads to the need to adjust the phases of the gas distribution mechanism
To adjust the tension of the GR mechanism belt, there are two small holes on the roller. A special key is inserted into them (you can replace it with a drill or self-tapping screws) to turn the roller. When the tension is correct, the belt in the middle part between the two pulleys turns 90 degrees.
Installing a new timing belt
We check that the marks on the camshafts and crankshaft match. We install a new timing belt. If there are no directional arrows, put it so that the inscription is read from left to right.
The right, or descending, branch of the belt should be tight. You can turn the right camshaft clockwise a few degrees, put on the belt and turn it back. In this way we will stretch the descending branch. The tension roller has two holes for a special key. You can find it in any auto store. The issue price is 60 rubles. To tighten the timing belt, insert a special key and counterclockwise . Since there is a lot of controversy about tensioning the timing belt, let's write it this way: a tensioned belt should not have a sag between the camshafts of more than 5 mm when pressed and 7 mm on the longest branch (specially experimented).
Remember: an overtightened belt reduces the service life of the pump, and an undertightened belt can lead to cylinder head repair. (photo below)
We check all the marks. We turn the crankshaft two turns and check the marks again. If the pistons and valves do not meet and the marks coincide, then accept my congratulations. Then we put everything back in place in the reverse order of removal. Don't forget to tighten the bolts. We tighten the service belt roller with the same wrench as the timing belt tension roller. Fill with antifreeze and start the car. We wish the belt many years of service, but don’t forget to check it periodically; after all, it was made in Russia.
Set the timing marks correctly - otherwise you will bend the valves!
The VAZ-21124 engine has a special feature: no matter how its pulleys are turned, it does not bend its valves. With the 21120 engine (16v 1.5 l) such jokes will not work! If the pulley positions are not too far off, try putting on the belt and turning the mechanism to the “TDC 1 and 4” position. From now on, always use the following instructions:
- The crankshaft is set to the required position by checking the mark on the generator drive pulley (photo 1) or on the crankshaft pulley (photo 2);
Alternator drive pulley and crankshaft pulley
- Let us clarify: there should be 20 teeth between the DPKV sensor and the “pass”;
- The marks on the “upper” pulleys should point straight up (photos 3 and 4). These pulleys must be fixed, after which the tension can be released;
Exhaust and intake shaft pulley
When the belt is loose, the crankshaft cannot be rotated.
In theory, on the VAZ-2112, marking is carried out the same way, no matter what engine we are talking about. Here are photos for engine 21120.
What it looks like in reality and in the instructions
Take the time to find the inspection window on the gearbox housing. There is another mark under the plug.
The last step is optional. And they do it so as not to redo all the work “from scratch.”
The number of belt teeth between the “upper pulley” marks is exactly 16; The mark on the crankshaft pulley sometimes breaks off - use the control method “1” (photo 1) or “3” (lower photo).
Updates for VAZ-21124
On a 1.6 engine, all actions are performed in the same way as described above. There is one exception - the generator drive pulley is aligned according to the mark on the casing (see photo).
Generator drive pulley, motor 21124
However, if this mark is not there, use the proven method: 20 teeth are counted from the DPKV body. Instead of the 21st there should be a “pass”.
The timing pulleys can be rotated as you like - the pistons will not touch the valves in any case. Compare what the pistons of two different engines look like and it will become clear what we are talking about.
Two different 16 valves
For those who don't understand anything
The number of teeth on the crankshaft pulley is 21, on the camshaft pulleys – 42. When the crankshaft rotates 360 degrees, the camshafts rotate 180. In general, the full engine operating cycle consists of two crankshaft revolutions (720 degrees).
In theory, you can use an alternative configuration method. Let the camshaft pulley marks point straight down. Then the mark on the crankshaft pulley should face up (TDC 1 and 4).
see also
Whistle on a cold engine
- 19 0 25k
Belt conditioner
- 18 2 24k
How to eliminate a whistling alternator belt
- 248 1 224k
Hinged belt
- 0 0 42k
If the alternator belt breaks on the road
- 108 0 94k
How to tension the alternator belt
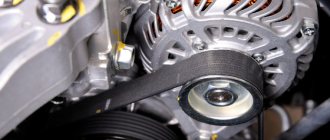
Many car owners are interested in the question: how to tighten the alternator belt ? After all, the battery charge level and the voltage in the car’s electrical network depend on this. Also, the condition of the belt itself, as well as the condition of the crankshaft bearings and the generator shaft, depend on how the generator belt is tensioned Next, we will analyze in detail how to properly tension the alternator belt with a specific example.