The design of the gas distribution mechanism on the VAZ 2115 car is identical to the previous modifications 2114, 2112, 2110. The main purpose of the timing gear is to transmit torque from the crankshaft to the camshafts for the subsequent movement of the car.
During the systematic operation of a technical device, the drive often fails. At high speeds and rpm, the belt breaks into pieces, blocking the operation of the cylinder head and valve mechanism. There are frequent cases of holes in the block and valve bends.
The process of replacing the drive yourself is not at all complicated, but it requires attentiveness on the part of the technician. Violation of technology is not acceptable. If you encounter any difficulties with repairs, contact a service station specialist for help.
On VAZ 2115 cars a toothed belt is pre-installed. Unlike wedge and poly-wedge, it has a long service life. The cost of the belt is 10% higher than analogues.
Early models of VAZs were equipped with chain drives, but they are not as efficient and have a higher noise level during operation.
Replacing the timing belt of VAZ 2113, 2114 and 2115 with your own hands
Replacing the timing belt with your own hands on VAZ 2113, 2114, 2115 cars, in the cylinder head of which 8 valves are installed, is relevant today for many owners of cars of these brands.
This operation cannot be called complicated, since repairs can be easily carried out in a garage or on any flat area without the use of special equipment. Before starting work, you should prepare the necessary spare parts:
- Timing belt, article number 21080-1006040-82.
- Tensioner roller, article number 830900AE2 (2108-1006120).
- Pump in the engine cooling system, article number 2108-1307010.
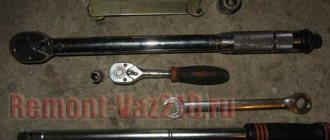
Experts recommend replacing the timing belt, tensioner and pump in the cooling system at the same time, since problems with this unit most often lead to malfunctions in the valve mechanism. You will need tools and accessories:
- car jack;
- car body stand;
- wheel chocks;
- set of wrenches;
- container for draining coolant;
- rags.
Checking the set ignition
To check the ignition on an 8-valve engine, an injector, you should prepare:
- Multimeter.
- Set of keys and screwdrivers.
- Pliers (necessarily with insulated handles).
Attention! Due to the lack of special equipment, the described method can only test the operation of the circuits. Diagnostics of the microprocessor part will not be available.
- When the ignition is turned off, check how tightly the high voltage wires are seated and what contact is in the module.
- Remove the connector from the module, connect a multimeter (monitoring mode should be low AC) to pins C and B, make sure there is voltage. Check the coil (2nd and 4th contacts).
- Check the functionality of high-voltage wires. Install a working spark plug in each cap in turn, attach one end to the block and crank the engine with the starter. The presence of a spark signals that everything is normal. Its absence on each wire means the module is faulty.
If you managed to set the ignition correctly on the VAZ model and this was confirmed by the test, but problems are still observed, you need to check the power system.
Preparatory work
To replace the VAZ 2114 timing belt with your own hands, you will need a lift, an inspection hole in the garage. When there is neither one nor the other, any flat area will do.
The car is placed at the work site, the handbrake cable is tightened, and the gear shift lever is placed in the neutral position. Wheel chocks must be installed under the rear wheels. Using a wheel wrench, tear off the wheel bolts on the wheel in the front of the car on the right side, lift the vehicle with a car manual lift, place a reliable stop under the body and dismantle the wheel. Now you can begin the operation of replacing the timing belt on a VAZ 2114 8 valve.
About the procedure for doing the replacement yourself
Open the engine compartment hood and disconnect the terminals on the battery. Further work is carried out in this order:
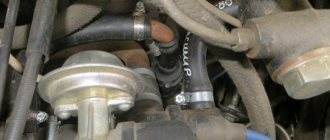
- Using a “10” key, unscrew the screws securing the plastic cover of the front part of the timing mechanism and remove it from the engine.
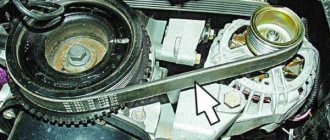
To loosen the tension of the generator set drive, take the key to “13”, loosen the tension, and dismantle the generator belt.
Now you need to set the control marks in the drive. To do this, the assistant uses improvised means to rotate the crankshaft pulley, and the driver controls the location of the installation marks. One of them is on the camshaft pulley and the cover behind the pulley, the second is on the cylinder block and the crankshaft pulley.
To ensure that the marks are installed correctly, remove the rubber plug on the clutch housing. In the window that appears, a mark on the engine flywheel should be visible, which coincides with the mark on the clutch housing.
- The time has come to remove the engine crankshaft pulley. It is necessary to stop it from turning. To do this, engage first gear and press the brake pedal. After this, use a socket wrench to “17” to unscrew the pulley mounting bolt and remove it from the engine.
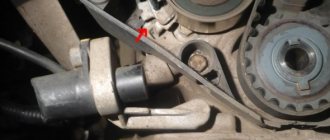
- To remove a worn belt, you need to loosen its tension. This is done by unscrewing the tensioner roller fastening bolt, then turning the roller to the left and dismantling the belt.
- When it is planned to replace the tension roller and cooling system pumps, they are removed from the engine. Before this, the engine cooling system fluid is drained.
Features of labeling
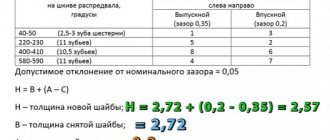
Before installing another timing belt, it is better to set the crankshaft and camshaft to the specified marks from the very beginning. We set the gears to 0 position. Points A, B, C, D, E, F must match as shown in the picture. After this, you need to set the marks on the camshafts and the belt casing in the same position.
Timing belt tension diagram
To check the location of the crankshaft, remove the plug from the box, which is installed under the thermostat, and look for the flywheel. If the marks on the camshaft and the casing match, then there should be a match in the cut on the flywheel and on the metal casing.
All alignments must be clear, the marks must match for proper operation of the belt. After the mark is installed on the flywheel, it must be fixed in this position so as not to break off the thread. And then, as mentioned, you can begin to tension and adjust the timing belt.
Installing a new belt
Installation of the timing belt VAZ 2113, 2114, 2115 8 valves is carried out in the reverse order of removing the worn part. Before starting work, carefully check the position of the timing marks in the timing mechanism drive again. Failure to perform this check may damage valve train components in the cylinder head. There are known cases where, in addition to valves, pistons and, in some cases, connecting rods were damaged. Install the adjusting washer first, then the tensioner roller, screw the nut onto the bolt securing it, but do not tighten it. When the engine cooling system pump is changed, a new spare part is installed. Next, the order of work will be as follows:
Installation begins with the crankshaft pulley of the power unit.
Next, they cover the pump pulley, circle the roller in the tensioner, and cover the belt on the camshaft pulley.
At this point, the repair work done by yourself can be considered complete. The belt in the drive can be replaced by contacting a specialized center, but the price for such work will start from 1000 rubles. You can save on repairs by replacing the belt yourself, following the instructions provided and the advice of specialists.
Also watch the video of replacing the timing belt on a VAZ 2113, 2114, 2115:
Source
Which timing belt to choose
To make it easier for you to find the answer to your questions about which belt to choose or which belt is suitable, we have prepared a table for selecting timing belts for different brands and models of cars:
| Brand, model | Original code | Code analogue |
| Renault timing belt | ||
| Timing belt Logan | 7701477024 130C17480R 130C10178R | K015662XS 130C17529R |
| Timing belt Logan 2 | 130C17480R 130C10178R | K015662XS 130C17529R |
| Timing belt Largus | 130C17480R 130C10178R | K015662XS 130C17529R |
| Timing belt Duster | 130C11551R 7701477028 130C13130R 130C10178R | 130C17529R |
| Timing belt Renault Clio | 7701469776 7701472726 130C10178R | 130C17529R |
| Timing belt Sandero | 130C17480R 130C10178R | K015662XS 130C17529R |
| Timing belt Sandero 2 | 130C17480R | K015662XS |
| Timing belt Sandero Stepway | 130C10178R | 130C17529R |
| Timing belt Sandero Stepway 2 | 130C10178R | 130C17529R |
| Timing belt Symbol | 7701477024 | |
| Timing belt Megan | 7701469776 7701472726 130C10178R | 130C17529R |
| Timing belt Megan 2 | 130284231R 7701063999 130C13130R 130C13191R | CT977 |
| Timing belt Megan 3 | 130C13191R 7701477028 | |
| Ford timing belt | ||
| Timing belt Focus 2 | 1672144 | VKMA04226 |
| Timing belt Focus 3 | 2045356 | KTB764 CT881K5 VKMA04226 530049510 KD452.24 |
| Fusion Timing Belt | 1672144 1672143 | |
| Daewoo timing belt | ||
| Timing belt Nexia | 1987948226 530 0332 10 5900270 | |
| Timing belt Opel | ||
| Timing belt Opel | 95516740 | |
| Chevrolet timing belt | ||
| Timing belt Lacetti | 93185845 93746917 | |
| Timing belt Cruz | 95516740 | |
| Hyundai timing belt | ||
| Timing belt Accent | 24312-26001 | |
| Solaris timing belt | 24321-2B200 | |
| Timing belt Elantra | 24321-2B200 | |
| Timing belt Skoda | ||
| Timing belt Octavia | 06A198119D | |
| Timing belt Fabia | K035565XS | |
| Kia timing belt | ||
| Rio timing belt | 24321-2B200 | |
| Timing belt Soul | 24321-2B200 | |
| Timing belt LED | 24321-2B200 |
Timing belt options for VAZ
- Timing belt VAZ-2110, VAZ-2112
- Priora timing belt
- Granta timing belt
- Timing belt VAZ-2108, VAZ-2109
- Timing belt VAZ-2105, VAZ-2106, VAZ-2107
If you can’t decide where to buy a timing belt in Volgograd, Volzhsky or another city in the region, contact us, you can’t go wrong.
Pay special attention to how to set the timing marks
. We suggest taking a little more time to watch the video of replacing the timing belt on a VAZ with a 16-valve engine.
Replacement frequency
Natural wear, improper operation or other reasons lead to failure of the timing belt and the need to replace it. At the same time, there is no need to take the situation to the extreme: it is enough to carry out regular diagnostics and visual assessment of the part. Such a check will help to avoid a break at the wrong moment.
Abrasions indicate obvious wear on the timing belt.
The frequency of replacing the timing belt depends on the specific brand of car and is indicated in the vehicle’s operating manual. Despite the standards established by automakers, many experts advise changing the spare part every 50 thousand kilometers.
When buying a used car, you will have to check the condition of the timing belt yourself - a visual inspection of it for wear is enough. Clear signs of wear are abrasions or cracks on the surface of the belt. However, the presence of such defects does not mean that the belt will immediately fail, since inside it there is a base consisting of metal rods. Thanks to them, the part can withstand shock loads and maintain its working condition throughout its entire service life.
A cracking timing belt is another clear sign of wear.
Some cars are equipped with timing belts with reinforced metal cord, which affects their service life, increasing it by an average of 30%. Modern car models are equipped with belts made of rubber and metal, which have a limited shelf life.
Such parts cannot be repaired; if they fail, they are simply replaced. The decision to replace the belt is made not only if it breaks, but also if it sag, stretches or reduces the tightness of the fit, which negatively affects the synchronous operation of the valves. As a result, this can lead to malfunctions in the functioning of the entire car, the main symptom of which is engine malfunction.
Visible traces of belt stretching, as well as abrasion along with cracks, indicate that it has worn out
Almost always, the water pump or water pump is replaced along with the timing belt. On most cars, this device copes with its duties perfectly until the car dies, however, in some situations it needs to be changed ahead of schedule. For this reason, experts advise changing the pump at the same time as the timing belt.
The water pump is a part that is replaced along with the belt
Replacing the timing belt on VAZ 2113, VAZ 2114, VAZ 2115
The timing belt synchronizes engine operation. Without it, the car simply won’t start, and if it was working and the belt breaks or falls off, the engine will instantly stall. And if the engine bends the valves, it will not only stall, but also bend the valves. True, this does not apply to 8-valve cars of the Samara-2 family. The belt must be changed on time, its condition monitored and maintenance carried out. Belt rupture, flying off and other troubles depend on the quality of the belt and the pump. We recommend that you always carry a new belt with you in the trunk, because replacement is a simple and short process. This prospect is much more pleasant than a breakdown far from home, garage or service station. Here only a tug or tow truck will save you.
Note! You will need the following tools: spanners, a 10mm socket wrench, a mounting spade (sold at a reasonable price at a car dealer, but a thick, strong screwdriver will do instead), a special wrench for turning the tension roller (two thin drills and a screwdriver will do instead) , knob with cap heads.
Replacing the timing belt on a VAZ 2113-VAZ 2115
Removal
1) First, remove the plastic cover that covers the belt from dirt, various types of water and lubricants. The cover is removed as follows: take a wrench or socket wrench and unscrew the three bolts securing the cover (in the bottom photo the bolts are already unscrewed). Two bolts are present on the side and hold the cover in place, and one is located in the central part. By unscrewing them, you can remove the cover from the car engine.
2) Now turn off the power to the car by disconnecting the negative terminal from the battery. Then remove the alternator belt - read the article for details: “Replacing the alternator belt on a VAZ.” Set the piston of the fourth and first cylinders to TDC (top dead center). Simply put, place both pistons completely straight and without angles up. The publication will be useful to you: “Installing the piston of the fourth cylinder at TDC on a car.”
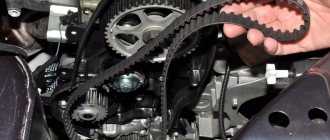
3) Then take a “13” wrench in your hands and use it to slightly loosen the nut securing the tension roller. Loosen until the roller begins to rotate. Then turn the roller by hand so that the belt loosens. Grasp the belt and carefully remove it from the rollers and pulleys. You need to start from the top, with the camshaft pulley. It will not be possible to remove all the pulleys, so only release the belt at the top.
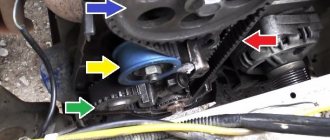
4) Next, remove the front right wheel (removal instructions are available here: “Correct replacement of wheels on modern cars”). Now take a socket wrench or any other wrench that can unscrew the bolt securing the generator drive pulley (the pulley is indicated by the red arrow).
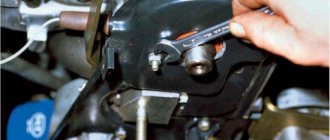
Note! The bolt is unscrewed with the help of a second person (assistant) and a mounting spatula (or a thick screwdriver with a straight blade). From the left side (in the direction of travel of the car) of the clutch housing, remove the plug marked in red. Then a spatula or screwdriver is inserted between the teeth of the flywheel (the teeth are indicated in blue) - the flywheel is kept from turning. You will have to use force, the main thing is not to overdo it. After unscrewing the bolt, remove the pulley and set it aside!
Replacement
You can do the replacement yourself using our instructions and armed with a special tool for the work.
Required tool:
- Ratchet with two extensions
- Head on "17" and "15"
- Hexagon "6" or Torx T30 (asterisk)
- Wrench for tensioning timing belt and alternator belt
- Open-end wrenches "13"
- Timing belt and rollers
Work process
- Prepare the car, fix it in its original position, jack up the front right wheel, placing stops under the rear wheels.
- Remove the wheel and protective covers of the engine compartment
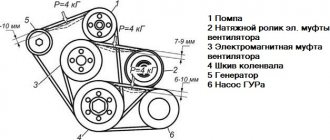
- We remove the generator belt; to do this, use a key set to “13” to loosen the fastening of the generator, then use a key set to “10” to loosen the tension of the generator belt and remove the belt.
- Remove the timing belt protective cover.
- Next, you need to unscrew the crankshaft pulley; to do this, you will need a ratchet with two extensions and a socket set to “17”.
- To unscrew the bolt securing the generator pulley, you need to put the car in gear and insert a screwdriver into the vent hole of the brake disc.
Unscrew the generator pulley bolt counterclockwise.
- Remove the generator pulley and washer.
- Before you remove the alternator belt from the gear, you need to set the marks. The marks must be set as in the picture.
- Not all car modifications have a mark on the crankshaft gear, so it is best to find the mark on the flywheel, it is located under the rubber plug, under the thermostat.
- Next, use a 15mm wrench to unscrew the tension roller and remove the timing belt.
Installing a new belt
- We install a new tension roller, but do not tighten it.
- We set the timing marks and put the belt on the pulleys.
- Next, when the belt is put on, the marked marks need to be tightened.
The timing belt is tensioned automatically by the roller itself, but initially the roller needs to be given spring tension; to do this, you need to align the marks on the rollers, as shown in the picture.
- After tensioning the belt, you need to check the timing marks; to do this, screw in the bolt securing the pulley and turn the crankshaft clockwise 2-3 turns and check the marks again.
- Next, the assembly and installation process occurs in the reverse order of removing the timing belt.
- Let's start the engine.